Back in early October of 2016 Festool offered a special edition of their new Sander for an amazing $99 which also included a $50 off coupon towards another tool. It seemed too good to be true given how expensive all my other Festools are. Within hours of the announcement I placed my order. I would think I must have been one of their earliest orders. A couple days later there were notes that the demand was so overwhelming that Festool told its network of dealers to stop taking orders. Then the waiting started….and dates kept getting pushed out.
I waited and waited and waited and in very late March of 2017 I *finally* received my new sander — 6 months is a LONG wait. I’m not sure what Festool’s reasoning was for the special package — some said it was supposed to be a thank you to loyal Festool customers, others said it was a good way to get folks hooked on their tools. Either way the demand was overwhelming I am glad that they eventually honored the order.
Here’s what came in the special color Systainer 2:
Contents of the Festool PRO5 LTD KitI was happy to see that Festool included some extras in there — an adapter for non Festool vacuums and a sampler pack of their Granat Abrasives (Which I think was added by the tool dealer ToolNut.com) rather than the 1 piece of sandpaper that would otherwise come with the unit.
Festool PRO5 LTD Special Color Systainer 2The Systainer 2 is a nice dark Festool blue and has space for some optional accessories and some limited abrasive storage.
Left Porter Cable Random Orbit Saner, Right Festool Pro5 LTD Sander.The new sander is lighter and better balanced than my trusty old Porter Cable 5″ Random Orbit Sander that I’ve had over 10 years now. The power switch is nice and big and the 13′ cord is nice. When paired with my Festool CT36 Dust Extractor the dust collection with the PRO 5 LTD is exceptionally good. Also the pad break is neat as the unit stops spinning fast. I normally use my trusty old ‘sander sitter‘ as a safe place to let a sander spin down and clean off an abrasive pad that has loaded up. The suction is so strong that the PRO 5 LTD will lift the rubber pad right out of the sitter — something I never saw with any of my other sanders (5″ or 6″ ROS with same CT36 attached)
The machine is well balanced with a tight stroke, powerful motor (Which I believe is brushless) and has noticeably less vibration compared to other sanders I’ve had over the years. The ergonomic handle is nice and rubberized texture provides good grip. Sometimes with 2 hands on the unit I find my second hand wants to cover the motor exhaust port a bit but the heat will quickly remind you to move that hand.
Left Porter Cable Random Orbit Saner, Right Festool Pro5 Sander. (Note the differences in dust collection holes)Too good to be true?
Like most things that seem too good to be true there is usually a catch. If you look at the image above you’ll see this Festool Sander and Festool abrasives have a VERY different pattern for dust extraction holes. That means you are locked into their abrasives. I haven’t seen any 3rd party companies sell pads with the same pattern yet. Like most things Festool they are expensive, but also very good quality. The abrasives have been long lasting and consistent and slow to load up. I
already have a few hundred dollars invested in Mirka Gold 5″ and 6″ and Abranet abrasives (which I keep in old style Systainers with 4 latches designed to hold sanding pads. I got those Systainers on clearance when the new style Systainer came out a couple of years ago). I don’t look forward to having to buy and stock another assortment of Abrasives but probably will as I am otherwise very happy with this new sander. I wish the advertising was a bit more straightforward in noting the above hole difference.
I hope that Festool, or a 3rd party compatible manufacturer will make a replacement sanding pad that also has the old style dust extraction hole pattern.
The Verdict
If you can look beyond the sanding pad hole location issue it is otherwise a great random orbit sander and I am very happy with it. I wish I ordered more than one unit.
Not all router bits are created equal. On a recent project I had to make a lot of 1/4″ wide and 1/4″ deep dadoes.
In my 20+ years of using an electric router I’ve only lost a handful of bits, most due to the carbide chipping out or something similar. (Or using a poor quality bit — back when I was starting out and didn’t know any better) Whenever possible I try to buy bits with a 1/2″ shank for the added strength and decreased vibration. Leaving my 1/4″ shank bits mostly relegated to my 1HP Bosch Colt palm router and tasks like using 1/8″ round-over bits — my favorite profile for cleaning up edges on around the shop projects.
Routing 1/4″ dadoes in maple ply
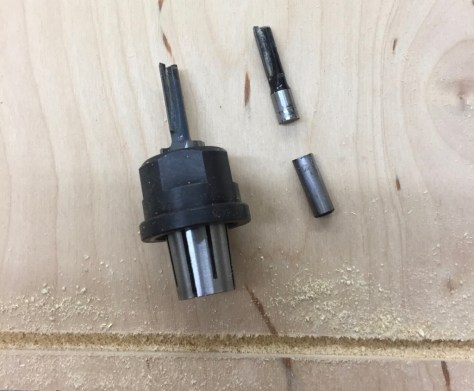
Two weekends ago I was cutting a long dado with a variable speed 2-1/4 HP plunge router with a fence and had my old Craftsman 1/4″ straight bit snap off at the collar which was unusual as I would think it would snap off right below the carbide where the bit narrows slightly and is presumably the weakest point on the bit. I didn’t think much of it and figured ‘eh its a pretty cheap and 15 year old bit’ and went back to the tooling cabinet to grab another bit.
Old 1/4″ shank Craftsman bit snapped, now on to the 1/2″ shank MLCS bit.
The second time out I grabbed an MLCS 1/4″ straight bit with a 1/2″ shank. In looking at the bit (it was part of a set of straight bits and looked like I never used this 1/4″ bit before) I thought to myself, wow that is quite the taper below the carbide. I loaded it up into the collet and got maybe 6″ through the maple and it twisted right off.
A few expletives flew, and I was questioning myself. Have I been spending too long doing hand tool only work? Am I using a router that is over-powered for the task at hand? I thought I was taking it easy as I made my passes — the tool wasn’t bogging down and it was cutting well.
After inspecting the plywood, both times where the bit broke it was hitting what looked like a knot in the veneer core of the plywood — so I think that change in density along with heat and friction was a contributing factor.
I was determined to make more progress on this project as I don’t get as many weekends to woodwork as I’d like. I headed out to Home Depot in the freezing cold and trying to make it there before they closed at 9pm and bought a Freud Diablo solid carbide bit. I balked at the ~$18 price compared to the say ~$5-8 each I paid for these bits from MLCS (but didn’t have the luxury of waiting for them to ship an order to me)
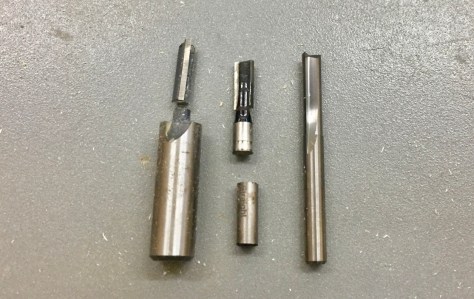
Left to Right — 1/4″ straight bits — MLCS 1/2″ shank (broken), Craftsman 1/4″ shank, Freud Diablo Solid Carbide 1/4″ shank
I really liked how the Diablo was solid carbide and had a completely straight profile from the shank down to the tip of the bit. The bit worked like a champ and so far I have been very happy with it.
What is the lesson from all this? Remember to go extra slow and take very shallow passes when working with a narrow bit like this. Make sure you adjust the speed (if your router has a variable speed control). Remember that humans and tools are not perfect. Some tooling like these sorts of bits are disposable. Inspect your tools and look for quality designs. Remember that even solid carbide can be brittle — so do what you can to minimize any jarring changes. There are many lessons to be learned and re-learned as you progress in your woodworking career. Don’t be afraid to make mistakes and most of all get back out into the workshop — which is where I am headed right now.
Transitional planes are the pariahs of the woodworking world. The tool collectors don’t want them. Patrick Leach burns them in a funeral pyre. I’ve had a few over the years I got for a song and kept in the shop mostly for decoration.
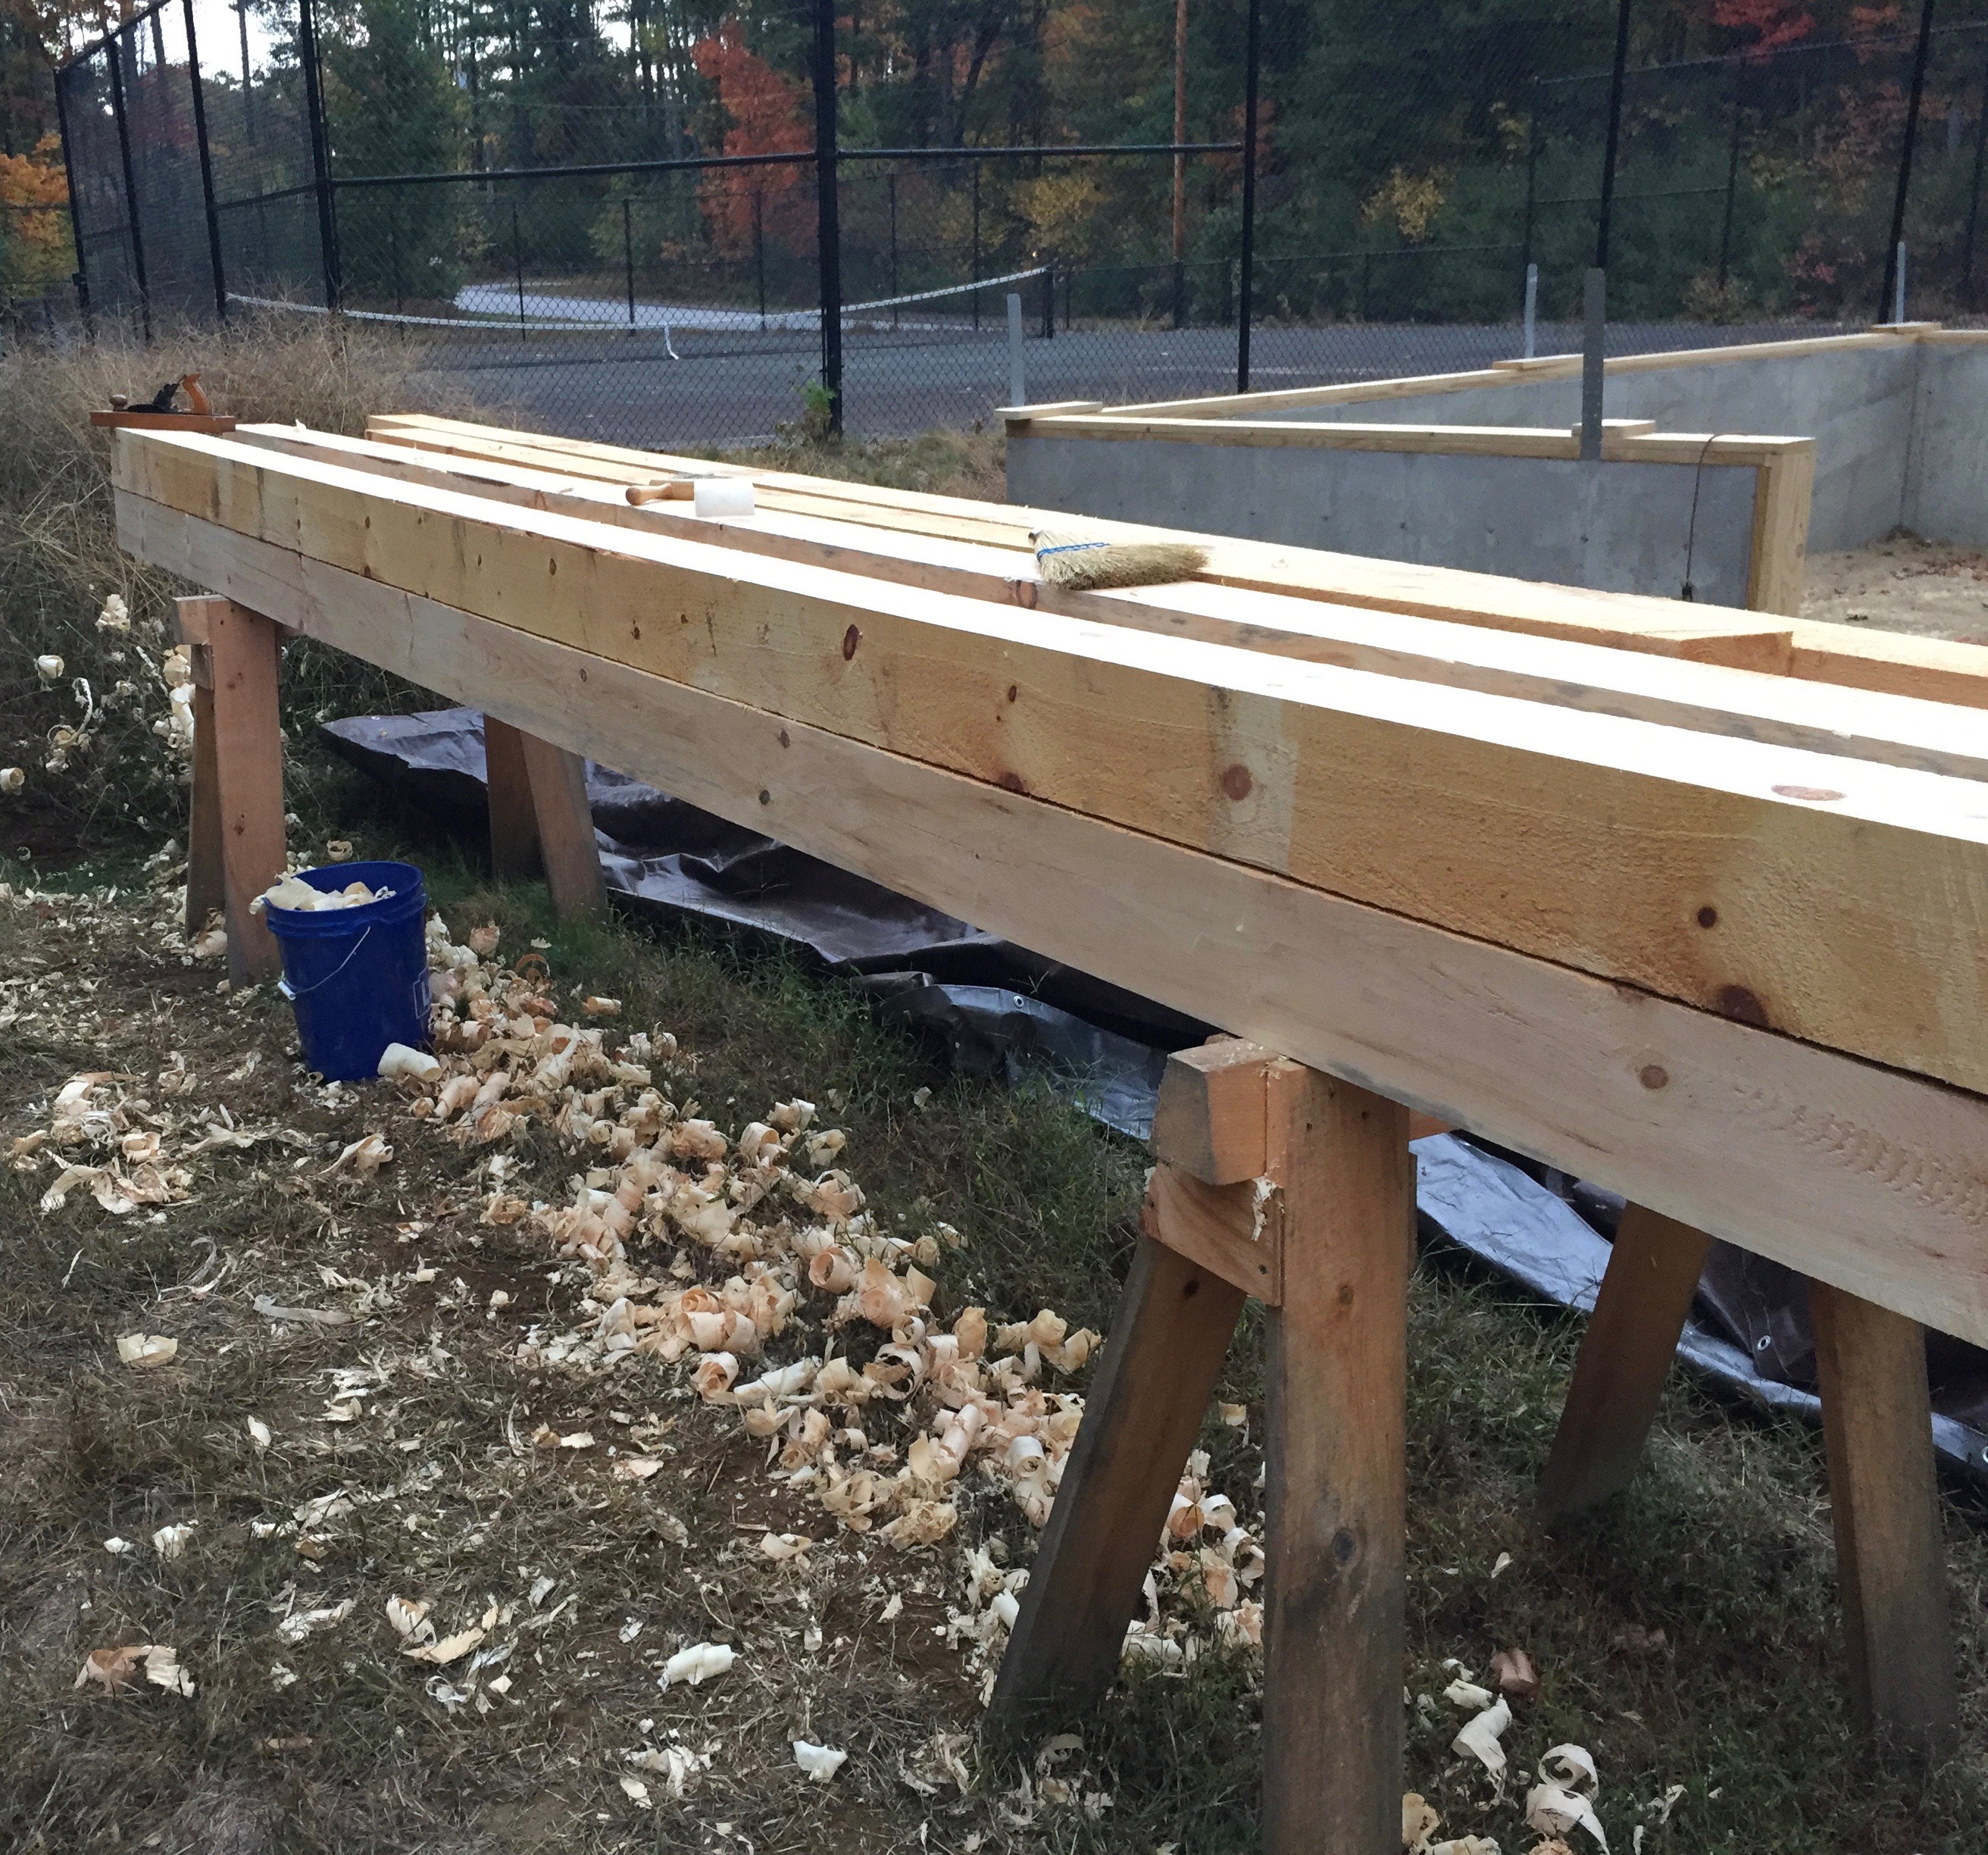
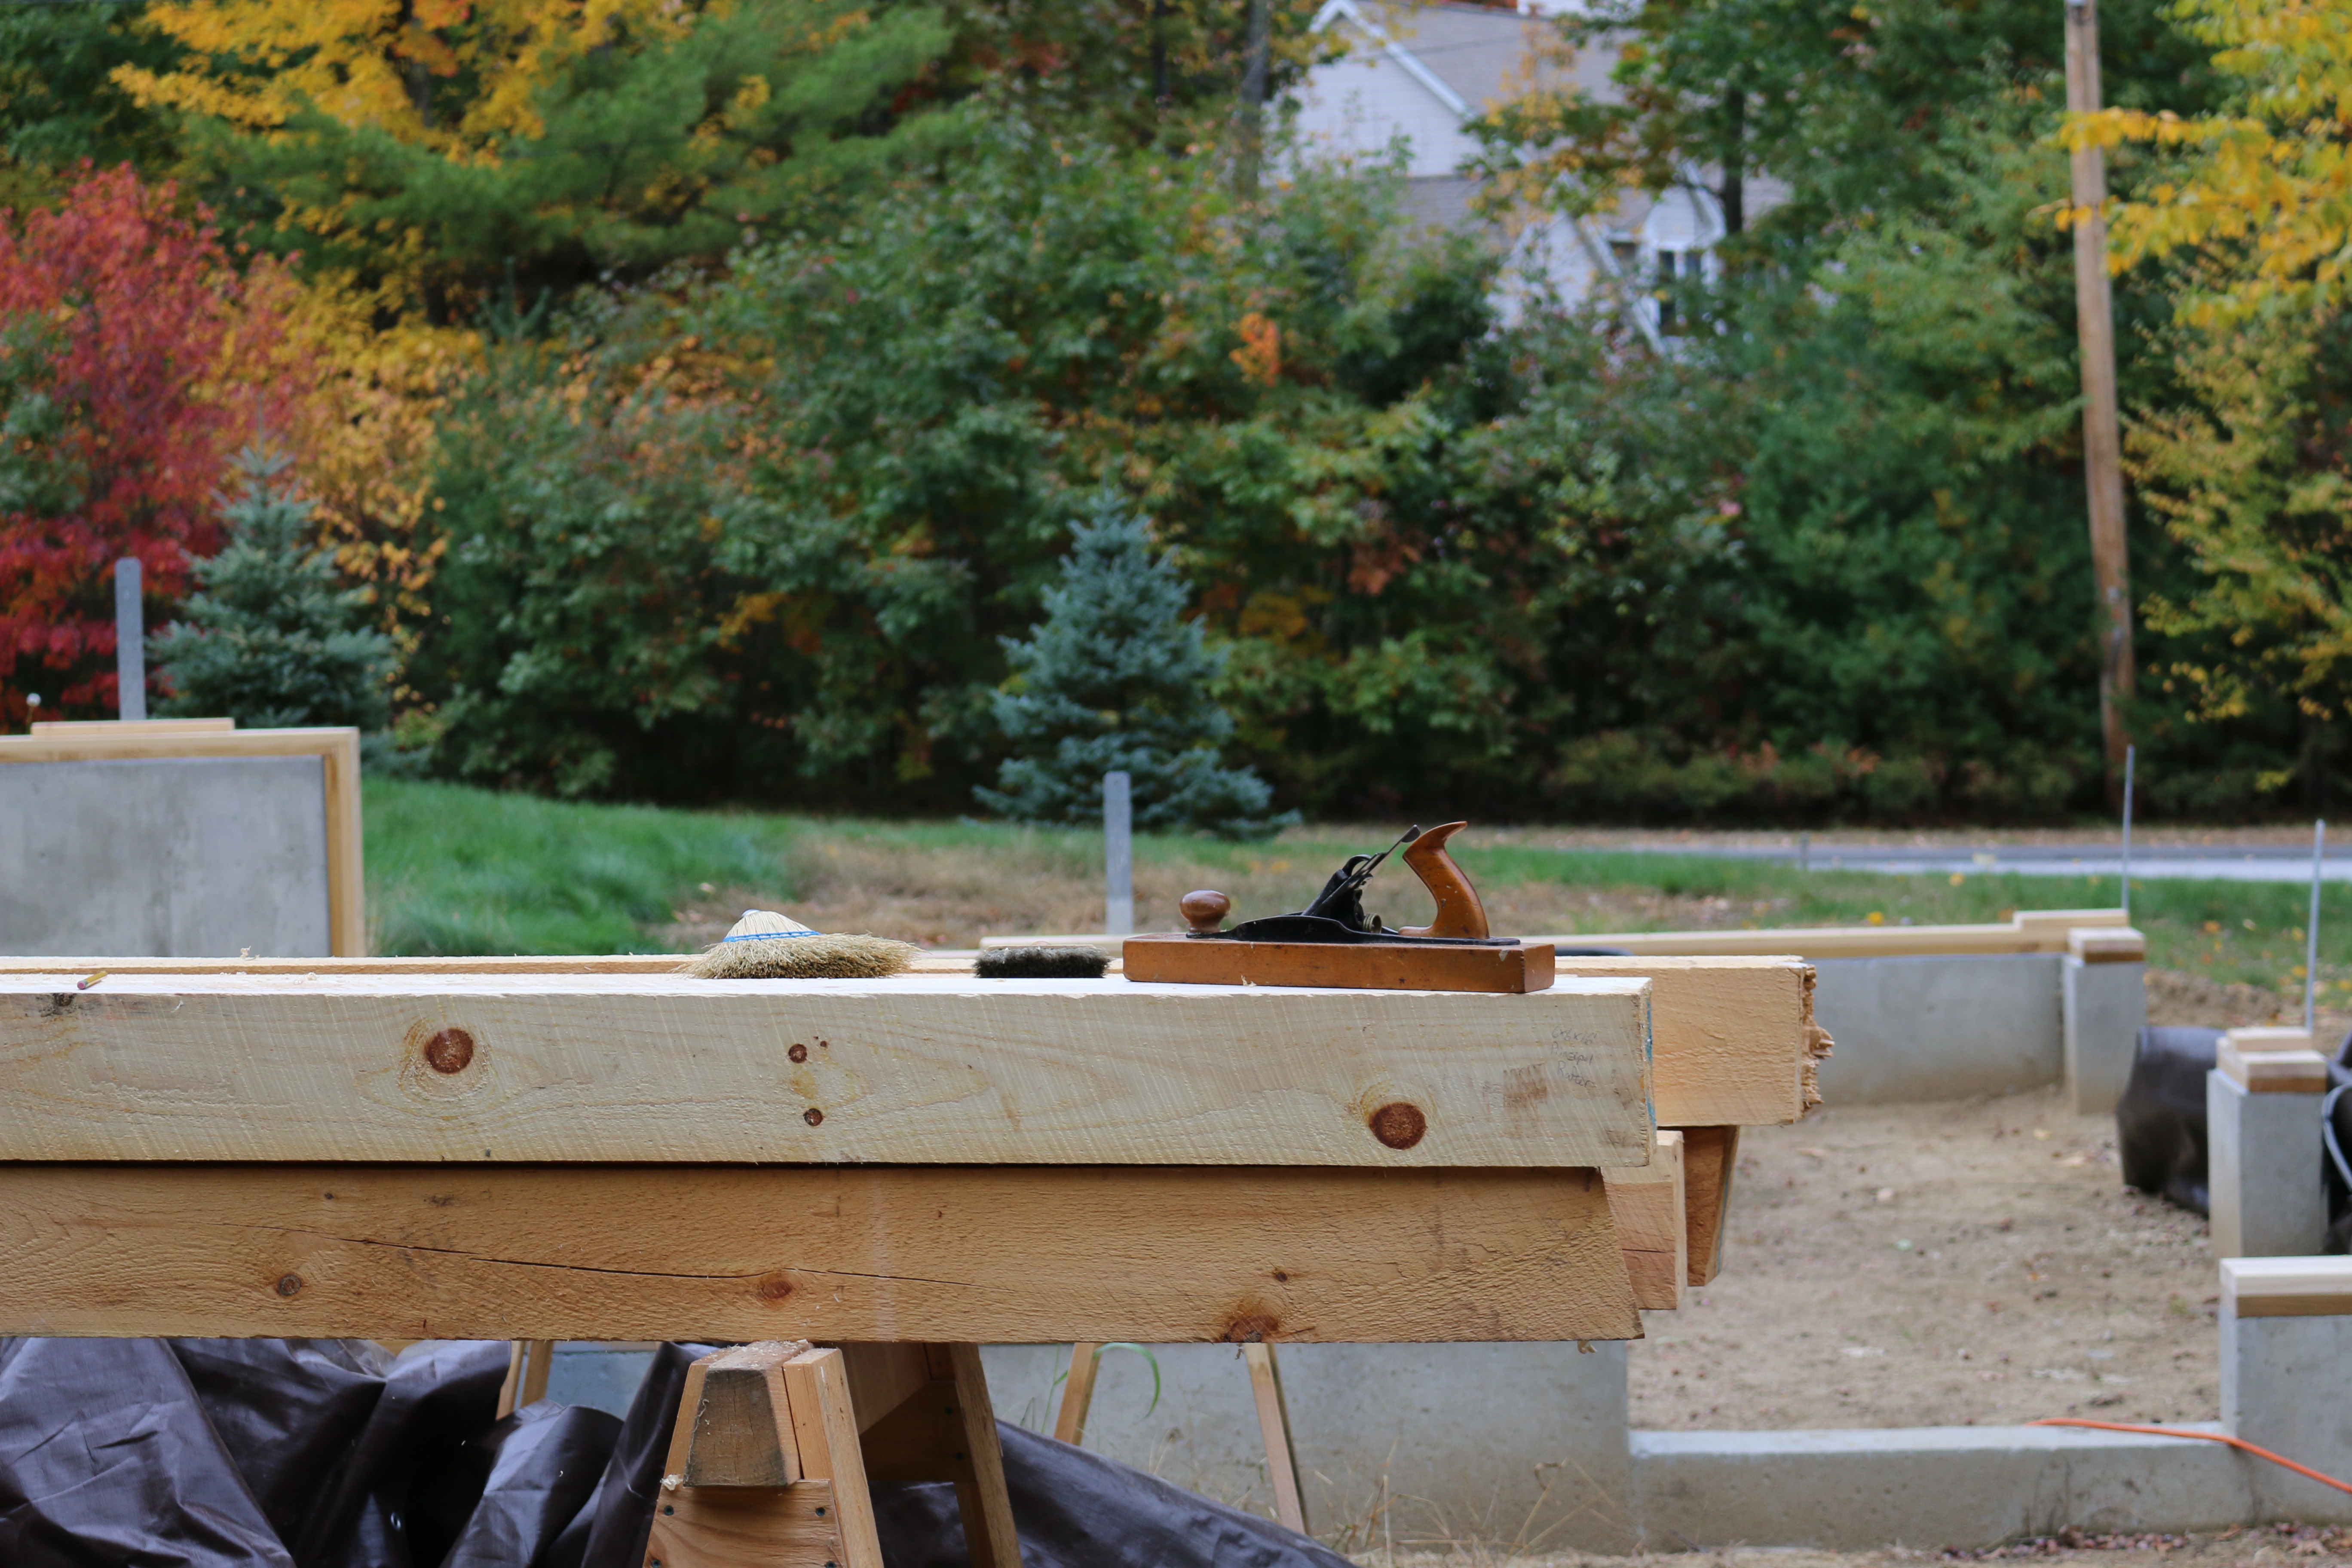
Cleaned up timber frame post
As I got more into timber framing and working with green timbers it dawned on me that these transitional planes — at least in the jack and jointer sizes might be useful for cleaning up timbers. The large wooden sole doesn’t rust the way a metal plane would when exposed to wet wood for long periods of time and you have a more or less modern Bailey style mechanism. The one annoying thing about the mechanism on a transitional plane is the blade advancement wheel spins the opposite way a metal plane works, but after a few minutes you get used to it.
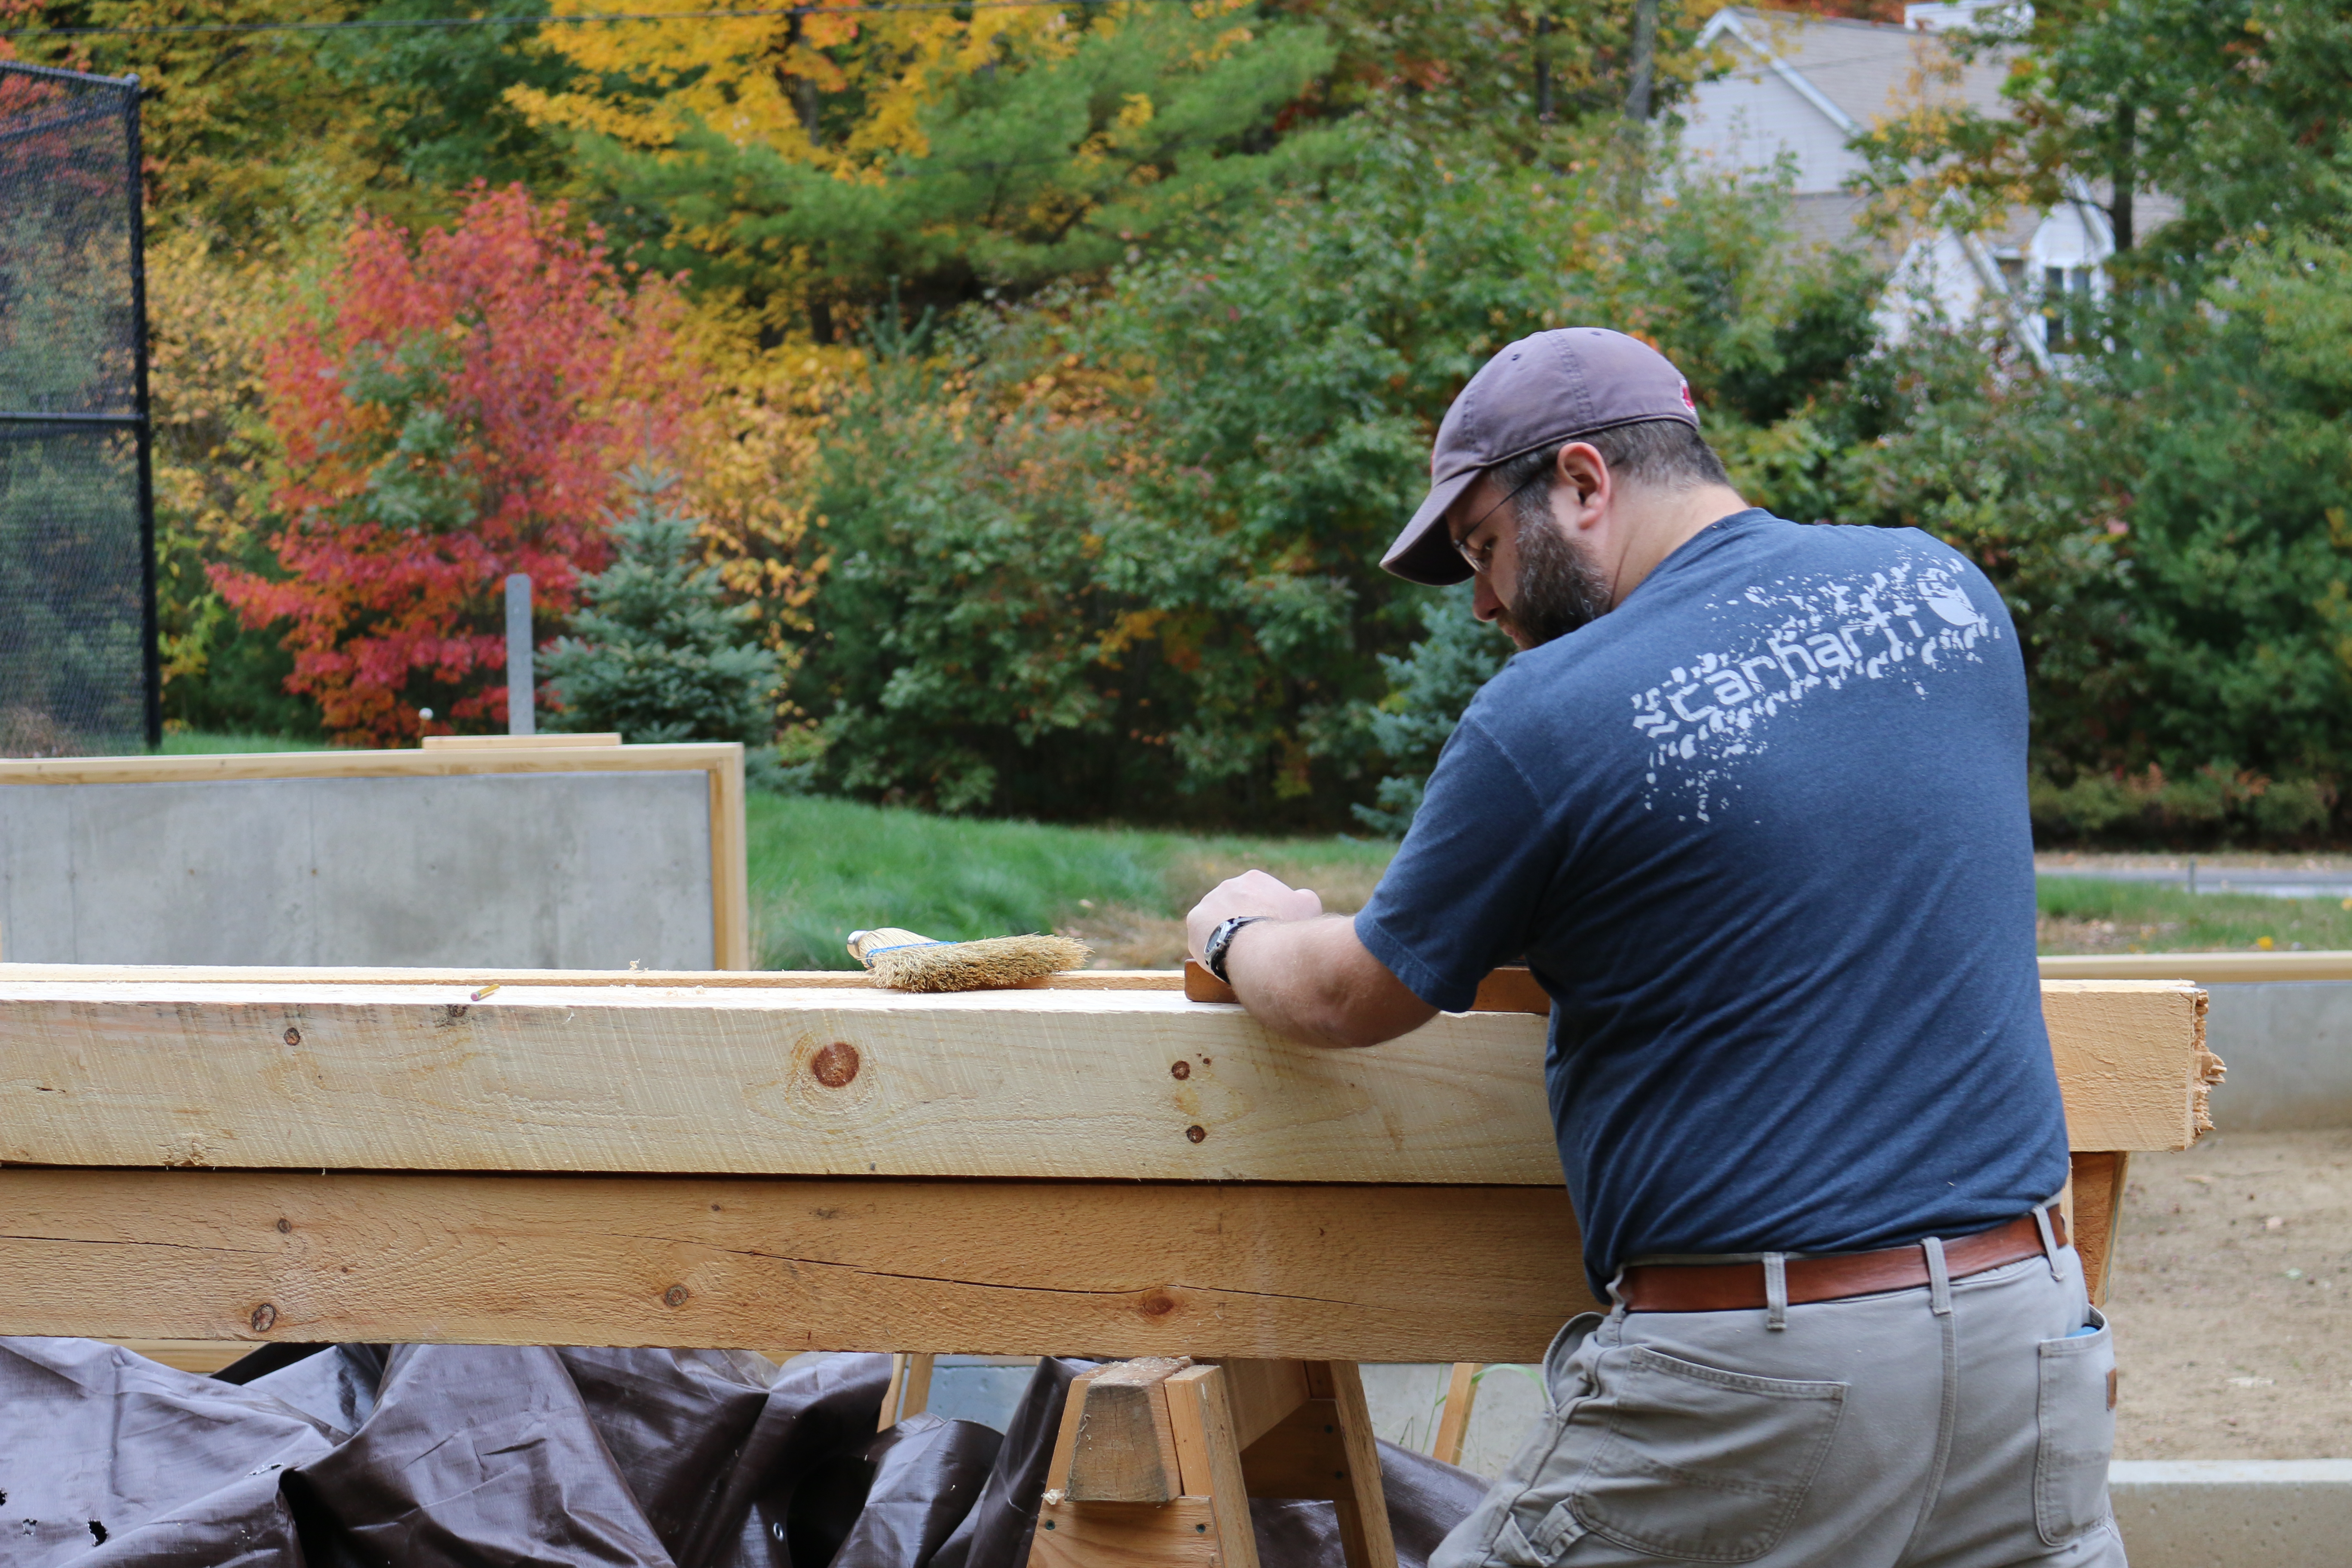
Bill using a traditional jack plane to clean up timber
For some timber frames I need to clean up and remove all the large circular saw or bandsaw marks. In a workshop or outbuilding being fresh from the mill is fine, but in a house all those rough surfaces can be a dust magnet or source of splinters.
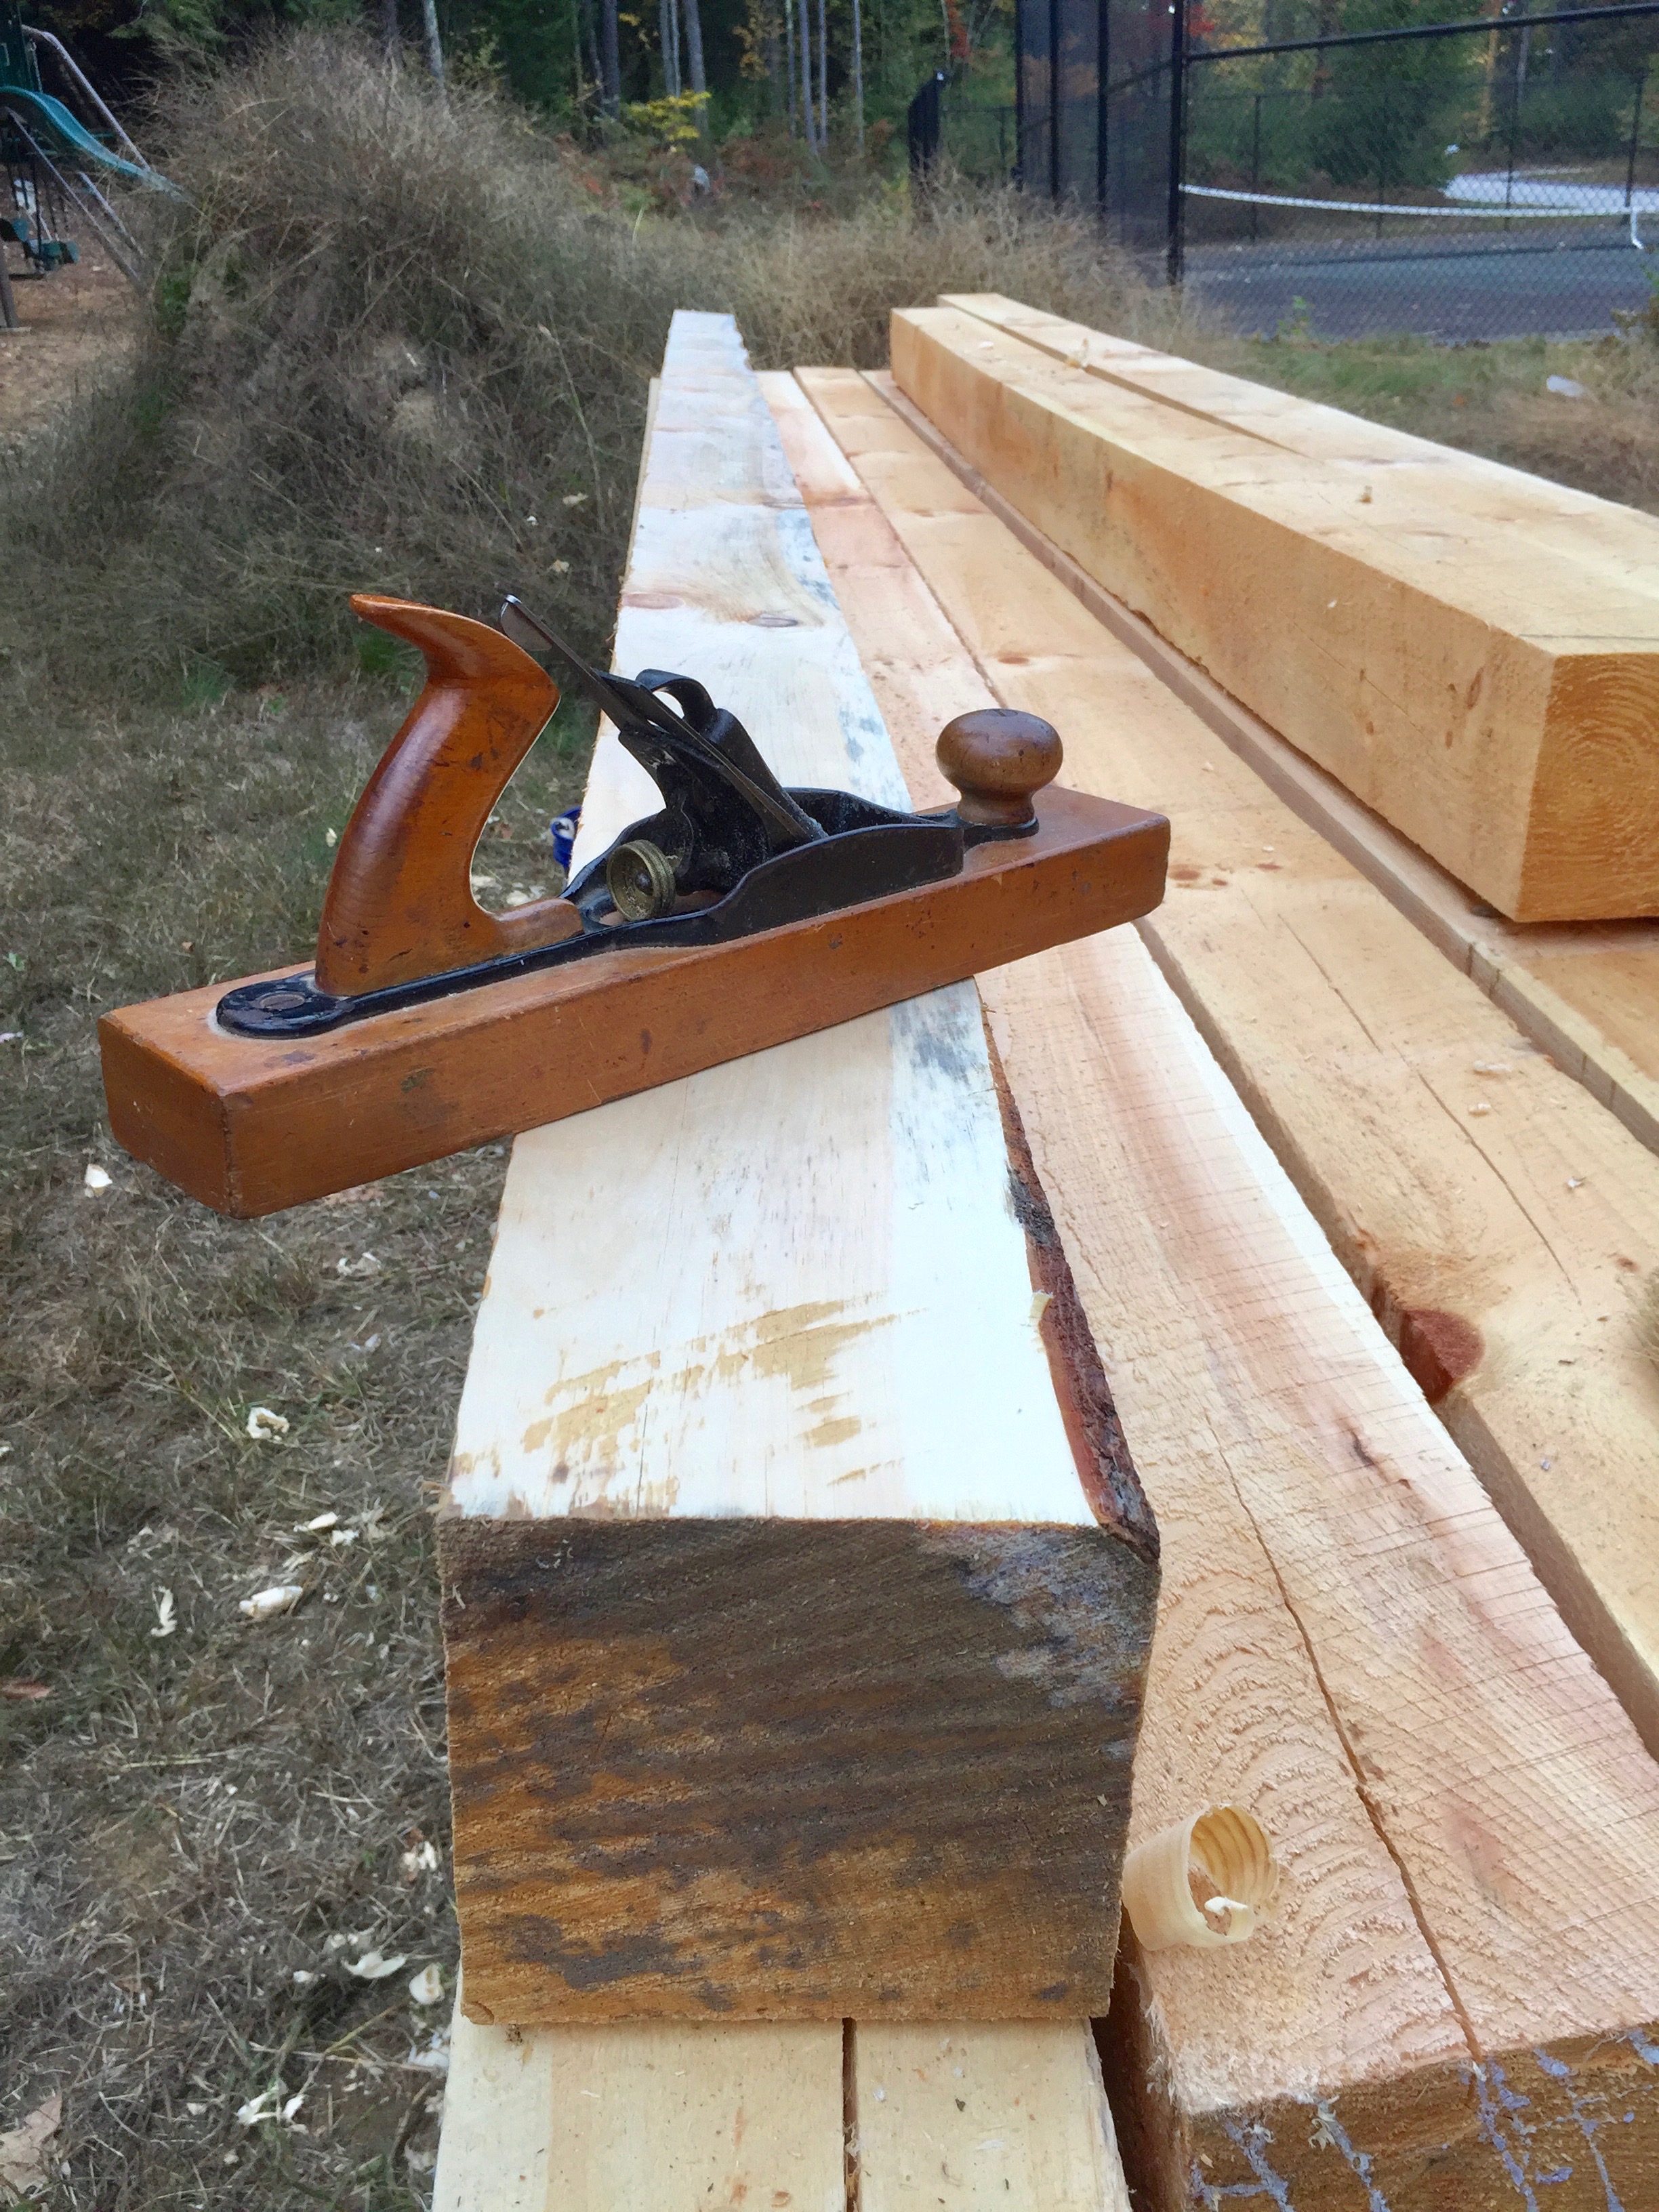
With a nice camber it makes quick work of dressing a green eastern white pine timber
On my jack plane I’ve ground a camber appropriate to a jack plane and take a reasonably heavy shaving. The work goes fast and I admit its fun to make a 25′ foot long shaving on some of the largest timbers.
At first I felt bad about using a plane from the 1870s for this sort of work, but if properly maintained it will have a surprisingly long life and I’d rather see this plane get used as opposed to being in a pyre or on a shelf.
At the end of the day I make sure to remove the iron and wipe it down with oil so it does not rust and I’ll usually give the sole a little more wax.
Transitional Jack Plane in its new habitat
I can usually find these planes in surprisingly good shape for $10-35. If you’re willing to take one with more rust on the mechanism or a replacement sole you can likely get it for even less or even free from some dealers if you buy a few other items. The next time you are at a tool swap you may want to take a second look at a transitional plane and score yourself a good deal on a solid workhorse for your own timber framing or green woodworking projects.
Time for my semi-annual post about the Nashua ‘Live Free or Die’ Tool Show and Auction. Wait, didn’t that happen back in April? Yep. I’m really behind on my blogging as I have been busy working, writing, teaching and helping with our second baby. Having two kids under 2 years old is definitely exhausting. So there will be a few posts here and there out of time as I work through my backlog.
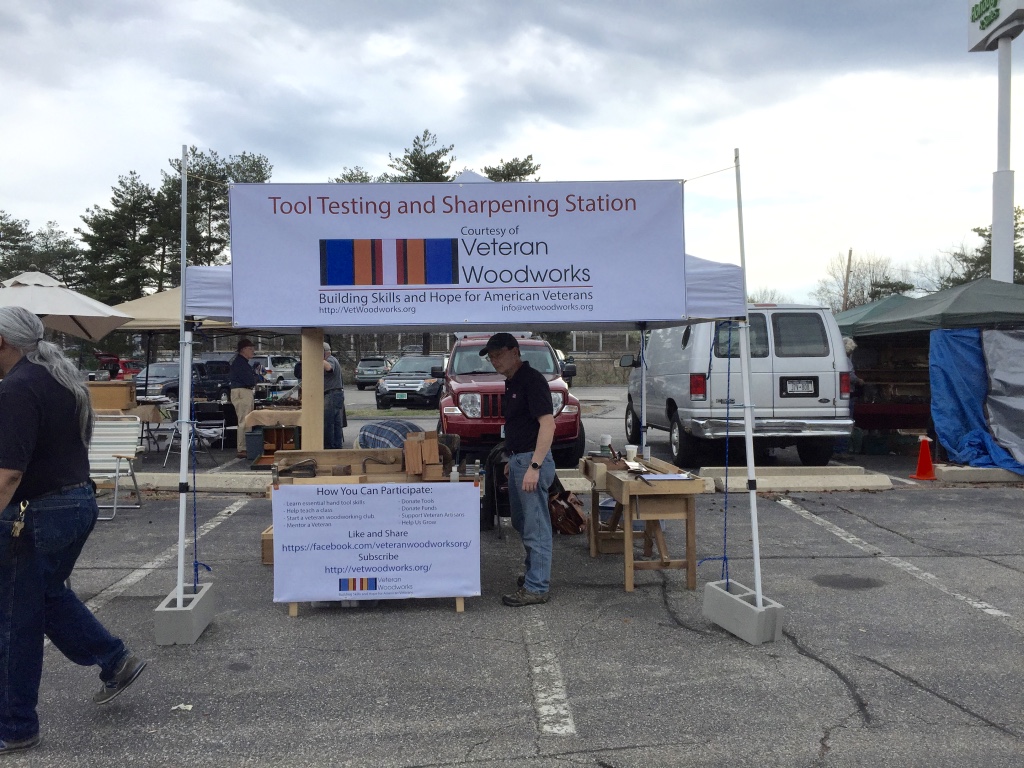
Veteran Woodworkers Association — Tool Testing and Sharpening Station
A new vendor/booth I had not seen before was the Tool Testing and Sharpening Station that was put on by the Veteran Woodworkers Association — a great place to sharpen and test out your new tool purchase.
April 2016 Nashua Tool Show and Sale
It was an overcast day with the threat of rain so I think turnout was a little lower than average and my new job is a lot further away from home so I didn’t get to spend as much time at the show as I normally do.
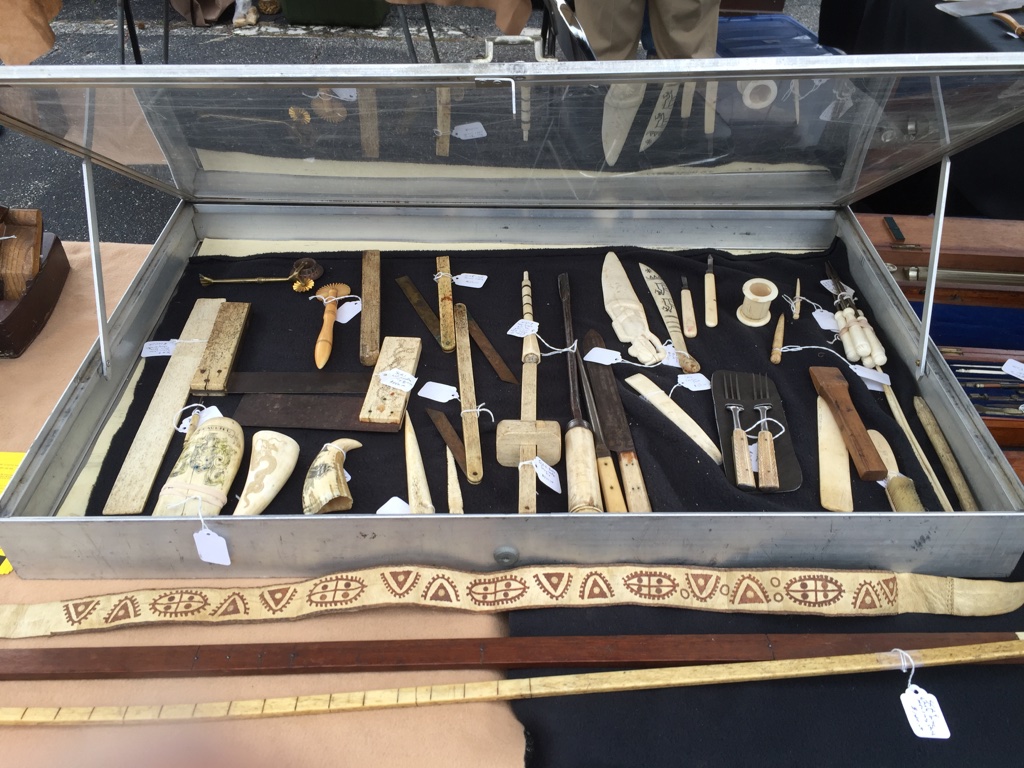
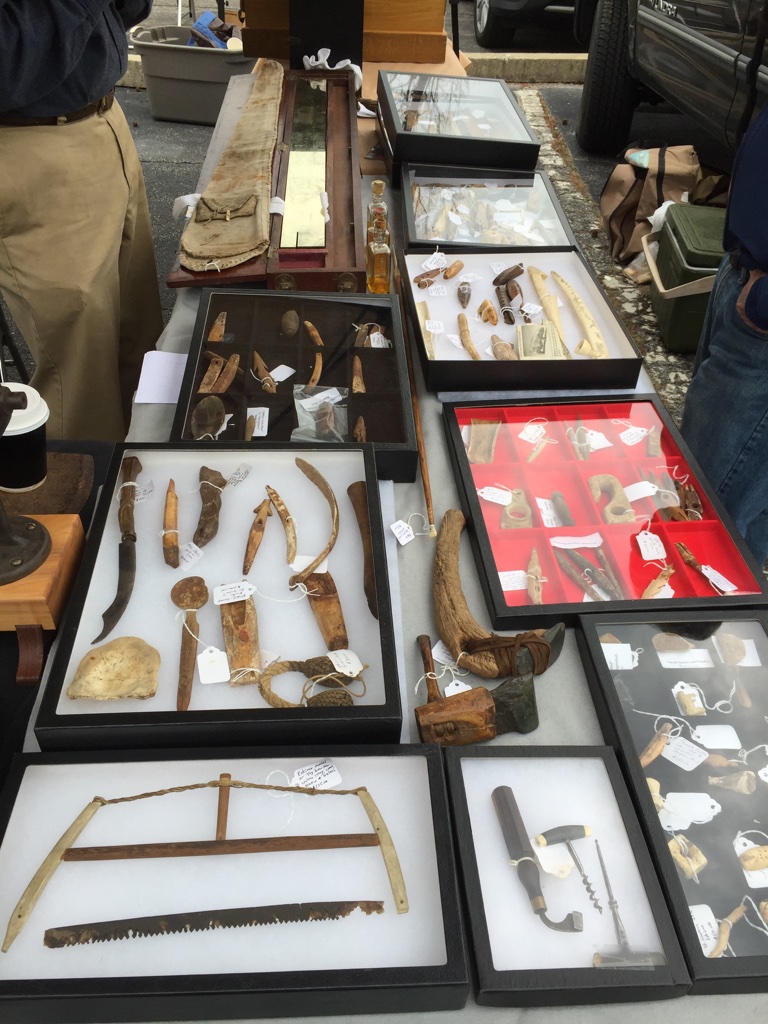
Vendor with an extensive collection of tools make from bones and ivory.
There was not a lot that jumped out at me this year, but one vendor had a pretty extensive collection of native and ancient tools. He also had a lot of tools made from ivory and bone.
More of the Vendor with an extensive collection of tools make from bones and ivory.
It was amazing to see some of the detail on these early tools.
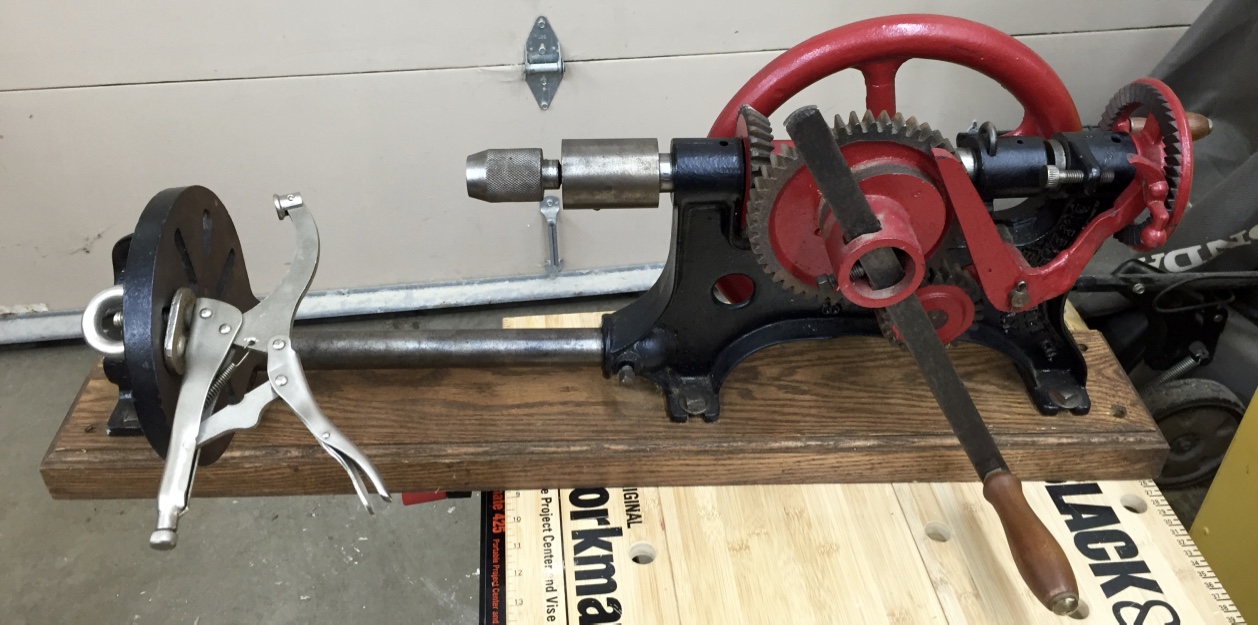
Post Drill Side View
I almost made it out of the show without spending much at all but then two items caught my eye. The first was this nice Post Drill by Buffalo Forge. The drill looked complete, exceptionally clean (possibly restored but can’t tell for sure, so if it was restored it was a while ago). Even has a nice heavy vise grip style hold down — assuming that was a later addition, but works great and useful. It looks like this was one of the later produced models by the Buffalo Forge.
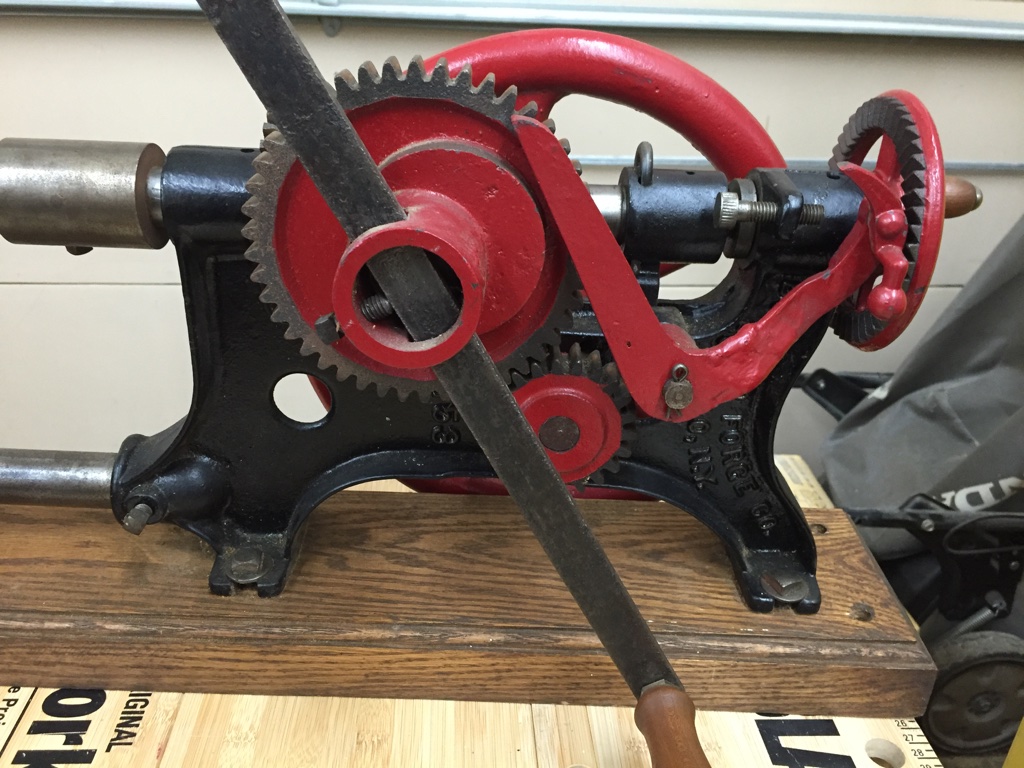
Details of the Post Drill
I’m in the process of building a timber frame barn and want to get a bit more into Blacksmithing (took some classes at Prospect Hill Forge and down in NC with Peter Ross) and would love to dabble in it a bit more. Once the barn is standing I know right where this drill will get mounted. The drill gets mounted on a heavy post, hence the name and is powered by hand crank. You can adjust the throw of the crank lever. You can also turn the mechanism using the heavy fly wheel on the left but in general that is more to help keep momentum going. This model also has a gearing mechanism on top that will advance the drill bit as you turn the drill and is useful when drilling metal.
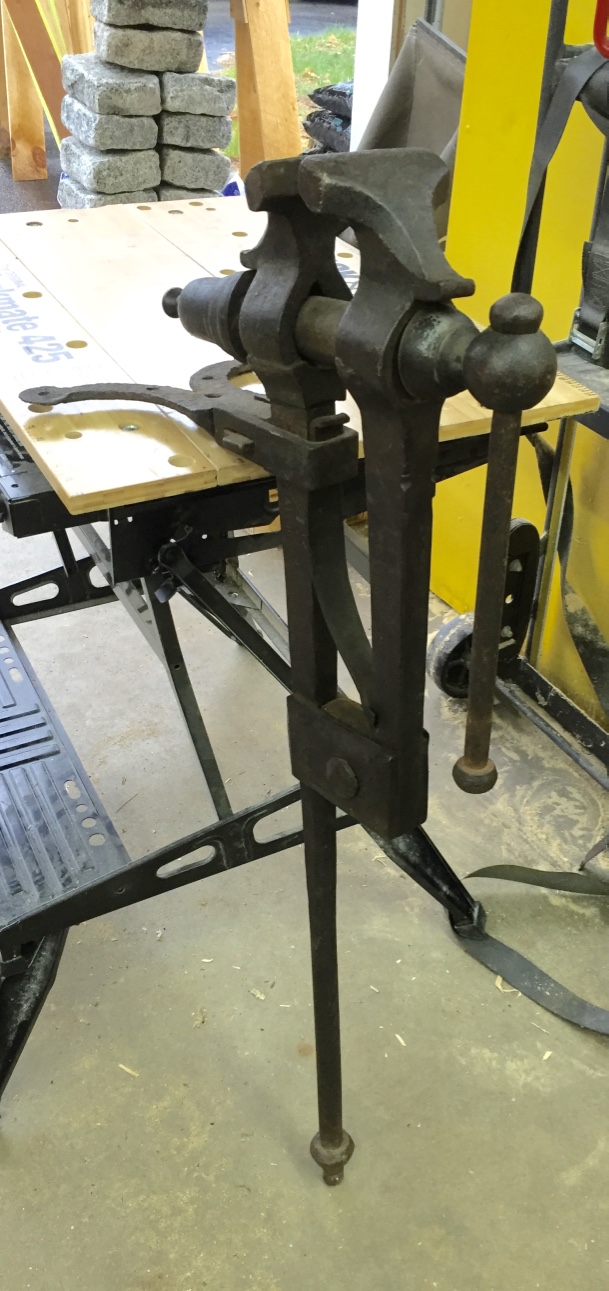
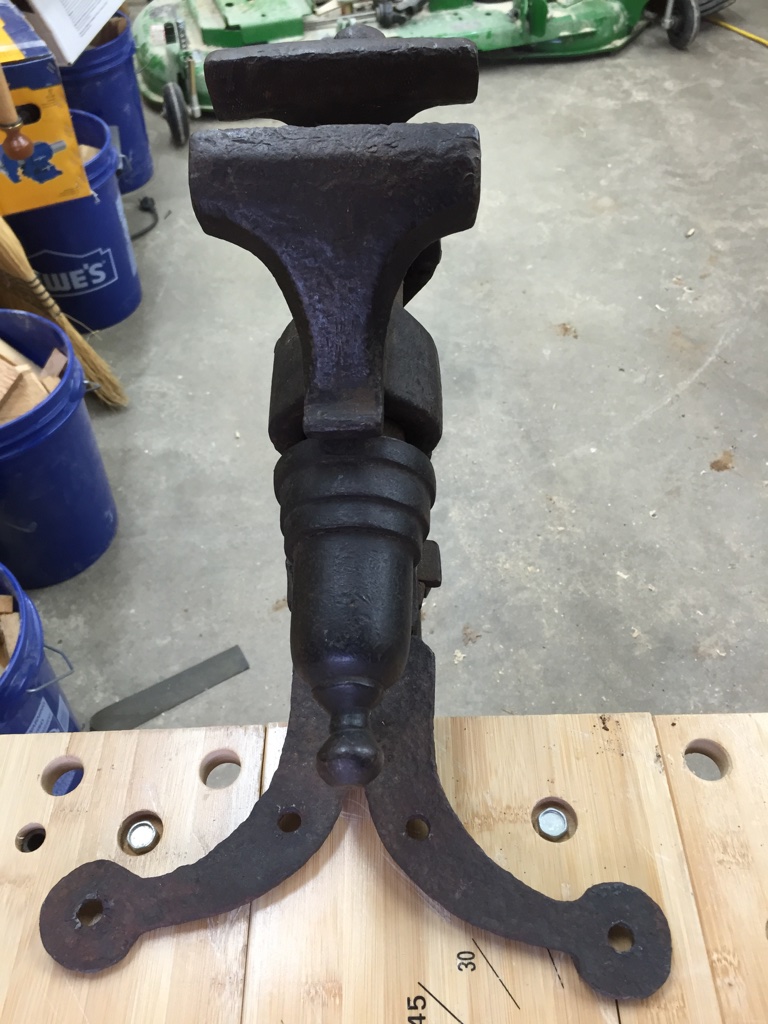
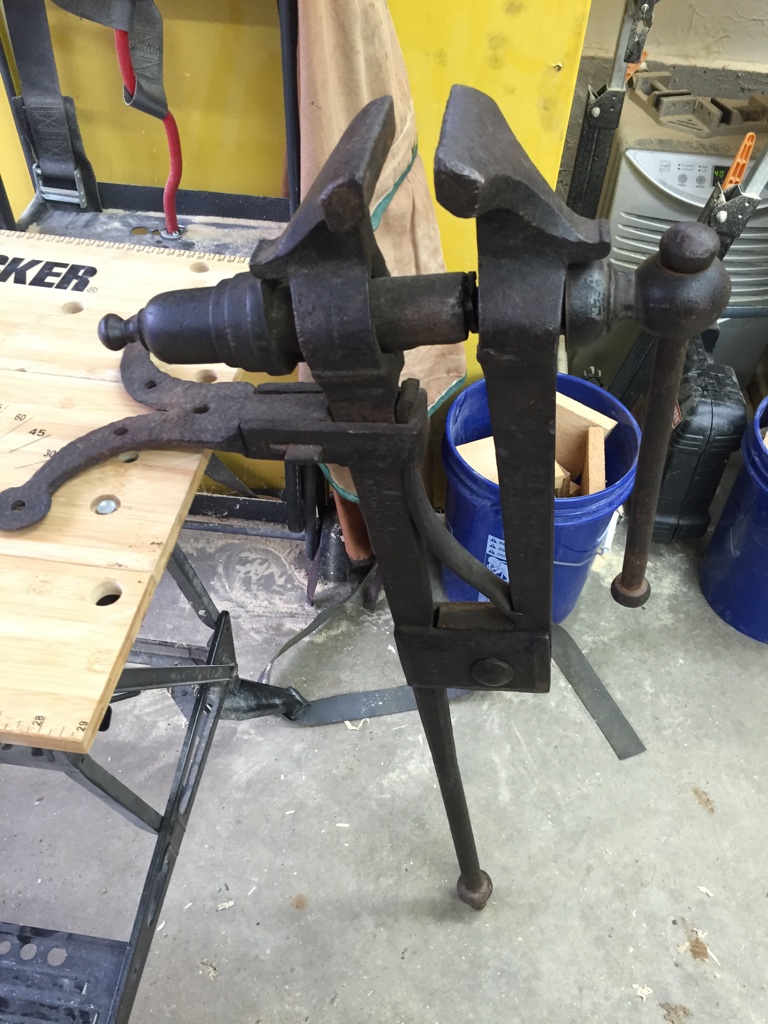
The same vendor also had a nice Leg Vise used for Blacksmithing that also caught my eye. The vendor was not at the booth and after waiting around for 15 or 20 minutes and going by some very VERY vague descriptions of what the seller looked like from neighboring booths, I posted my friend Ken (Thank you Ken 🙂 ) at the booth to keep an eye on my new treasures and went into the auction to search.
Nice complete Blacksmith Leg Vise
As it turned out it was my friend Josh Clark of HyperKitten fame.
Top view of Blacksmith Leg Vise
It’s a nice big leg vise with some nice details, working spring, reasonably clean jaws and still a good amount of life left in the screw.
Side view with jaw open
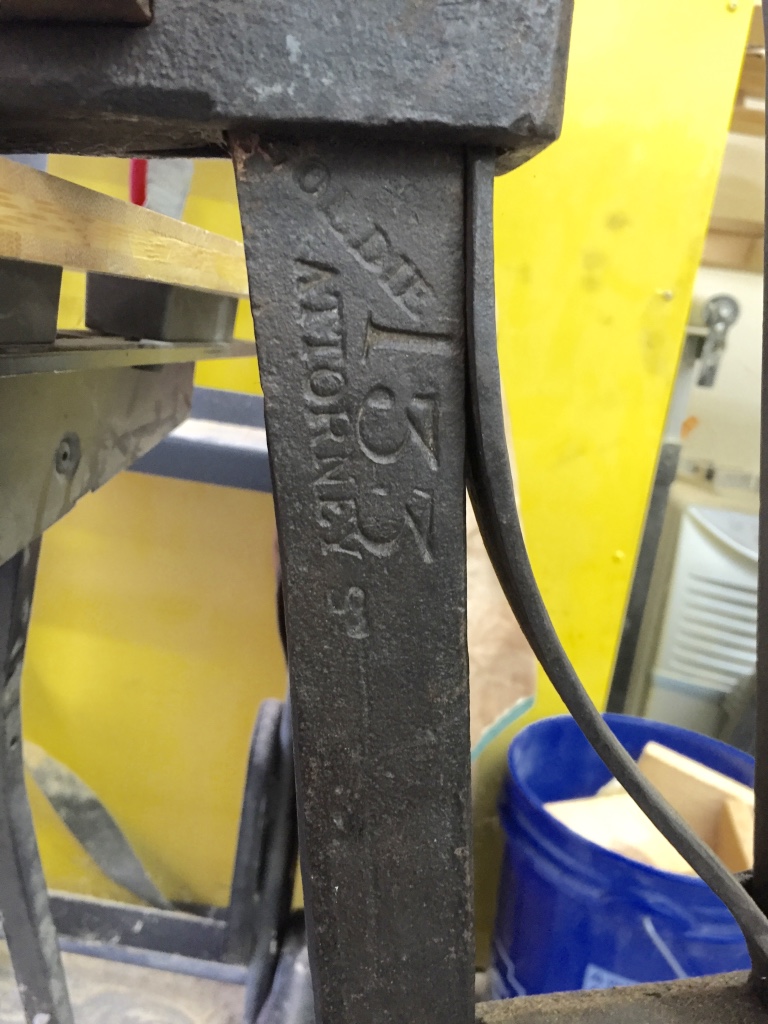
The vise had nice chamfered and some filed details and has a named stamp in it which reads “Goldie. 133 Attorney Street”.
Goldie, 133 Attorney Street NY
After doing some online research and in particular finding this post on a forum I was able to learn a little bit about this vise.
“From the above post by Frank Turley (Which had a lot of great pictures which have gone MIA, but matched my vise above) I
The raised letter markings are “GOLDIE” AND “133 ATTORNEY.” He googled and found that the maker was Joseph Goldie located at 133 Attorney Street, New York, NY. I found Goldie in my Directory of American Toolmakers as a maker of “anvils, rules, and vises,” 1842-1849. The son, Joseph Goldie, Jr., made “miniature vises and anvils,” probably for jewelers. The big vise has the wrap-around U-shackle with its split and splayed mounting bracket. It has chamfered legs and pivot beam. It has a nicely turned “bell shape” on the screw box, not too unlike the Peter Wright’s.
[Snip]
The tenoned vises were “composites.” The box was a forge welded tube with a coil of square-sectioned stock brazed within for the internal threads. The stops, to keep it from turning. usually two, were brazed on.The external portion of the box was composed of perhaps 3 rings that were brazed together and then lathe turned. A careful cleaning will sometimes show lines of brass left from the original brazing. These old vises rarely exceeded a 4 1/2″ jaw width.
The tenon for the mount was often rectangular in section going through a hole in the fixed leg. This necessitated having a hole in the leaf spring. To tighten the assembly, the tenon had a carefully placed slot in it to receive a wedge.
The pivot beam usually had an unthreaded, headed bolt with slot to receive a wedge, not a nut and bolt. If there is a nut and bolt, it was probably added at a later date.
My pictured vise has a jaw width of 4 5/16″ and an overall length of 36″ — Frank Turley
All in all it was a good show, I saw a lot of old friends, picked up a couple of fun new tools for the shop and I look forward to the September show which is fast approaching.
For many hand tool woodworkers, analog and imperial is the only way to go. Sometimes the modern world imposes itself on me and I have to bite the bullet and go digital and even occasionally metric.
I ran into this recently with a custom knife for my Williams & Hussey Molding Machine…
General Digital Calipers in nice fitted case with extra battery and screwdriver.
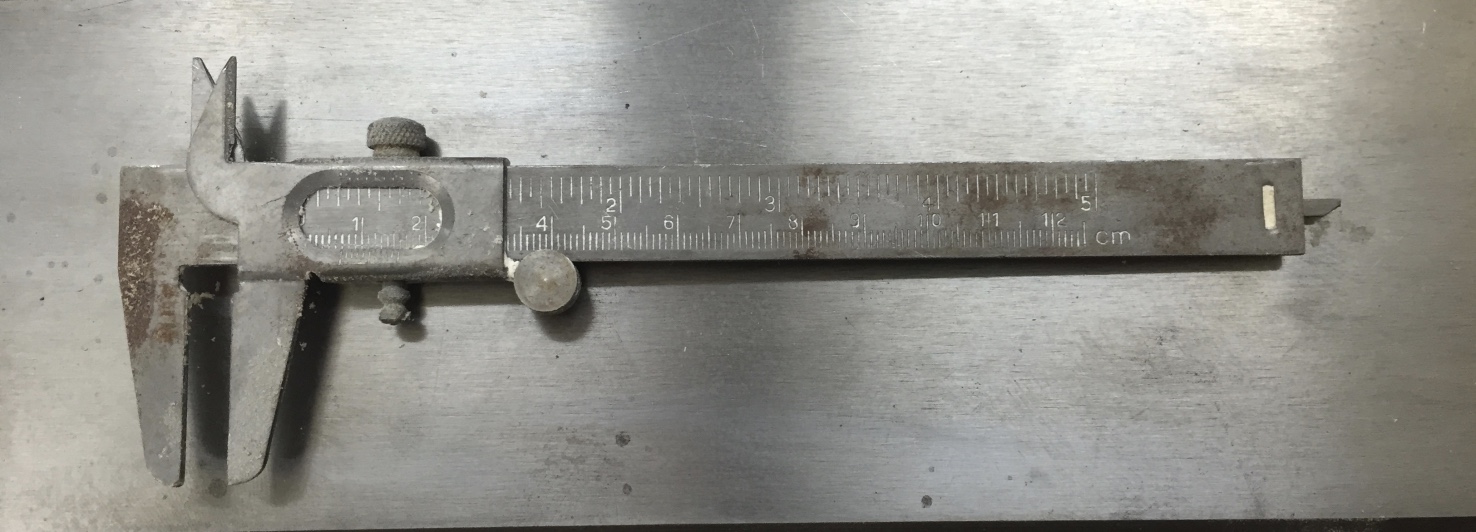
When I ran some muntin stock for a window sash the portion of the profile it was slightly narrower than my mortising chisels and hollow chisel mortising bit. I triple checked the setup of the knives and made sure they were aligned. I then took the chisel to the knife and it was slightly wider than the template. The CAD drawing of the knife matched what I expected the knife to look like. When talking to the knife manufacturer he asked that I double check the size of my chisels and I broke out the old, low resolution (1/32″), manual calipers I had and described what I was reading. That is where our two different worlds met. My trusty old General Tools Vernier caliper which worked great for comparing say two tenons — as I don’t have to read the value so much as compare — sort of like using a pair of wooden ‘pants’ on a timber tenon do not give the digital readings he was expecting. Terms like ‘a very tiny bit over 3/8″ ‘ don’t work in this context.
TIP: When taking measurements, especially those wherein you want to compare say two tenons, make sure you secure the lock screw — this way the jaws do not move.
Old and low resolution calipers I inherited and used mainly for comparison testing
I wound up having to send in my chisels for him to look at and adjust the knife, which I am grateful he did, but I did not want to repeat this experience.
“I thought the whole point of old woodworking was that you didn’t have to go metric.” –- Roy Underhill ( The Woodwright’s Shop Episode “Who Wrote the Book of Sloyd?” )
Right after the above I had the opportunity to get a digital caliper set from General Tools.
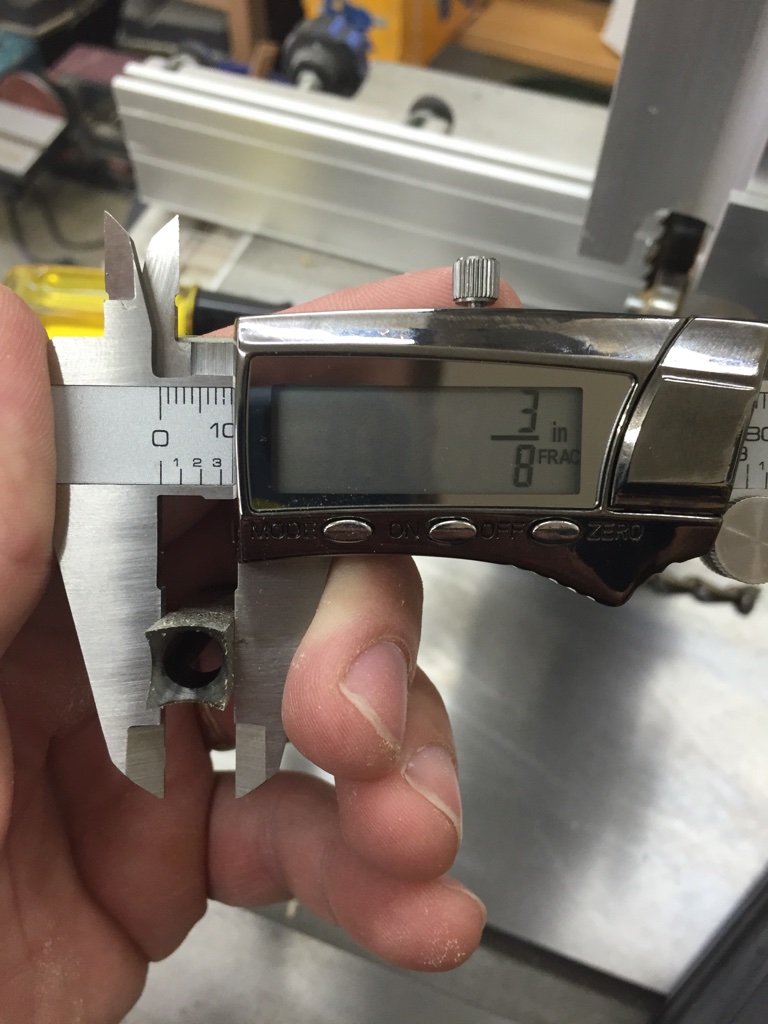
Measuring in fractions of an inch (Goes to 1/64th of an inch)
I’ve toyed with the idea of getting a real nice dial caliper like a Starrett but $185-$700 was out of my price range (Though I do use a Starrett Dial Indicator for setting up my stationary tools and love it) or high end digital caliper like the Mitutoyo ($150-$500+ depending on model), but for how often I’d use it I could not justify the price.
Enter the General Tools Model 147 Stainless Steel Digital Caliper. The tool sells for about $25 on Amazon.com and claims and accuracy of ±0.001 in./0.02mm and a resolution of 1/64 in./0.0005 in./0.01mm.
Calipers zeroed out.
I read all the reviews for this model and similarly priced calipers and wanted to see for myself how good it was or was not.
Top concerns I saw in the reviews for this sort of tool — questions around repeatability of measurements, battery life and accuracy. As a woodworker my measuring tools usually are only graduated down to 1/128th of an inch at most, anything beyond that is tested by hand, eye and reference straightedge. Anything beyond that I defer to my machinist friends who like to get OCD about ambient temperatures and other fine details of super high resolution measuring.
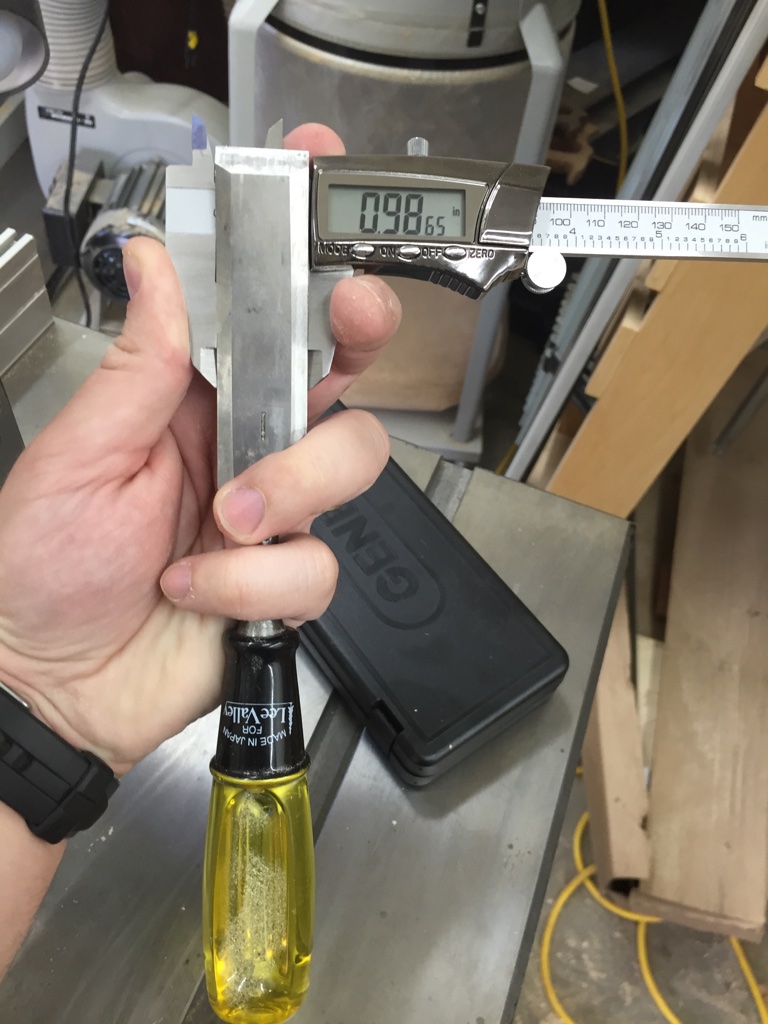
Testing a 1″ Lee Valley Chisel
The caliper comes in a nice little plastic form fit case, along with a tiny screwdriver for the battery compartment along with a spare battery. (See first photo in post). The caliper seems to be mostly stainless steel with what looks like metallic coated plastic around the display. Overall to tool has a nice weight and finish quality and seems to be machined better than I expected. My only real nitpick is the thumbscrew has a tiny bit of play left and right, not in the direction it drives, so it doesn’t affect performance, but is something I noticed on close inspection.
I took out the tool and tried it on several chisels to see how they measured up. My old set of Lee Valley Japanese steel chisels measured a little bit under their nominal size. (As others have described, such as this article)
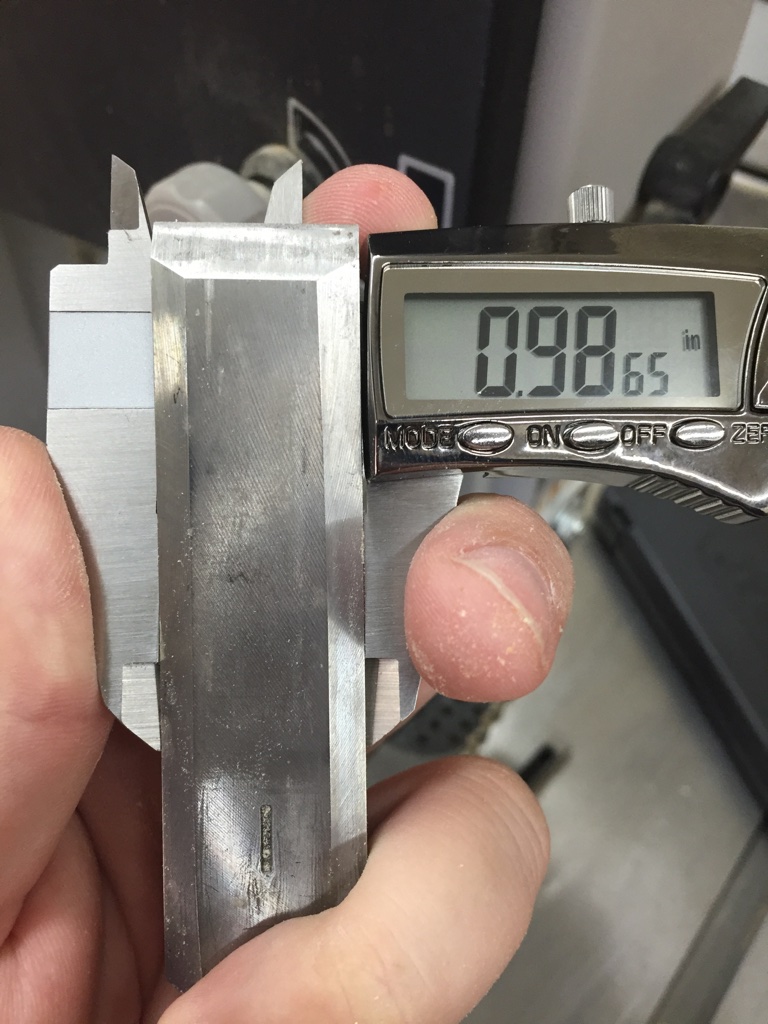
Re-testing for accuracy.
After taking a measurement I took a few other measurements, defined a new zero location, either arbitrary or using a reference like a machinists 1-2-3 block and then re-zeroed out the caliper and re-tested the chisels. I was able to get consistent readings each time.
Tip: Before taking a measurement make sure that he calipers are ‘zeroed’ out — by making sure the jaws are touching (and you can see no light through them) using the zero button. If starting from a new open position, so you can take a reading relative to a given starting place, you would open or close the jaws on the reference object, press the zero button and then adjust (open or close) and take your next measurement. (You can take negative measurements as well when starting from a zeroed out open position)
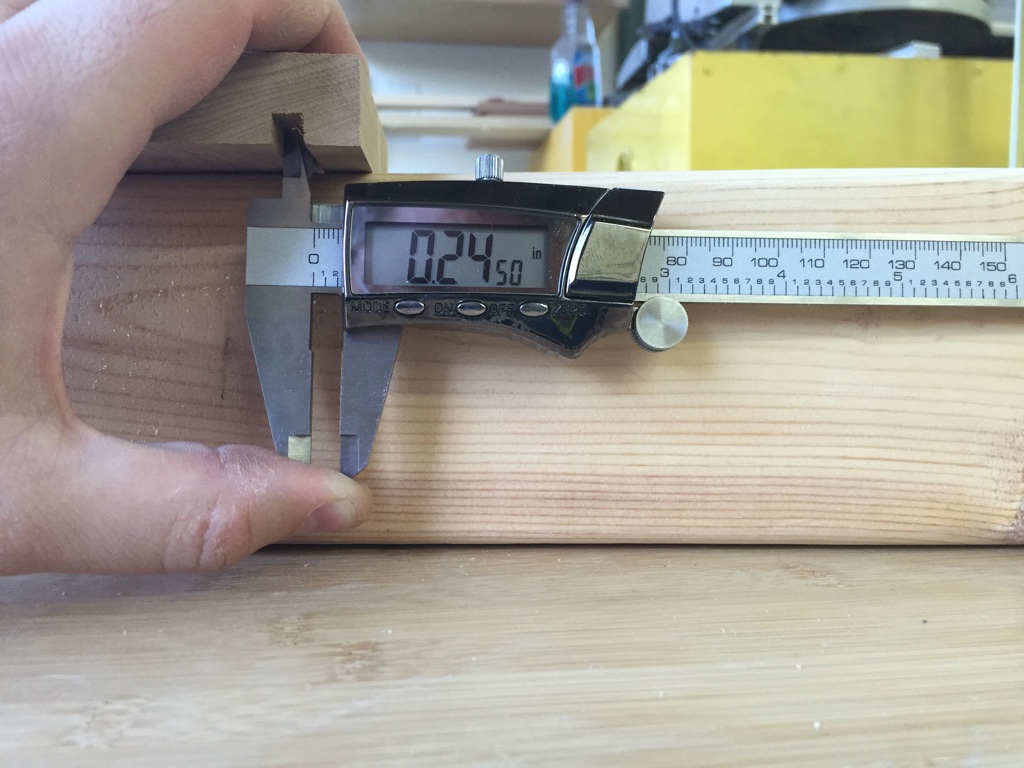
Using the upper jaws to measure inside.
I also took some inside measurements (as shown above) and used the depth gauge rod (not shown) and had similarly consistent results. The fractional mode only displays down to 1/64″ and if you want higher resolution output on the screen you’ll need to use the imperial decimal mode or the metric (mm) mode. I like the ability to switch modes as it takes out some of the human error in converting from fractions to decimals or to metric measurements.
Tip: When taking measurements such as the chisel above make sure the jaws are firmly up against the item being measured and parallel — don’t be lazy using your finger on the thumb screw (used to open or close the jaws).
Others noted battery life issues, but my inner-engineering OCD likes to shut of the caliper as soon as I am done using it, but a few times I left it on to make sure that it eventually shut off and it seemed to work fine for me. The form fitted case has an instruction sheet in it when you get it and I wonder if for some folks if they didn’t seat the caliper properly in the case or put something on it so heavy that the closed case gets a little crushed/deformed it might press the buttons and prematurely drain the battery. I’ll keep an eye on battery longevity and add comments if things change, but so far so good on that front and I like knowing I have a spare ready to go in the case.
Summary:
For this price range do I expect the tool to replace the high end premium line — no. But do I need a premium high end dial or digital caliper in my woodworking shop, also a no. This tool is a nice step up from my old caliper, offers and accuracy range above what I expect to work at and seems to be a real good value for the woodworker in need of more accurate measurements and a solid user tool.
Take care,
-Bill
P.S. If you are interested in the same model, you can find it here on Amazon. I do not get anything from sharing that link. If you have this tool or get one for yourself, let me know what you think of it in the comments below.
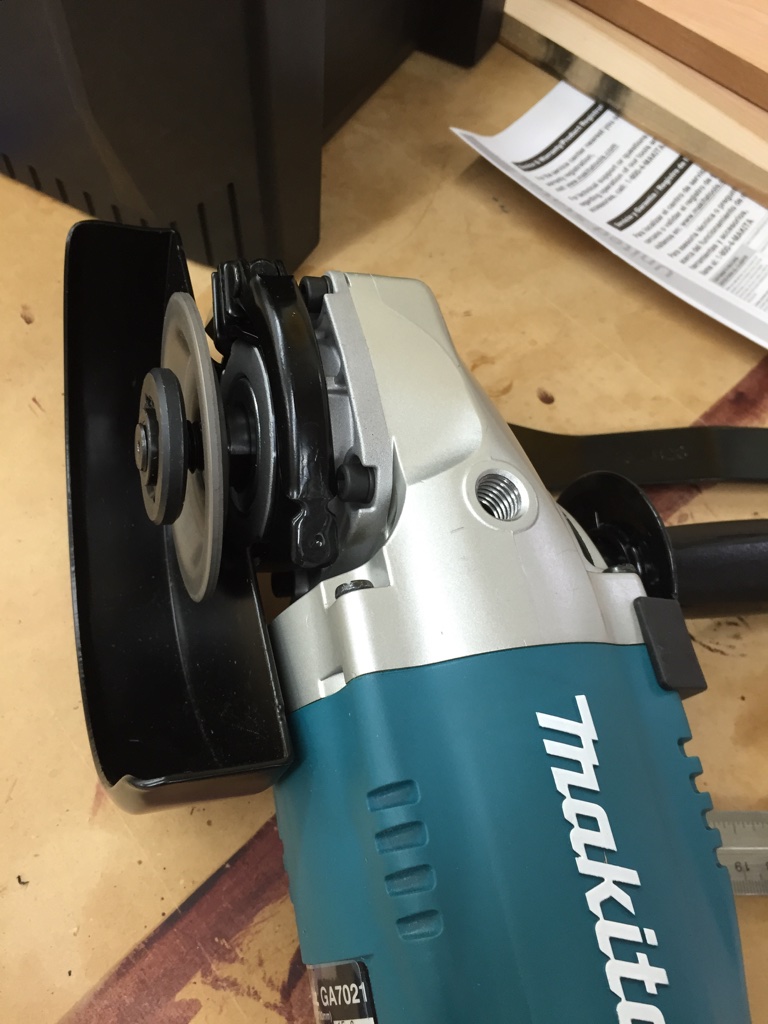
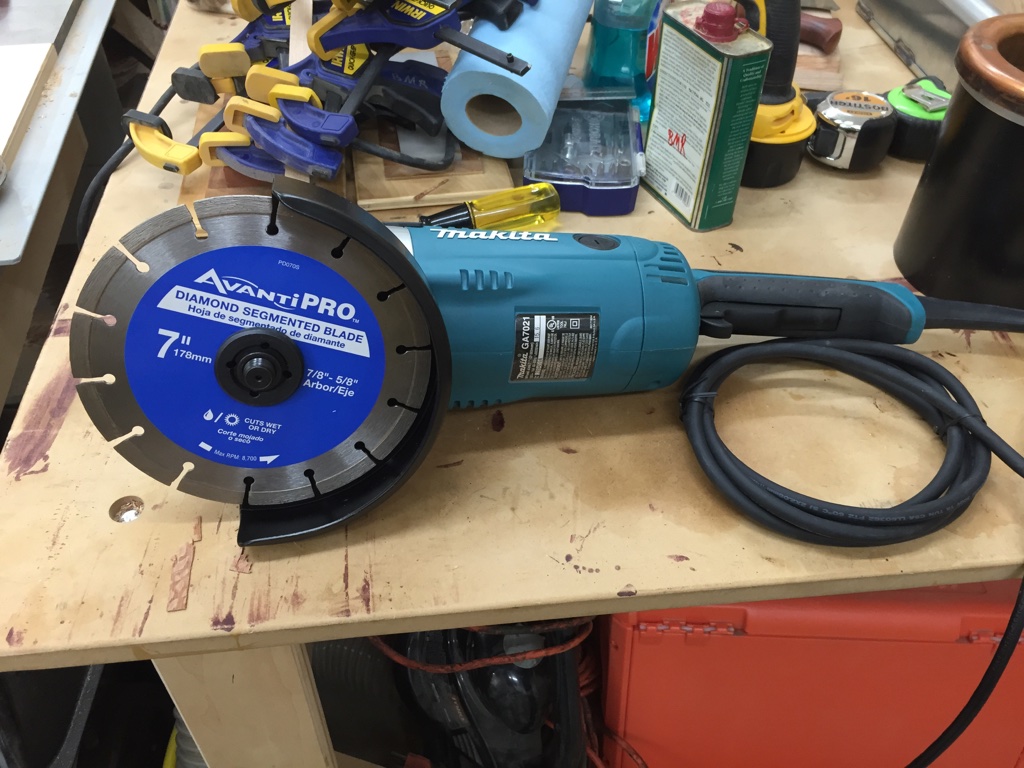
Working on historic homes and buildings often requires the application of techniques employed by several trades. In recent years I’ve been learning more about preservation masonry. For an upcoming project wherein I’ll have to precisely cut a lot of bricks out in the field I decided to invest in a 7″ angle grinder and a diamond masonry blade.
I’ve been a fan of Makita tools as I use many of them in my work. (From large portable power jointers, angle grinders, chop saws, circular saws etc. and they have all served me well). The 4″ angle grinder I had would not have the depth of cut I wanted to make fast work of brick and block cutting. I bought the Makita GA7021 15amp, 7″ angle grinder at my local Home Depot as it was the largest grinder they stocked, had the specs I was looking for and the Makita website showed this model using a diamond blade on masonry.
When I got it home, opened the box and read the manual I saw that it only included the domed inner flange and lock nut shown below. The instructions made no mention of using flat blades in the tool. I had concerns about support of the blade given my smaller grinders had a separate flat inner flange for use with flat cut off wheels.
Inner flange and outer nut that come with the grinder.
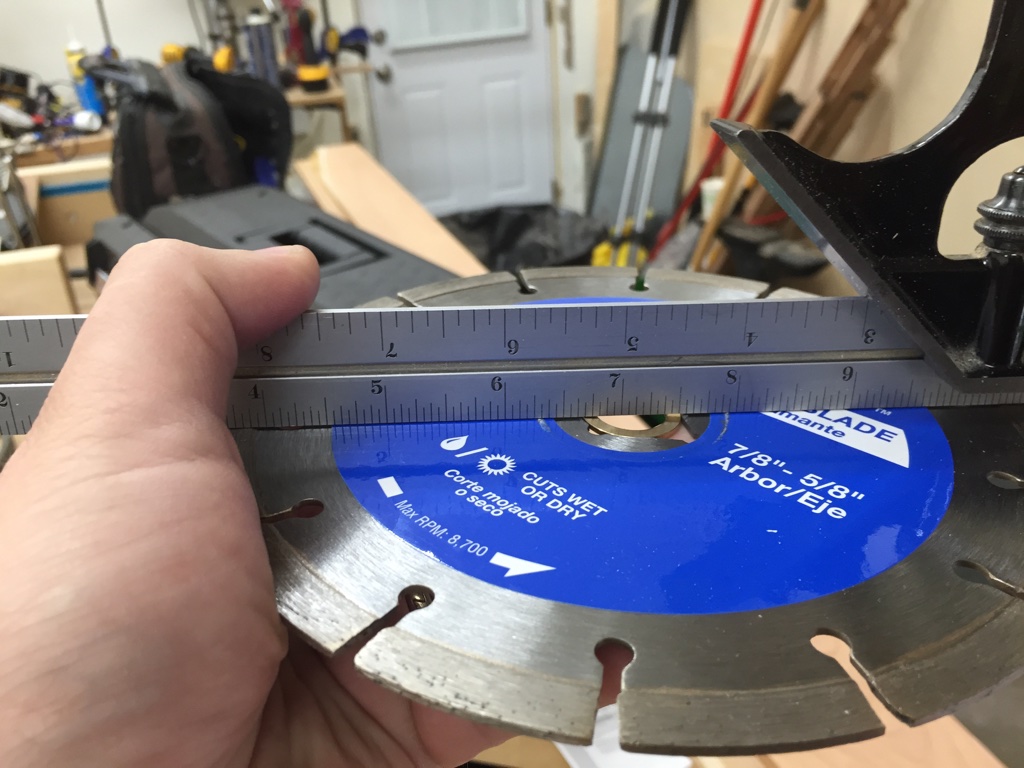
I opened up the Avanti Pro segmented diamond blade and wanted to make sure the blade was dead flat, which it was.
Diamond blade is flat.
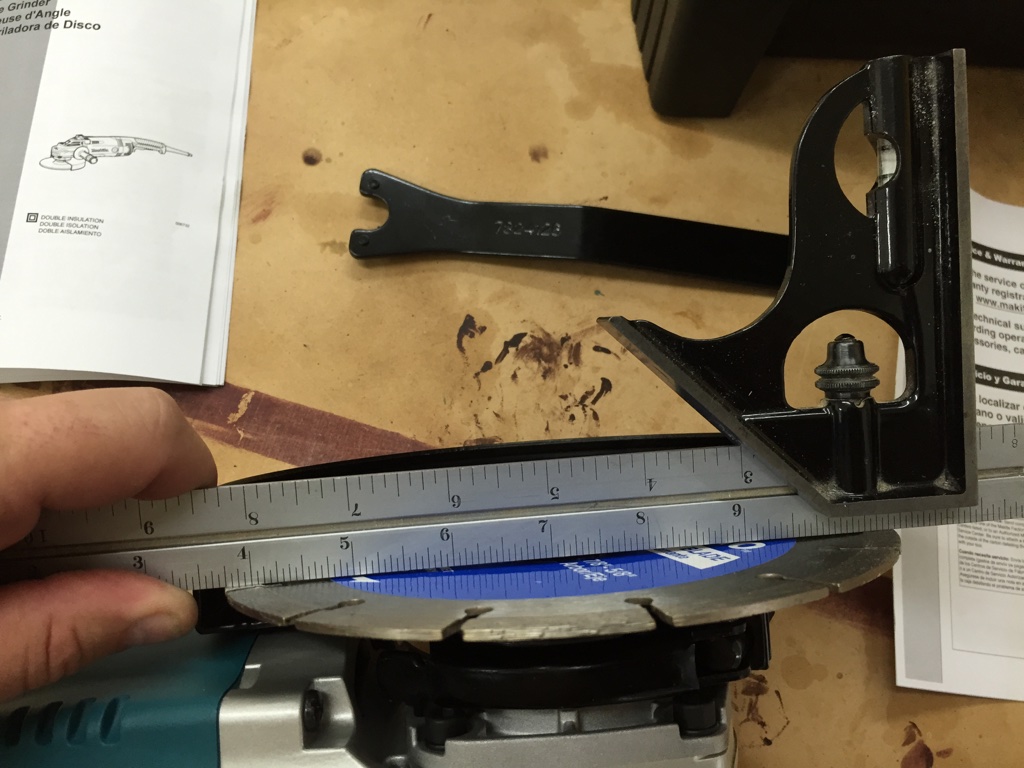
When installing the blade given the included domed inner flange the pressure the lock nut applied was sufficient to deform the blade. I did not feel this was safe and would not use it in such a configuration.
Diamond blade deformed by nut and lack of support from inner flange.
I called Makita’s tech support and the gentleman I spoke with said the above configuration would be the approved way to use a 7″diamond blade with this grinder. I argued that this was unsafe and a deformed blade would likely bind in the kerf and asked repeatedly if there was a flat inner flange available for this unit. As far as he could tell, he said no, but as a follow up I offered to send photos so he could escalate as I could not believe that answer given all the smaller Makita grinders came with both types of flange and Makita itself sells 7″ diamond masonry blades which they show being used in this grinder. I sent the above three photos and a detailed description and never heard anything more back from them. I was ready to return the unit and get a Rigid or DeWalt but they all seem to come with the same default flange setup out of the box. For DeWalt the unit cost more and had a lower amperage motor but could special order a set of flat flanges for an additional fee.
In pricing out alternative units I stumbled across this link on Home Depot’s website which included a hard to find Q&A section wherein someone else asked the same question about an inner flange for flat blades and someone at Makita responded to his question with the following reply: “Yes, the correct flange you would want to use to install specialty blades on the Makita 15-Amp 7 in. Angle Grinder (GA7021) is the Makita Inner Flange (224378-9). To purchase this flange, please contact our Customer Service line at 1-800-4Makita (1-800-462-5482).” I looked up the part in more detail and it looks like the flat inner flange was made for other Makita units with the same size spindle and in all their official documents don’t show it being listed as a part for nor compatible with the GA7021 but looked like it would do the job and I figured it would be worth a try. It was annoying that the Makita Tech Support person I spoke to did not have access to the above information.
Inner flange side that engages with the spindle
The fact that a part exists was good news and I tried calling Makita to order it, but it was 6pm and the person who answered said they could not take orders at that time. My frustration level was definitely high at this point so I ordered the flat inner flange from a 3rd party tool part vendor via Amazon.com and it arrived in a few days.
Inner flange side that engages with the blade
I installed the flat inner flange and the blade fit perfectly.
Blade mounted on arbor, making use of new inner flange
No deformation of the blade.
Blade held tightly between two proper flanges. (No deformation)
Great, now time to go use this new tool…
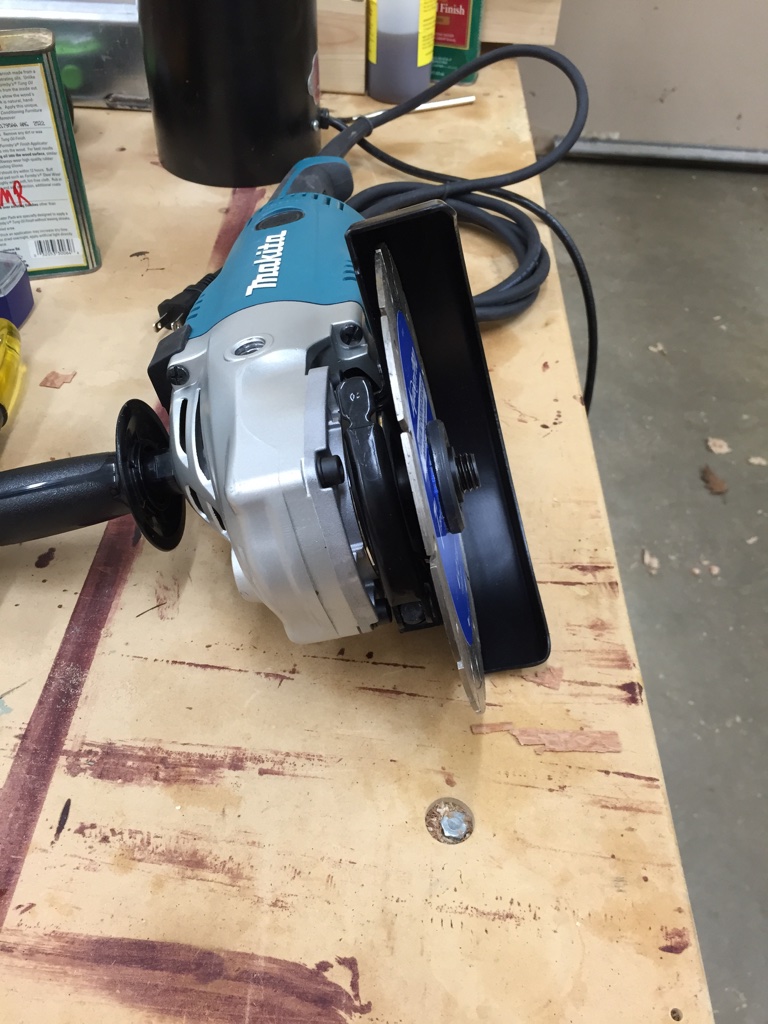
Diamond blade properly mounted in the grinder
Unfortunately the heavy housing/guard and mechanism reduce this 7″ blade to a 1-3/4″ cutting depth, but I need 2-1/4″+ to clear cut a brick, so after all of this the grinder and blades will be going back to the store and I’ll have to special order a 9″ grinder and diamond blade online. The good news is the 9″ model is virtually the same machine, just with a bigger safety housing that can accommodate the 9″ blade so the flat inner flange should work with that unit as well. The Makita 9″ model grinder only seems to cost about $10 more, though the diamond blades are more expensive in the 9″ size. I’ll be sure to post about the actual cutting when I have the new machine in hand. 🙂
I hope that this post saves someone else from the headaches I had. If so, please let me know in the comments below.
If you love old tools, the Nashua Tool Show is always the place to be. I used to get up at dawn and drive up from MA, but the past few years living in Merrimack, NH I’ve been lucky as the show is on my way to work so I can go extra early on Thursday and Friday morning before work.
We had some beautiful weather for the September 2015 Live Free or Die Tool Show and Auction. Below is a recap of my semi-annual pilgrimage to tool nirvana:
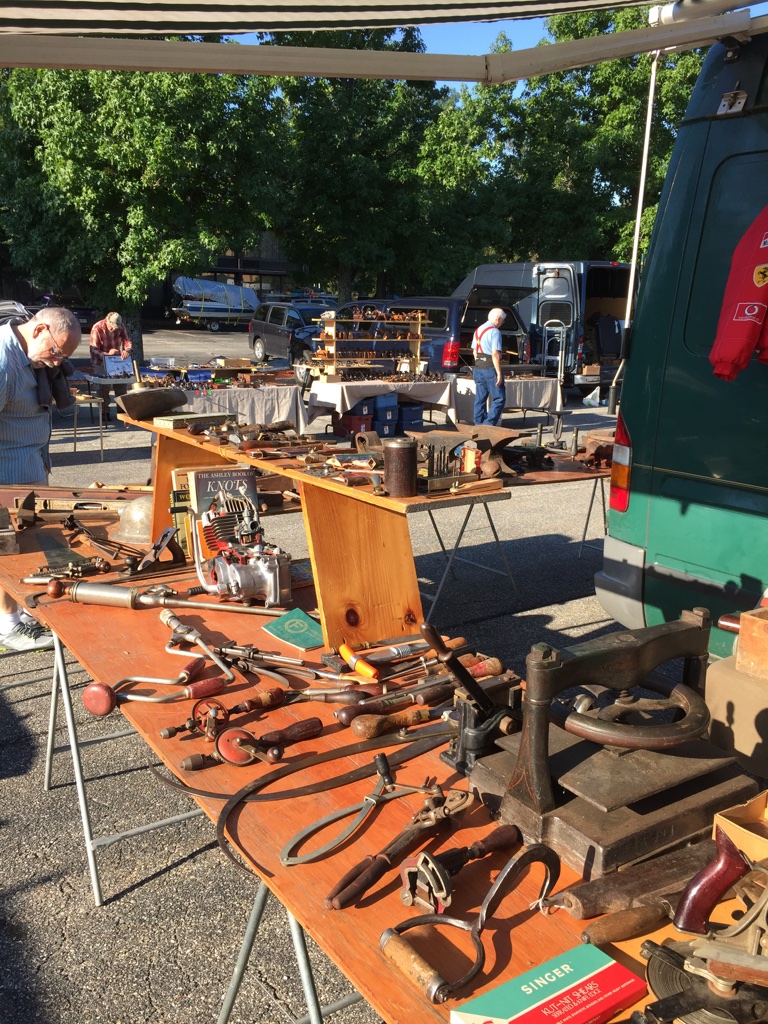
A sampling of some of the wares you’ll find out in the parking lot.
We interrupt this blog post for a quick Public Service Announcement:
The lot looked pretty full with some different vendors I had not seen before, but a few of my old favorites were not around. Apparently the hotel — the Nashua Holiday Inn — decided they wanted to try and make more money off of the event and start charging to tool vendors out in the lot for spaces and by the table. Many of these vendors are retirees who drive from around the country to be at this event, buy from the auction and pay to stay in the hotel for several days — most doing it for fun as I doubt what these folks are making off the tools goes too much further than covering expenses. Some of the elders of the tool selling crowd apparently spoke with the Holiday Inn management and threatened to move the long running event and management capitulated, which is good news. Unfortunately several folks had already left when they heard about the fees, and since this event is not overly advertised, they may never come back. Given my posts about the show seem to get a lot of hits around the time of the show I am hoping some folks may read this and return to the show in April. So if you get this message and know of some other vendors you didn’t see, especially those who may not be on the internet, please reach out to them as I want to see this event continue to be a highlight of the tool year. 🙂
This concludes our PSA, now back to the tools:
The first of three aisles of vendors out in the parking lot.
The first aisle closest to the hotel is where all the high end tools tend to live. The closer you get to the highway the more likely you’ll find a deal or a diamond in the rough. As a user more than a collector I do tend to buy from the vendors in the middle aisles.
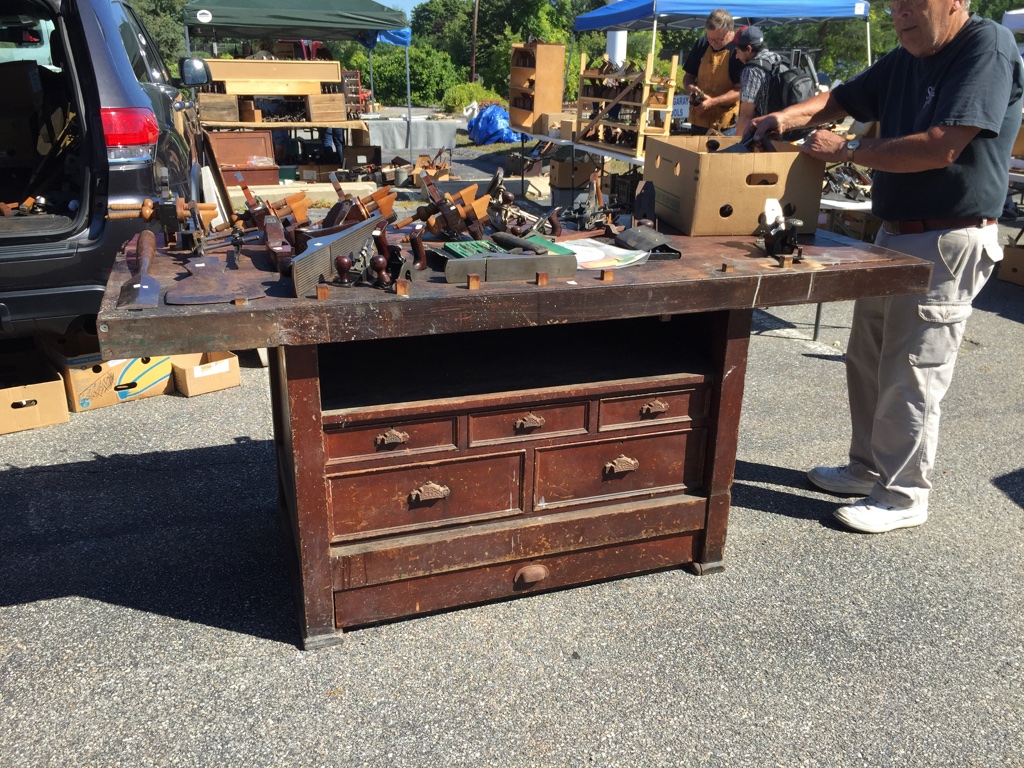
An almost Studley looking workbench. The seller said it was the first bench like this he was able to get in 30+ years of selling tools and that it had vises very similar to those on the Studley workbench. He also sold it at the show to another collector for a good amount of money.
Above is a great looking bench that had a vaguely Studley look to it. Apparently it also has vises with very similar hand wheels. The seller mentioned Don C. Williams book on Studley and said he was searching for a bench like this for the past 30+ years. Given the hunt I thought it was interesting that he already sold it to someone else for a pretty penny. I hope it gets cleaned up and back into service for the lucky person who picked it up.
Jugs of Johnson’s Wood Dye
Above are some old and still sealed gallon jugs of Johnson’s Wood Dye.
A view of the till
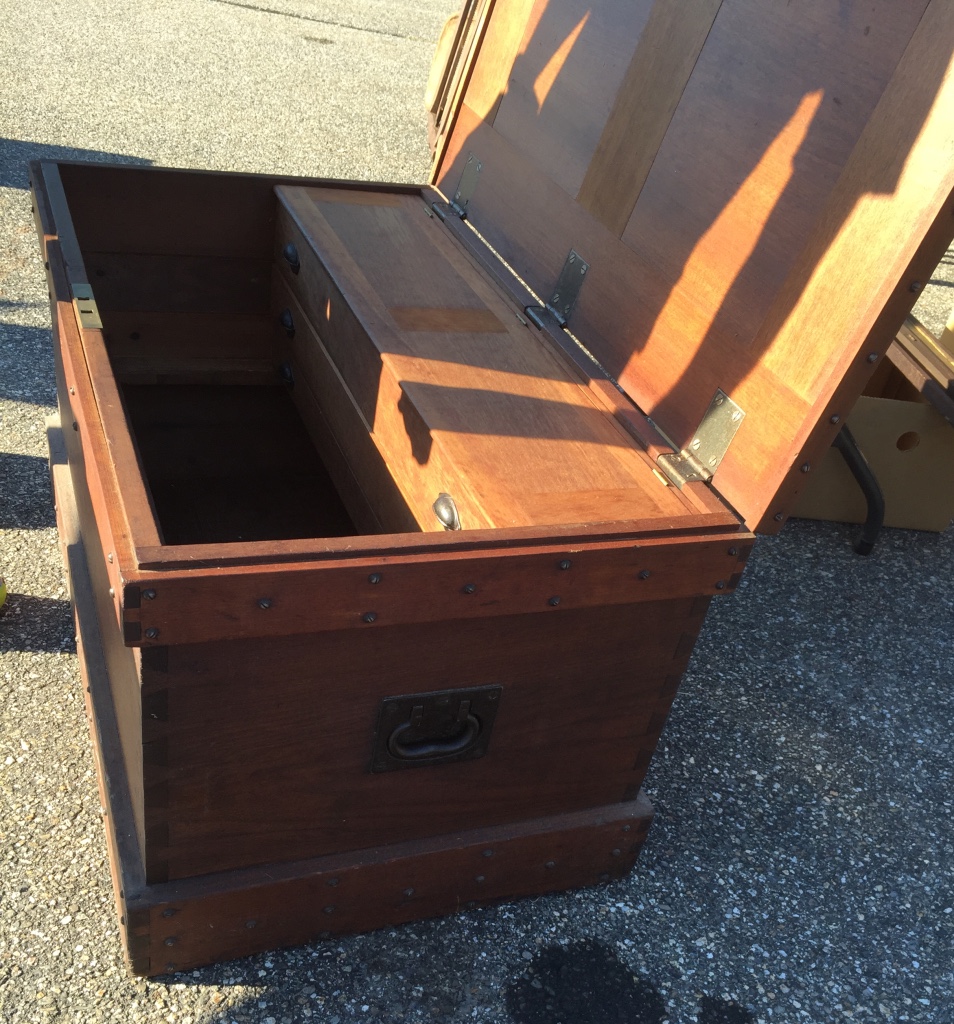
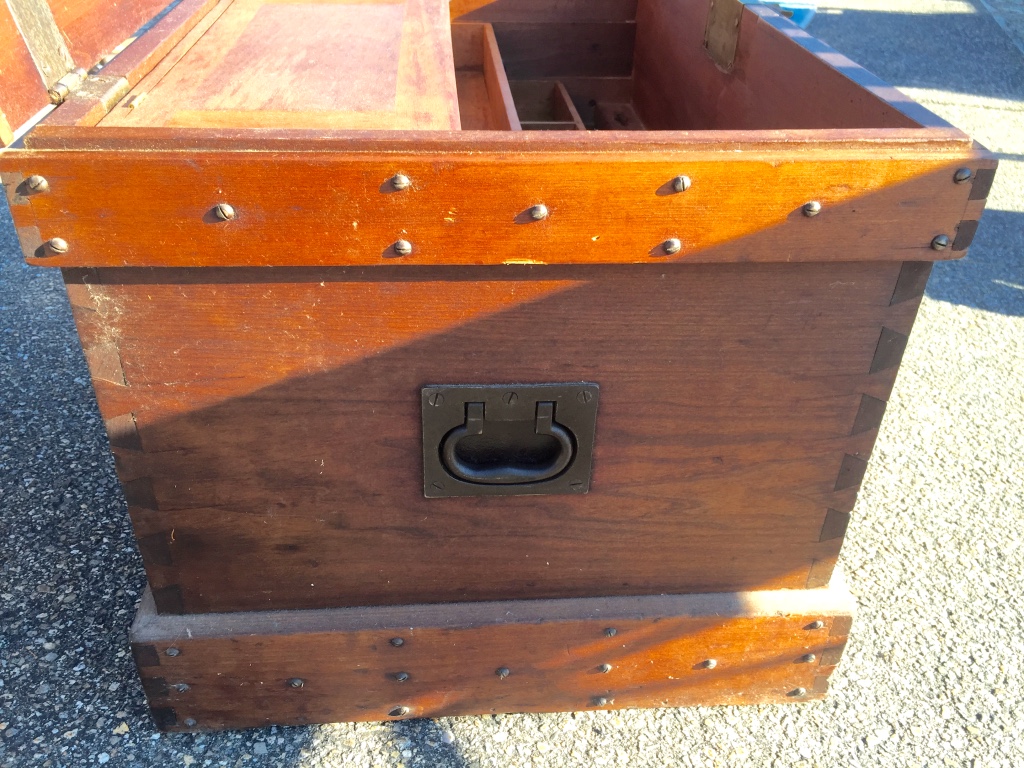
An interesting tool chest for sale with LOTs of round headed screws for decoration and as part of the construction of the chest.
Side view of tool chest
The carcass was dovetailed and the screws seemed to be backup support and decoration.
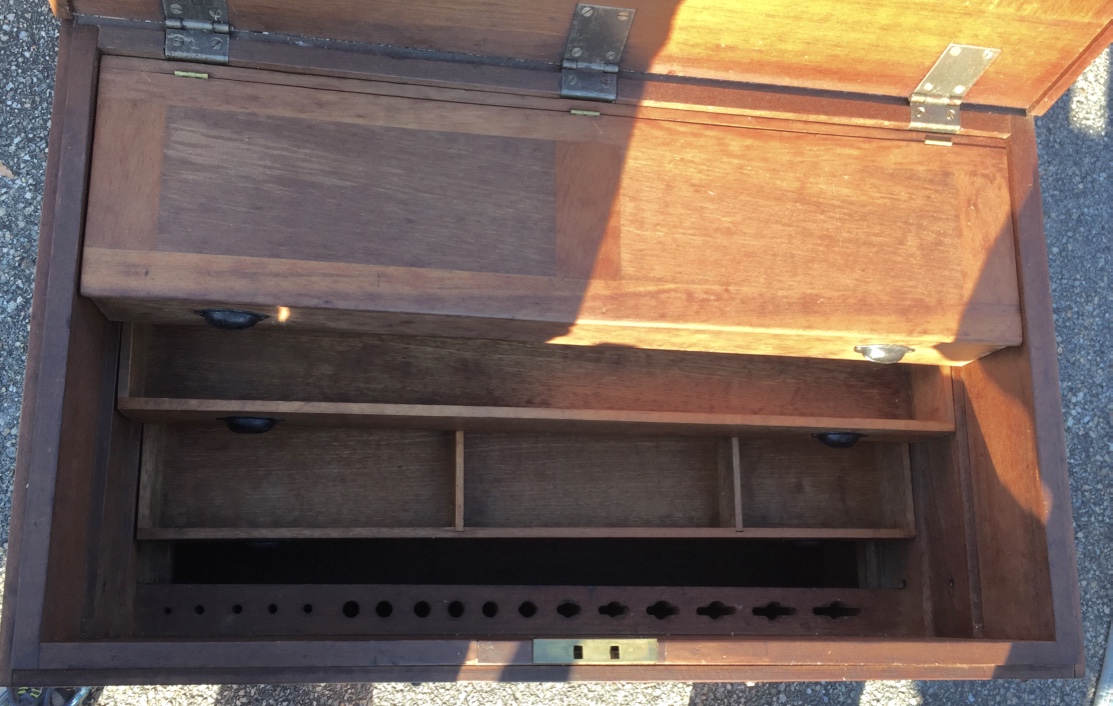
A view into the open chest.
Interior of the chest. The lower tills were open trays. The top till had a lid and a single divider inside. On the front wall was a nice tool rack carefully sized for the various chisels and tools that once inhabited the chest. The hinges for the lid were also nice.
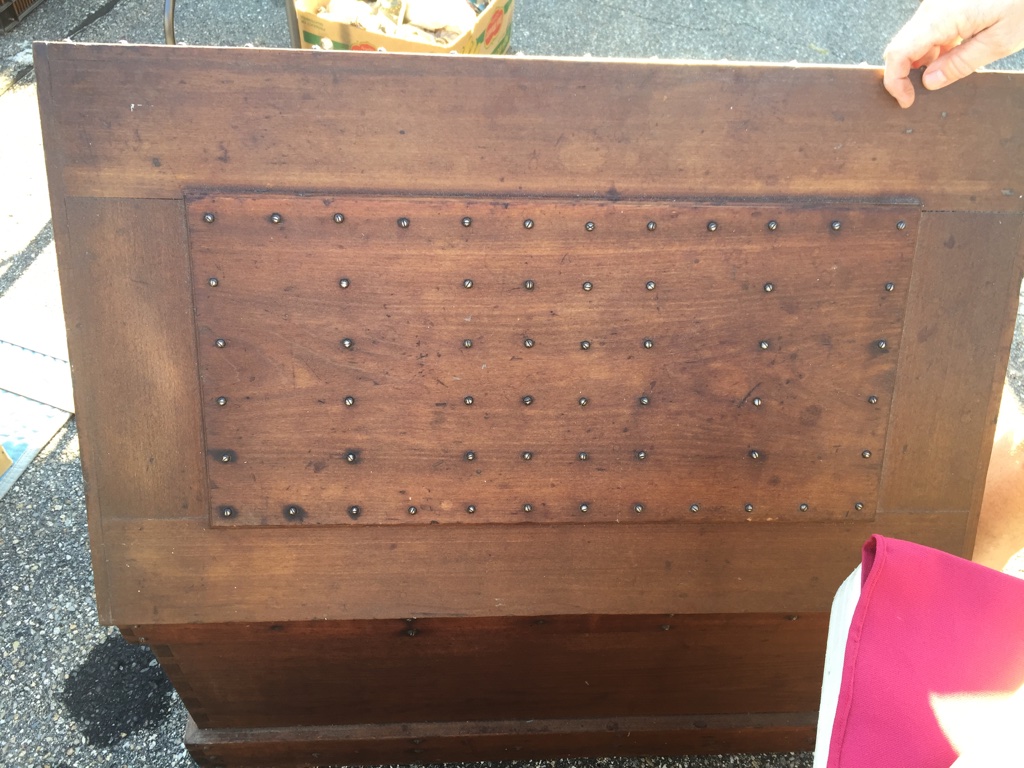
Interesting pattern of round headed screws on the chest lid
The lid also made liberal use of the round headed screws in an interesting pattern and likely helped protect the wood top as wood and other things were inevitably put on the lid and slid across the chest. The wood on the top looked to be in remarkably good shape.
Tool chests displayed by Bill Garrett of Sparrowbush NY
Above are some chests on display by Bill Garrett of Sparrowbush, NY. You may remember him from this earlier post.
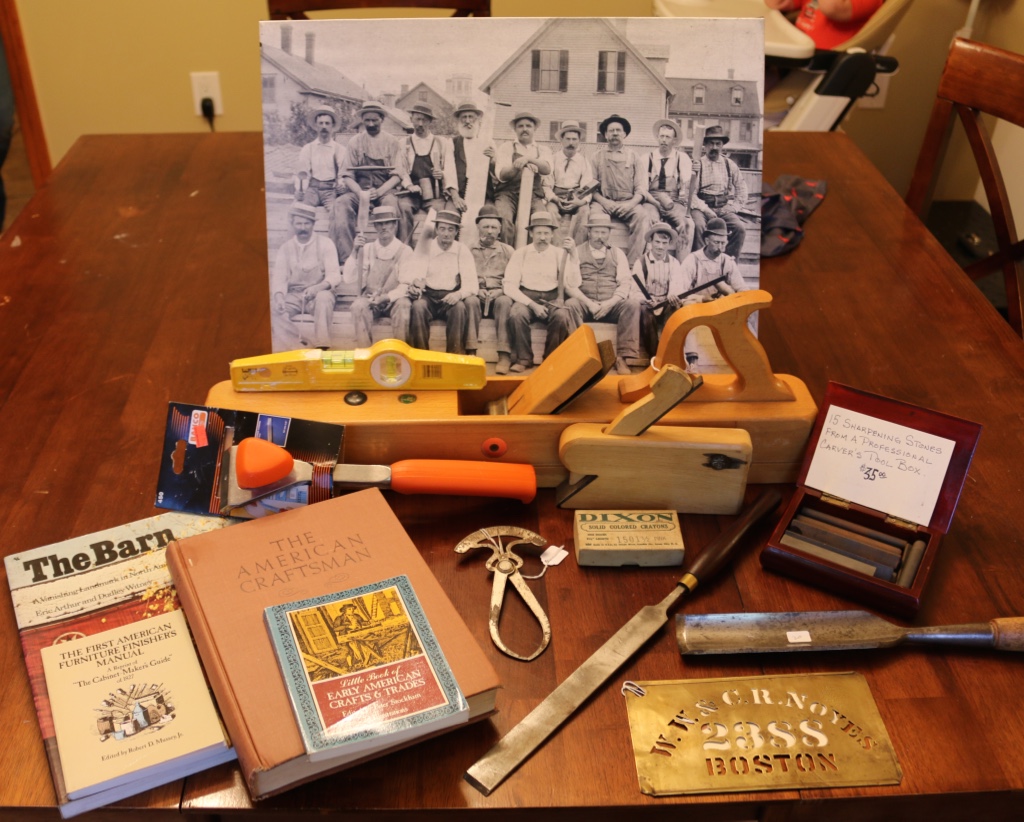
What I bought at the tool show this year.
And now on to what I bought. I happy to say I didn’t spent too much this year and got some interesting items. From left to right: Some interesting books (The Barn, The First American Finishers Manual, The American Craftsman, and the Little Book of Early American Crafts &Trades). A new in package Bahco scraper, New in package Stabilia Torpedo Level (I’ve had one for years that lives in my toolbelt so its nice to have a spare/one for the shop), Ulmia Jointer Plane, ECE Shoulder Plane (Being of German Descent, and the fact that Americans don’t seem to like these sorts of plane, it has been interesting to collect and test out German style tools in my shop), Inside/Outside Calipers similar to what you see in the Studley Tool Cabinet, Dixon wood marking crayons donated by a friend, Paring Chisel with modern handle crammed on, a nice box of small carvers slip stones, a nice big gouge for coping when timber framing, and a very neat brass stencil given to me by Cynthia and George Short that says “W.W. & C.R. NOYES, 2388, BOSTON” that was likely used to mark crates or similar objects. As I have been reading up on Civil War re-enactors who build their own furniture, crates etc it was something I wanted to try out. So if anyone out there knows who the Noyes were or what they sold I would be interested to hear from you. The prior owners contacted some historical societies and didn’t get a firm answer. I’m hoping to use it as a model as I eventually want to make my own similar stencil with my own name on it. I’ll be sure to post about it.
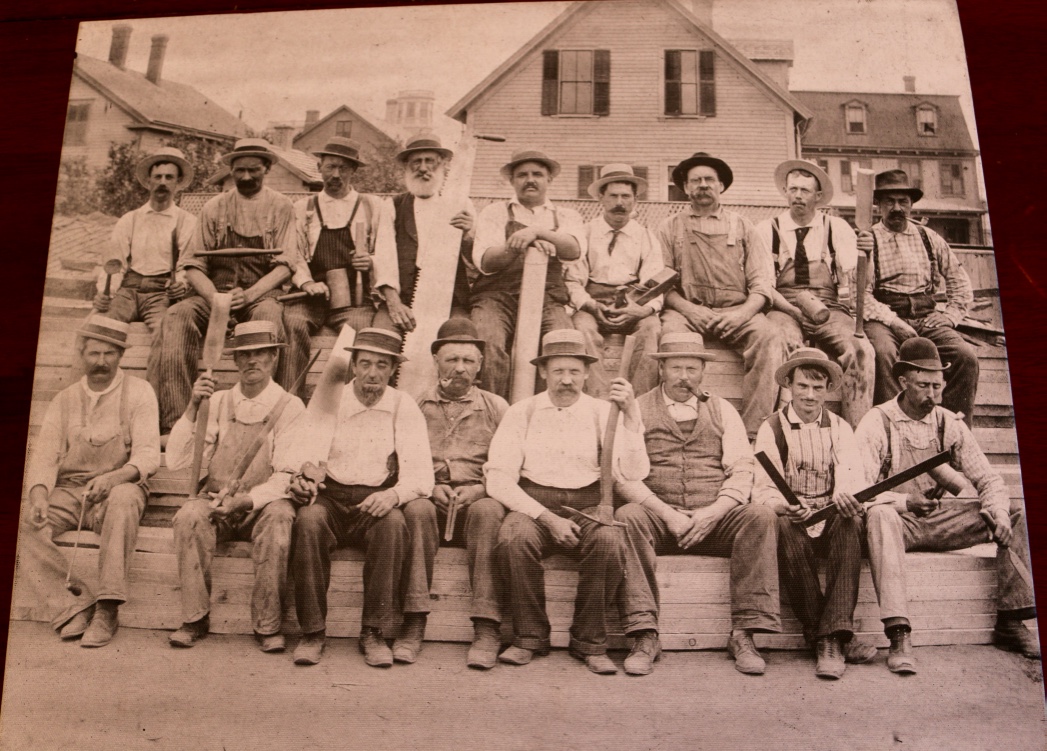
Canvas print of a group of carpenters and joiners.
And last, but not least the photo above, on canvas, though a modern reprinting of an historic photo. It’s a great shot of carpenters and joiners in the mid-late 19th century. I’m making that date assumption based on the architecture in the background and the more modern lumber they are sitting on. Even though they are sitting on a fairly modern looking lumber, likely to be used in a balloon frame, the men are holding slicks, mallets, draw knives, chisels of the scale used for timber framing, an earlier pre-bailey bench plane, framing square, bits with wooden handles, an adze, boxwood rules, a hand saw, a two man crosscut saw etc. It looks to be an amazing image of the time when things were transitioning from the old ways and heavy timber work to lighter construction methods. Other things of note in this picture are the various hats, pipes, aprons and overalls the guys are wearing. The guy in the first row, third from the left who looks like he’s in pretty rough shape. The well dressed man in the front row, third from the right with no tools in his hand — was he the owner? Or the foreman? Often the man with the framing square in a photo like this is the master, but the young man to the right of the well dressed man does not look like he’s the most experienced out of this lot. There is also an unusual building behind the head of the bearded man holding the two man saw that might help identify where this photo was taken. The seller thought it might be from southern MA, in the New Bedford or Fall River area. So if anyone has any further insights to add, please add them to the comments below. The photo opens up as many questions as it answers and will look nice hanging up out in my workshop.
I hope to see you at the next Nashua tool show in April.
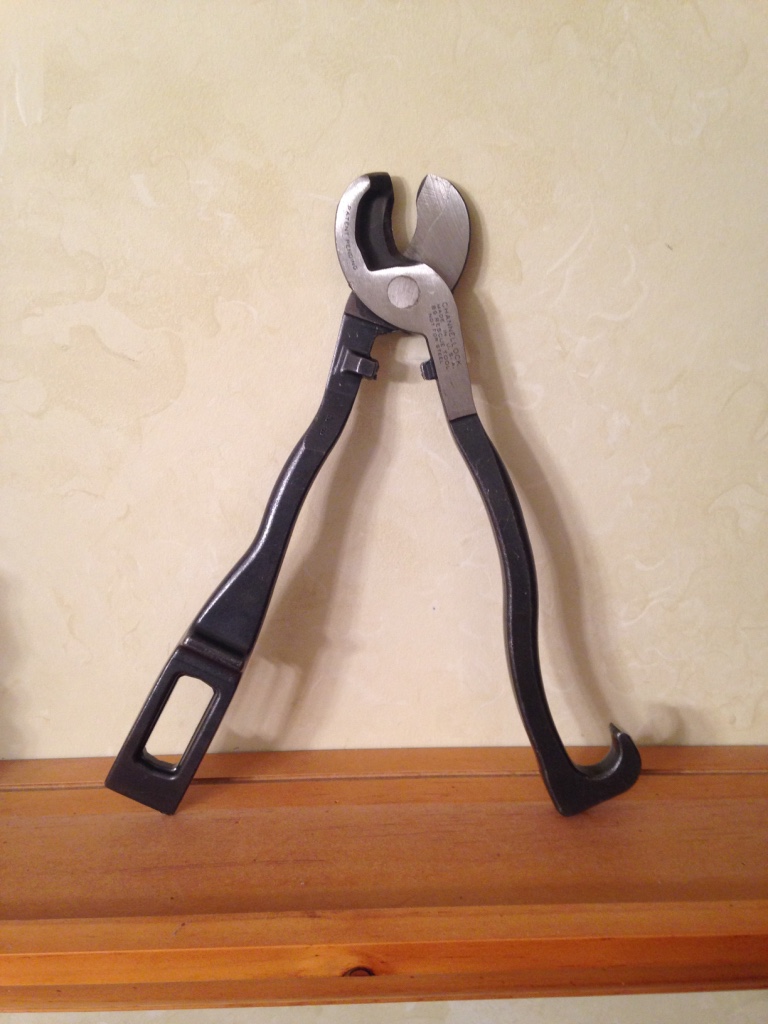
I love buying and using hand tools. The tool in this post I hope I never have to use. In fact, I bought two of them and hope I never have to use either of them.
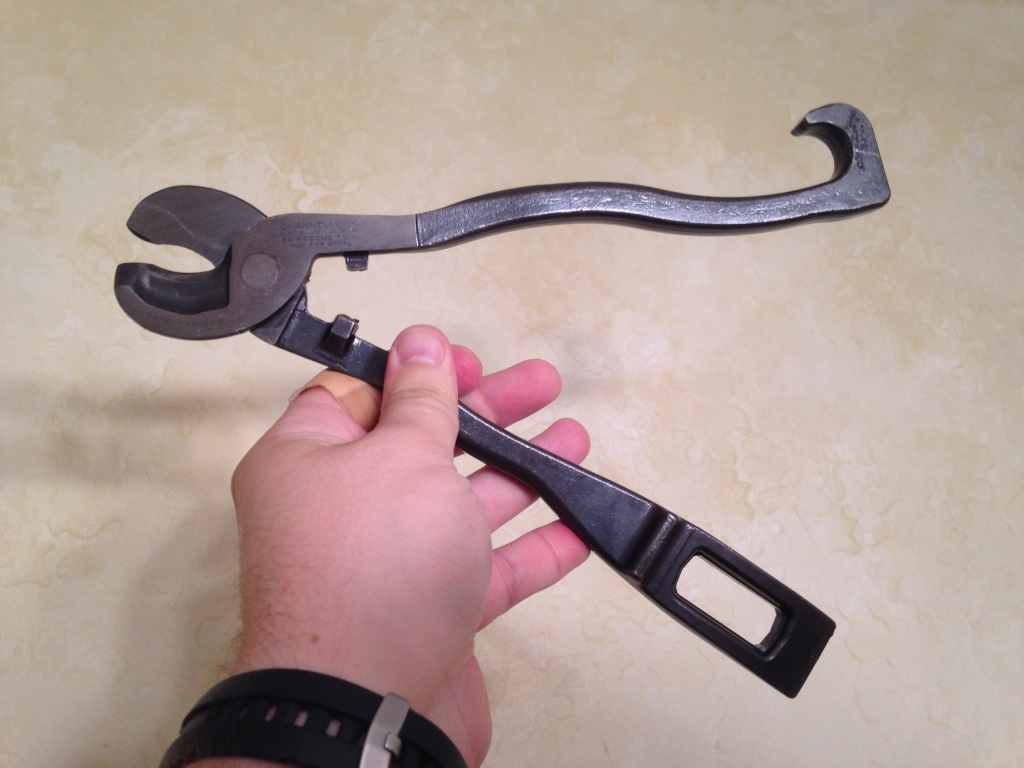
Channel Lock 89 Rescue Tool
Why would someone buy a tool they never want to use?
Is it a collector’s item? Nope.
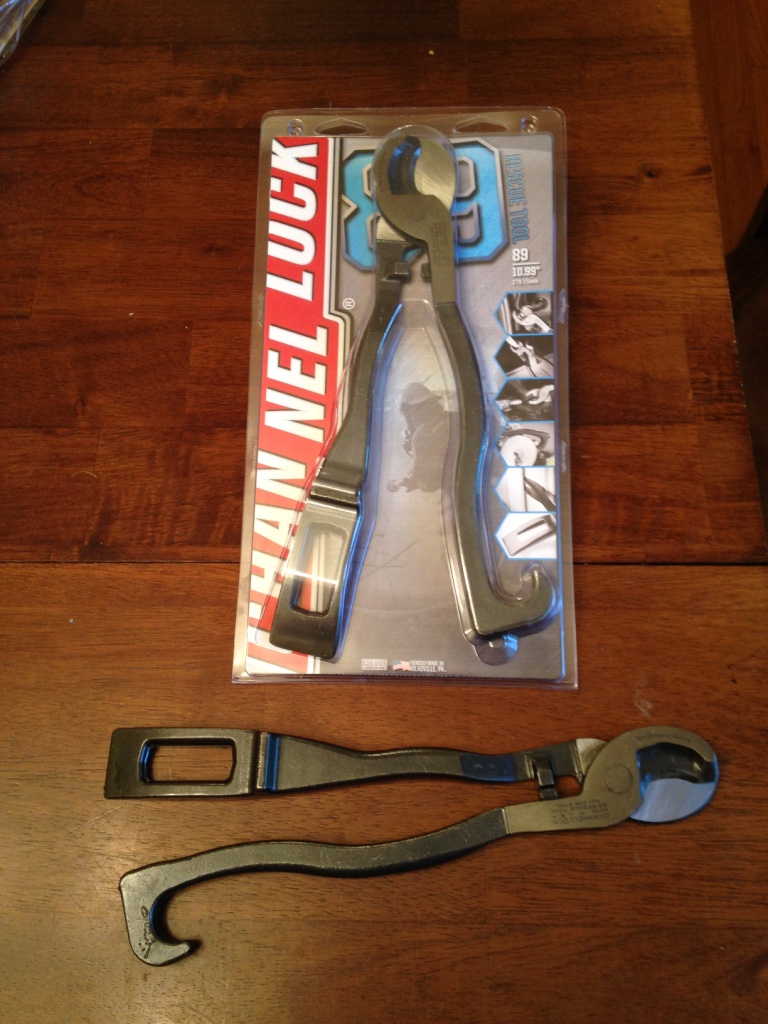
Was it a bargain? Nope. I paid about $43 each for them on Amazon.
I bought them because I am a parent now. (And I do love a good tool with a solid purpose).
Channel Lock 89 Rescue Tool
Why would someone want this tool?
This tool was designed for fire and rescue professionals and is a versatile multi-tool. The hardened cutter is designed to cut through a car battery cable, wiring harness or seat-belt with ease. The curved end can be used as a spanner wrench to open water fittings. The more rectilinear arm can be used to shut off a natural gas valve and the tapered end of that arm can be used to pry a door or window. The hardened arms also have some semi-pointed ends that can be used to break safety glass. If you get into a car accident or help someone on the side of the road this is the tool you want to have by your side.
The tool is made in the USA by ChannelLock and is called the #89 ‘Rescue Tool’. They also make a slightly smaller/lighter version (The #87) if you drive a miata or have this tool on your person as part of how you make a living. They also make the #88 version which has linesman pliers instead of the cutter.
Channel Lock 89 Rescue Tool
A few years ago I saw this in my local Home Depot and wanted to buy it, but we put it off as it was kind of expensive for a seemingly simple tool. As a new parent with a 10 month old baby and surrounded by terrible drivers and winter road conditions up here in New England I figured I’d bite the bullet and finally go buy one for each of our vehicles. They no longer seem to stock it in the store, but thankfully it’s still in production and readily available from Amazon and similar sources.
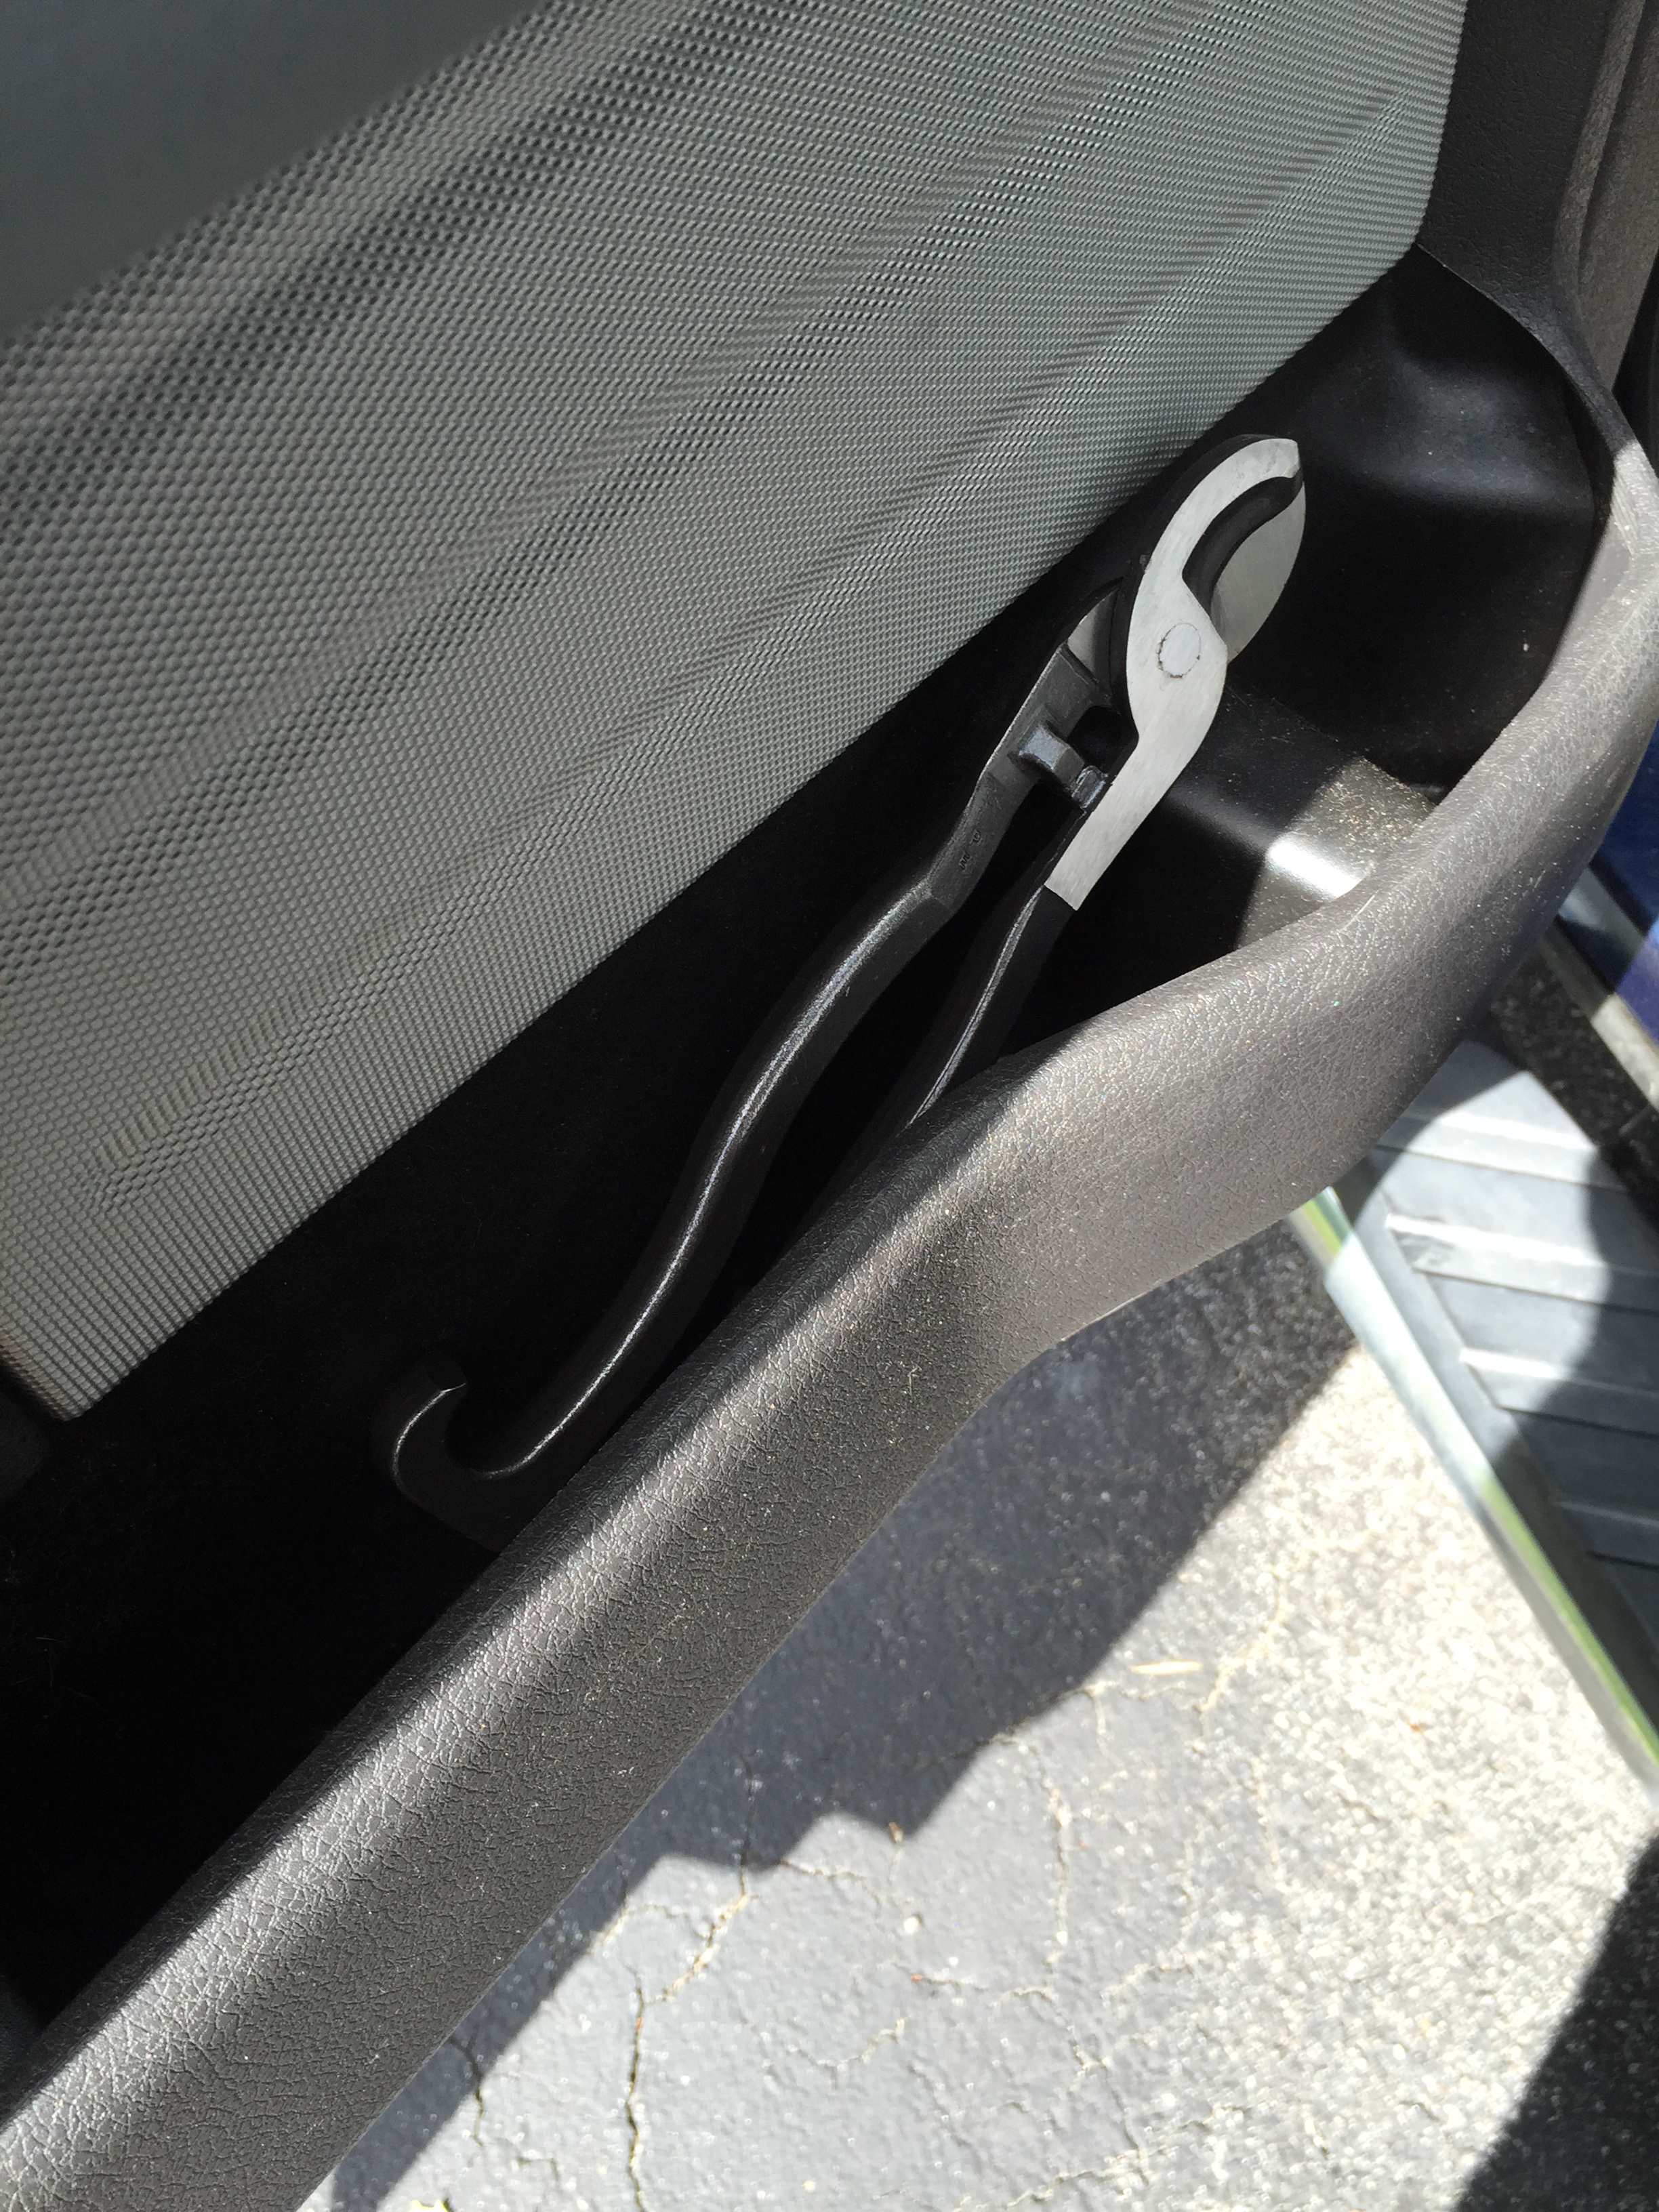
Fits nicely into car door storage pockets
The tool fits nicely into the door pocket on both of our vehicles. If it rattles around too much for you liking you can wrap it in a towel or similar to keep it quiet. It also has a nice thick clear-coat on it which should keep it from rusting in the door which likely gets some rain on it on occasion.
It’s a great addition to any vehicle. If you’d like to learn more about this tool ChannelLock has a dedicated website for it here.
Take care,
-Bill
P.S. I don’t have any relationship to ChannelLock, but have many of their Made in the USA tools that have served me well for years of hard work and I wholeheartedly endorse this tool.
P.P.S. Curiosity and necessity drove me to use it the other day and the tool did a great job cutting through some 3/4″ braided nylon rope with ease and made a nice clean cut.
While on vacation my wife and I have a few idiosyncrasies. Alyssa and I like to visit food stores we don’t have at home to see how the locals eat, try some new foods, bring home unusual condiments etc. It kind of gives us a feel for ‘could we live in this place’?
I also like to visit hardware stores and lumber yards to see what is available and popular in other parts of the world. We were recently in Quebec Canada for the Early American Industries Association (eaiainfo.org) Annual Meeting. The meeting was enjoyable as they always are — if you are not familiar with that group but love old tools and methods of work I encourage you to check out their website — don’t worry, I’ll wait for you to check out the site — I built out their webpage so you’ll see me over there as well. 😉
Main Aisle inside RenoDepot
While in Quebec we went to ‘RenoDepot‘. At first glance it reminded me a lot of Home Depot and Lowes — many of the same major manufacturers, same power tools etc.– but with a nicer blue-green color on everything. It was a little smaller in scale and reminded me a bit of what Rickles/Pergament/Grossmans used to be like before they were all driven out of business — a big store but limited selection of brands and supplies. I made a bee-line for the hand tool section.
Hand Tools at RenoDepo
I was happy to see a larger hand tool section compared to the American big box renovation stores I was used to. A larger selection of chisels (still not fine chisels), files etc. Stanley seemed to have a larger presence on the shelves of stores we visited followed by Fuller and the usual generic/store branded imported brands. There seemed to be more items made in Canada and North America in general, but not drastically different from home.
Rona Exterior
I also searched online in the area and checked out a RONA home store. Apparently RONA owns Reno-Depot and it seems like a RONA is the larger Super-Center type store with a wider selection.
Hand Tools at Rona
Again I went straight to the hand tools section. I was much happier with the selection at Rona. 5+ different makes of chisel including the BlueChip style Irwin/Marples/Record chisels which are the first tier of big box chisels I’d consider — I learned on them as a student and they were always a good value for a lower end chisel and work great out in the field. (The website showed the old Record ones at a great price which is why I went there, but on the rack was some of the early 2000s Irwin flavor chisel with round handle and the newer style with the stumpier handle). The price was right and I bought 2 of each style in odd sizes I didn’t have to round out my travel tool roll and will compare them to my old English made Marples Blue chip chisels in a future post. I heard the metal quality was not as good in these later Asian made lines so we’ll put that to the test.
What made me really happy with the hand tool aisle here was the quantity and variety given this was not a specialty woodworking store. There were a few low-end Stanley bench planes (Still better than the Buck Brothers or generic planes at similar stores near me), far greater variety of Nicholson and similar files and then lots of things I wish local big box stores still stocked — card files, sharpening stones and oil (not hyped up cheap diamond plates, but traditional oil stones etc), Stanley spoke shaves, card scrapers, record woodworking vises and that sort of thing.
Even safety gear and boots
The other neat thing was to see a selection of safety gear, working gear (jackets, overalls etc), work boots etc for the carpenter on the run.
It was clear that the Canadian renovation market still made use of human powered woodworking. Sure these stores still had all the latest cordless power tools as well, but at least craftsmen and handymen and women in Quebec had the option of filling their tool-boxes with reasonably quality hand or power tools. At my local big box stores the brand name hand tools have been increasingly swapped out for cheaper and cheaper brands, smaller selection and replacement by cheap gimmicky power tools.
As energy becomes increasingly expensive, folks spend their limited funds on higher quality materials and results and green/conservation movements help put pressure on the disposable society mentality of the 20th century I hope the current hand tool renaissance can spill back over into mainstream carpentry/renovation. Only time and our efforts to spread the word will tell.
Take care,
-Bill
P.S. I also checked out a BMR Lumber (great name as those are also my initials) and a Canac store with similar findings. I was hoping to find a store that stocked a lot of Bahco tools — I still want to try some Bahco files but never see them offered in the US. I love my Bahco Superior saws, card scrapers and paint scrapers. If you find other regional chains that value and sell quality hand tools, please share it in the comments below.
This past week I made my biannual pilgrimage to the ‘Live Free Or Die Tool Auction’ and tool sale out in the parking lot behind the Holiday Inn in Nashua NH. I’m glad my schedule worked out that I was able to go on Thursday morning — it was a beautiful day, I saw some friends who were only around on that day and didn’t spend too much money. Friday morning it was pouring so I briefly stopped by to see some friends from the school but many of the vendors were all packed up.
Let’s take a quick tour of some of the more interesting items I checked out:
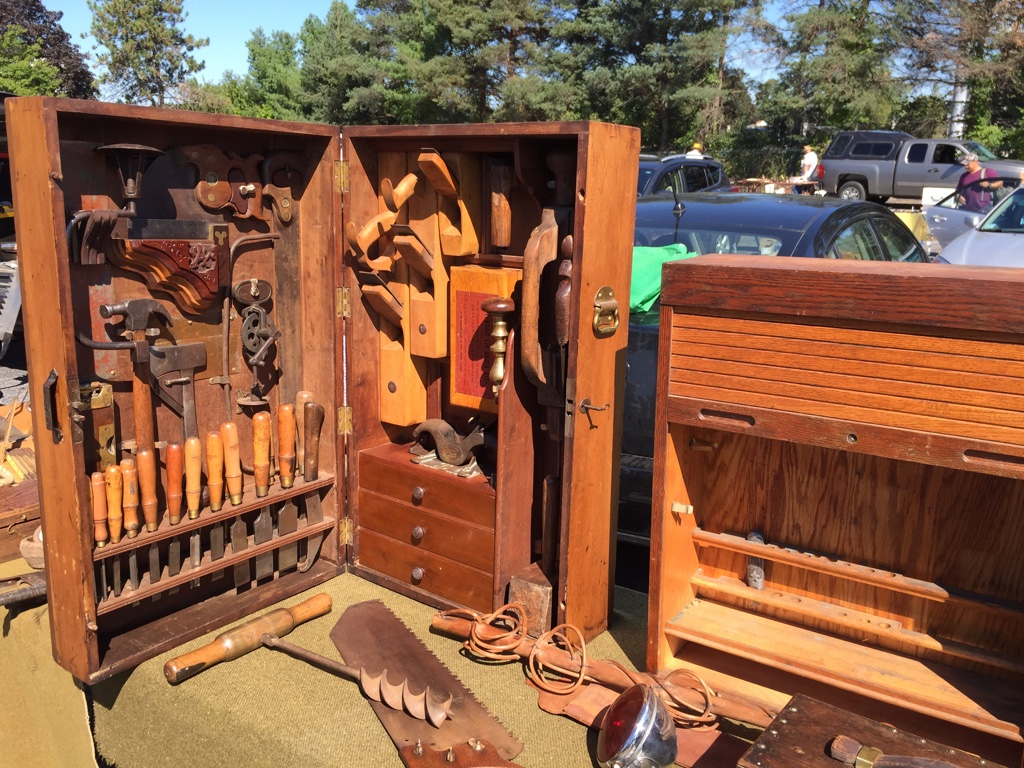
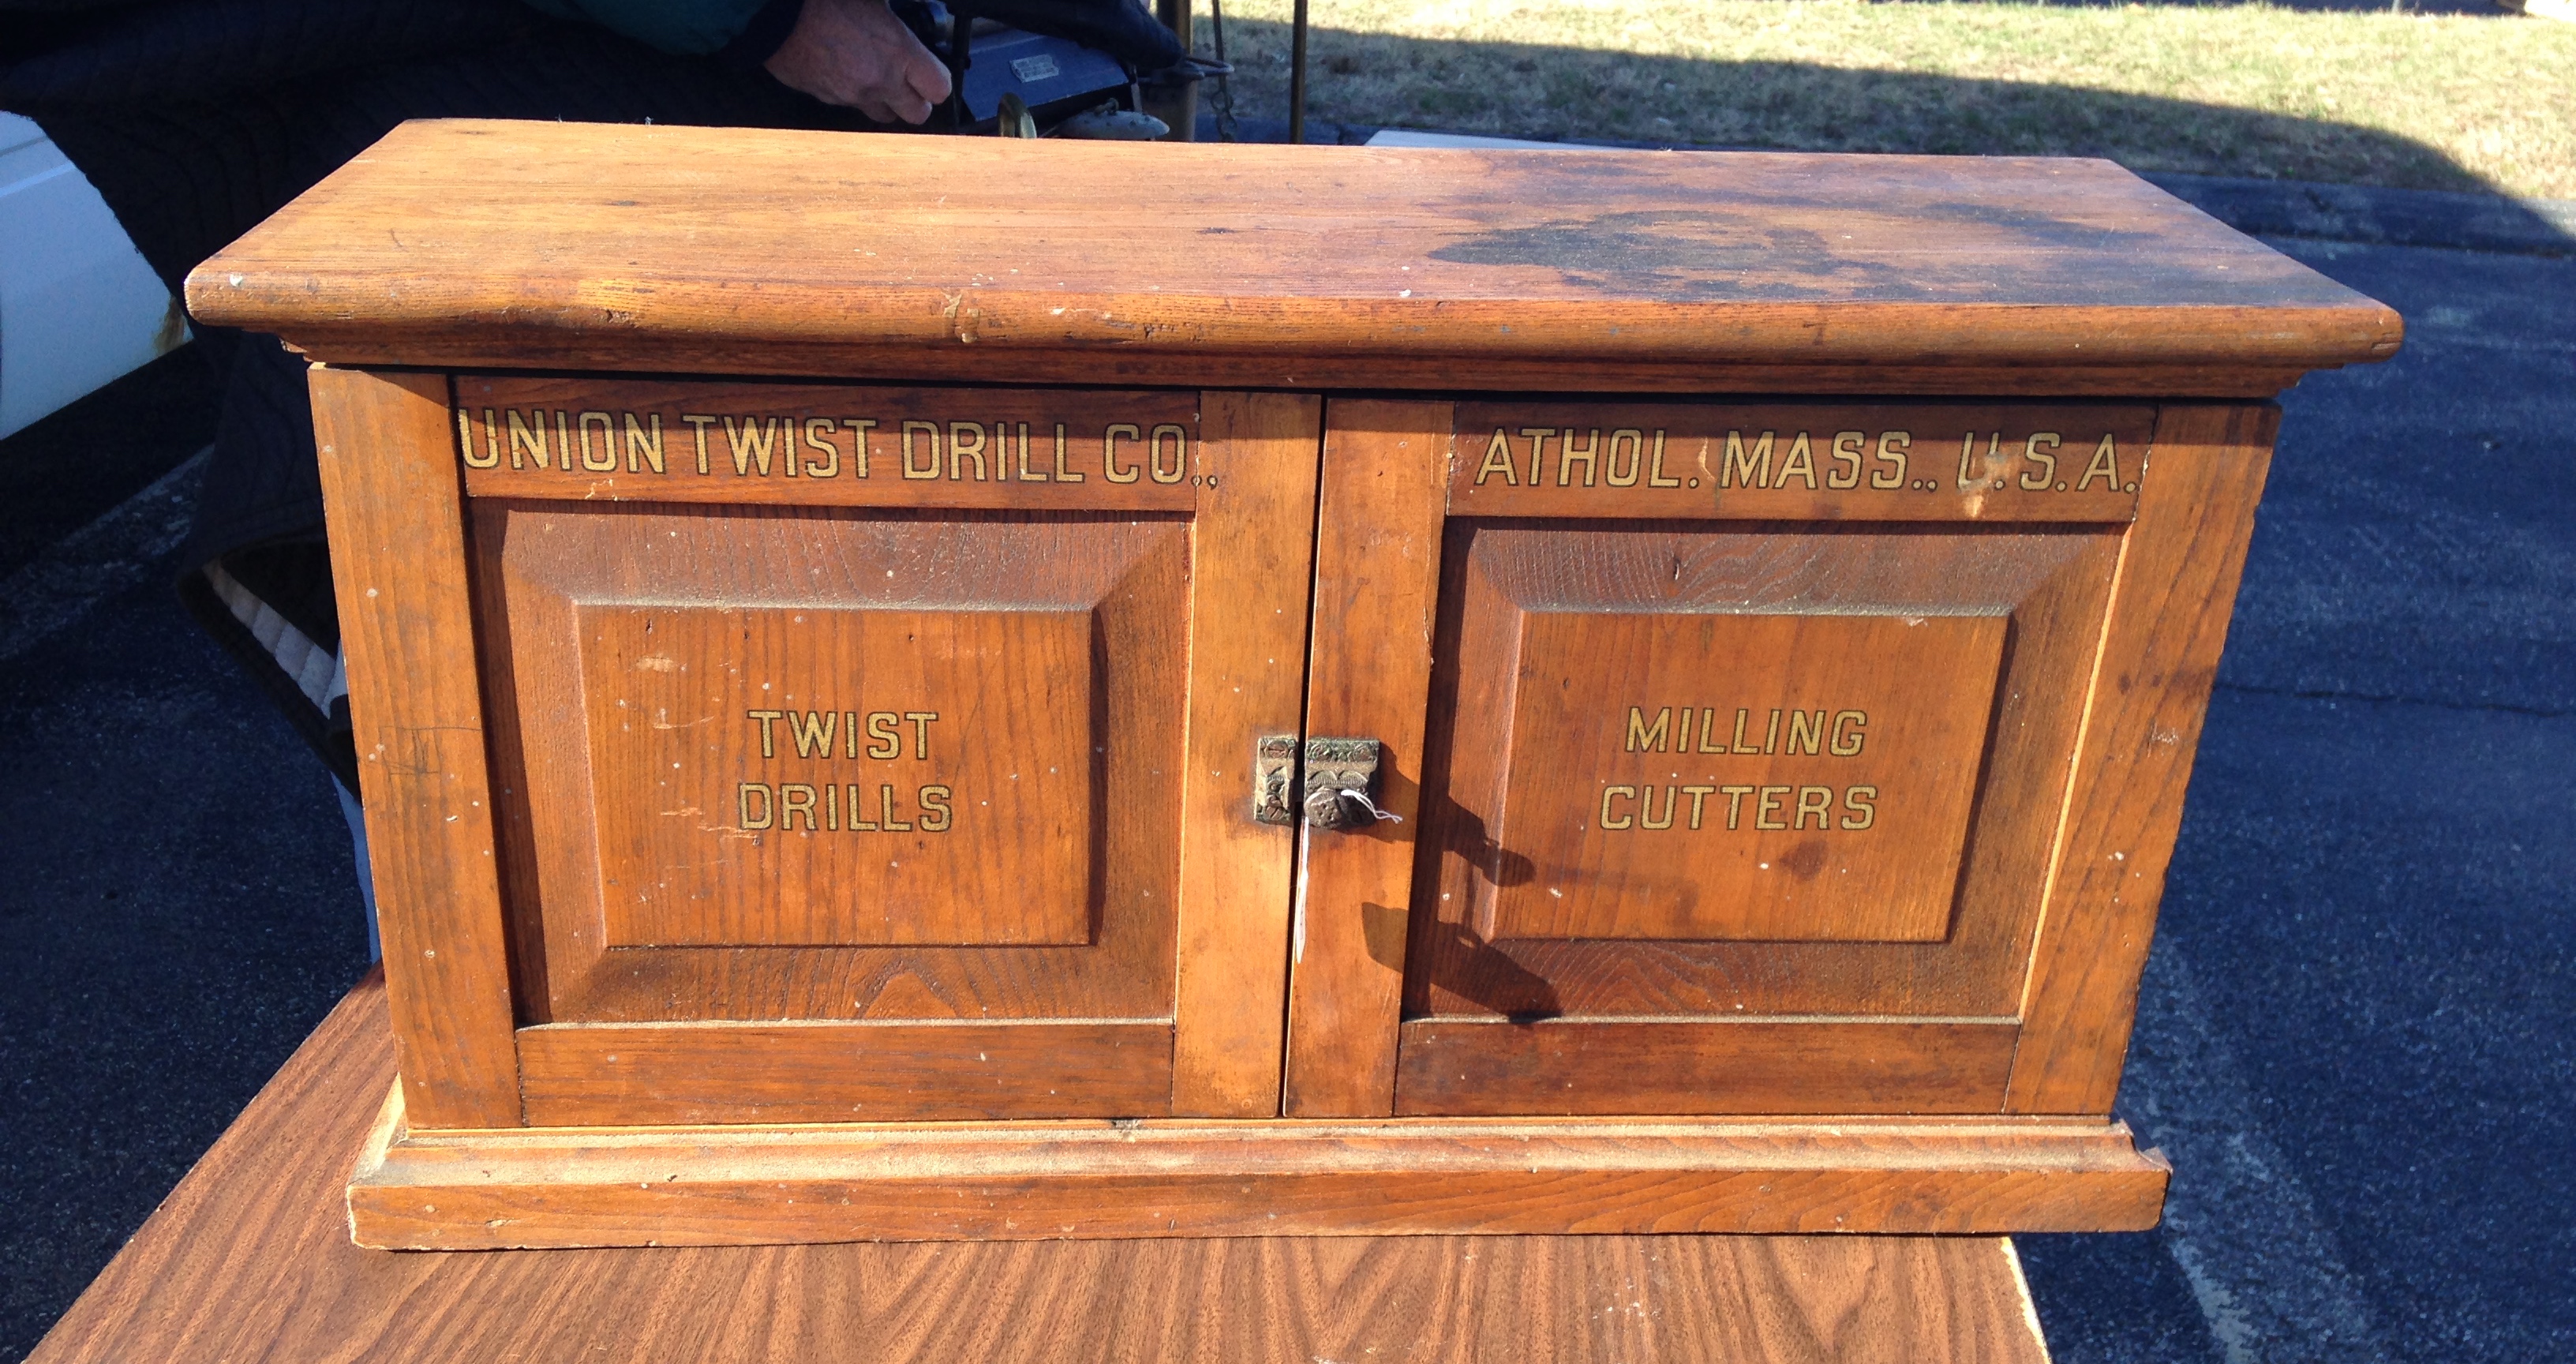
The cabinet below from the Union Twist Drill company of Athol Massachusetts (same town that is home to Starrett Tools) looked to be in great shape.
Union Twist Drill, Athol MA cabinet
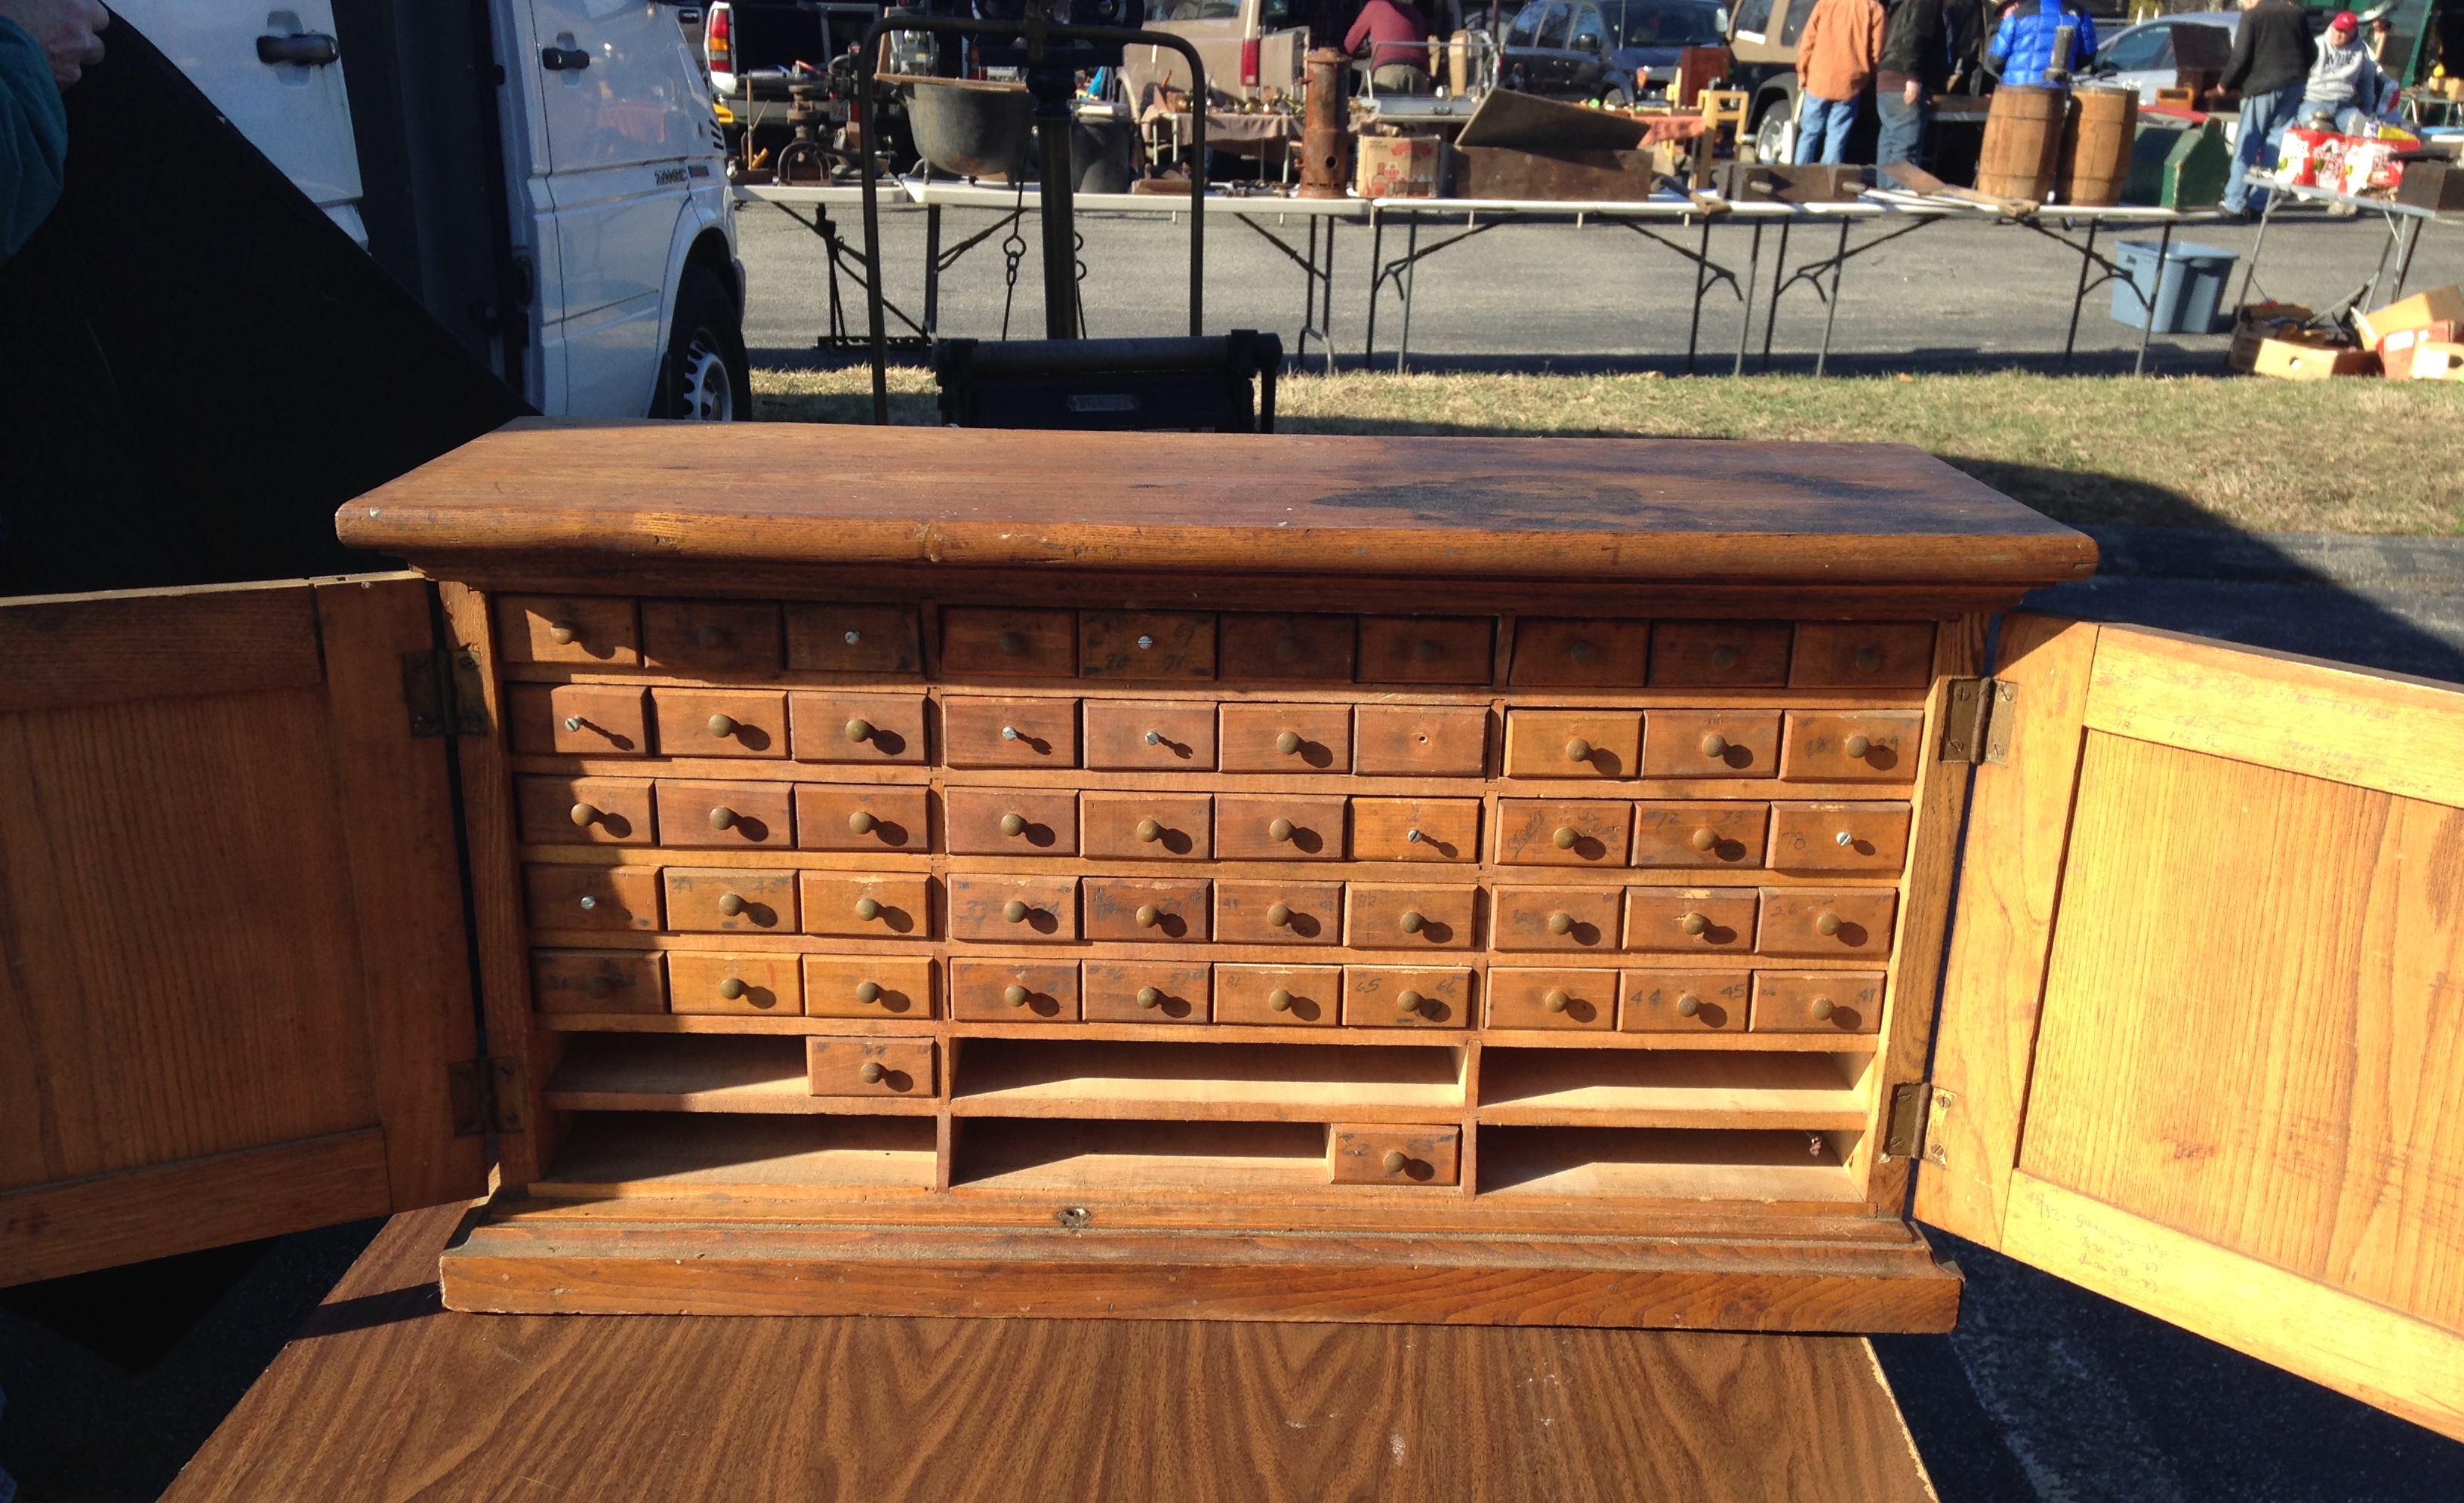
Inside the cabinet was a nest of drawers which once housed all kinds of drill bits and similar hardware. It was also interesting to see the notes scribbled on the inside of the doors.
Inside of Union Twist Drill, Athol MA cabinet
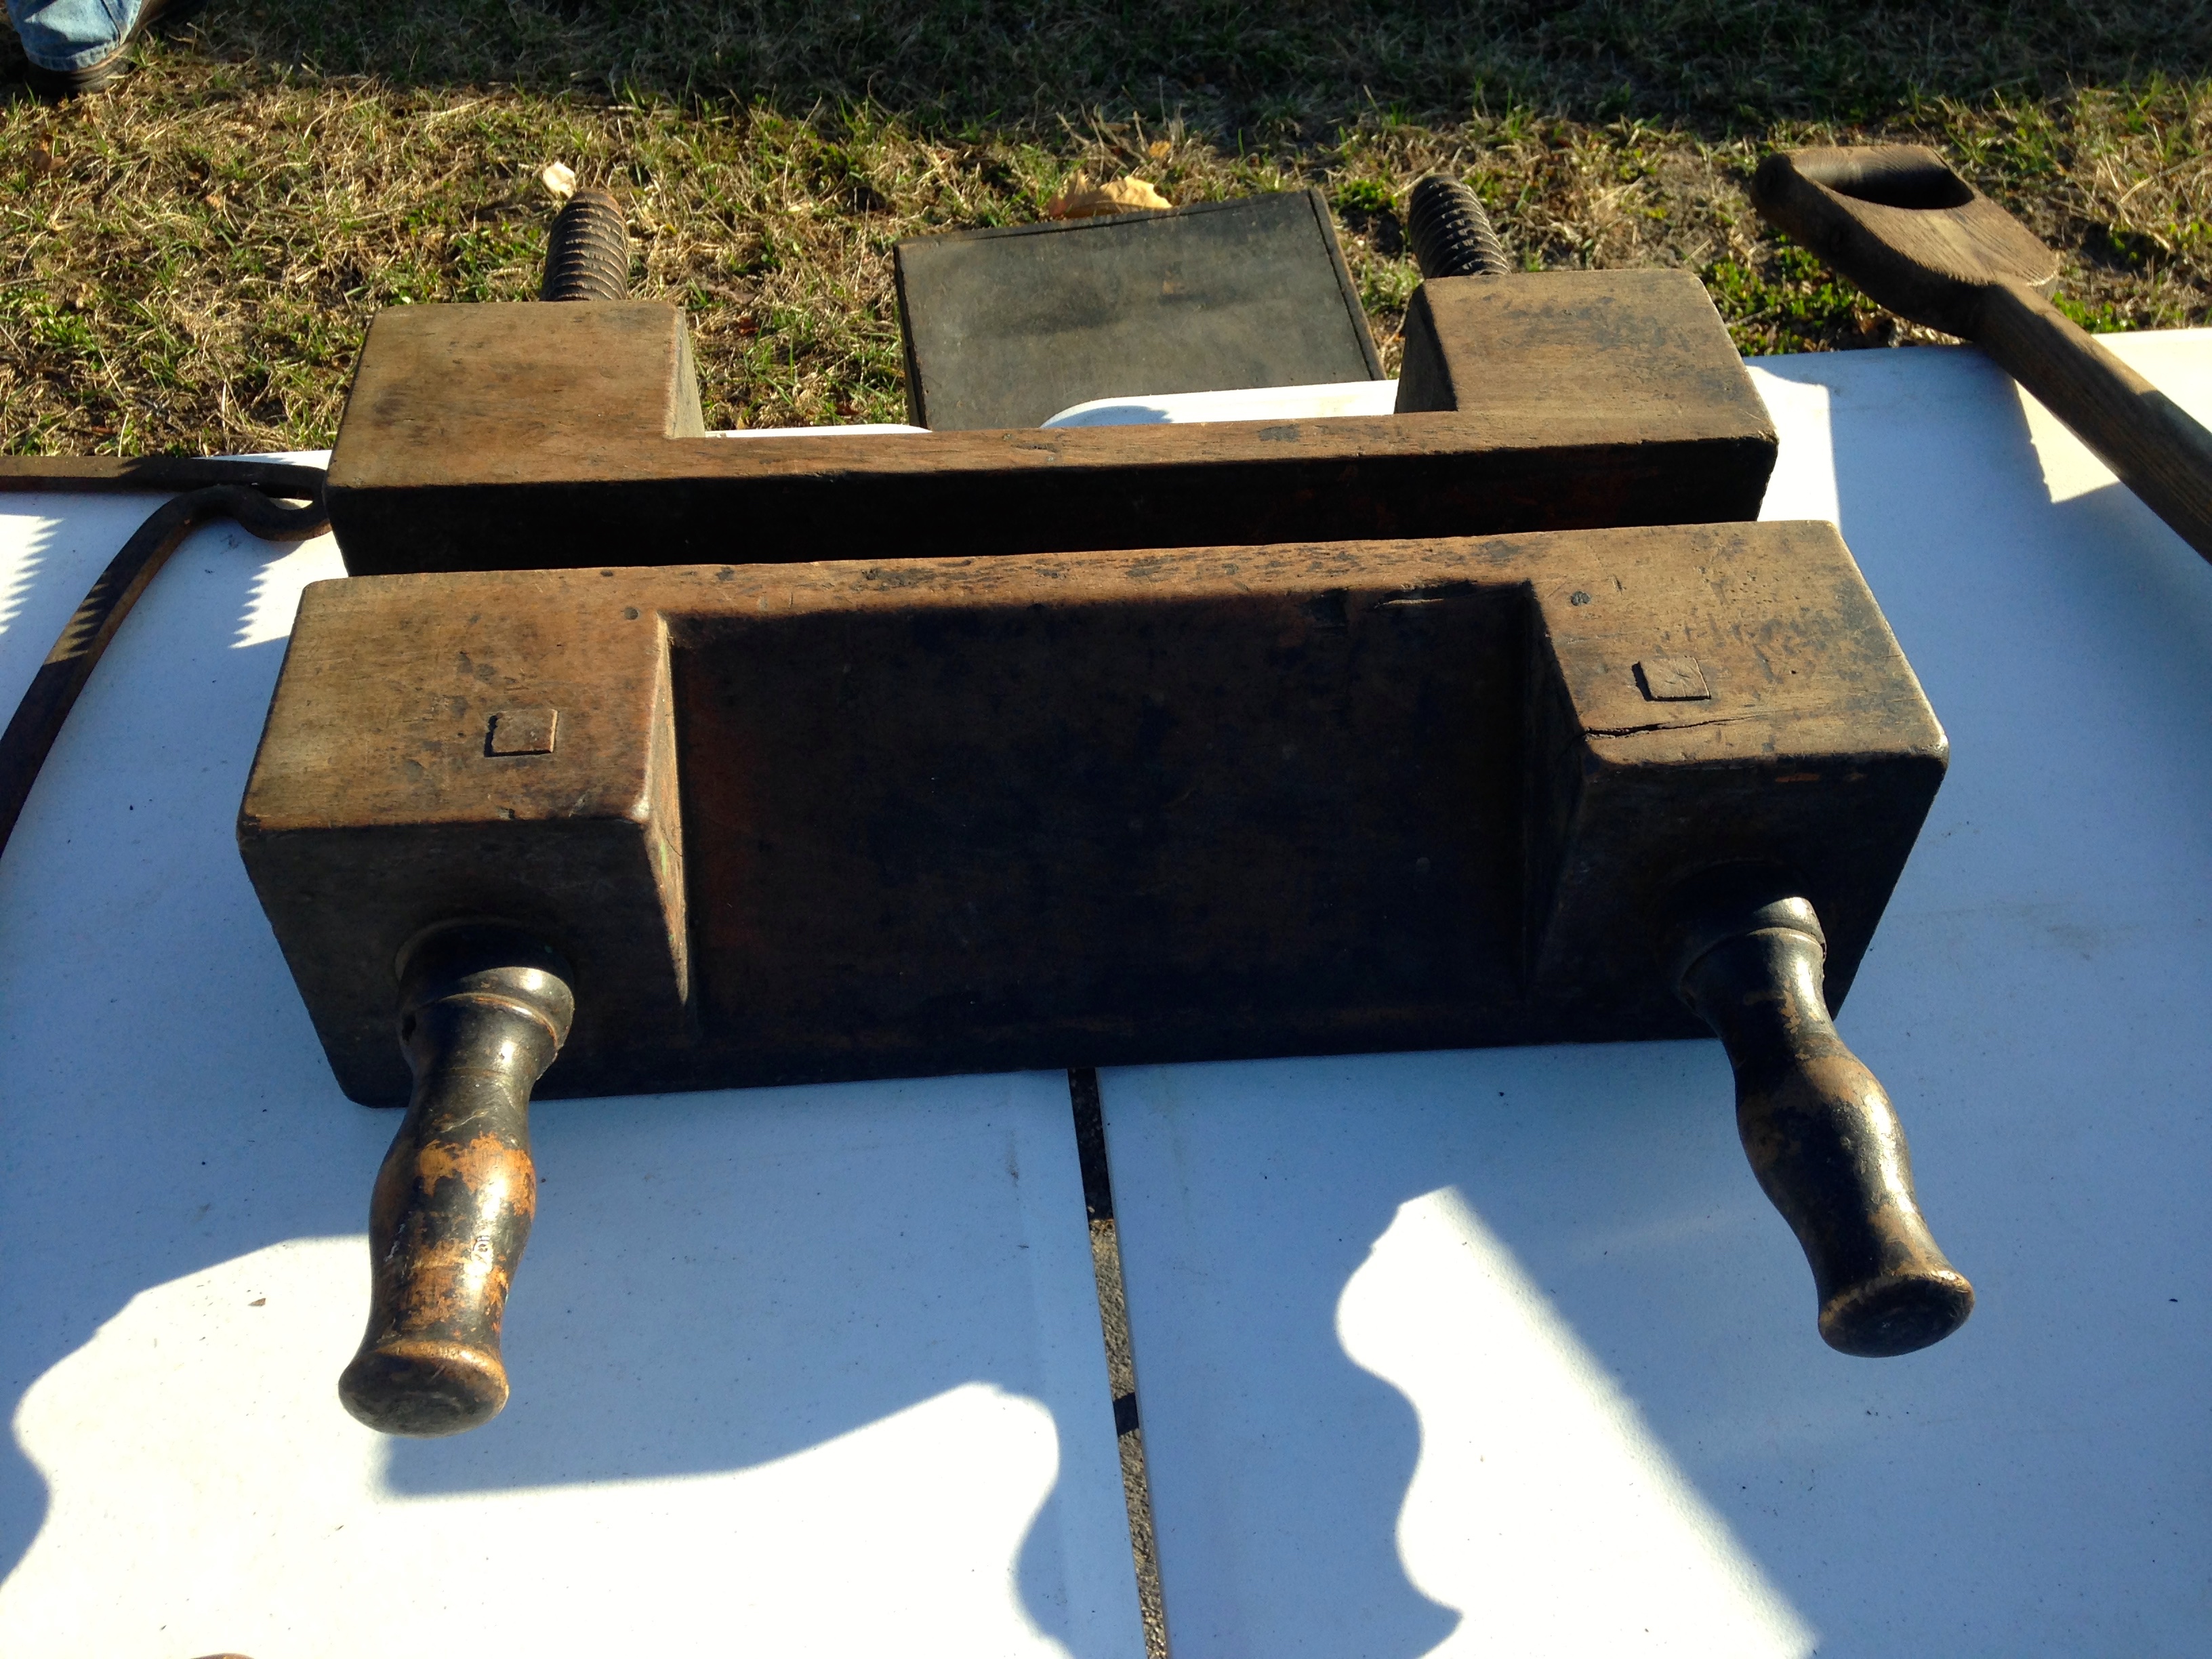
On another table was a nice looking moxon style vise with threaded wood handles. Made from a fairly large bit of timber I like how the maker removed a bunch of wood to make room for an angled saw.
Moxon Vise
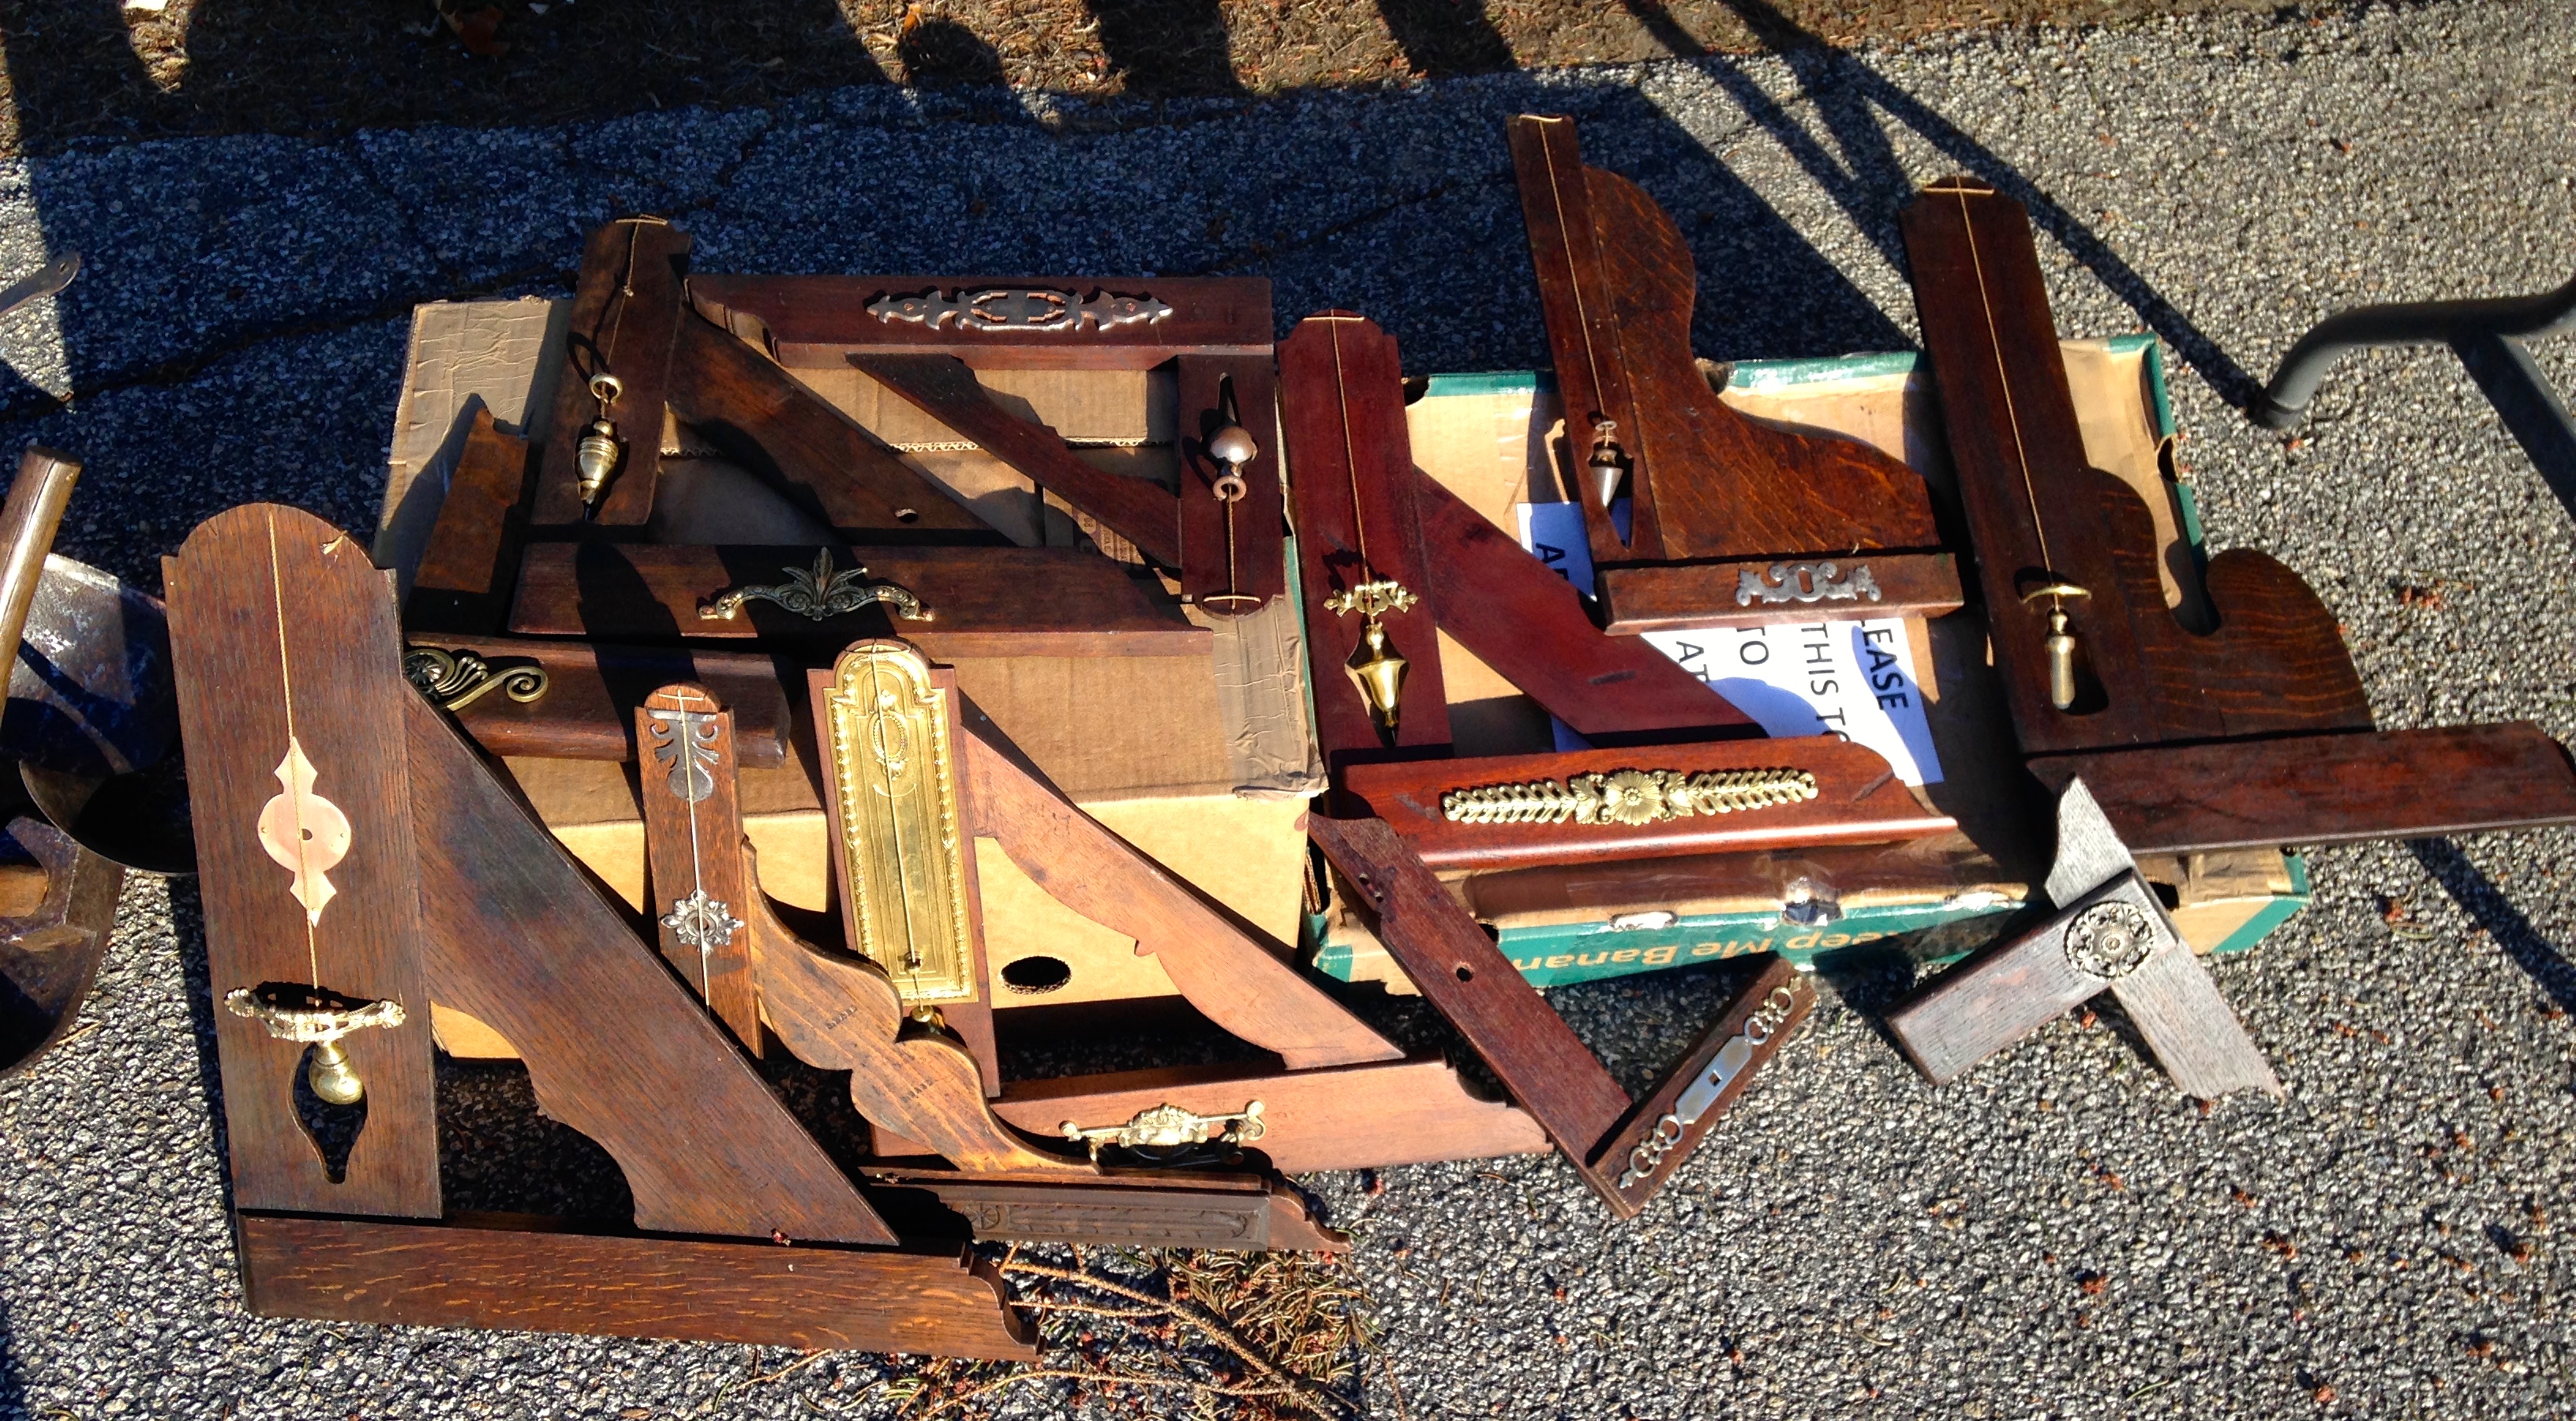
This year I finally got to meet Tony Murland in person. Over the years I’ve bought a lot of wood planes from his shop in the UK — including my matching pair set of hollows and rounds, snipes bills, sash planes and complex molders. On hand he had a great assortment of French Plumb Squares — some of which had some great decoration on them. I would have loved to get one if I had room in the budget this season for it.
French Plumb Squares from Tony Murland
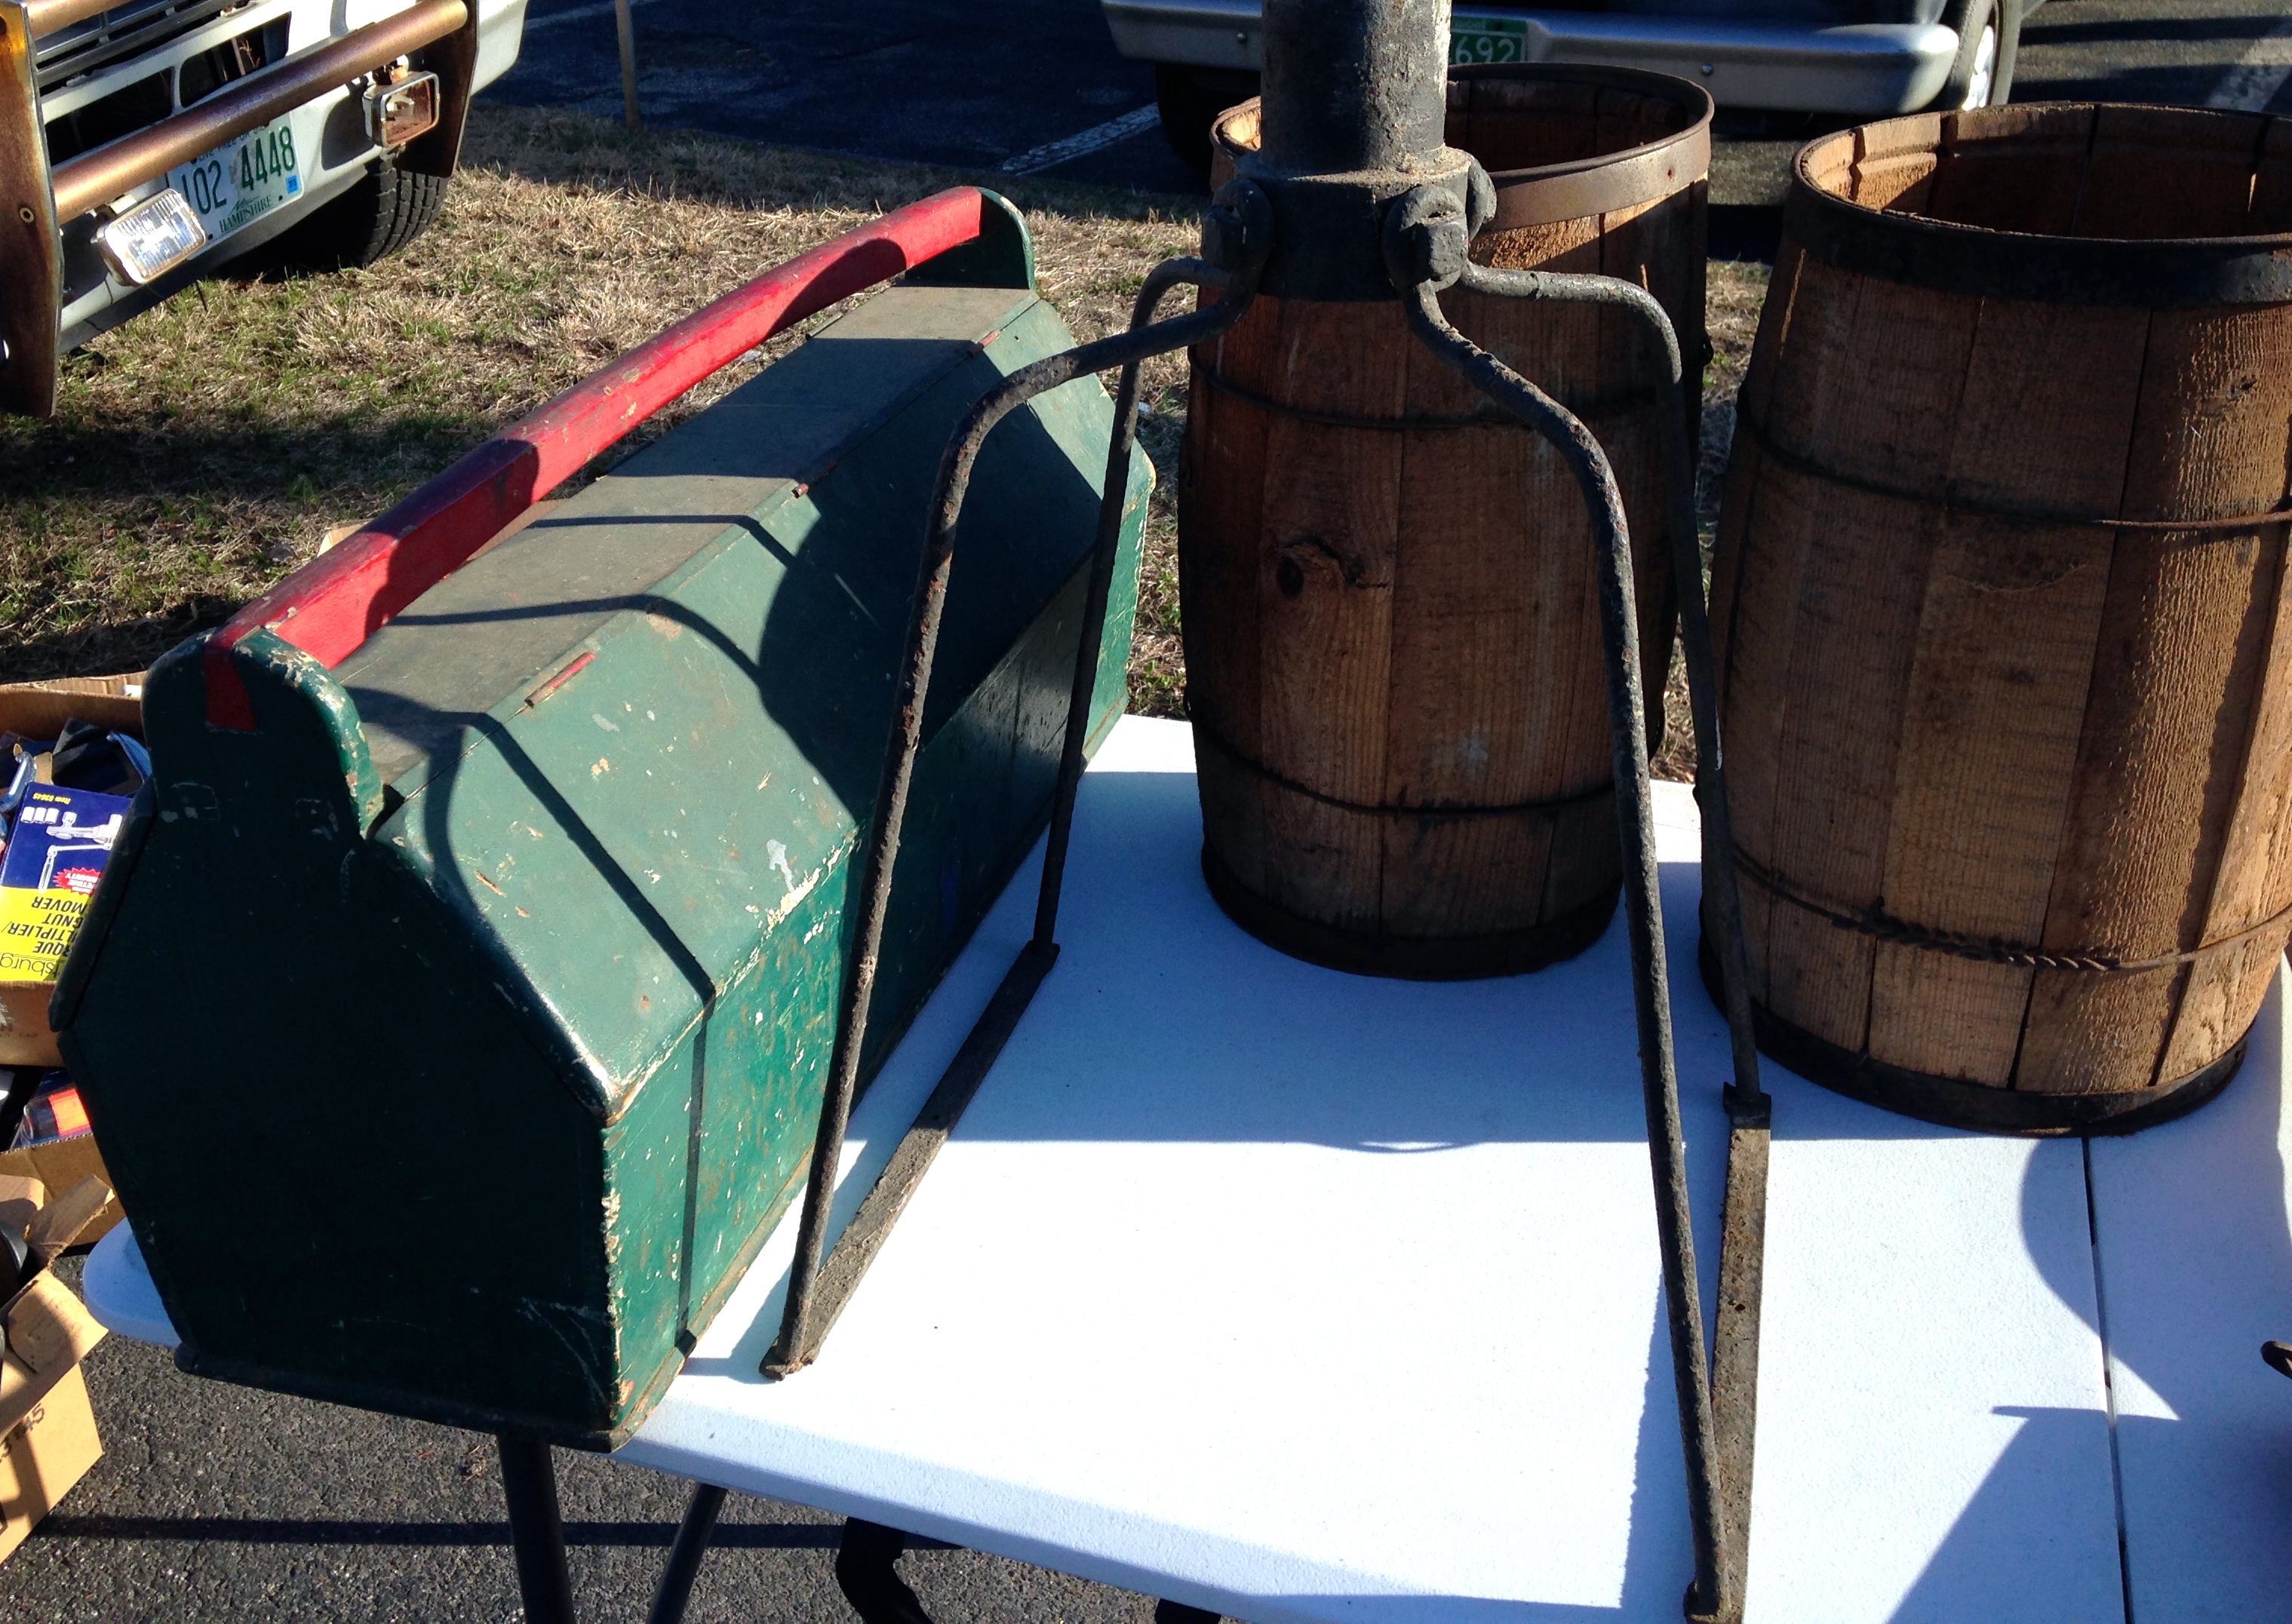
Casks of cut nails and a nice old tool tote with a dovetailed in handle and interior partitions.
Nail casks and tool tote
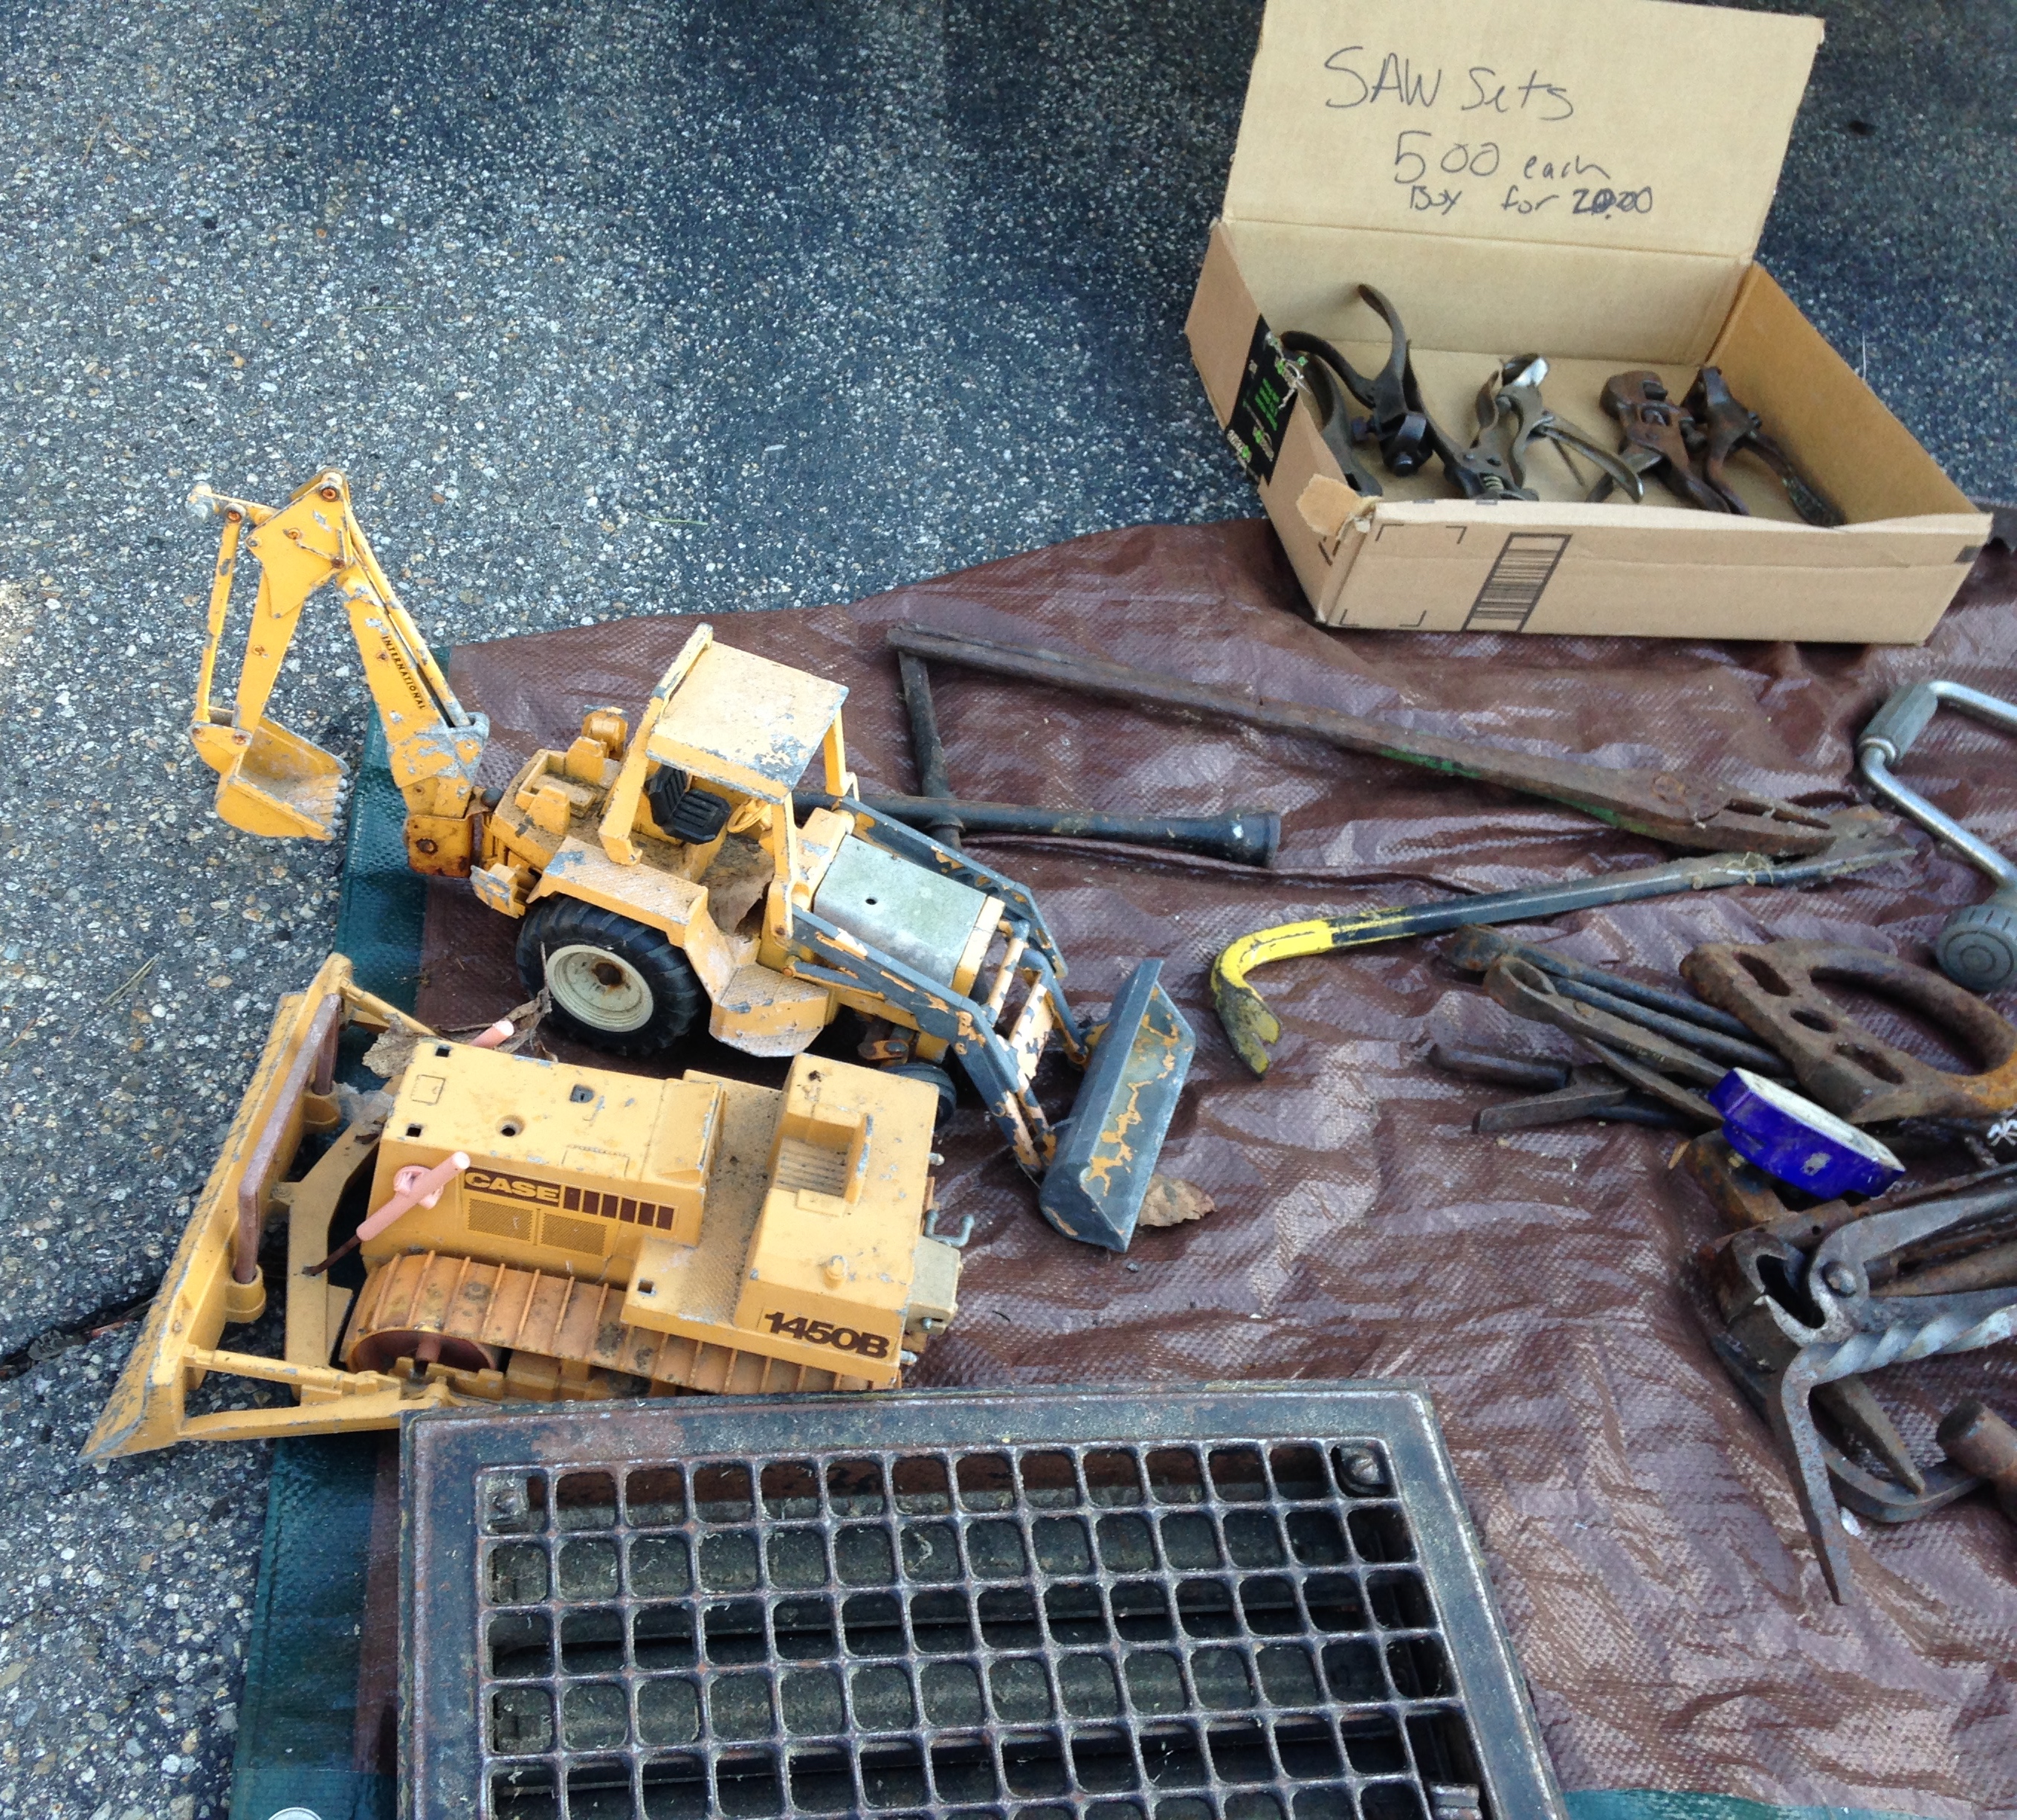
Next to a box of saw sets was an old 1980s Ertl Metal ‘Case’ backhoe/loader which was one of my favorite toys as child — and something I had not seen in years. If it was in better shape I might have even picked it up.
1980s Ertl Metal Case Backhoe
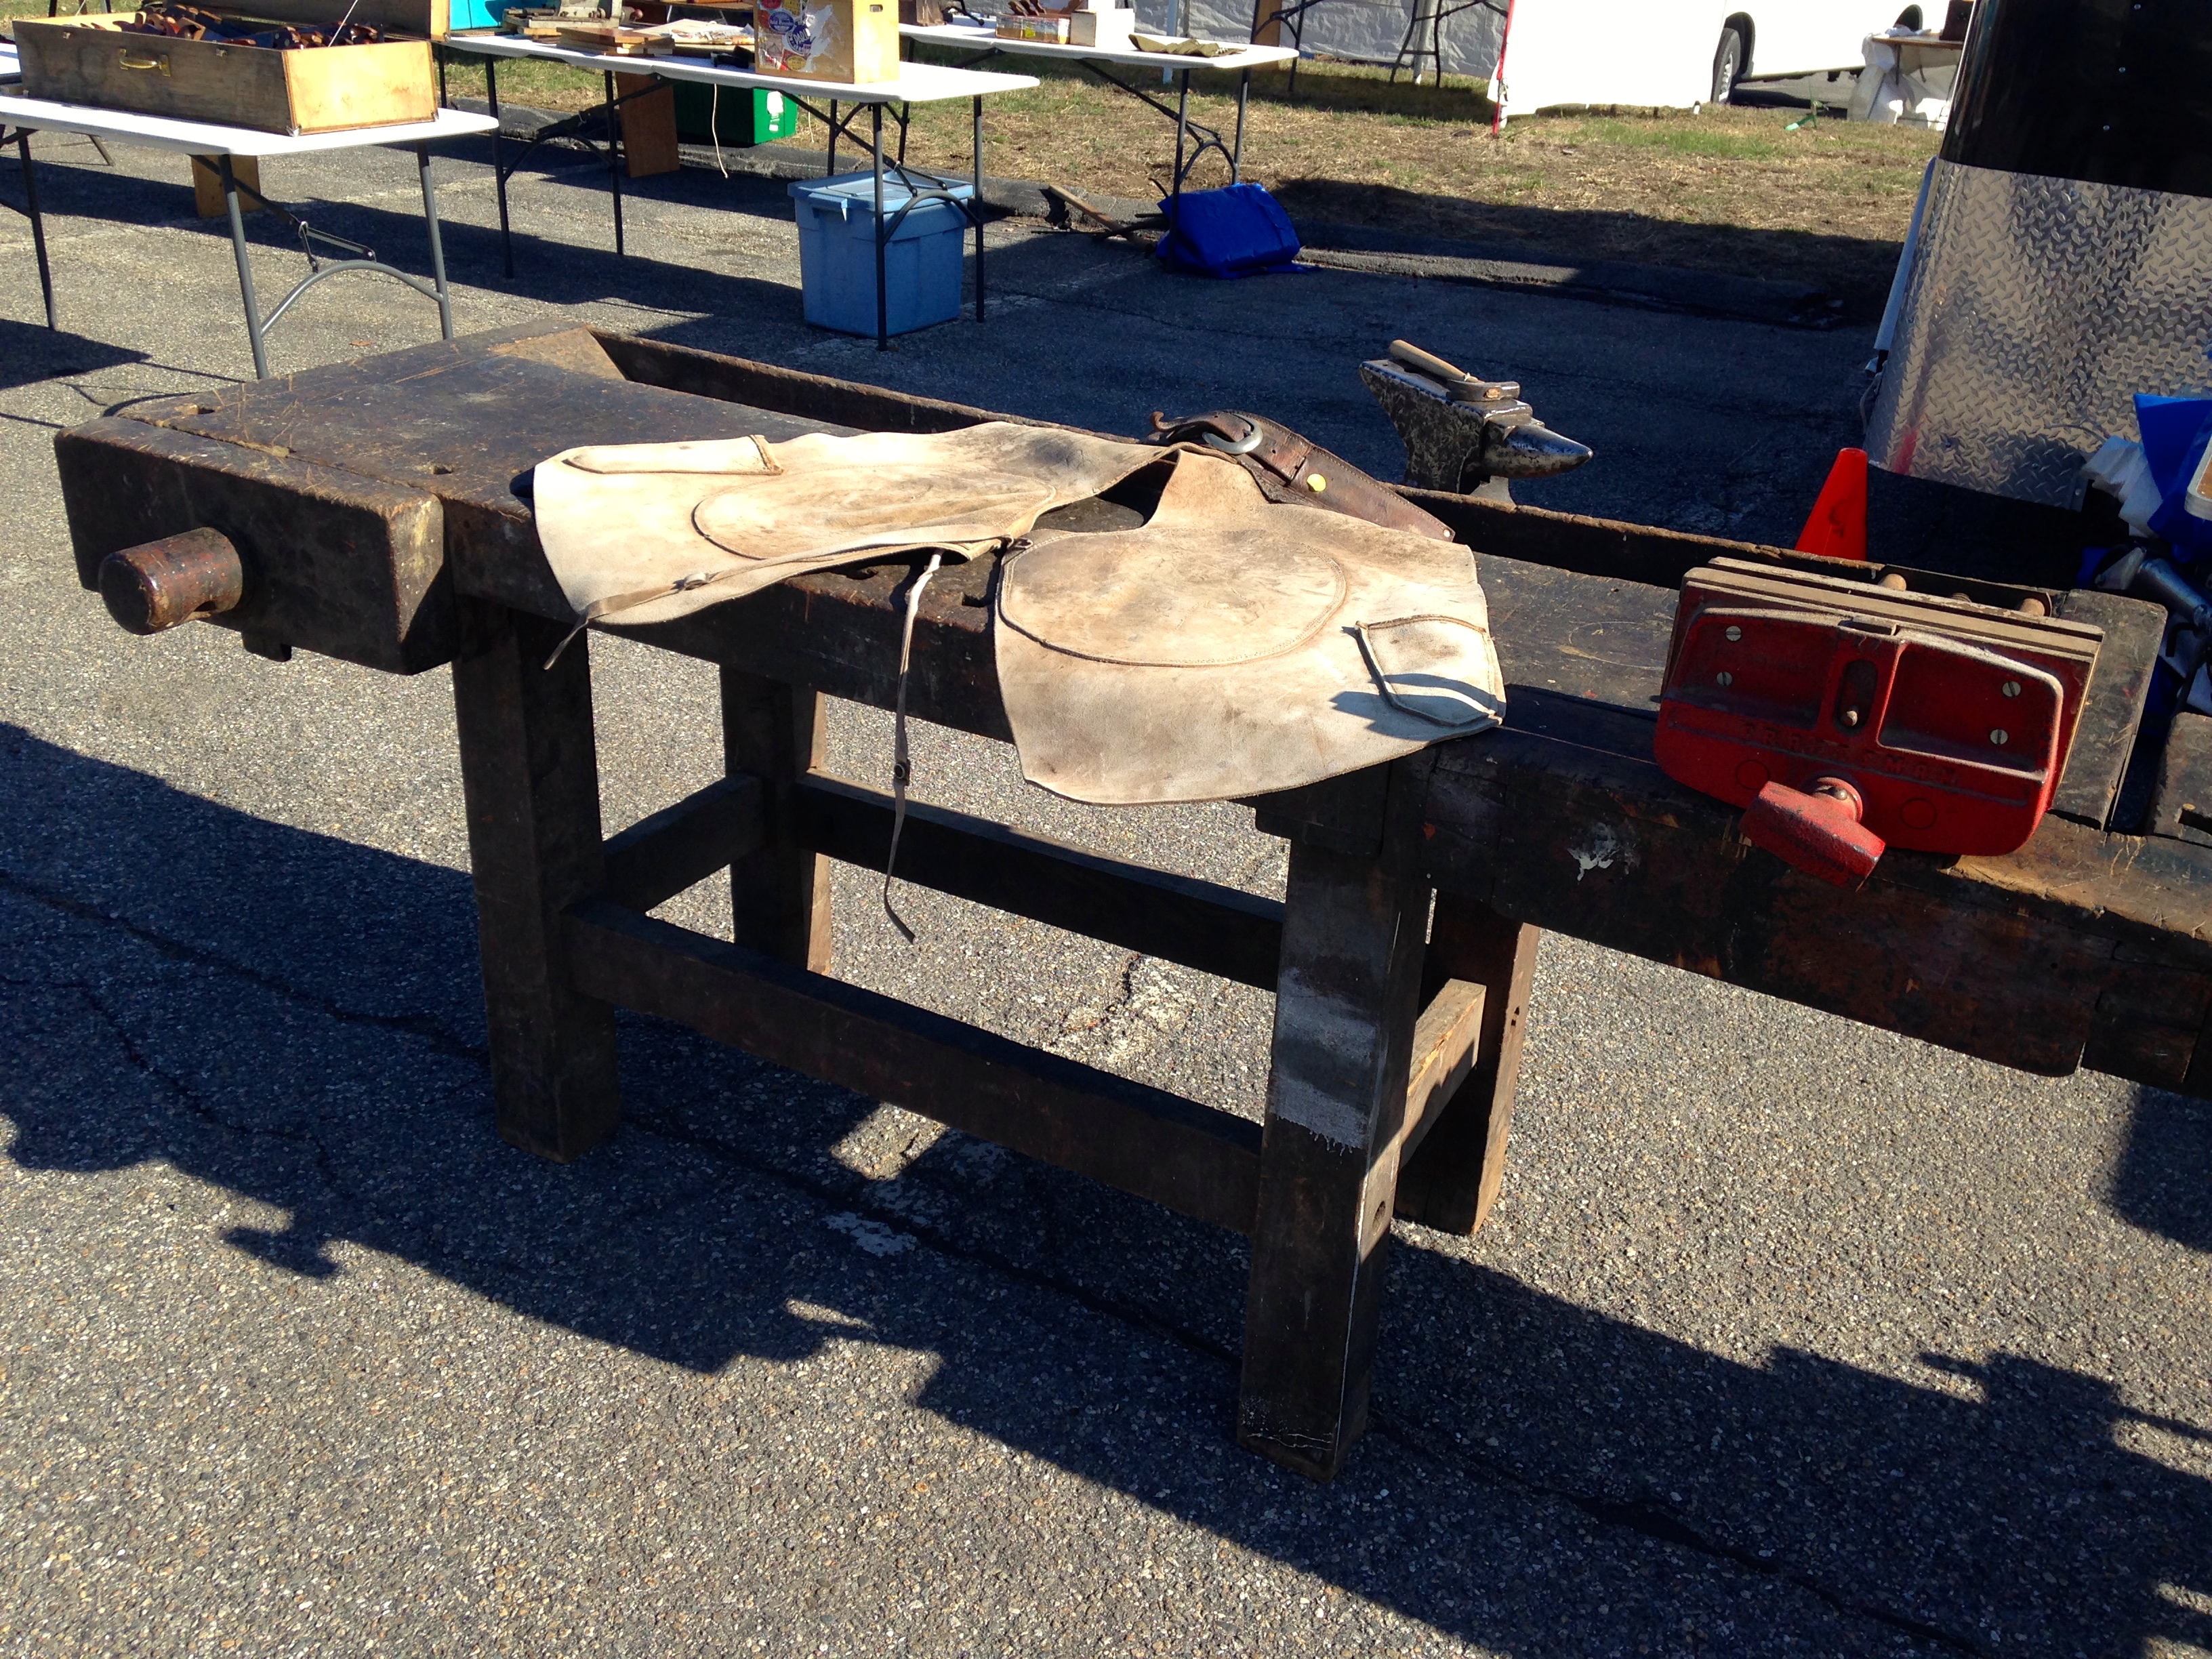
As always some interesting benches found their way to the show.
Leather apron and bench
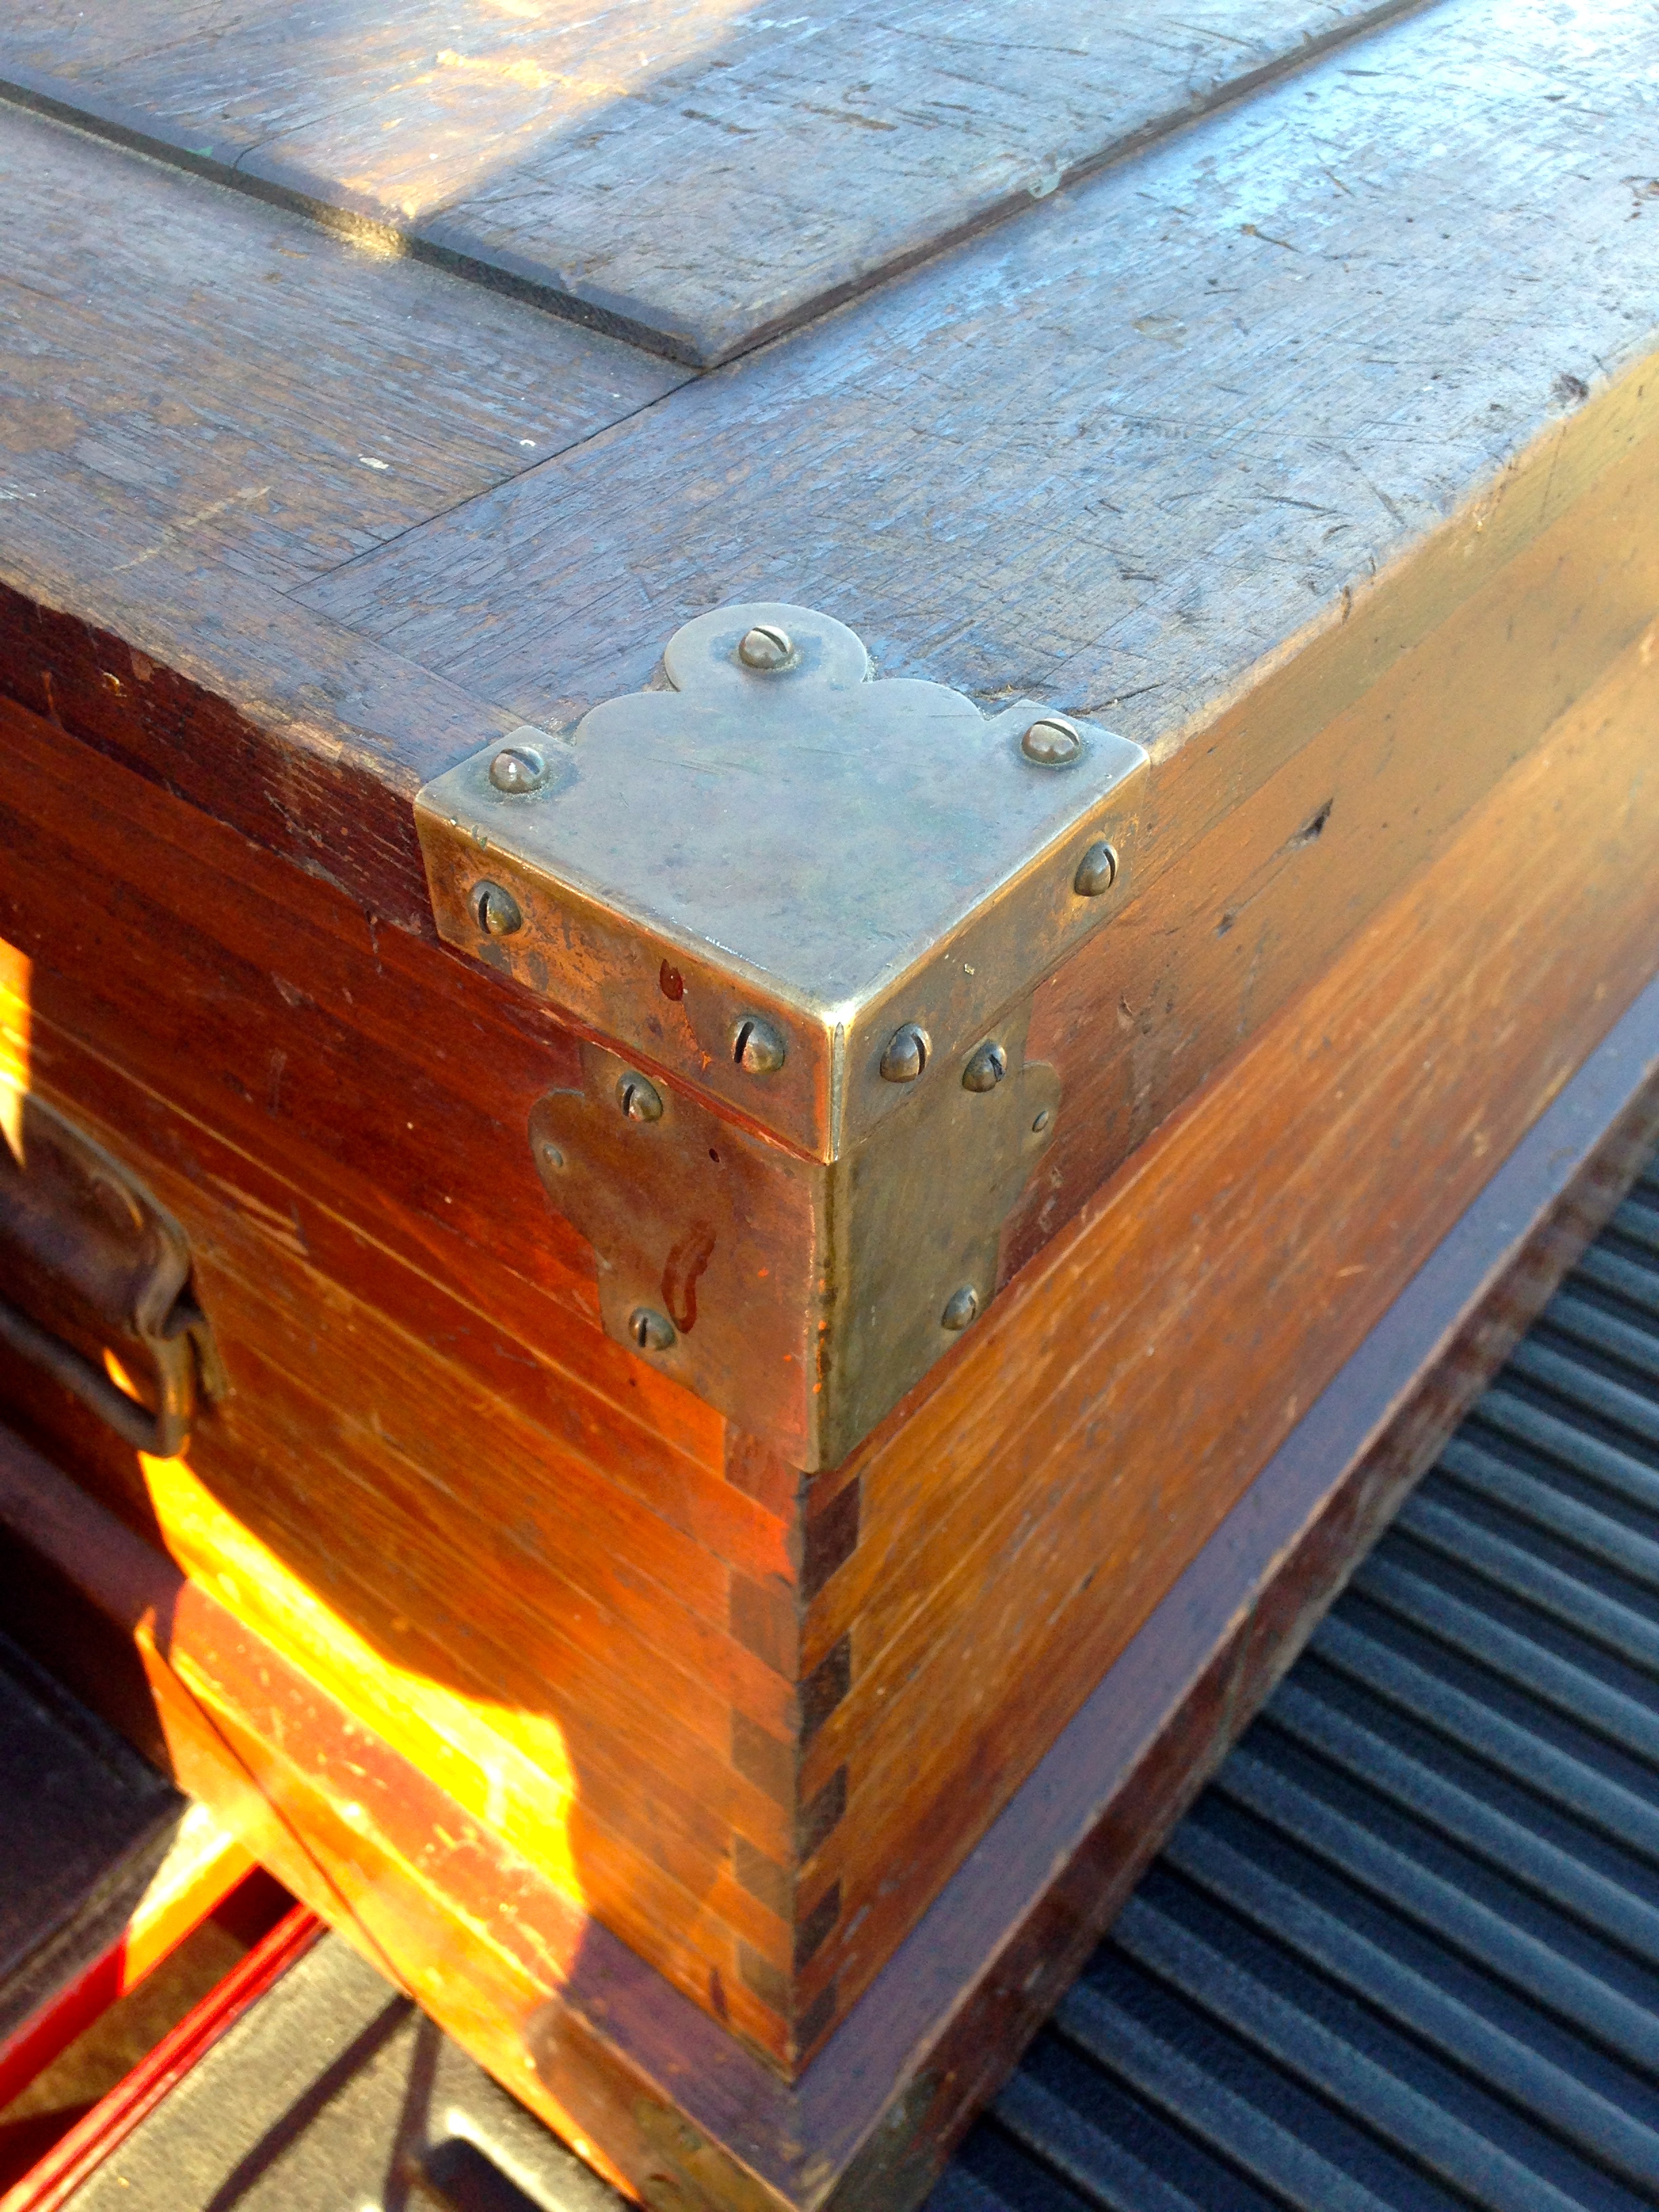
And here is a nice old tool chest that I spent some time looking at. Constructed with finger joints, this chest had some handsome hardware I wanted to highlight.
Nicely appointed tool chest
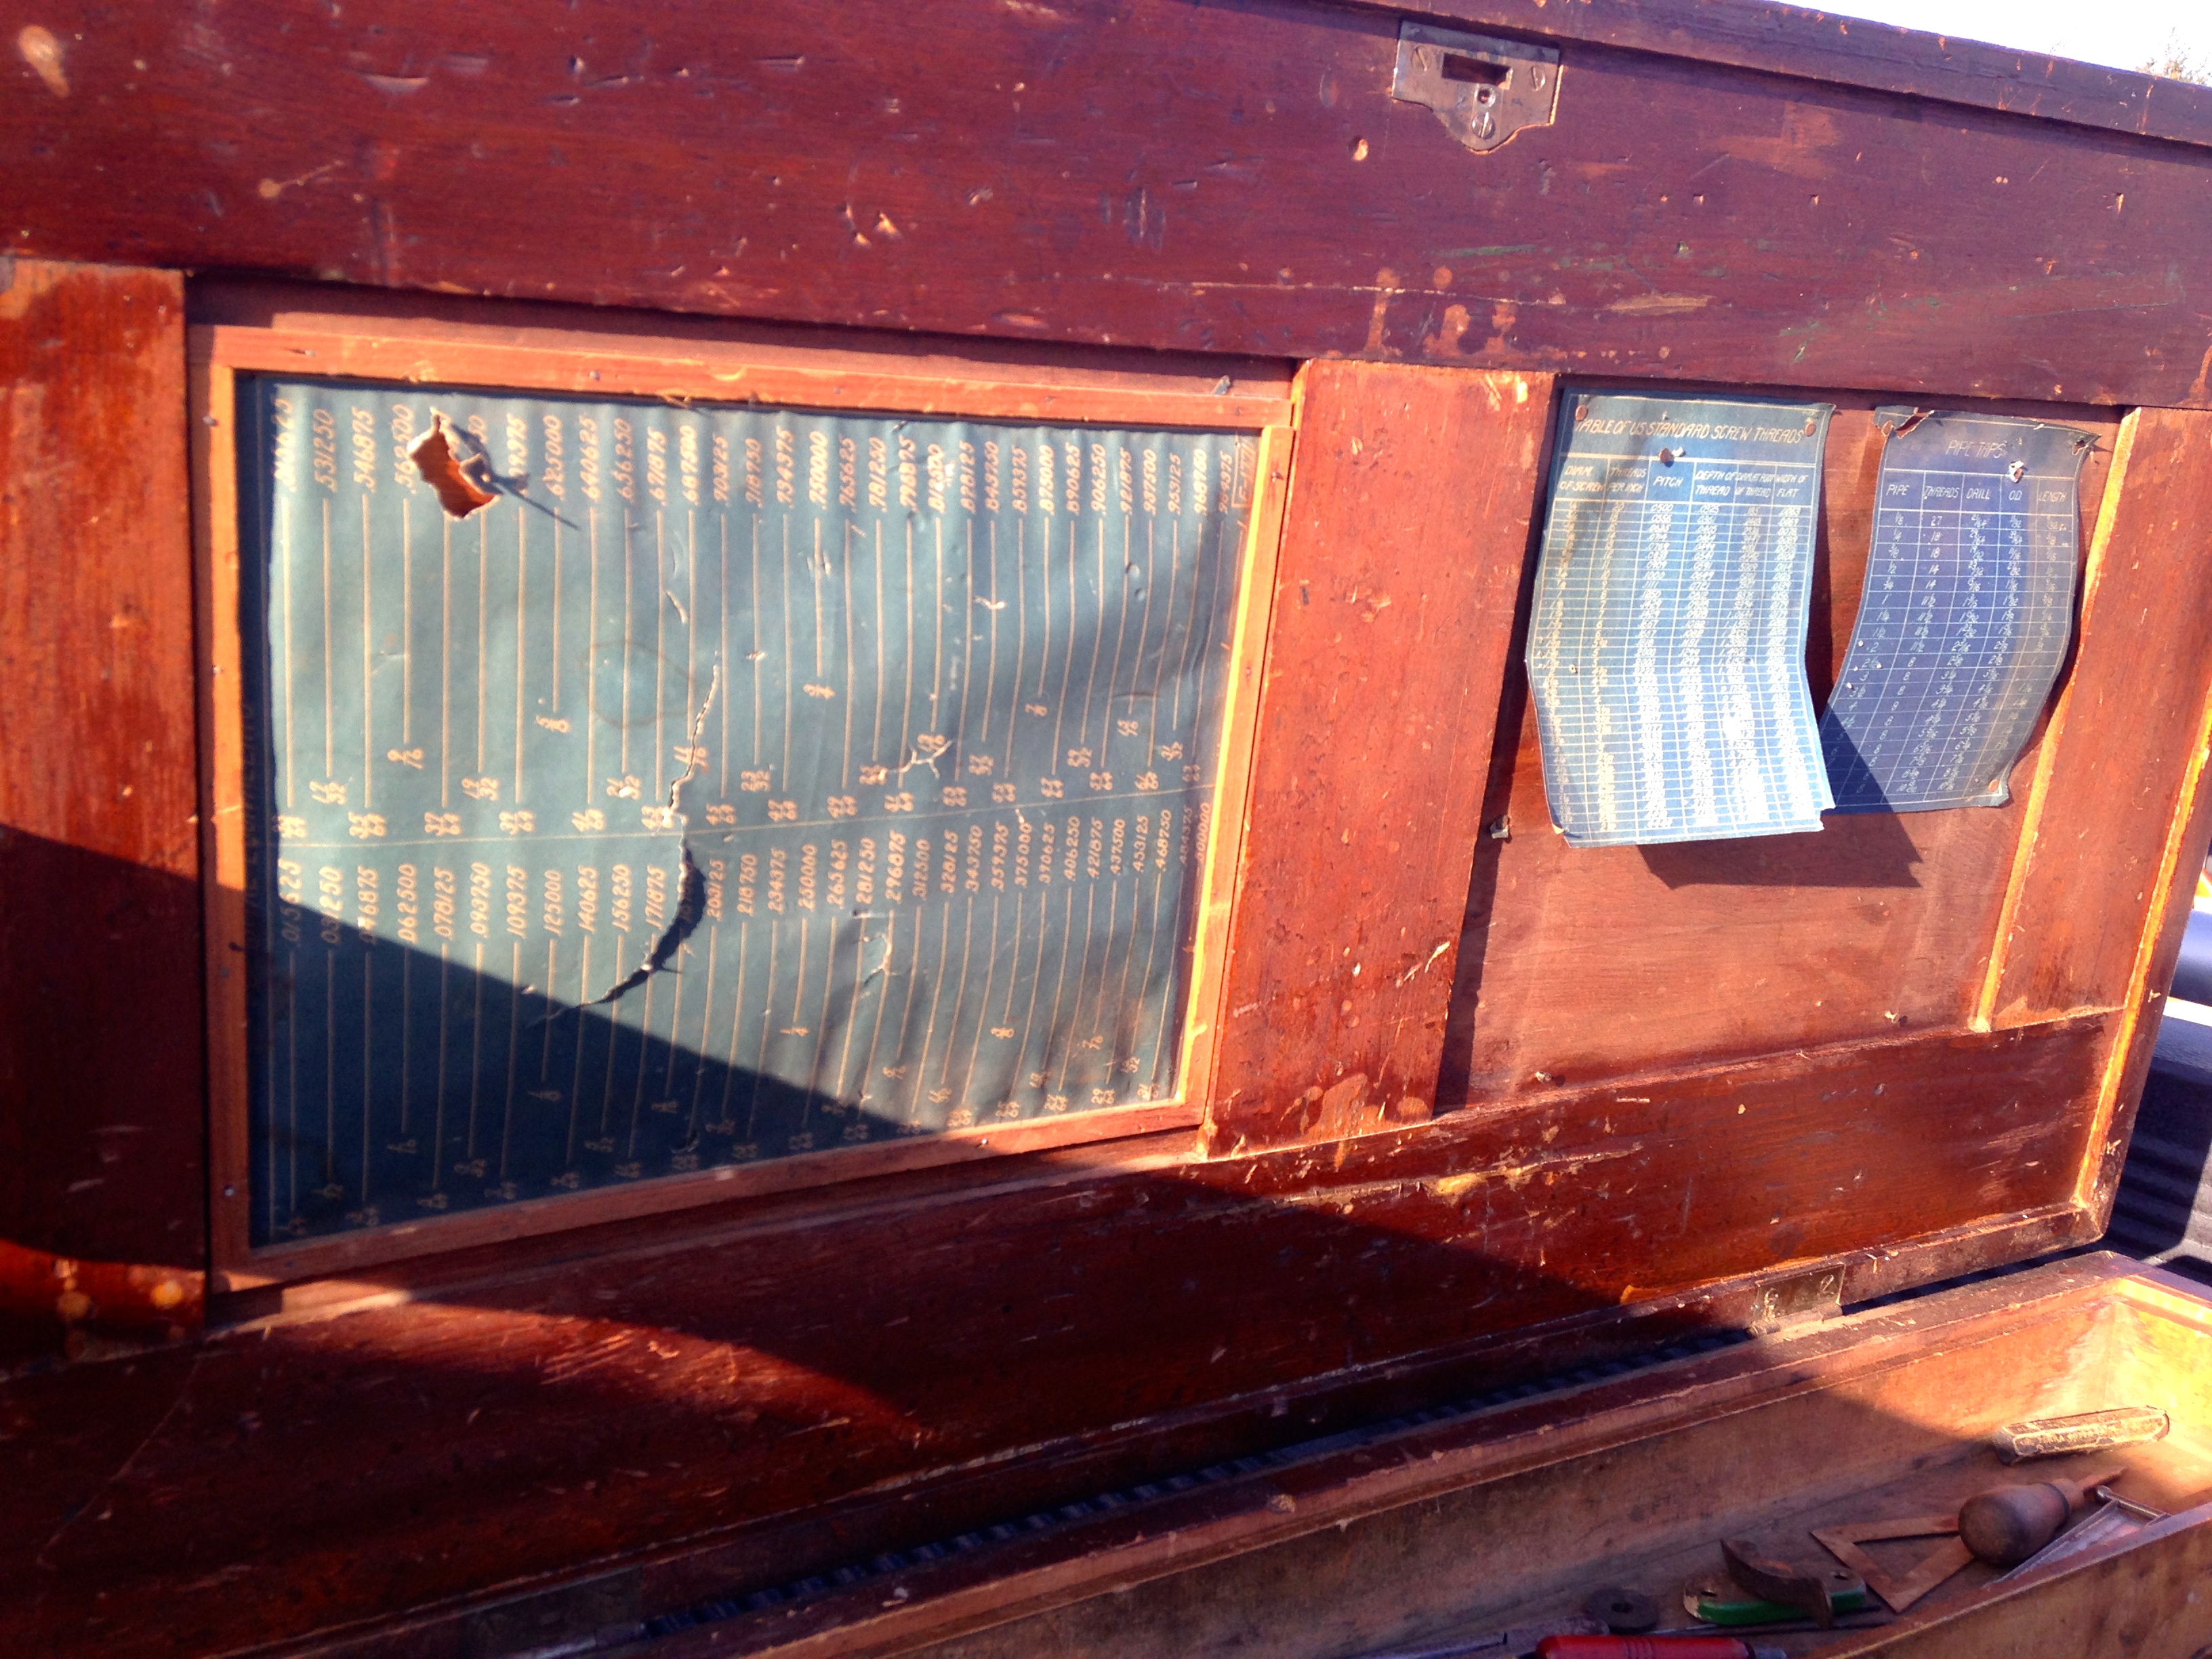
Inside the paneled top there were some great old reference/conversion tables tacked into place.
Reference charts under the lid
The corners had some nice brass hardware and all of the screws were carefully clocked (oriented in a specific way) — I know this makes my OCD happy as it likely will make my friend Chris Schwarz smile as well.
Clocked screws on the brass hardware
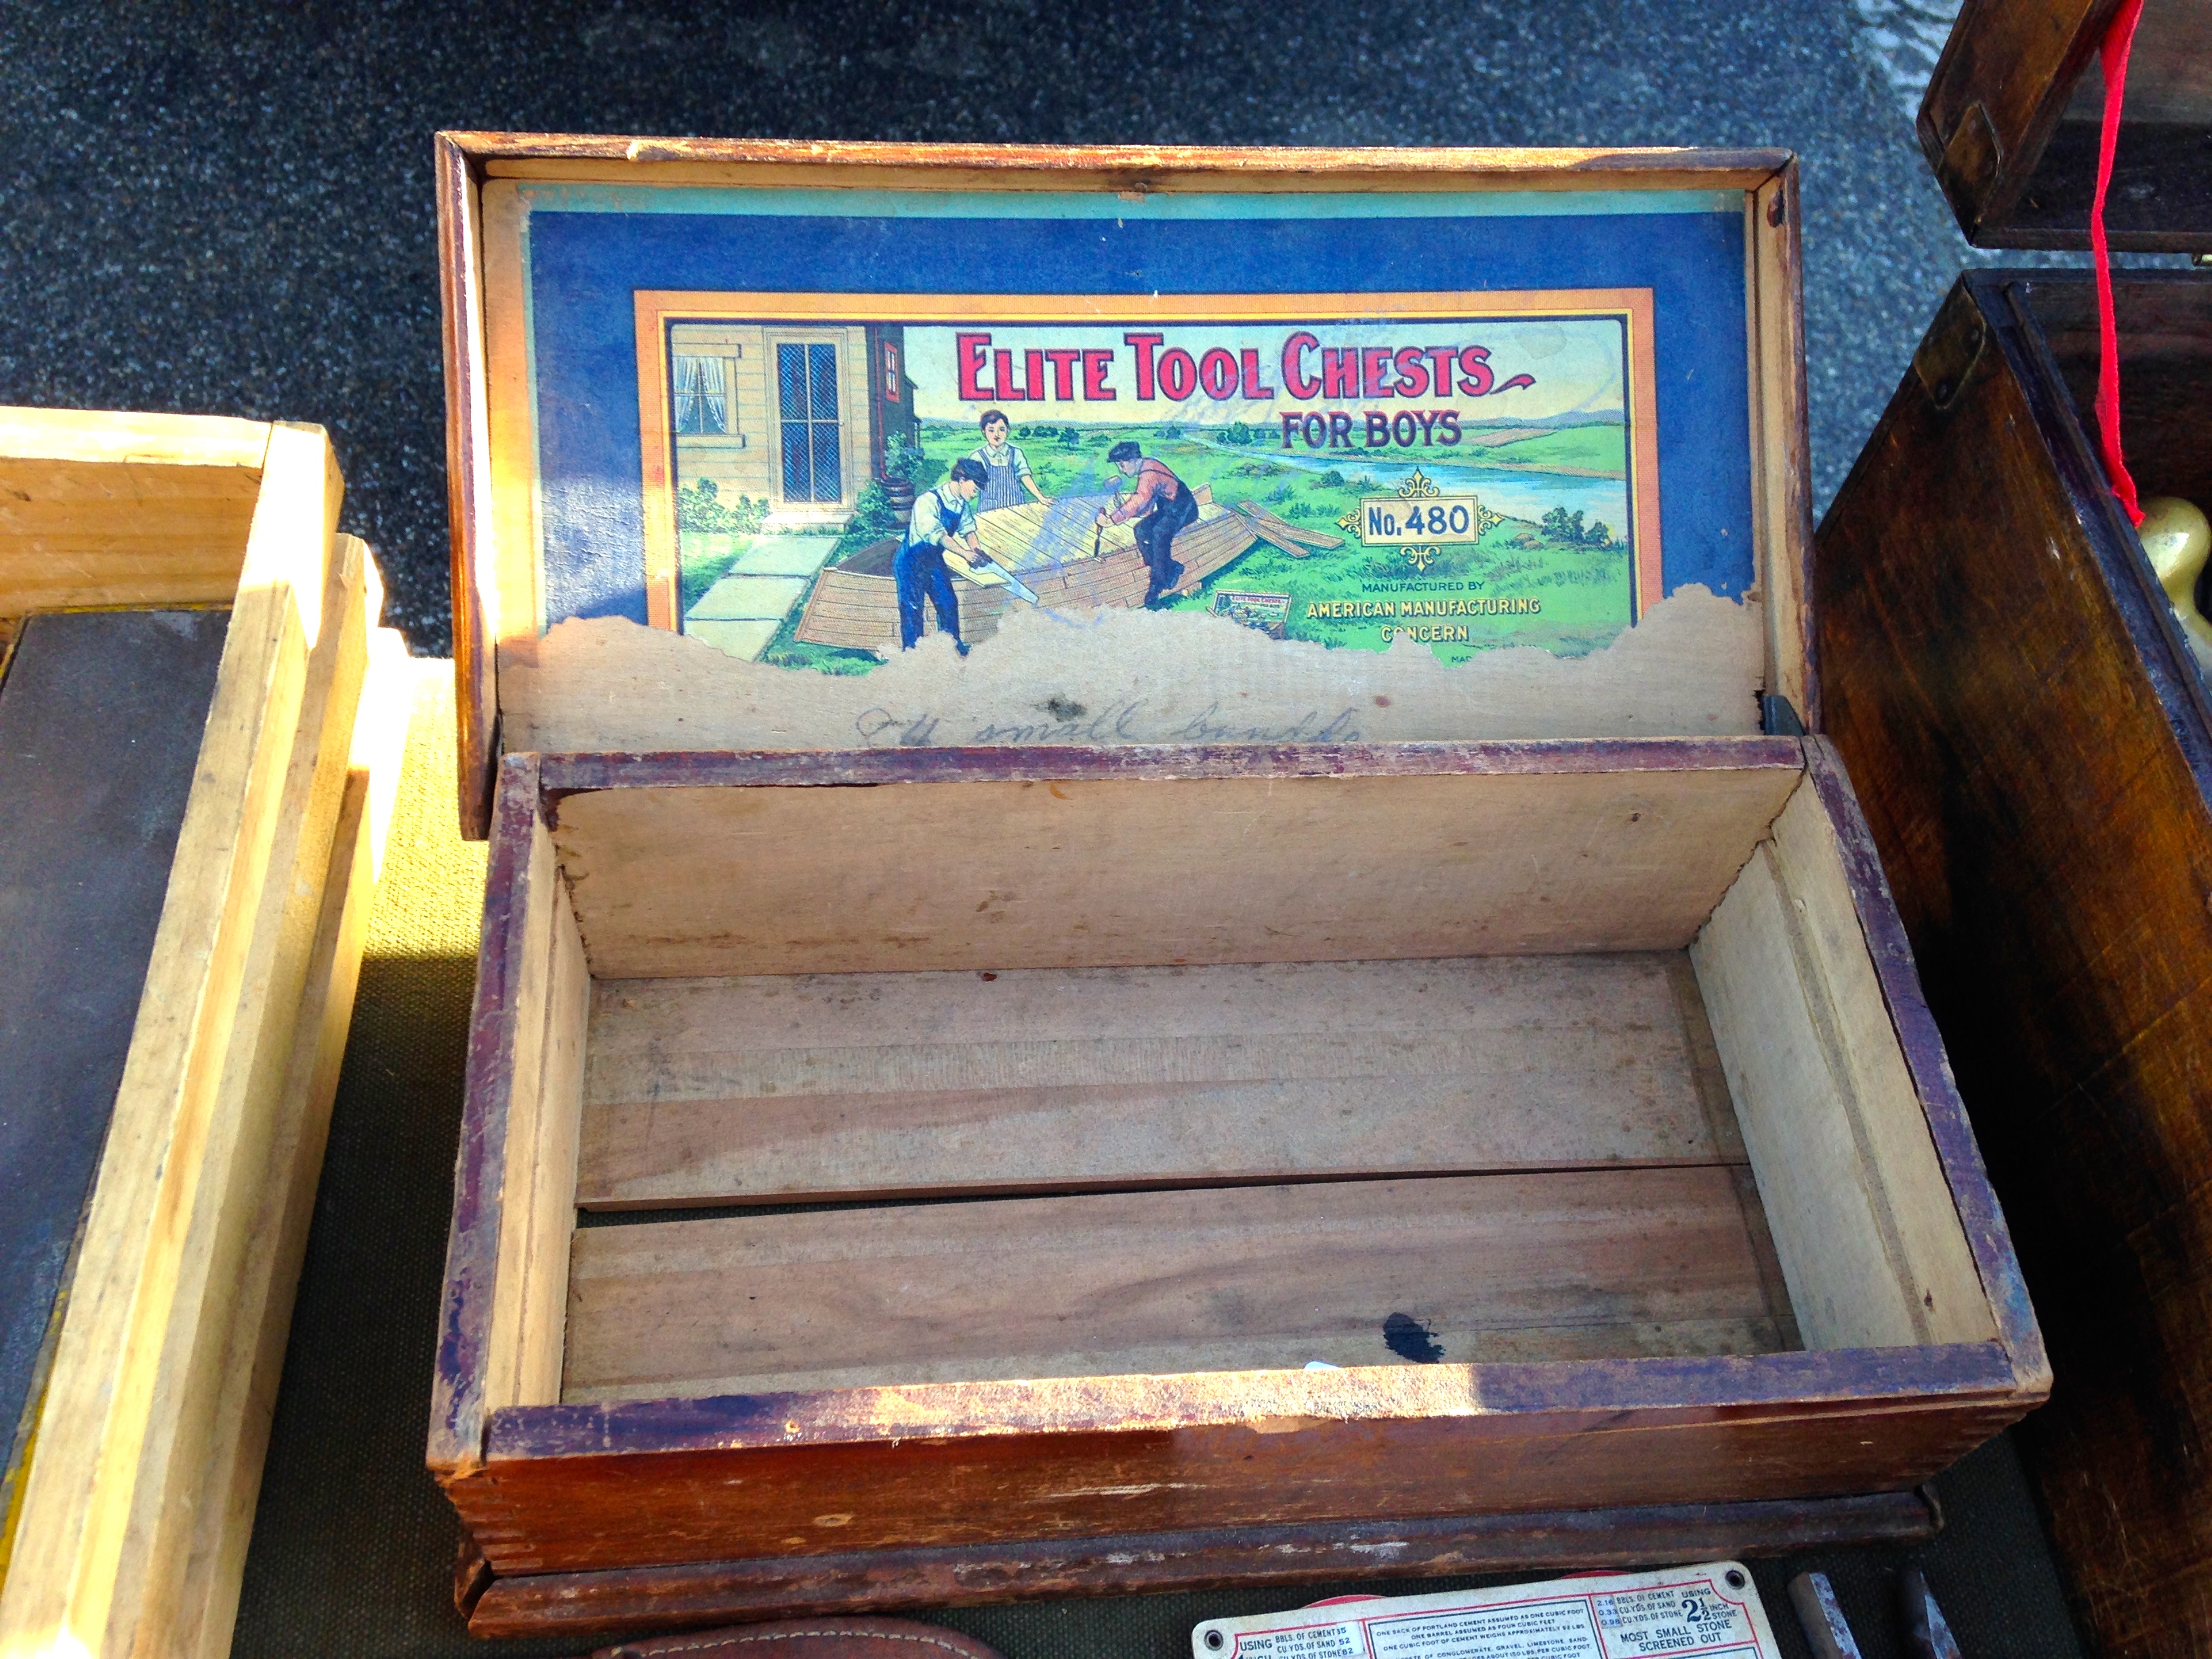
And last but not least was an ‘Elite Tool Chest for Boys’ that was used to haul some wares to the tool show.
‘Elite’ Tool Chest
What did I buy this year? Not too much which is probably a good thing. I’m trying to keep to the tools I regularly use and I have a very good working set. Also my tools/wood/toy budget has been saving towards a tractor and building a barn this summer — more on that in some upcoming posts. I bought nice Stanley Bailey transitional jack plane that I’ll be using to clean up some timbers — that wood sole will be a lot easier to use on green timbers. A nice metal block and tackle with a line lock that will be useful on a gin pole and about a dozen old manual training guides, tool catalogs/reprints and old woodworking texts.
Take care,
-Bill
A Joiner's Guide To Traditional Woodworking and Preservation