Workbench side clamps are not something I think anyone would generally use on a daily basis, but when the job calls for the sort of clamping they provide, they do a great job. I think one of the reasons they were not used often is the time it takes to affix them to the workbench — usually requires the use of nuts and wrenches.
How can I improve the likelihood I will use my new side clamps?
The 3/8″ 5 star knobs I ordered from Rockler for my side clamps arrived yesterday and I gave them a shot.
Side clamps with 5 star knobs
On the left you can see both knobs on the same side of the clamping block and on the right you can see one knob on the top and one knob on the bottom. Either configuration works well. With a 5 star knob you can easily loosen both knobs and remove one knob to move the block around.
The verdict?
The above tweak is not an earth shattering change but it does remove the need for a wrench and make it a little more likely I’ll break out the side clamps with the need comes up.
Take care,
-Bill
@TheRainford
P.S. If you’d like to read up on how to build your own pair of side clamps you can read my earlier post on that topic here.
In building my workbench I also built a simple traditional deadman to help support long boards at the bench.
Workbench Deadman
This simple to build workbench accessory is as a great addition to any bench with a tail vise.
Bill demonstrating the use of his deadman
If you’d like to learn more about this bench and how to build one for yourself, please check out my blog post on this topic over on the Popular Woodworking site here.
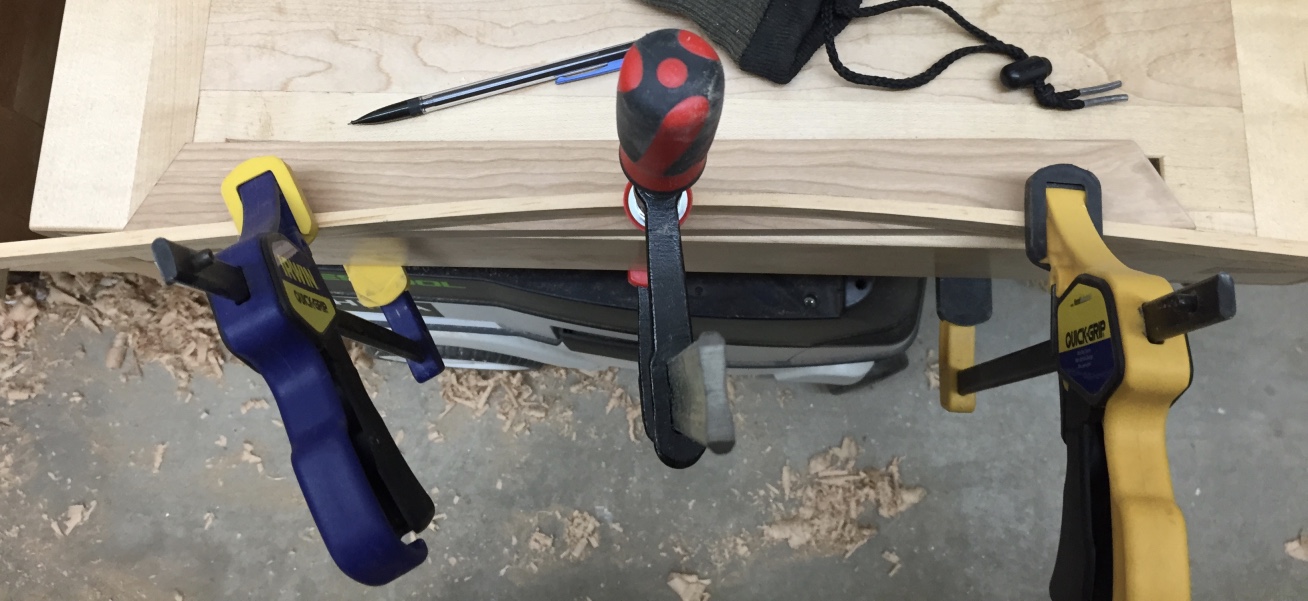
Have you used your side clamps lately? Wait, what are side clamps?
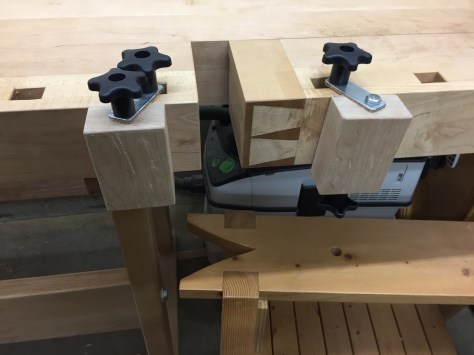
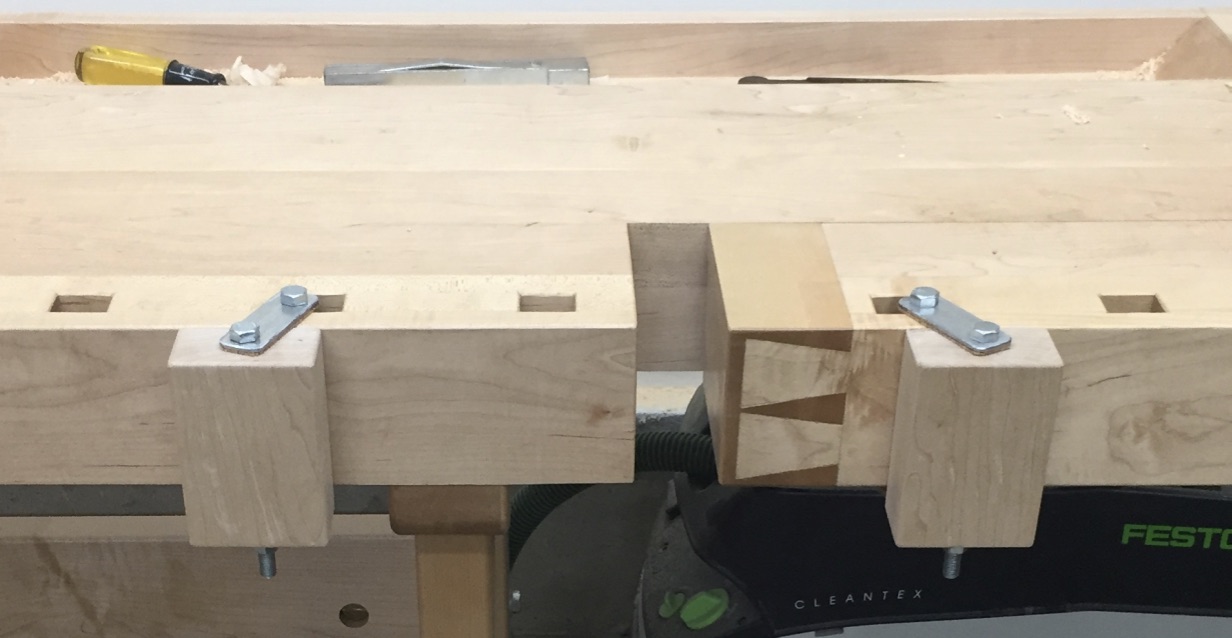
Close up of the side clamps
Side clamps are a pair of adjustable wooden blocks that mount on the outside of a traditional continental workbench with one block mounted to the tail vise and one mounted to the fixed portion of the bench top. In this experiment the blocks are mounted to the bench via 3/8″ diameter, 6″ long threaded bolts and some shop made metal plates.
Background:
When building my Tage Frid inspired Scandinavian workbench I spent a lot of time looking at examples of Frid’s benches — some early extant examples in person, his Fine Woodworking article on his bench (FWW Issue #4, October 1975), the chapter in Tage Frid Teaches Woodworking Volume 3 and various online searches.
In the FWW issue #4 diagrams and text there was a very brief mention of a set of ‘side clamps’. I couldn’t find any photos of these clamps online and they didn’t seem to make it into the book version of the bench. I was curious if they were cut to save space or if in fact they didn’t turn out to be useful.
I decided to build my own version of these clamps based on that lone diagram and experiment with them.
Building a pair of side clamps:
Using some scrap hard maple left over from the workbench I made two 1.75″ thick, 3″ wide and 4.5″ long blocks. I planed them and rounded over the edges with a 1/8″ radius router bit.
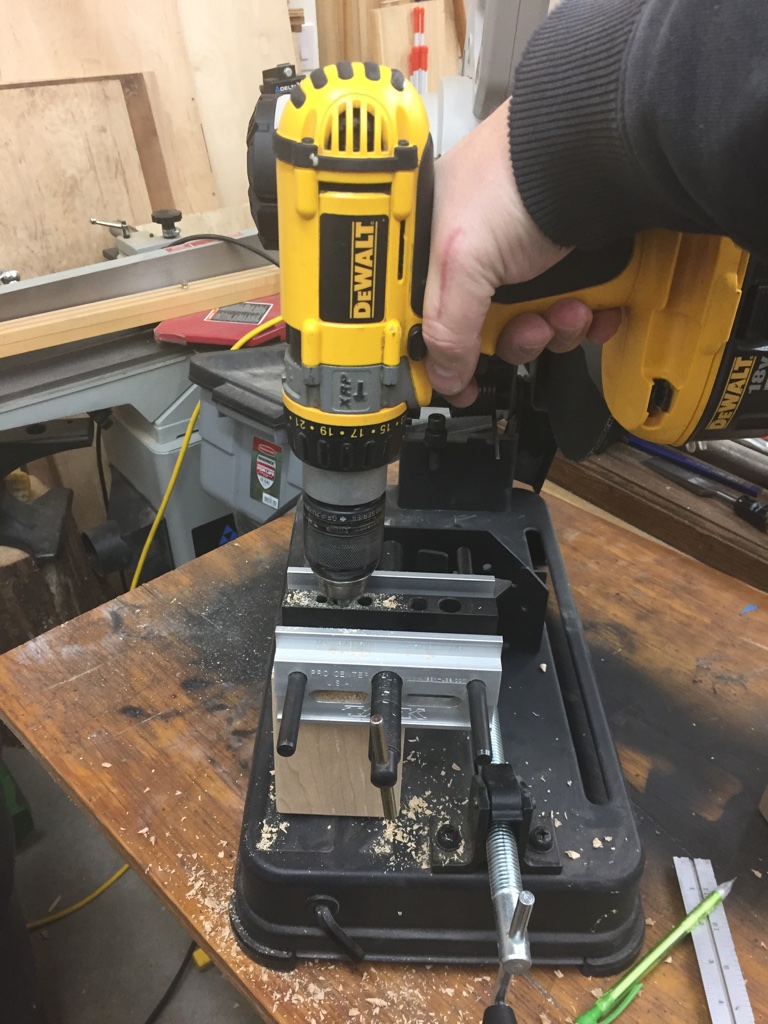
Use a self centering doweling jig to start the 3/8″ holes
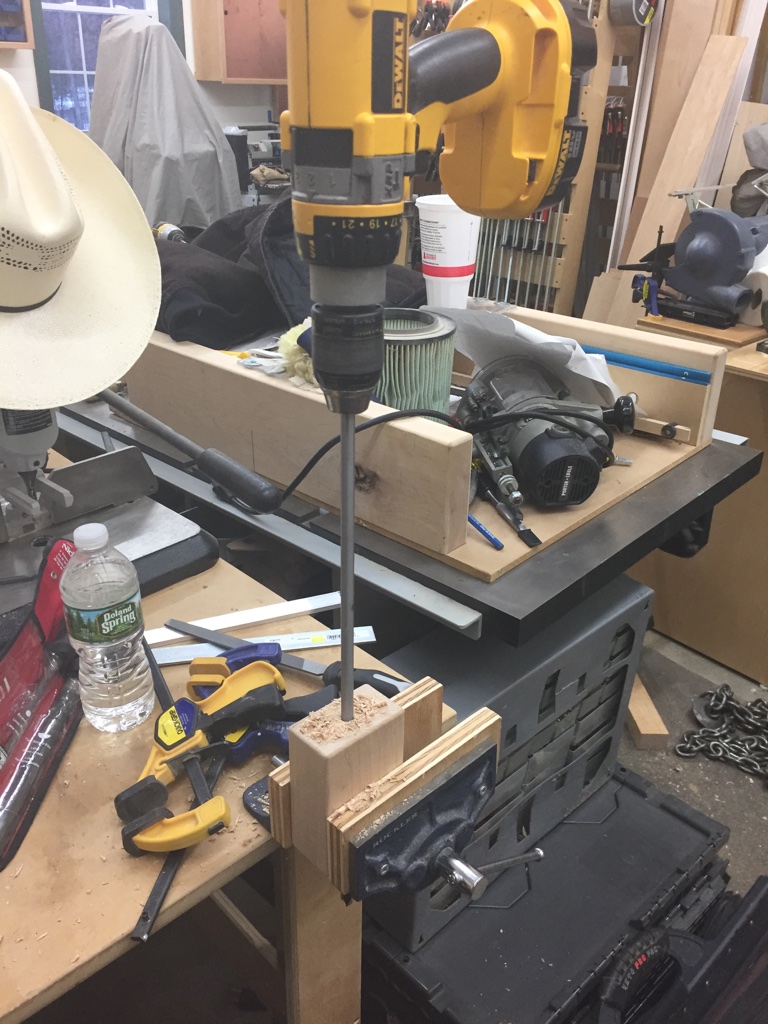
Next up was drilling a 3/8″ diameter hole through the center of the block, the long way. I started off the drilling by using a self-centering doweling jig (see photo above), and went as far as the bit would let me drill into the block. Then using that first hole as a guide I used a longer electrician’s style 3/8″ drill bit to drill the rest of they way through the block. (see photo below)
Use a long electrician’s style 3/8″ drill bit to finish the centered hole.
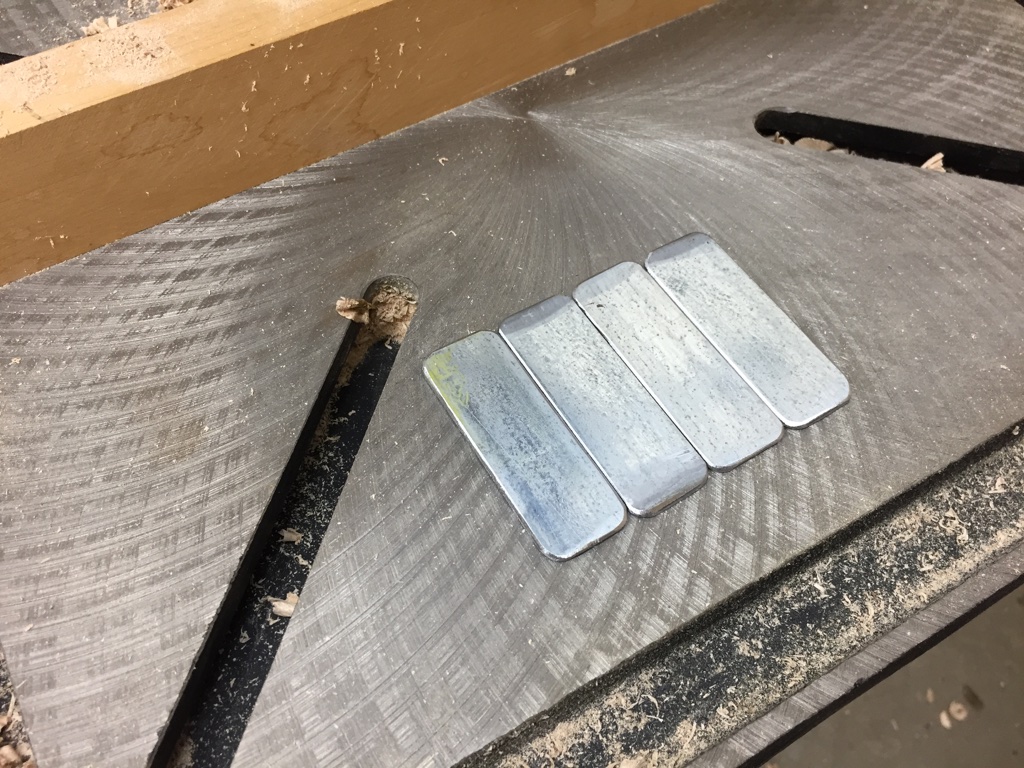
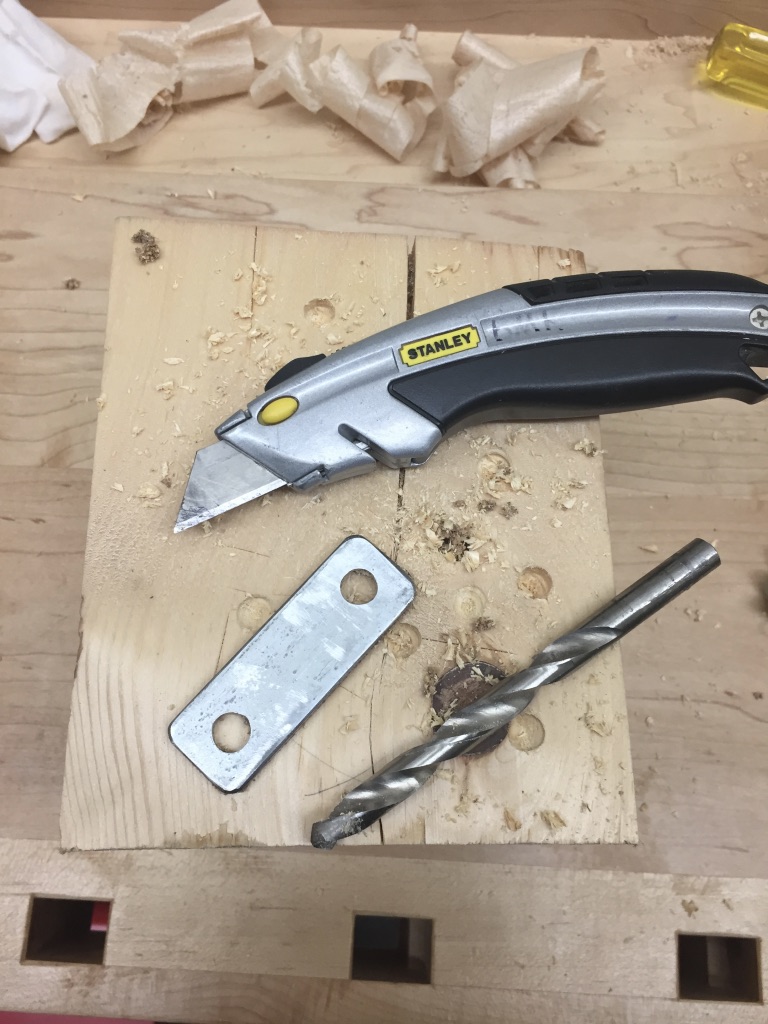
With the woodworking complete, it was time do to some metal working to make a series of small plates that are used to affix the clamp blocks to the dog holes in the bench by way of the 3/8″ bolts. I bought some 1/8″ thick x 1″ wide zinc’ed steel bar at my local hardware store and cut them to 2-7/8″ long. (Note this is 1/2″ shorter than what Frid called for as I as felt 3-3/8″ would have too much slop/space. I also could not find 1/4″ thick bar stock, but think 1/8″ thick is still plenty strong for anything I plan to do with these clamps. Make sure to leave at least 1/4″ of metal on all side around the holes). I cut the pieces to length using an abrasive cut off chop saw, but a hack saw could also get the job done.
Zinc’ed steel bar, cut to size, corners ground round and edge burs removed
I took the metal blanks over to the slow speed grinder and rounded over the corners and chamfered the edges a bit to remove any burs.
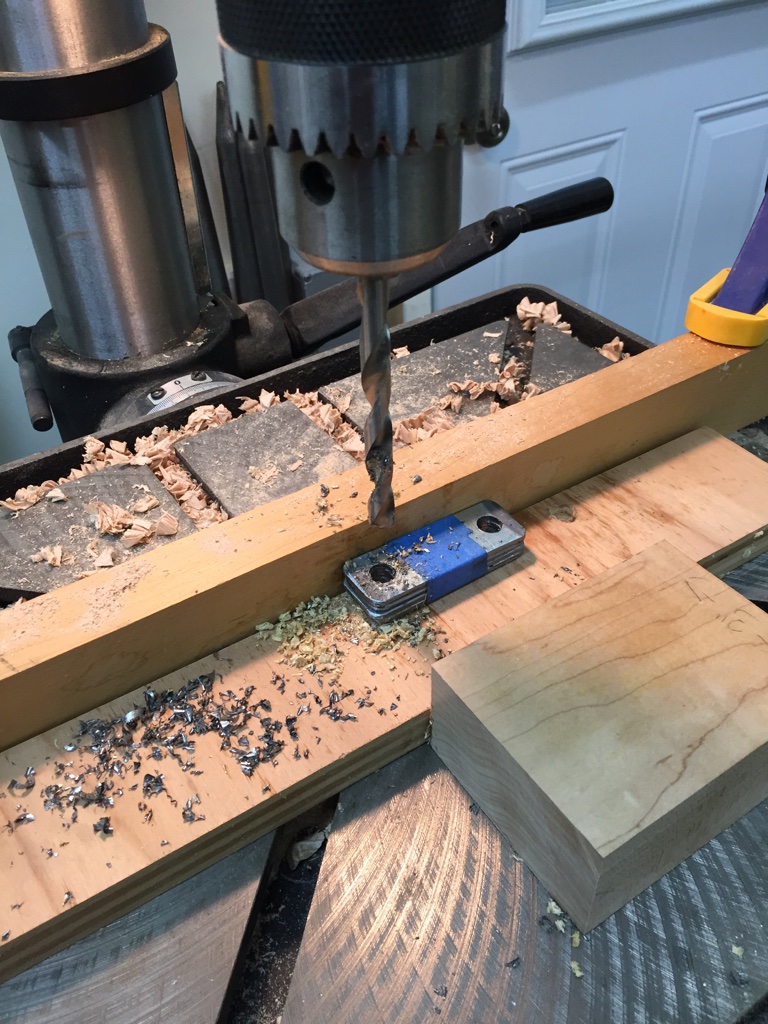
Drilling all four blanks at once.
Next up I stacked/ganged up all 4 pieces and drilled 3/8″ diameter holes at the drill press. The pieces were held together with some strong tape and held in place against my makeshift fence via the scrap block in the foreground of the above picture. Make sure to use some cutting oil and make sure you don’t overheat the metal nor your drill bit. Also use some scrap underneath the blanks to protect your drill press table.
Using a file to clean up and remaining burs and fine tune the work you did on the grinder
With the holes drilled out I took the metal blanks over to a vise wherein I made sure the bolts fit through the holes, cleaning things up with a rat-tail (round) file. I then used a flat mill file to clean up any roughness on the outside edges left from the work at the grinder.
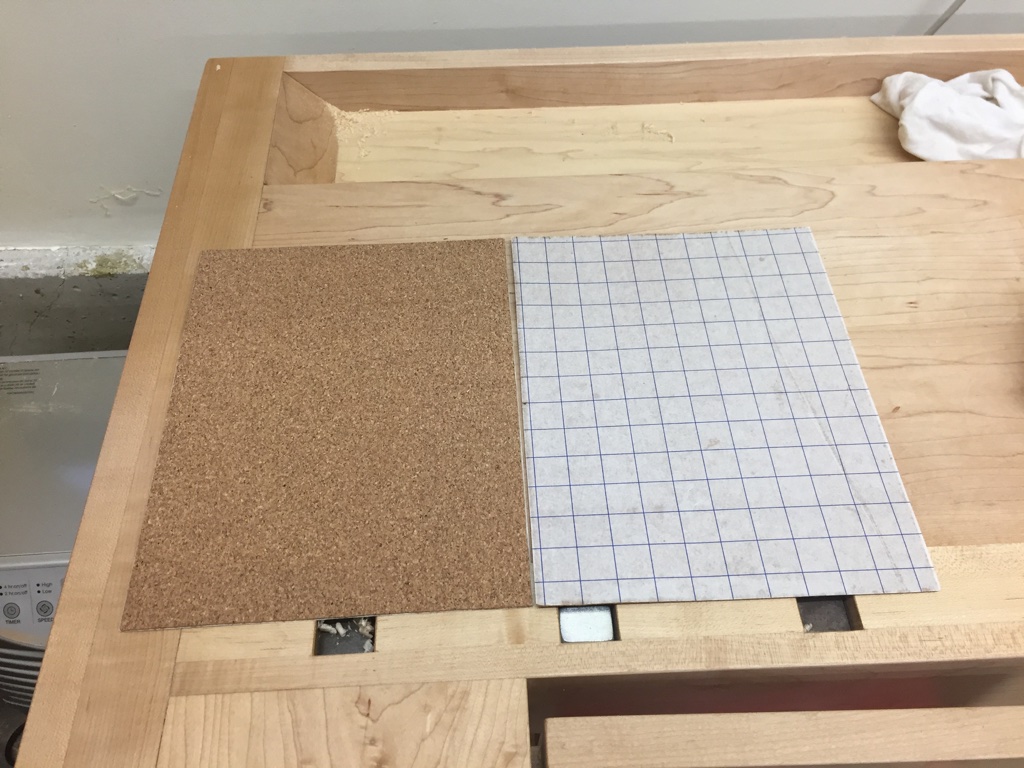
Given my background as an engineer, and touch of OCD I decided to add some self adhesive cork to the sides of these metal plates that might come in contact with my bench top
Self-adhesive cork sheets
I cut the cork to rough size, affixed it to the plate and used a utility knife to cut off any excess around the edge and a 3/8″ drill bit to remove any waste inside the drilled out holes.
Use a utility knife to clean up the cork around the edges of the plate and the 3/8′ drill bit to clean up and cork in the holes
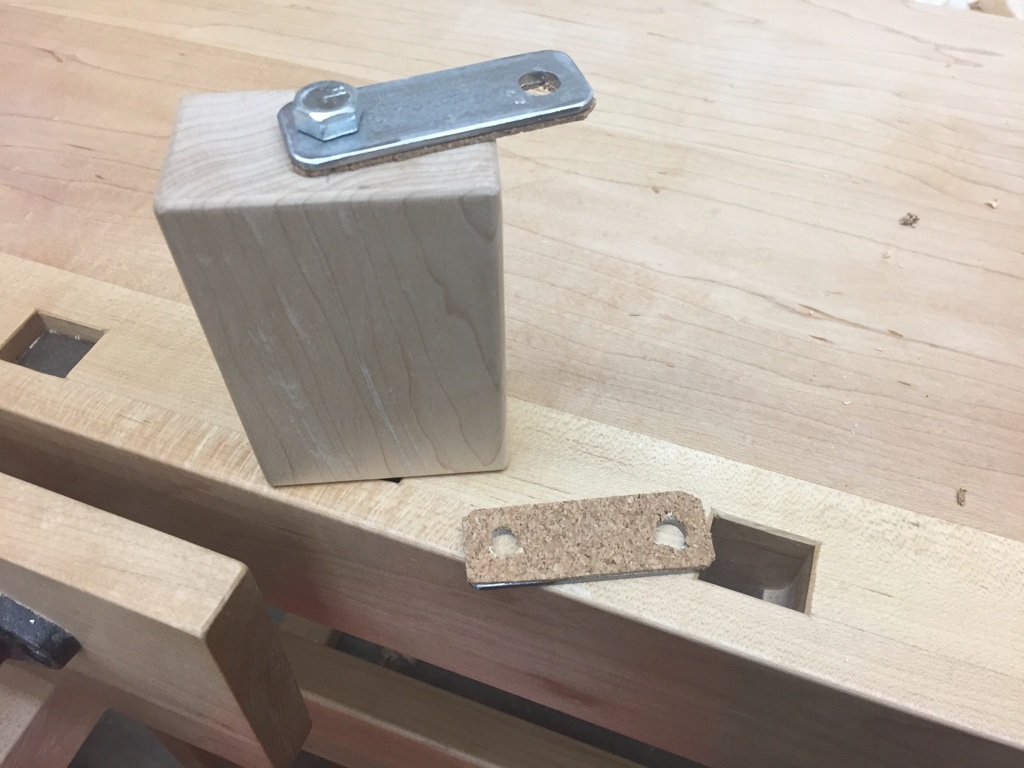
With the metalworking completed, it was time to install the nuts and bolts and try out the clamping blocks. One bolt goes through the top plate, the wood block, the bottom plate and is secured with a nut or five star knob. (I ordered some knobs from Rockler but at the time of this writing they’d didn’t arrive yet, once they come I’ll add some post script to show the clamps with easier to use knobs in place.) The other bolt goes through the top plate, the dog hole, the bottom plate and is secured with another nut.
Assembling a side clamp
Given the use of square dog holes on this bench, and the fact that that blocks are 1/2″ longer than the bench is thick, this allows the side clamps to pivot a few degrees in either direction. This gives you the ability to securely clamp some tapered or irregularly shaped pieces.
The blocks can be moved to different dog holes as needed or removed from the bench altogether. In testing these clamps on a few different items and shapes I found the blocks were surprisingly easy to use and held oversized items with ease.
Large objects are easily held between these side clamps
The Verdict: (So far…)
It was a fun project to build and experiment with. These clamps are useful for specialized clamping needs, such as large items, re-working the edges of a drawer box, planing dovetails flush, and similar operations.
Do I think they will get used every day? No. Do I think they can do a few jobs that would be tougher to do on the bench-top secured via bench dog, hold fast, face or shoulder vise? Yes.
For the small amount of wood, metal and time it took to make these side clamps I think they were a nice addition to my workbench.
If you build some side clamps for your workbench, please share what you thought of them in the comments below.
Take care,
-Bill Rainford
@TheRainford
P.S. If you’d liked to learn about the workbench featured in this post, please check out my related article in the February 2017 issue of Popular Woodworking Magazine which can be found here.
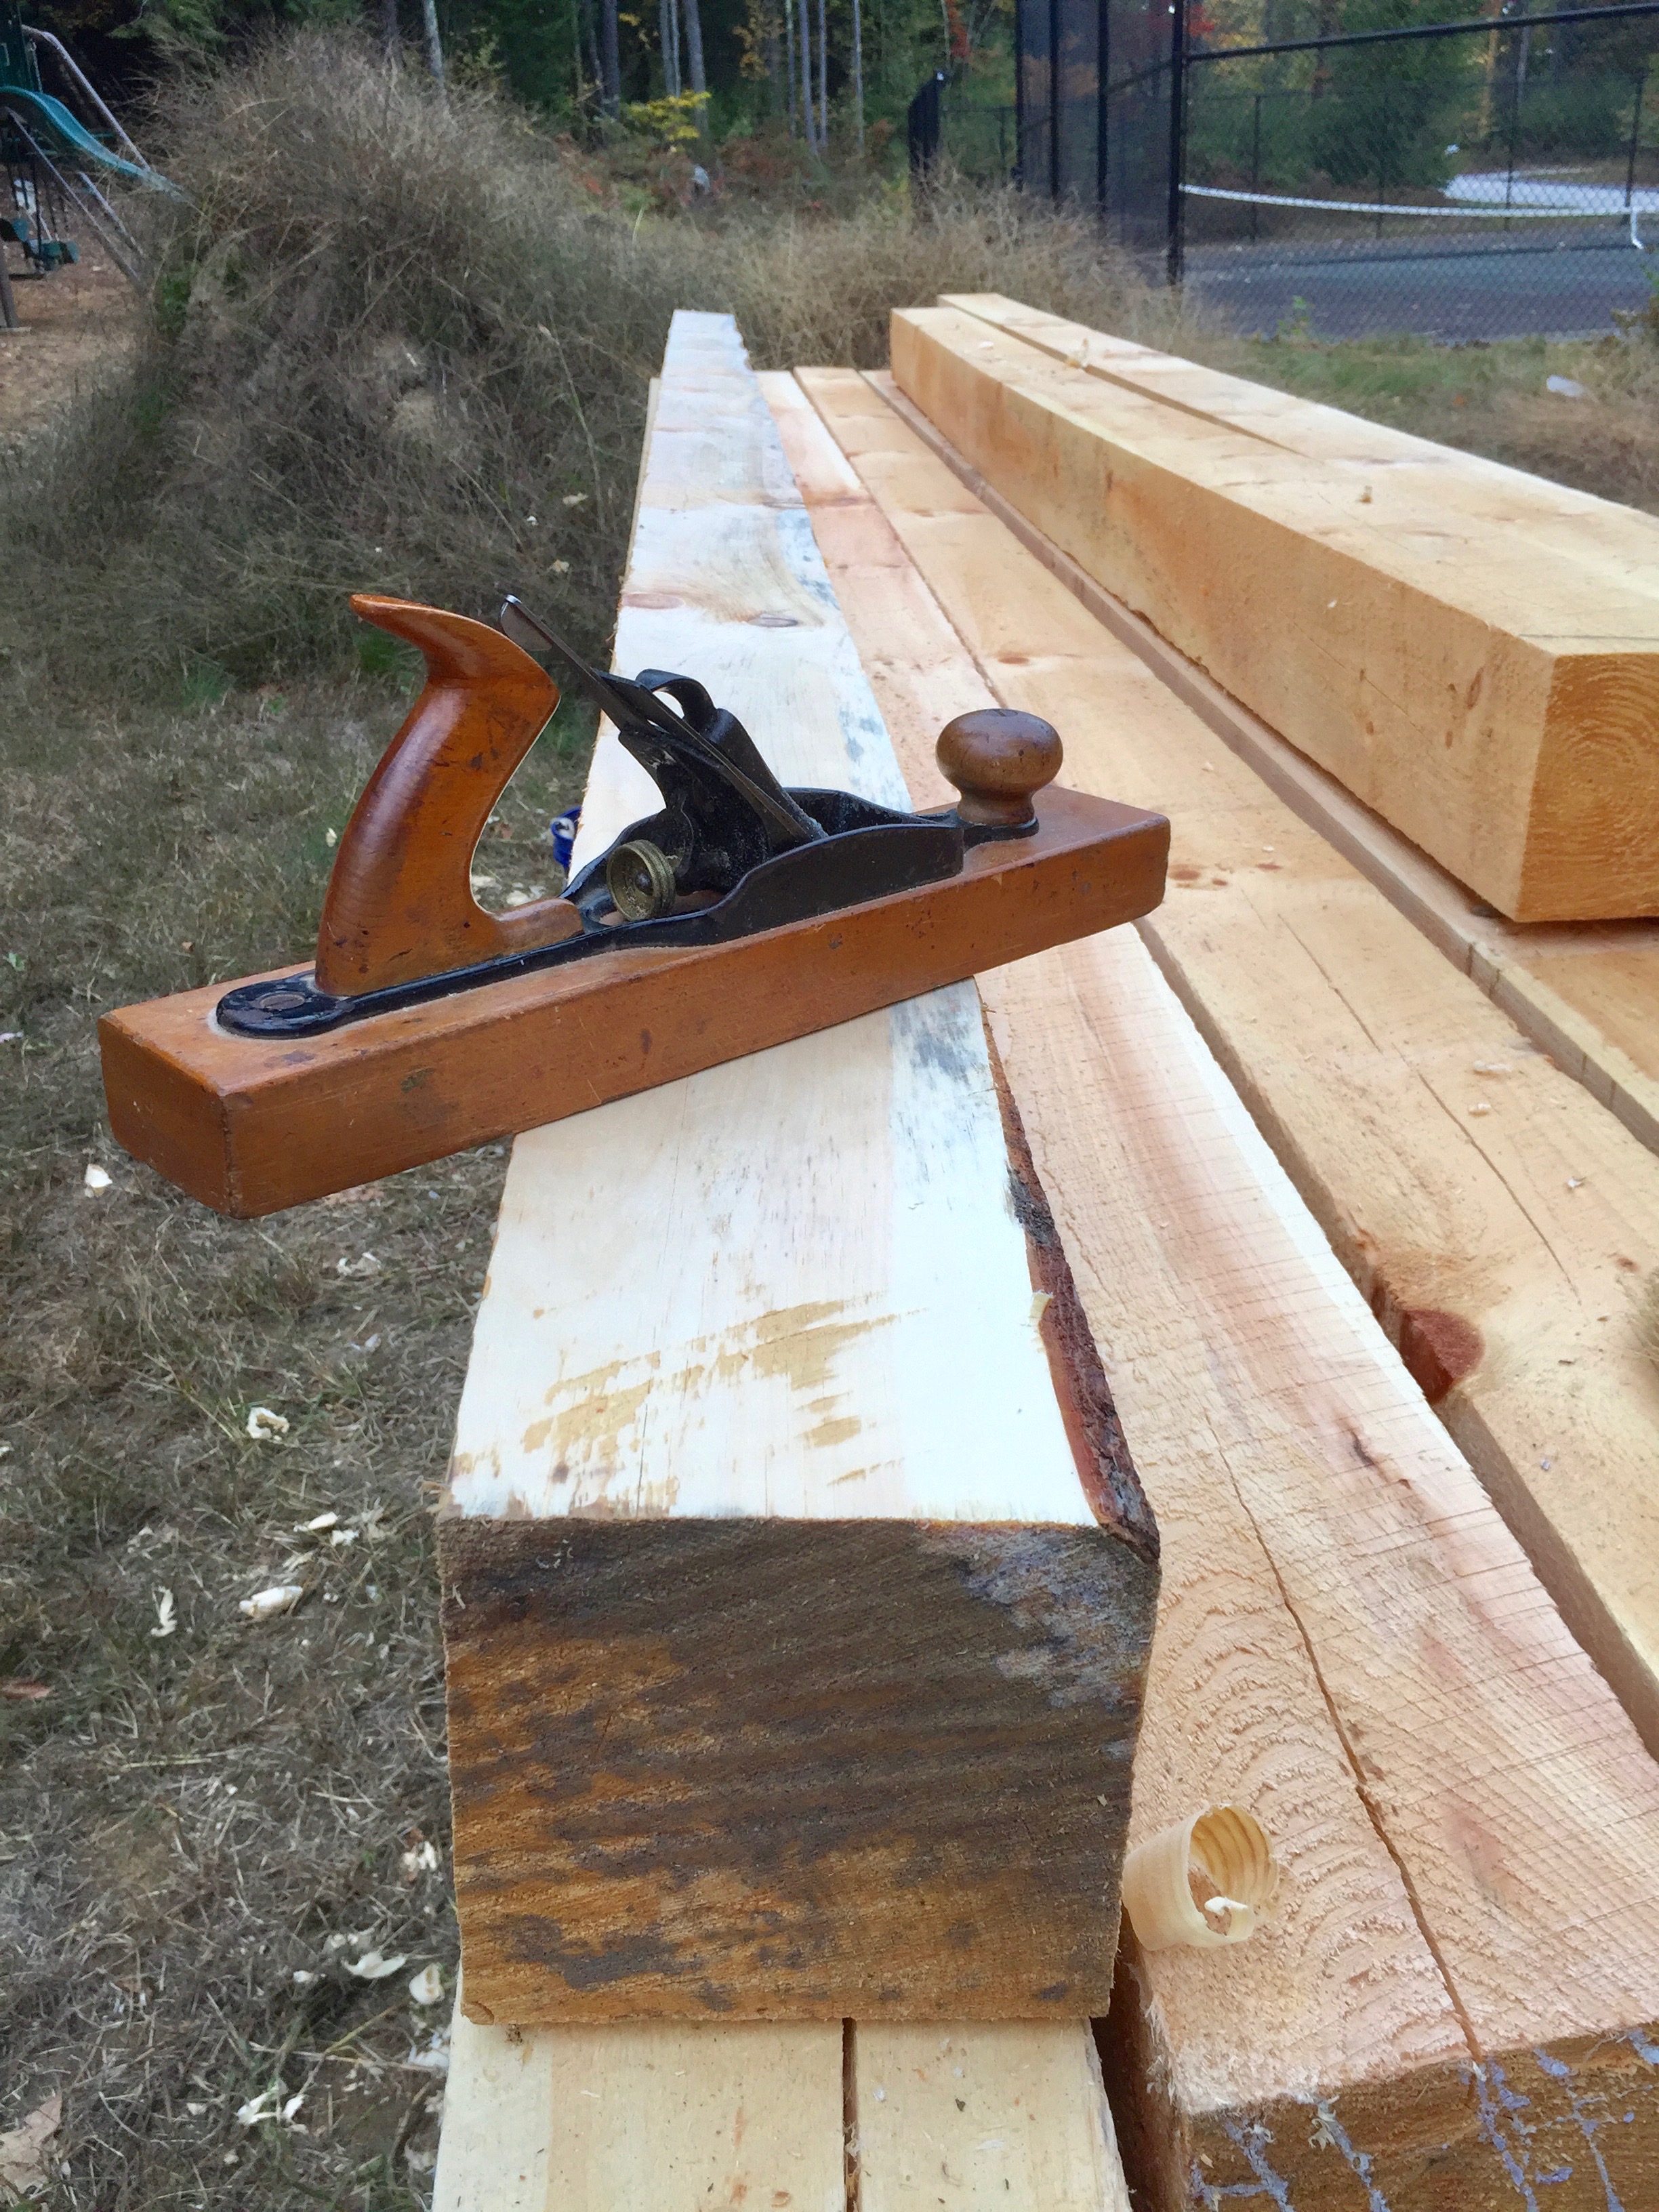
Transitional planes are the pariahs of the woodworking world. The tool collectors don’t want them. Patrick Leach burns them in a funeral pyre. I’ve had a few over the years I got for a song and kept in the shop mostly for decoration.
Cleaned up timber frame post
As I got more into timber framing and working with green timbers it dawned on me that these transitional planes — at least in the jack and jointer sizes might be useful for cleaning up timbers. The large wooden sole doesn’t rust the way a metal plane would when exposed to wet wood for long periods of time and you have a more or less modern Bailey style mechanism. The one annoying thing about the mechanism on a transitional plane is the blade advancement wheel spins the opposite way a metal plane works, but after a few minutes you get used to it.
Bill using a traditional jack plane to clean up timber
For some timber frames I need to clean up and remove all the large circular saw or bandsaw marks. In a workshop or outbuilding being fresh from the mill is fine, but in a house all those rough surfaces can be a dust magnet or source of splinters.
With a nice camber it makes quick work of dressing a green eastern white pine timber
On my jack plane I’ve ground a camber appropriate to a jack plane and take a reasonably heavy shaving. The work goes fast and I admit its fun to make a 25′ foot long shaving on some of the largest timbers.
At first I felt bad about using a plane from the 1870s for this sort of work, but if properly maintained it will have a surprisingly long life and I’d rather see this plane get used as opposed to being in a pyre or on a shelf.
At the end of the day I make sure to remove the iron and wipe it down with oil so it does not rust and I’ll usually give the sole a little more wax.
Transitional Jack Plane in its new habitat
I can usually find these planes in surprisingly good shape for $10-35. If you’re willing to take one with more rust on the mechanism or a replacement sole you can likely get it for even less or even free from some dealers if you buy a few other items. The next time you are at a tool swap you may want to take a second look at a transitional plane and score yourself a good deal on a solid workhorse for your own timber framing or green woodworking projects.
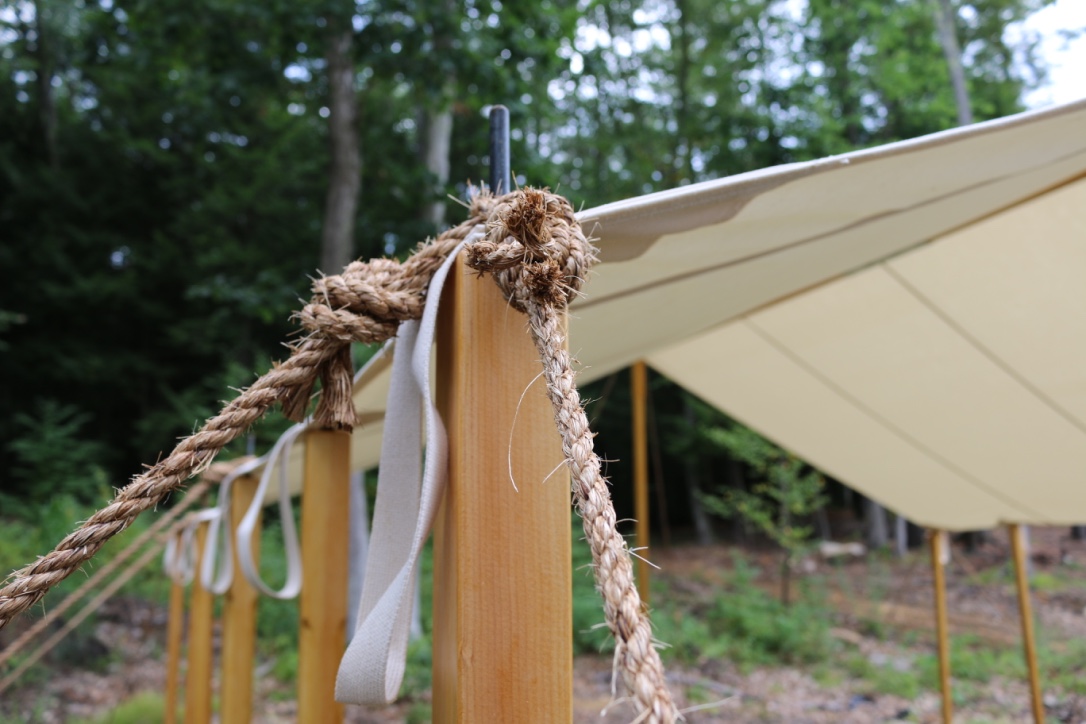
It can take a long time to make a tent fly — but it’s worth it.
What is a Tent Fly?
A fly refers to the outer layer of a tent or to a piece of material which is strung up using rope as a minimalist, stand-alone shelter. In basic terms, a fly is a tent without walls. Purpose-made stand-alone flies are also sometimes referred to as bivouacs, bivvies, tarpaulins, or hootchies. — Wikipedia
A few years ago I didn’t know what I tent fly was, at least not by name, but on one of my visits to Eastfield Village I saw a nice one that Billy McMillen built and used. On some visits to Colonial Williamsburg I also checked out a huge tent fly that Garland and Ted and the guys had and decided I wanted to build one for myself. I wanted a place to work on timber framing elements out of the sun and rain, a tarpaulin for when we have a party in the yard, maybe a craft fair or a re-enacting event.
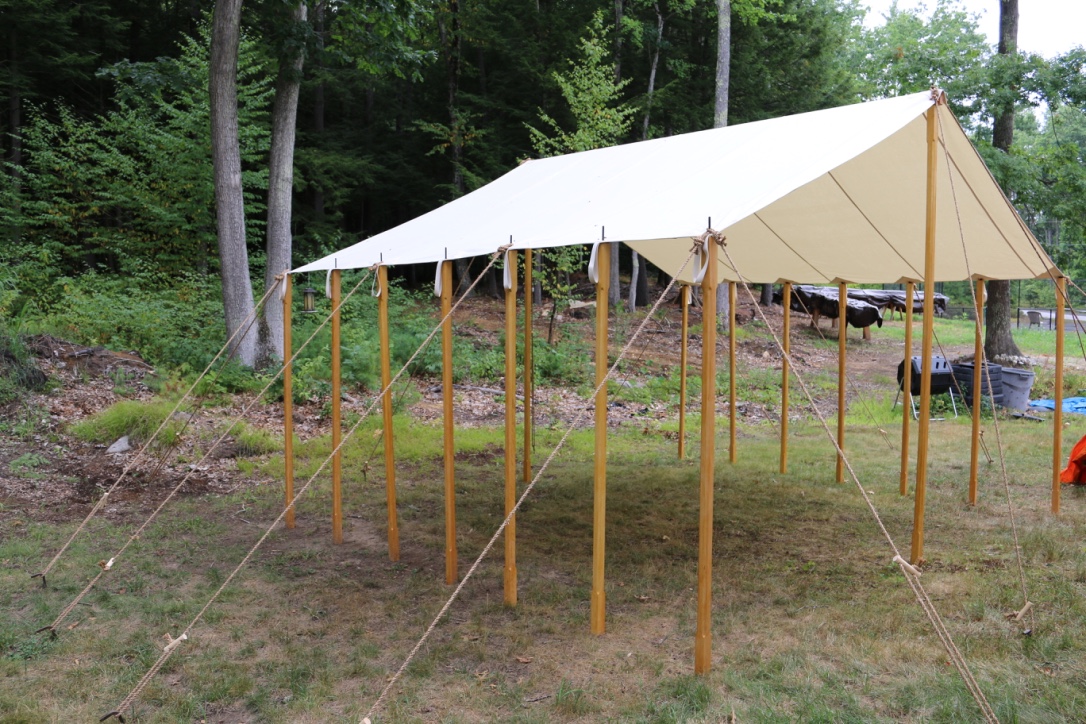
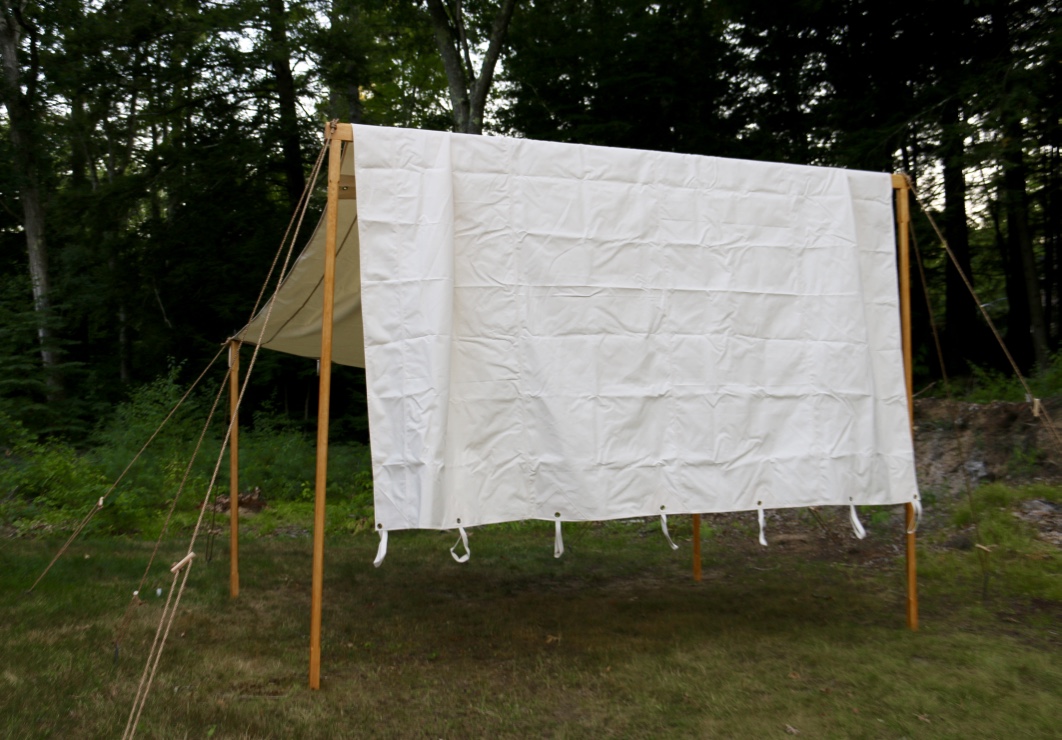
Tent Fly ready for use.
I decided to go with a custom made tent fly from Panther Primitives — an outfit Billy and Garland both recommended and big in the re-enacting community for making top quality tents. I went with the 12’x16′ Tent Fly with the 13oz Flame Retardant Sunforger Heavy Duty Canvas. I also had a special request to have grommets and loops so I could support the outer edges of the tent with a series of posts or a post and beams depending on how the fly will be used. I also ordered 16 manila rope sets, heavy duty stakes, a canvas bag for the ropes, bag for the tent and bag for the ropes. The folks at Panther were great to work with and make and excellent product — superior materials and craftsmanship.
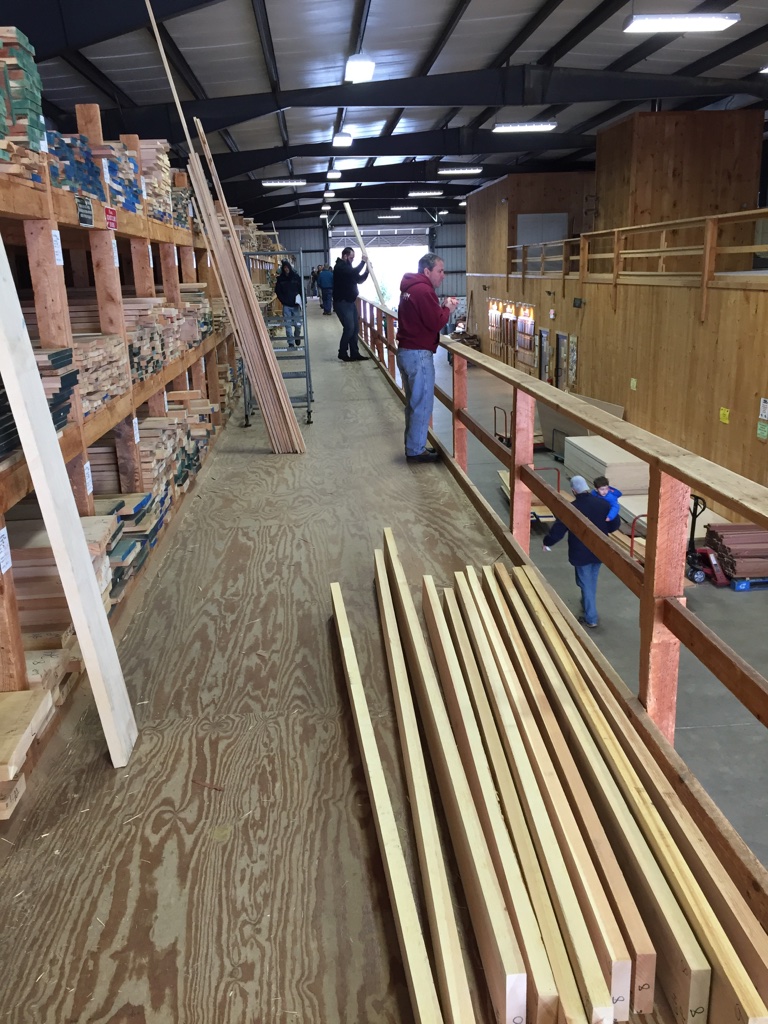
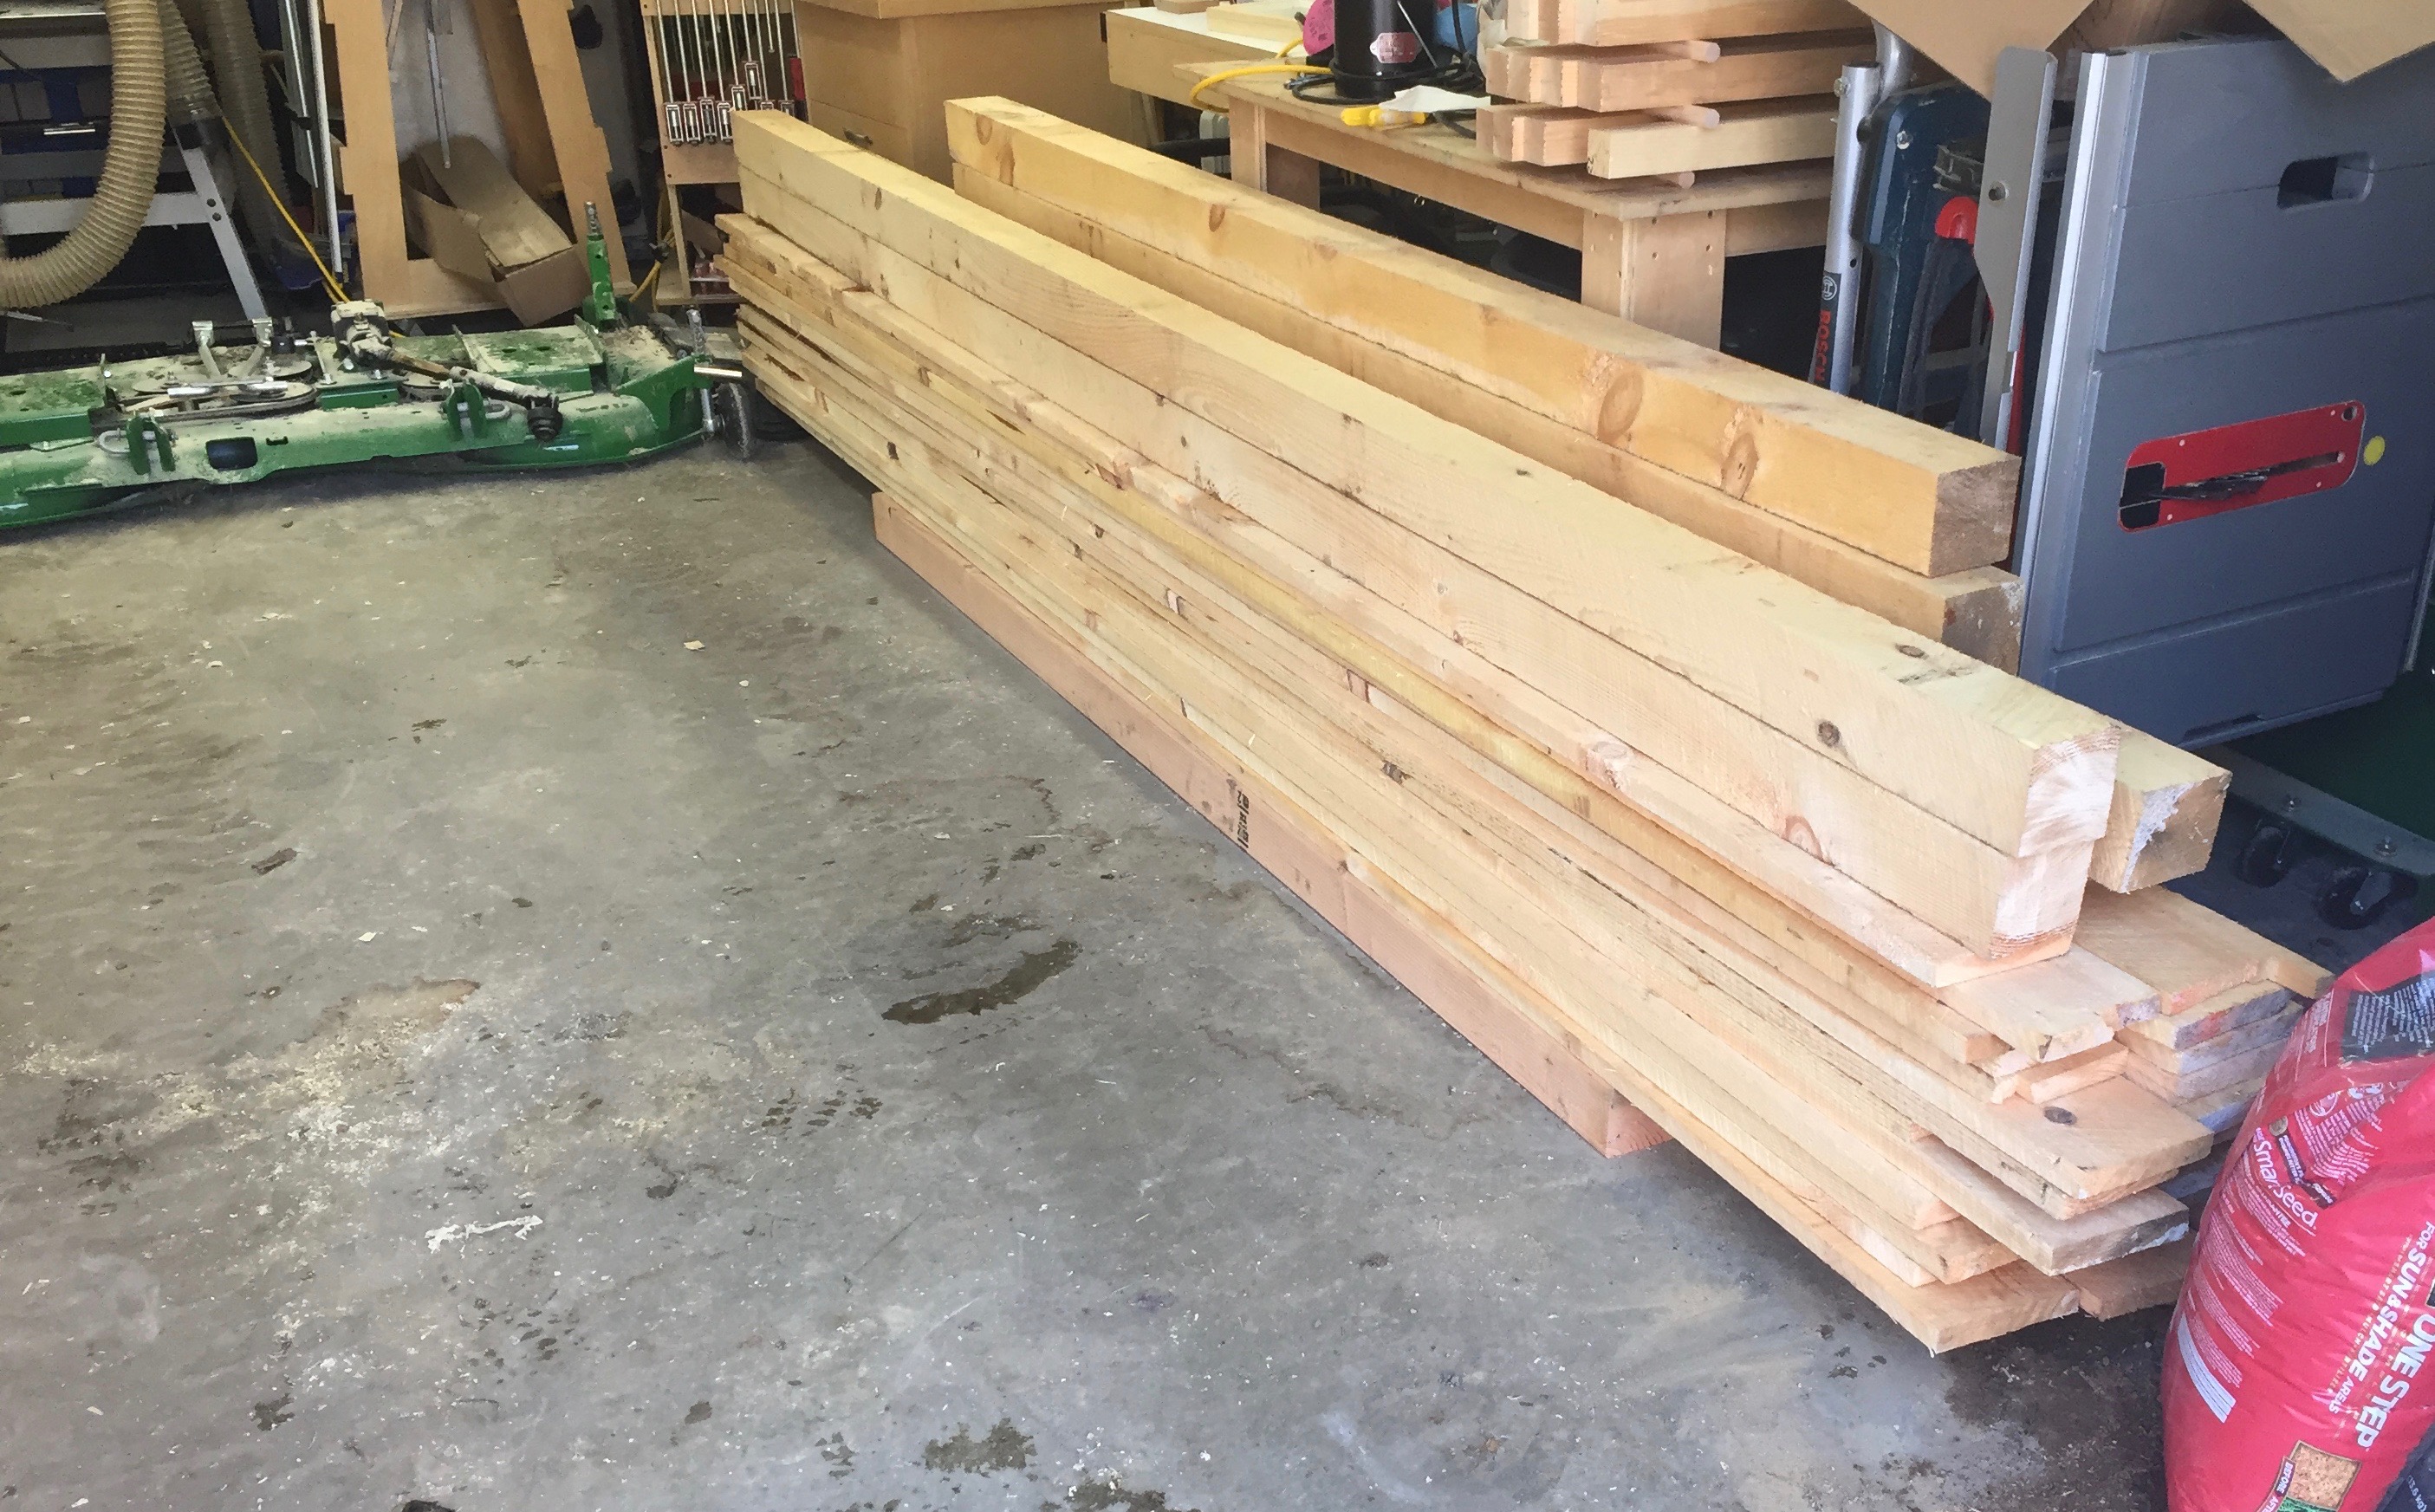
The project starts at the wood supplier — in this case Highland Hardwoods — my favorite.
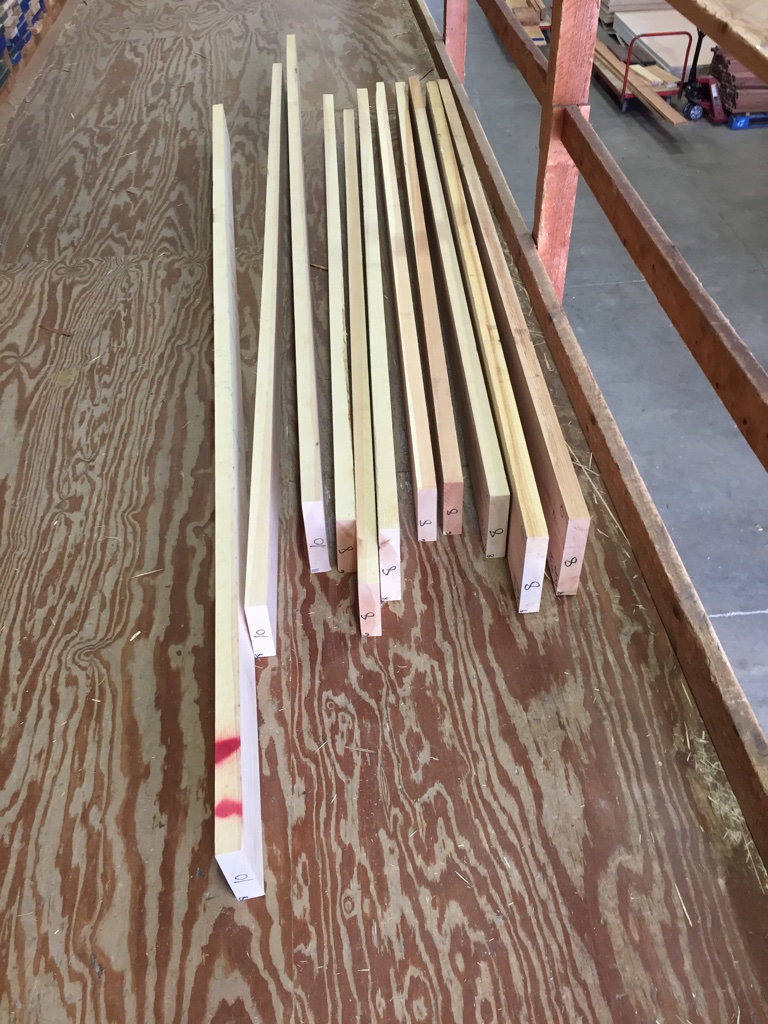
With the canvas taken care of it was time for me to build the necessary posts to support this tent. Like any good woodworking project it starts at your wood supplier. I went to my perennial favorite — Highland Hardwoods in Brentwood NH. I carefully selected some straight grained 8/4 Eastern White Pine. I ripped the pieces to rough size, power planed and jointed each of the pieces and removed the mill marks with a hand plane.
Carefully select straight grained easter white pine.
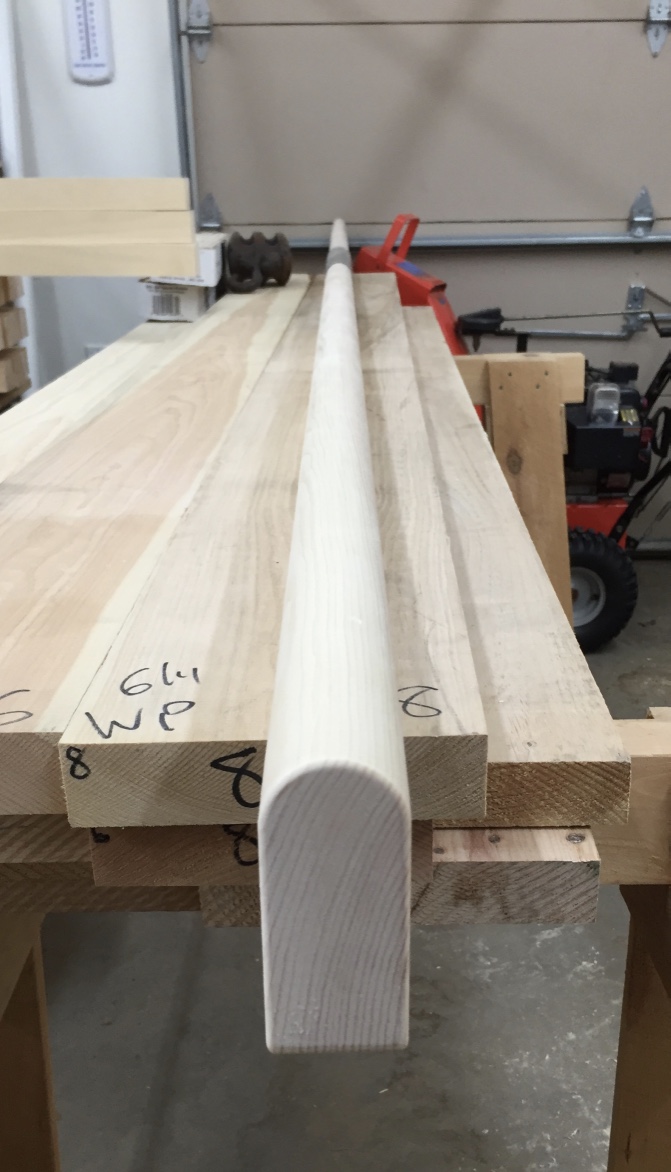
The center of the tent is supported by a larger beam –12.5′ long and roughly 2″x4″ — with a rounded over top. This beam is made from two pieces joined in the center with a simple metal connecting collar.
Stock getting ripped down to size and hand planed. Rounding over top of beam.
For each of the 2″x2″ upright support posts I routed in stop chamfers and used a 1/8″ radius rounding bit to break and square edges.
Creating stop chamfers on all the posts.
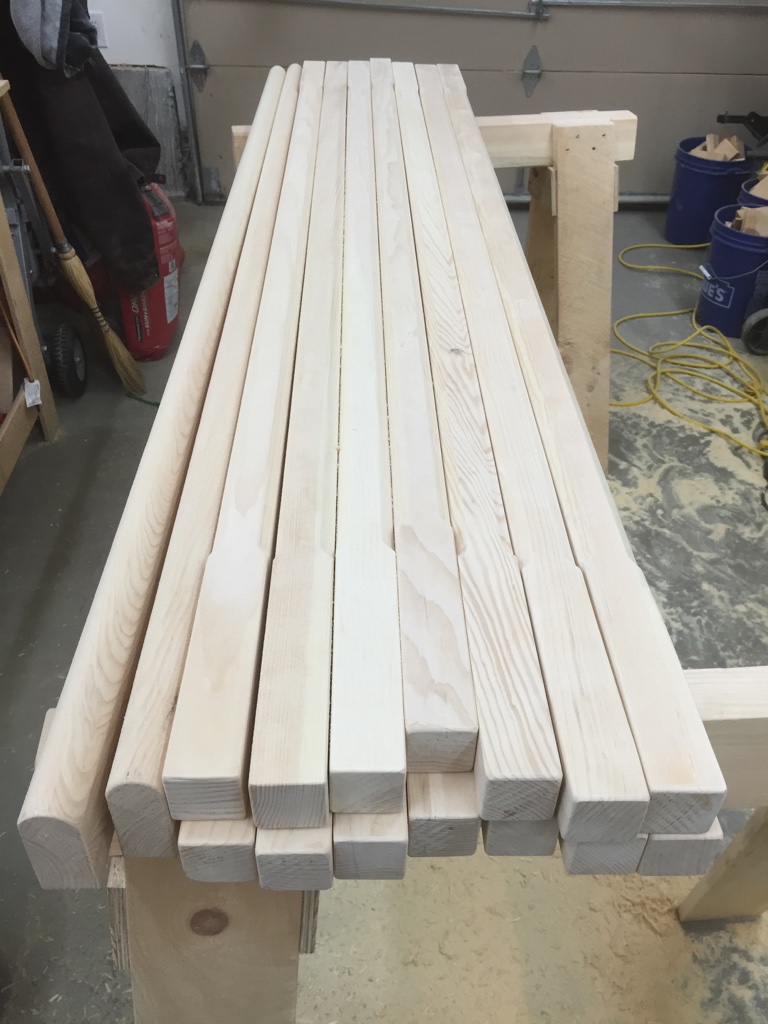
I then removed any mill marks from the routing. With 14 6′ tall posts and two 9′ tall posts it took a while to get all the woodworking up to this stage.
Shaping completed.
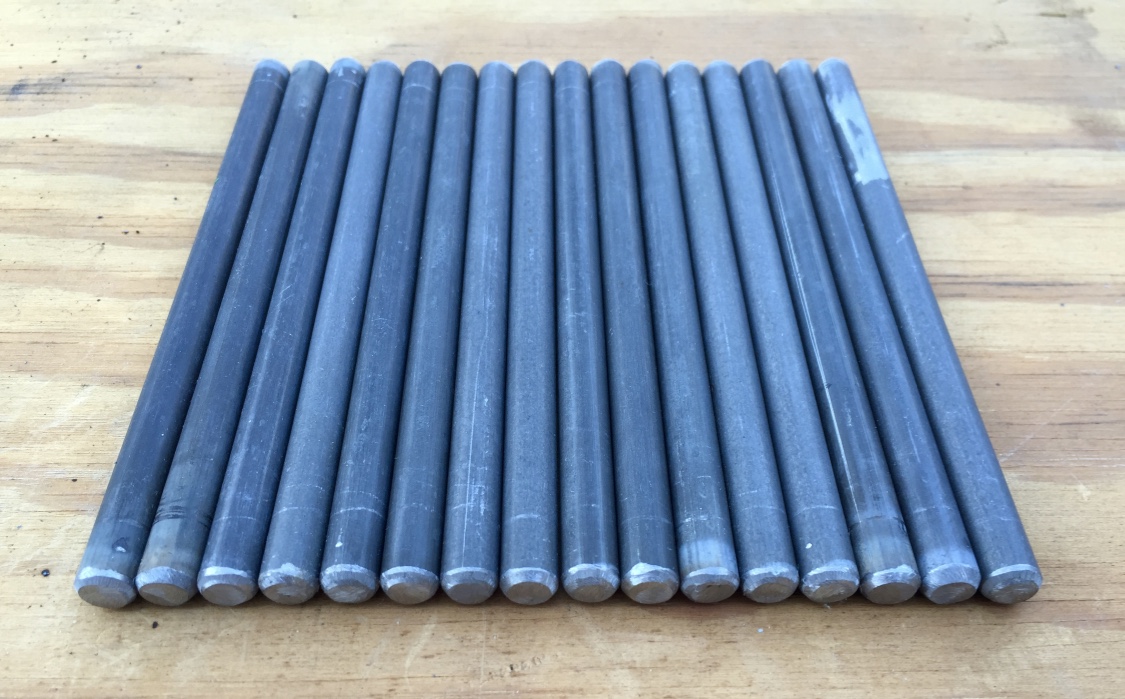
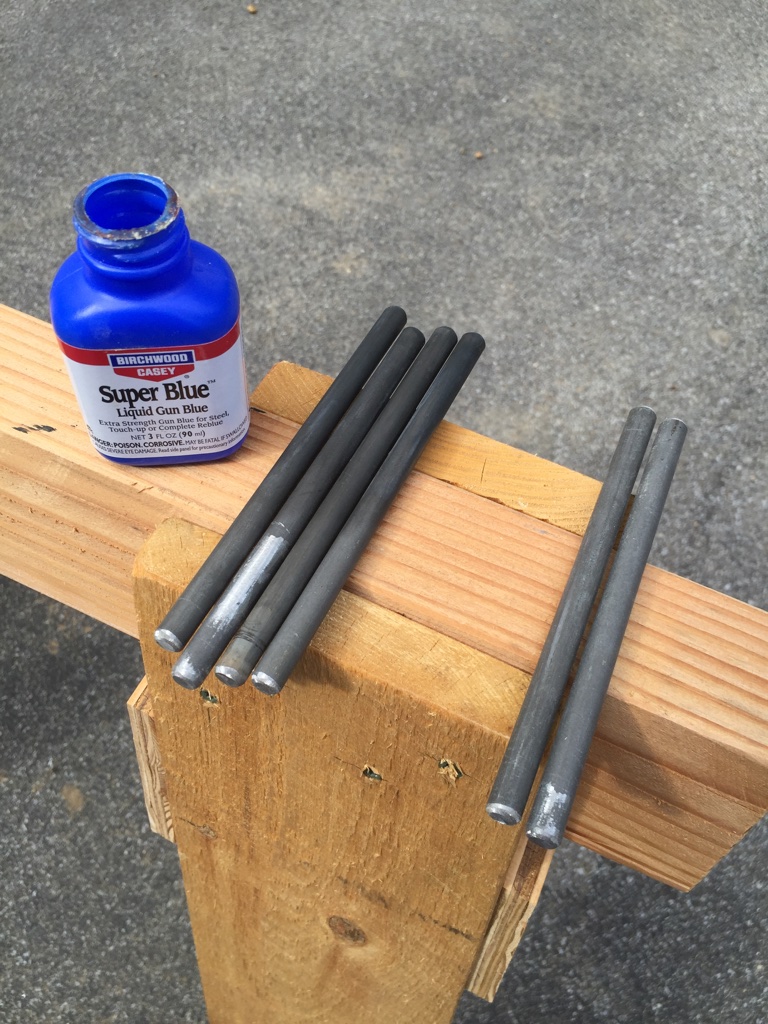
Next up was cutting 3/8″ metal rods to about 6″ long for each of the 6′ posts. The two 9′ tall posts needed 9″ long metal rods.
Rods cut with metal cut off saw and edges ground back on a slow speed grinder.
Once cut with an abrasive cut off wheel I rounded over the ends/corners of the rods on a slow speed grinder.
Ground rods for all the lower posts
The mild steel rods from the hardware store are prone to rusting and have a bit of a modern look to my eye, so I cleaned them off with alcohol and then applied Super Blue (Gun Blue) to ends of the rod that would be exposed. The dark gray/black patina looked like older ironwork to my eye and at the least darkened all the freshly exposed steel from the cutting and grinding process. I’d also advise sealing it after that fact — with some lacquer or similar clear film finish that won’t react with he metal.
Using Gun Blue to give the the rods a black patina. (Left are blued and right are just cleaned with alcohol)
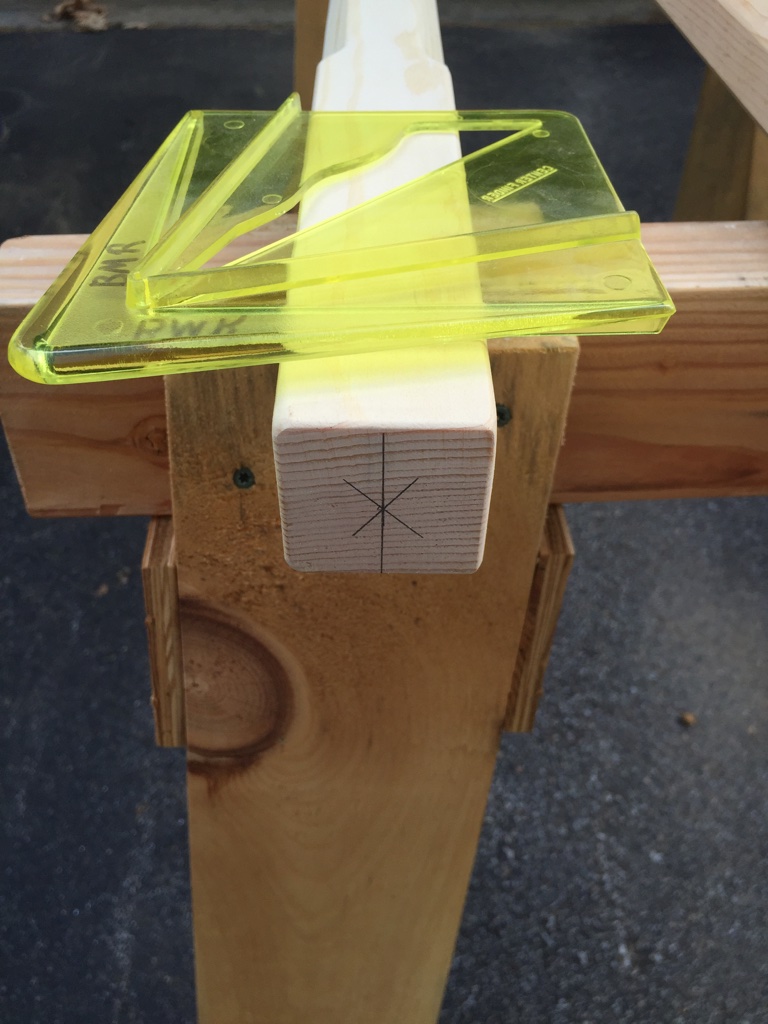
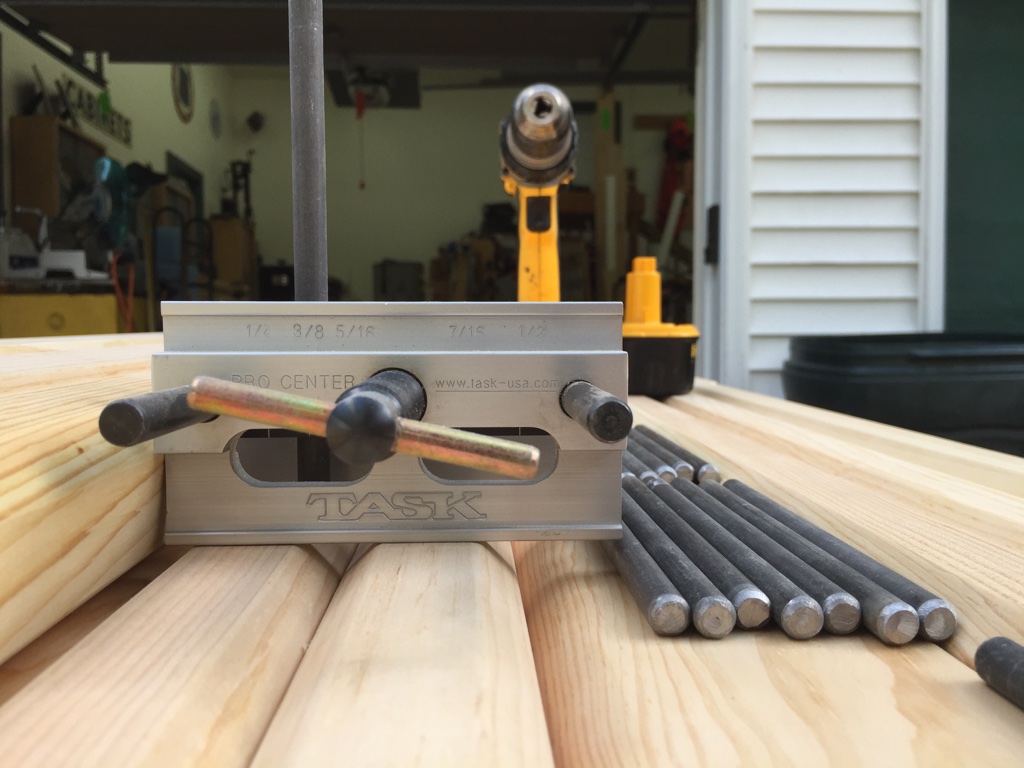
I used a center finder gauge to mark where I should be drilling a 3/8″ diameter hole, 3 inches deep into the end of the posts.
Marking centers on the posts
I also used a doweling jig keep the drill bit straight as I drilled into the ends of the posts.
Doweling jig used to center and guide holes drilled into the end of the posts.
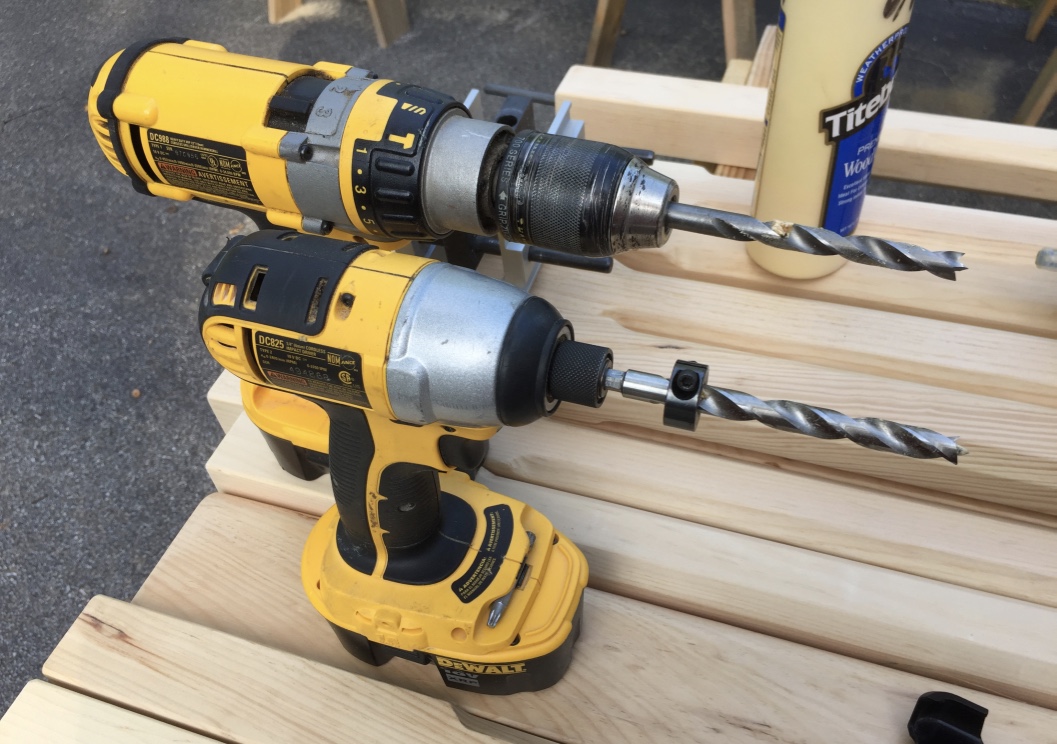
In order to accurately and repeatably drill to that depth and use the doweling jig which is pretty thick I needed to use two drills with the same size of bit. The drill (upper tool in photo below) is used with the jig to drill as deep as it will go. The drill is removed along with the jig. The impactor (lower tool in photo below) has a bit with an appropriately set stop collar to control the depth is used to complete the hole. The initial hole created using the drill and doweling jig provide a nice guide for the impactor + stop collared bit to reach the required depth.
(Upper) Drill used to drill most of the whole through the doweling jig. (Lower) Impactor (or second drill) with bit and stop collar used to complete the hole at the proper depth.
I then test fit/cleaned out the holes and glue the rods into place. (Make sure the blackened end is exposed). Ideally you want to use a high quality epoxy like the West System 2 part epoxy. I also installed tapered rubber washers from Panther that will help keep water out and keep the grommets where you want them on the metal rods.
Rods glued and inserted into the ends of the poles.
The freshly milled eastern white pine pine is a very pale white.
Applied amber shellac to give the pint some color. Followed this up with some UV stabilized satin water based polyurethane.
To give the wood a more pleasing color I gave it a coat or two of amber shellac. I then followed that up with two coats of a UV stabilized General Finishes satin polyurethane, sanding between coats as need.
Fitting the metal connector to support the top beams.
With the woodworking complete it was time to join the top beam together using the metal bracket. Use two large pan head screws to secure the wood into the connector. Also drill two holes through the top beam for the pins to pass through.
Insert the 9′ poles into the center beam.
Insert the two 9′ posts into the vertical holes in the top beam. When I did the metal working I initially put the same 6′ metal rods into the 9′ tall posts, but realized the rod would not stick out the top of the beam, so I had to add 9″ rods to the other ends of the 9′ posts, but this worked out great as the accidental shorter rods now on the bottom of the tall posts help keeps the posts from kicking out when you are trying to stand up and secure the posts.
Drape the canvas evenly across the beam.
Drape the canvas over the top of the beam and carefully raise it to an upright position — you’ll want a helper for this. With the posts, beam and canvas in an upright position you’ll want your helper to keep it standing up while you secure the storm ropes — attaching them first to a stake you have to drive into the ground (with the stake angled away from the tent) with a heavy mallet, then to the rod on top of the post. Then use the wood block on the rope set to tighten up the rope.
Raise the center beam, secure the support ropes and set the exterior posts and ropes.
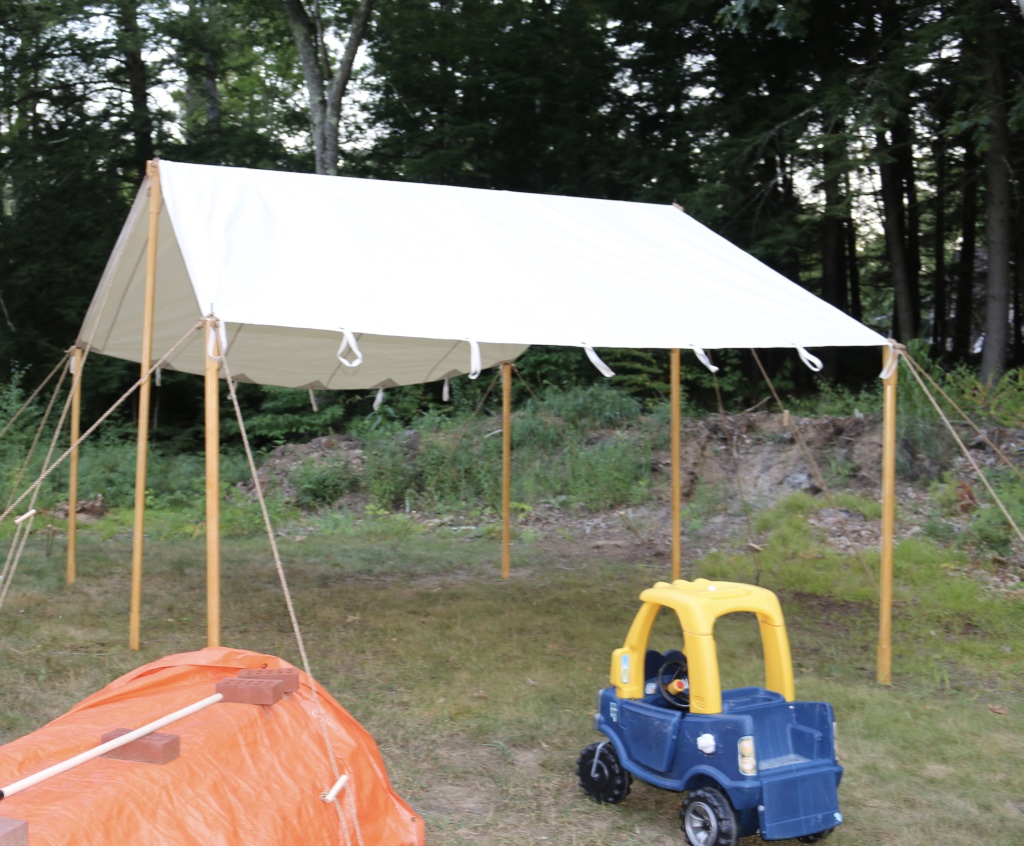
Next install the corner posts and install 2 rope sets on each corner deployed at 90 degrees from each other.
Work your way around the corner posts. (My 2 year old son already likes parking his little tikes pickup under it next to my saw horses)
Then install any additional posts you want to use. I built enough posts to fill every grommet on the canvas. Every other post on the side of the tent also got a single rope set and stake to further anchor the test to the ground. If you find your self coming and going through the lower side of the ten you can remove 1 or more of those side posts to give you better access.
Completed test standing.
With a new canvas and rope sets you’ll want to check the ropes every day as things will stretch a bit and can get loose. Eventually they’ll stabilize and you can enjoy the use of your new tent fly.
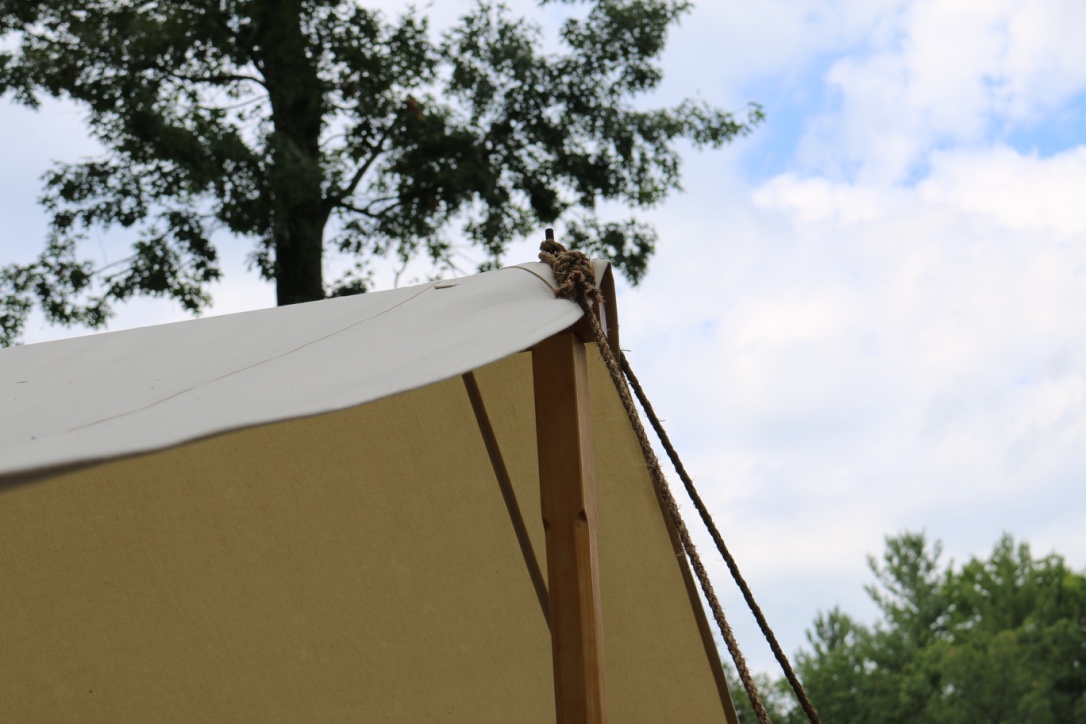
Storm lines at the ridge.
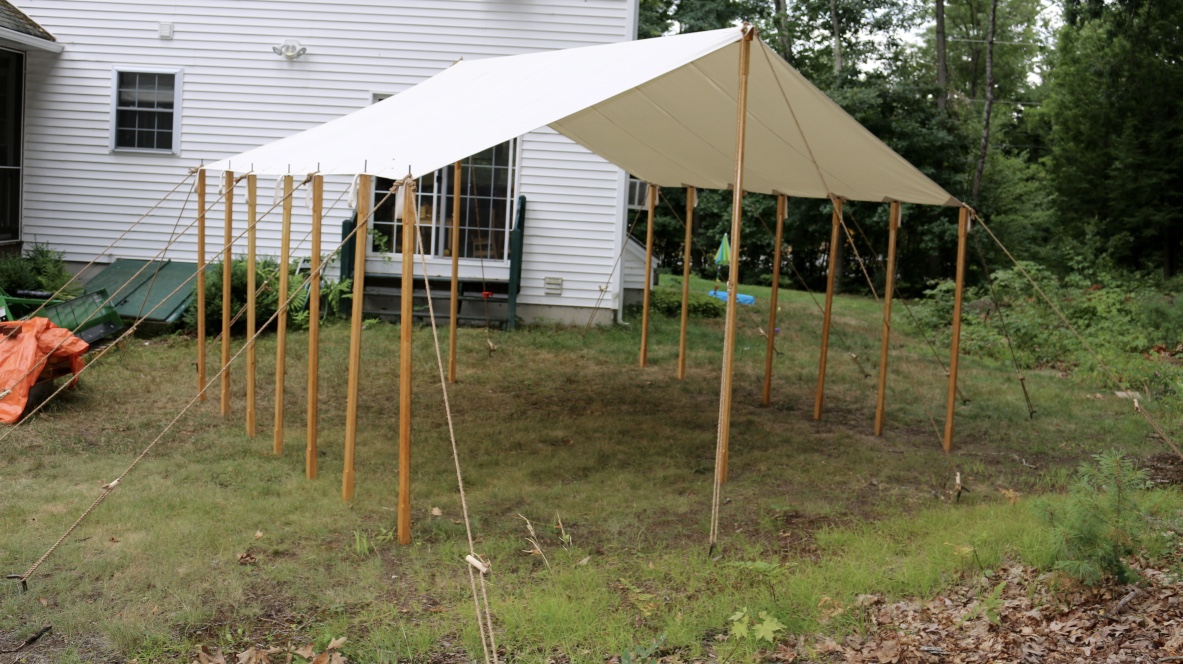
The 9′ high ridge beam and 6′ high ends are a bit higher than average but allowed me to walk in and out of the tent with ease and gave me a good size work space under the protection of the tent.
Tie down ropes secured.
It was a lot of work and a lot of fun to put together and I look forward to a long useful life for this tent.
Take care,
-Bill
P.S. If you build your own tent fly, please tell us about it in the comments below.
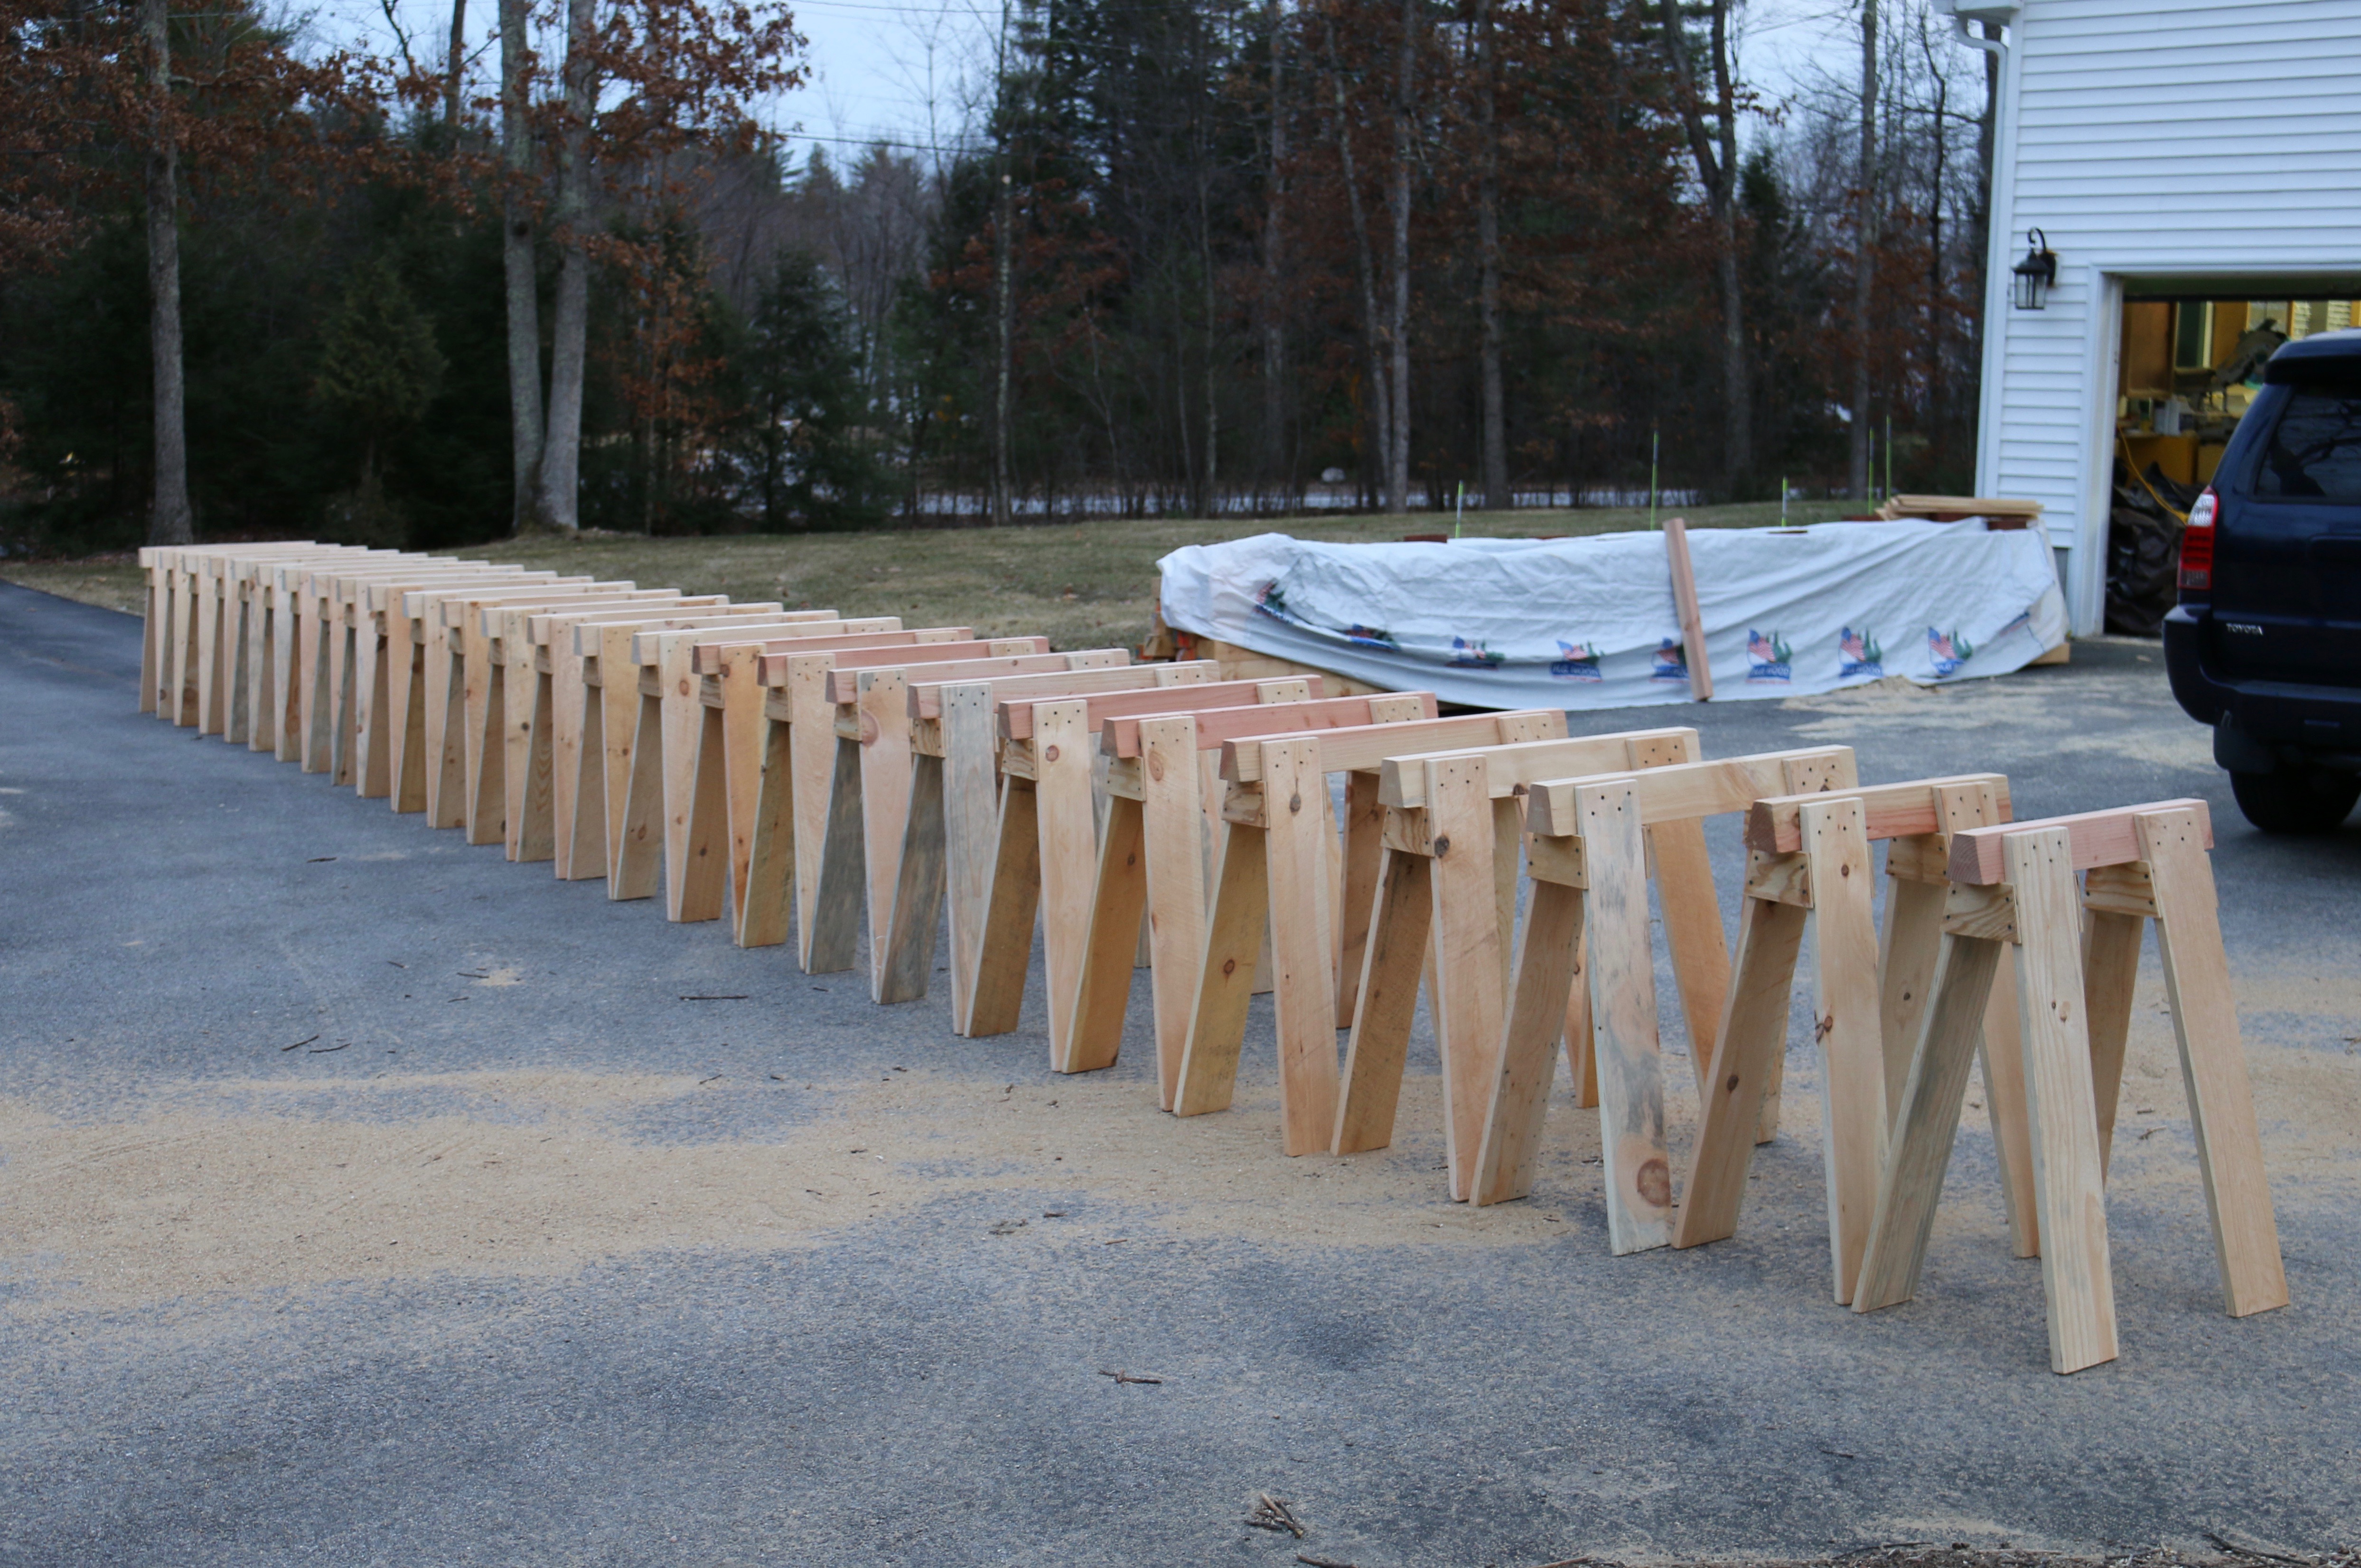
The best saw horses cannot be bought in a store, you have to build them. I’ve seen plastic saw horses bend and buckle under < 200 pounds of load. I’ve seen 2×4 saw horses with sheet metal couplers deform and crush.
When I was a student at NBSS one of the first projects we completed was building a pair of solid wood saw horses that could meet the heavy demands of a preservation carpenter. The school would load them up with more material than I ever thought a simple horse could hold. I was so impressed with how well they turned out I built 10 more while I was there and they have served me well over the years.
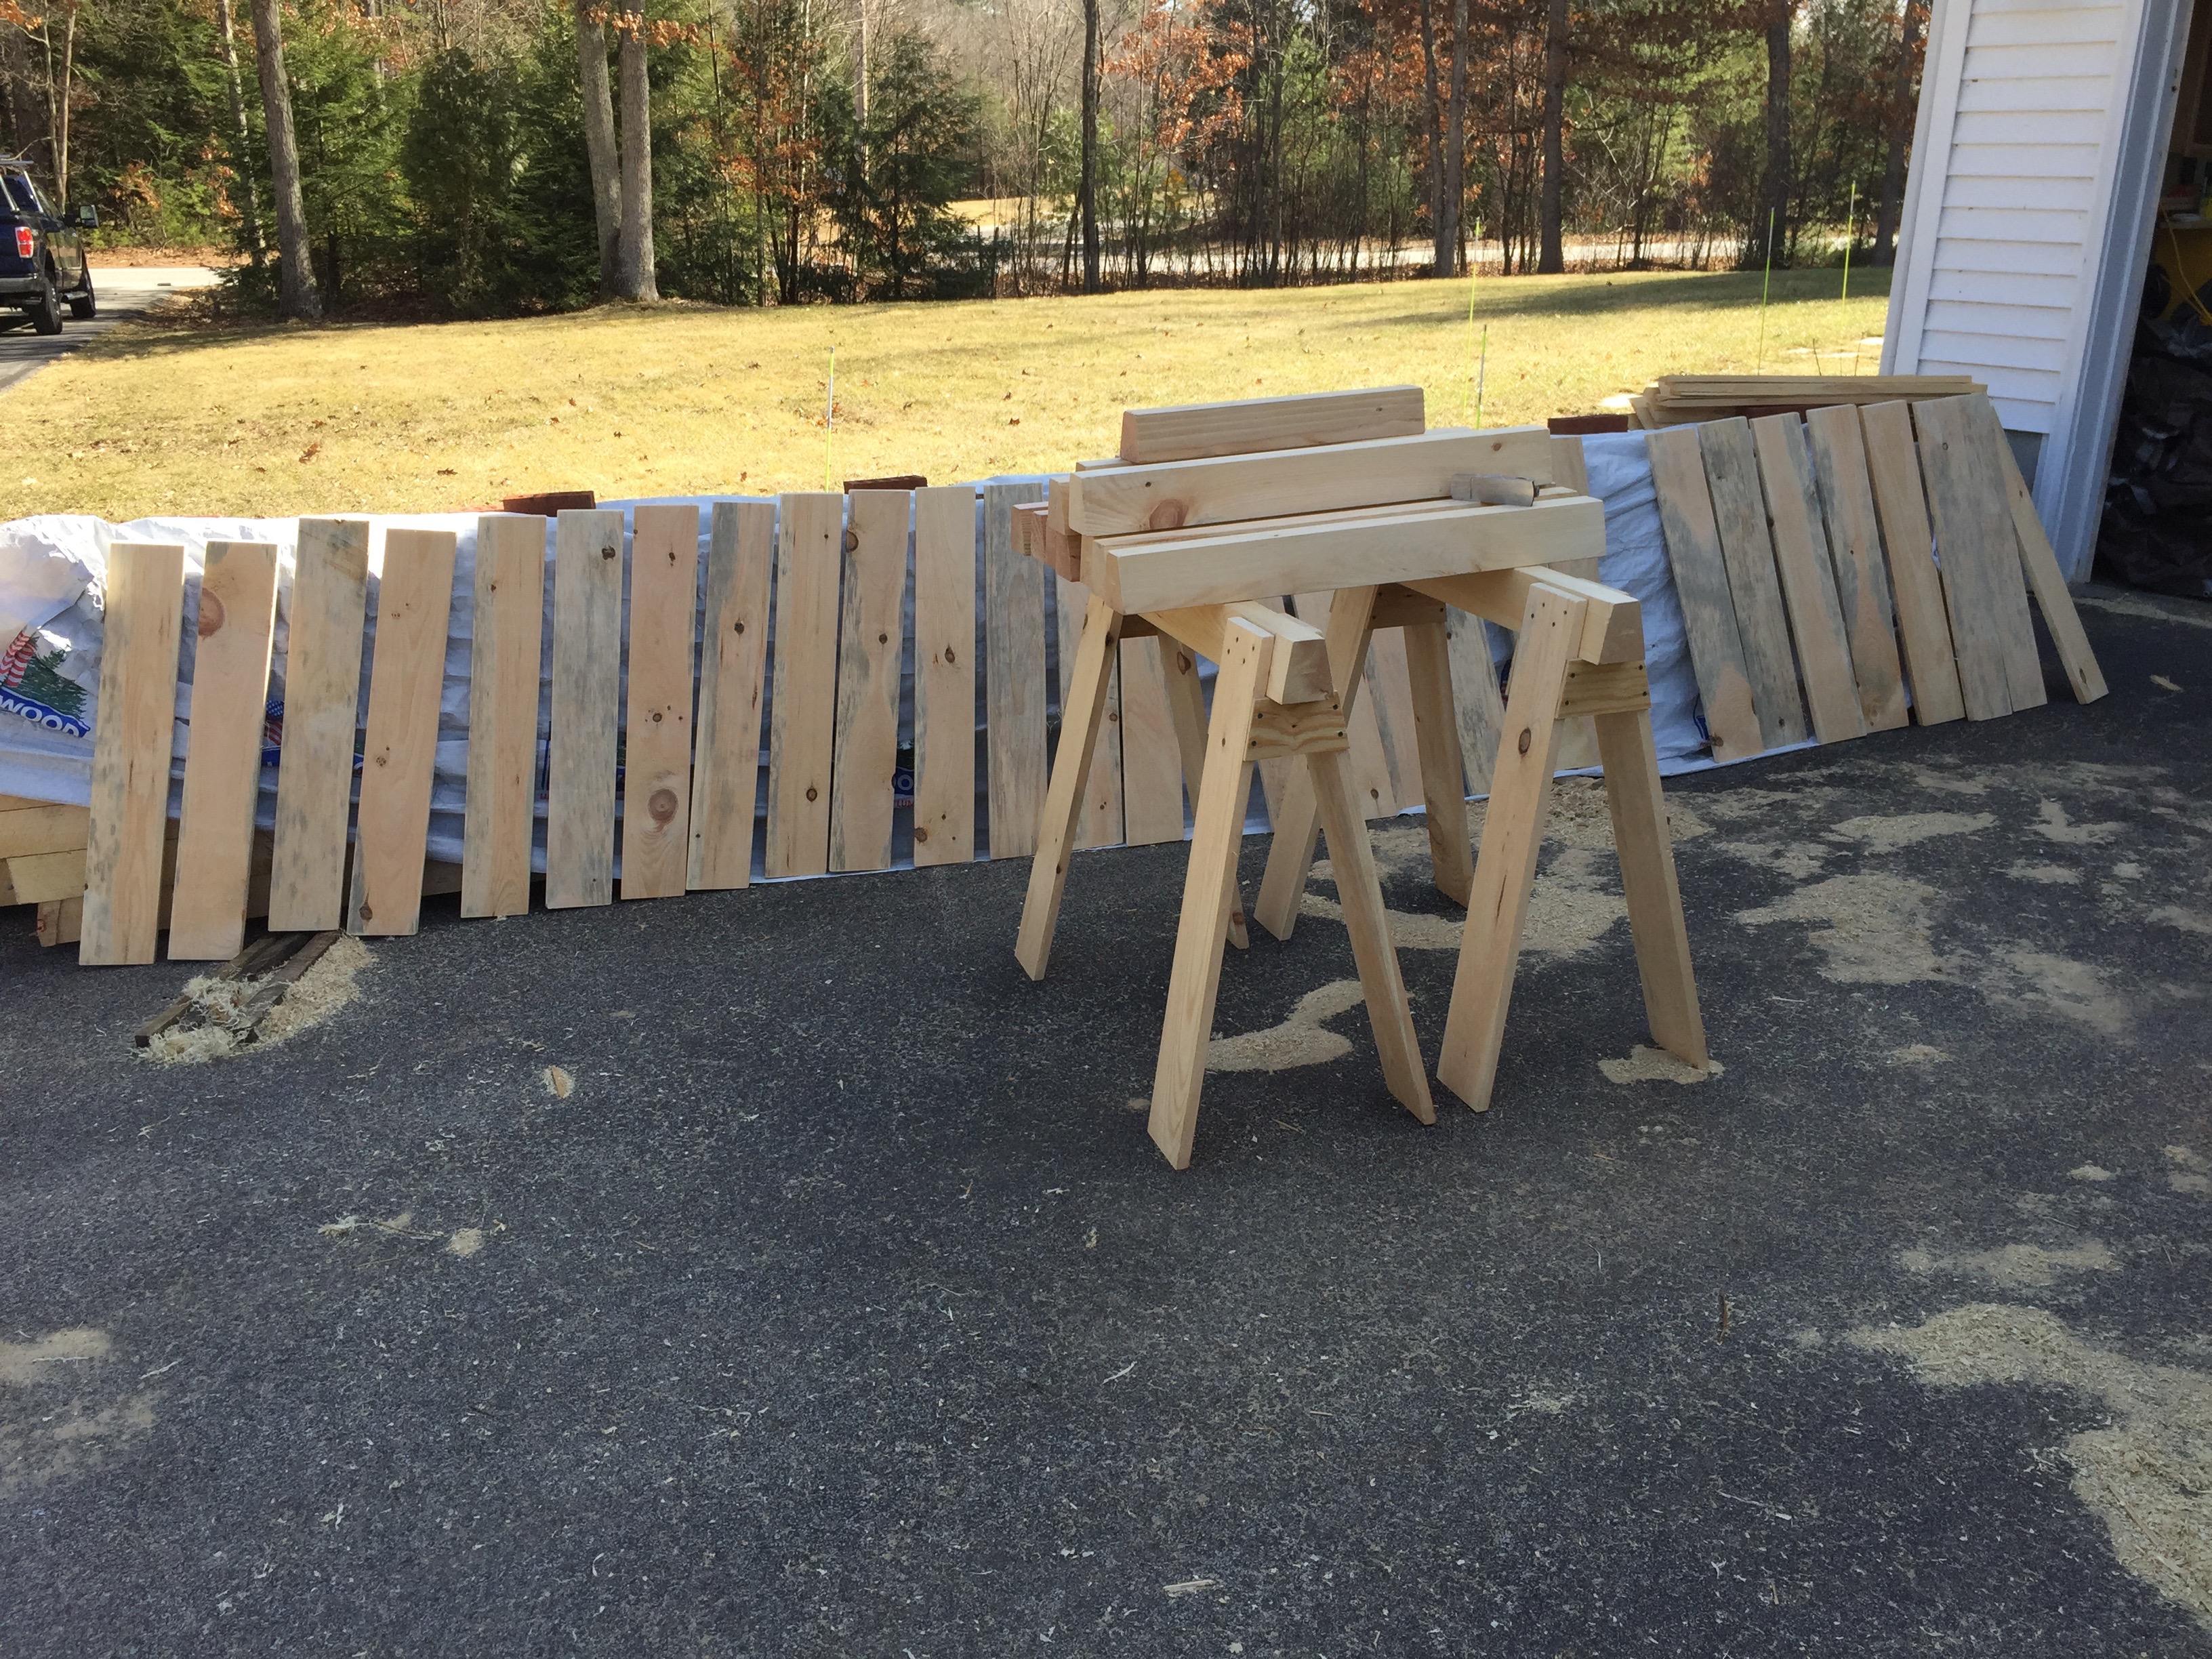
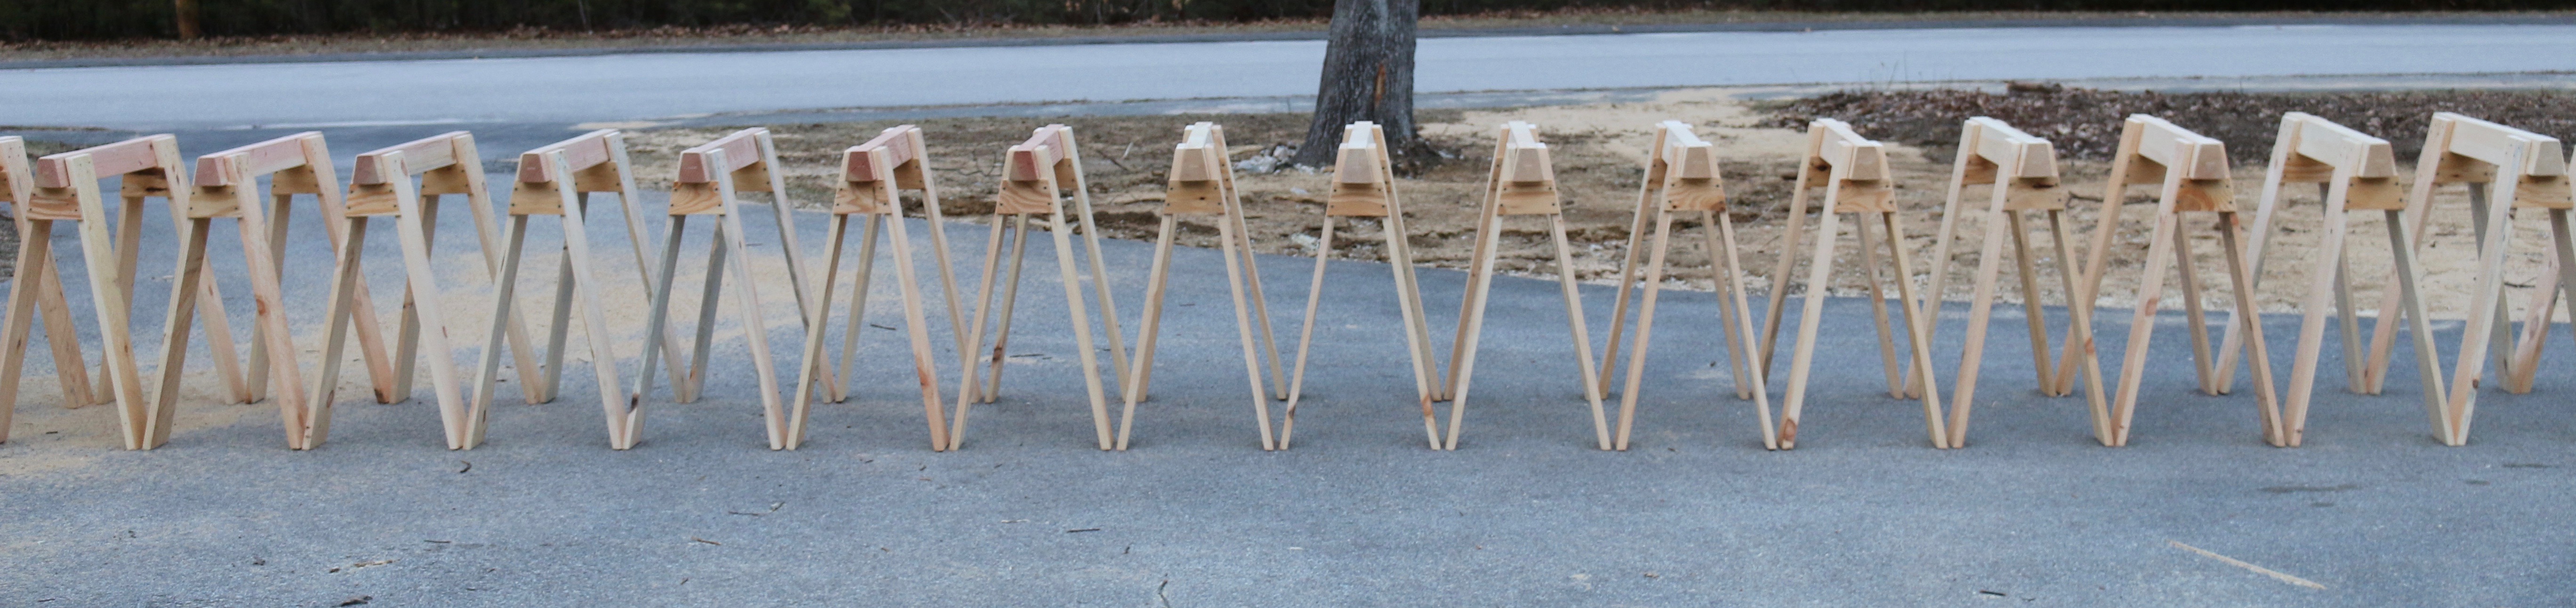
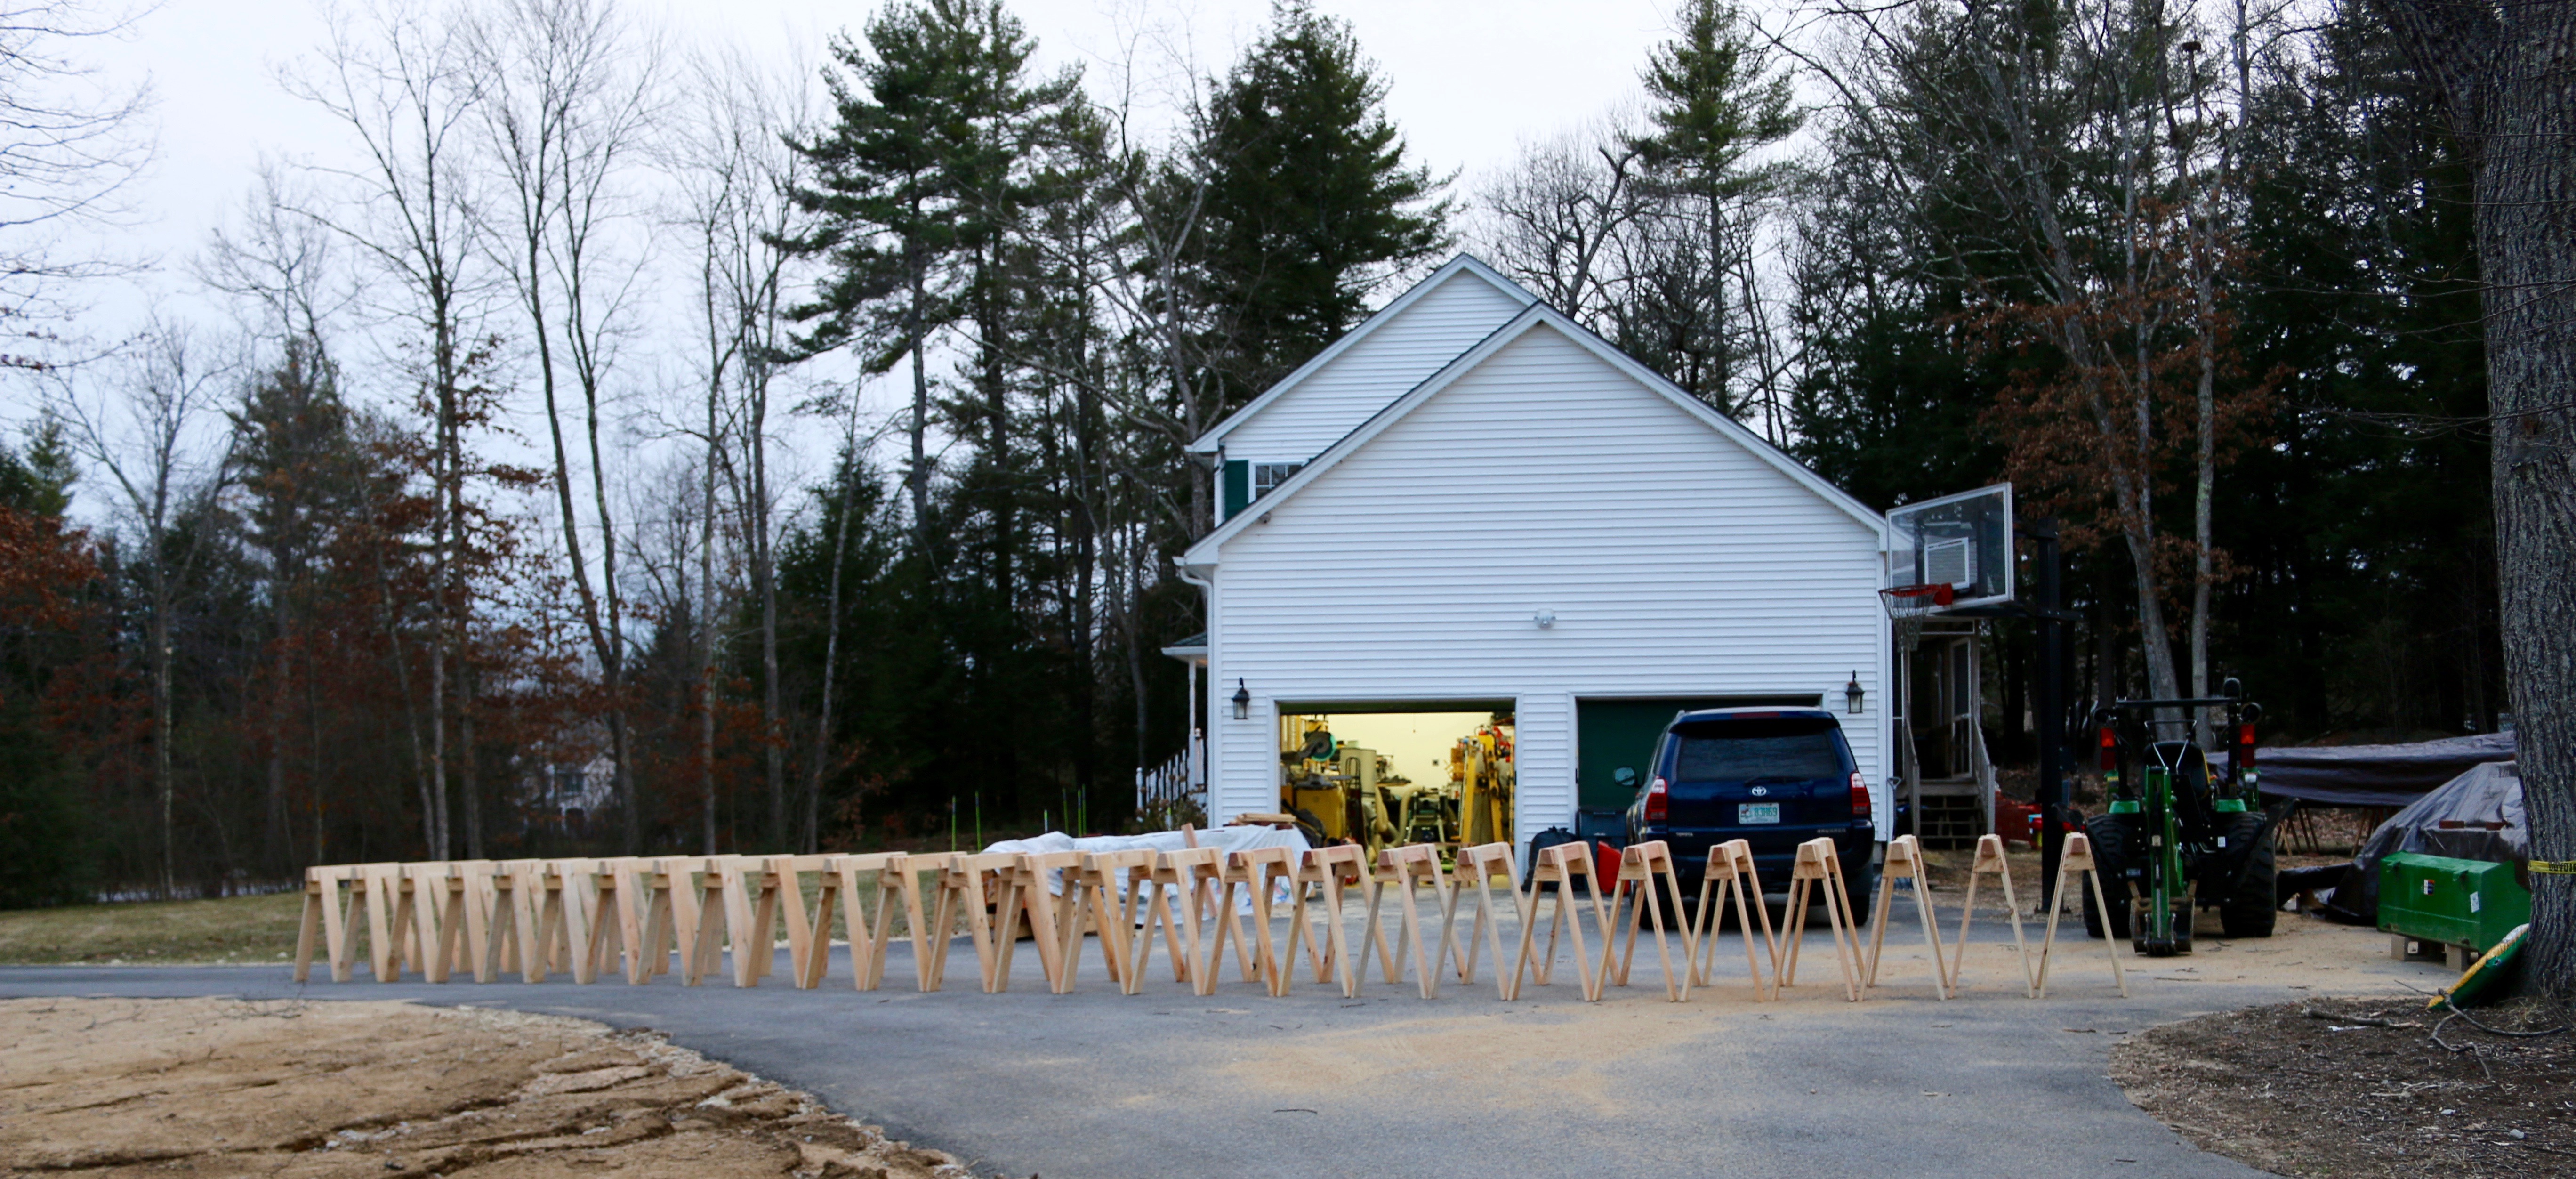
28 horses out on parade
Right now as I build a 24’x30′ timber framed barn out in the yard I built another 28 horses to hold all the timber off the ground for sorting and working through the piles. The post below covers how I built these heavy duty horses.
For a large run of horses like this it is important to run through each operation like a small assembly line, though at times it can feel like a slog — after cutting 112 legs you become a master at optimizing all of your operations.
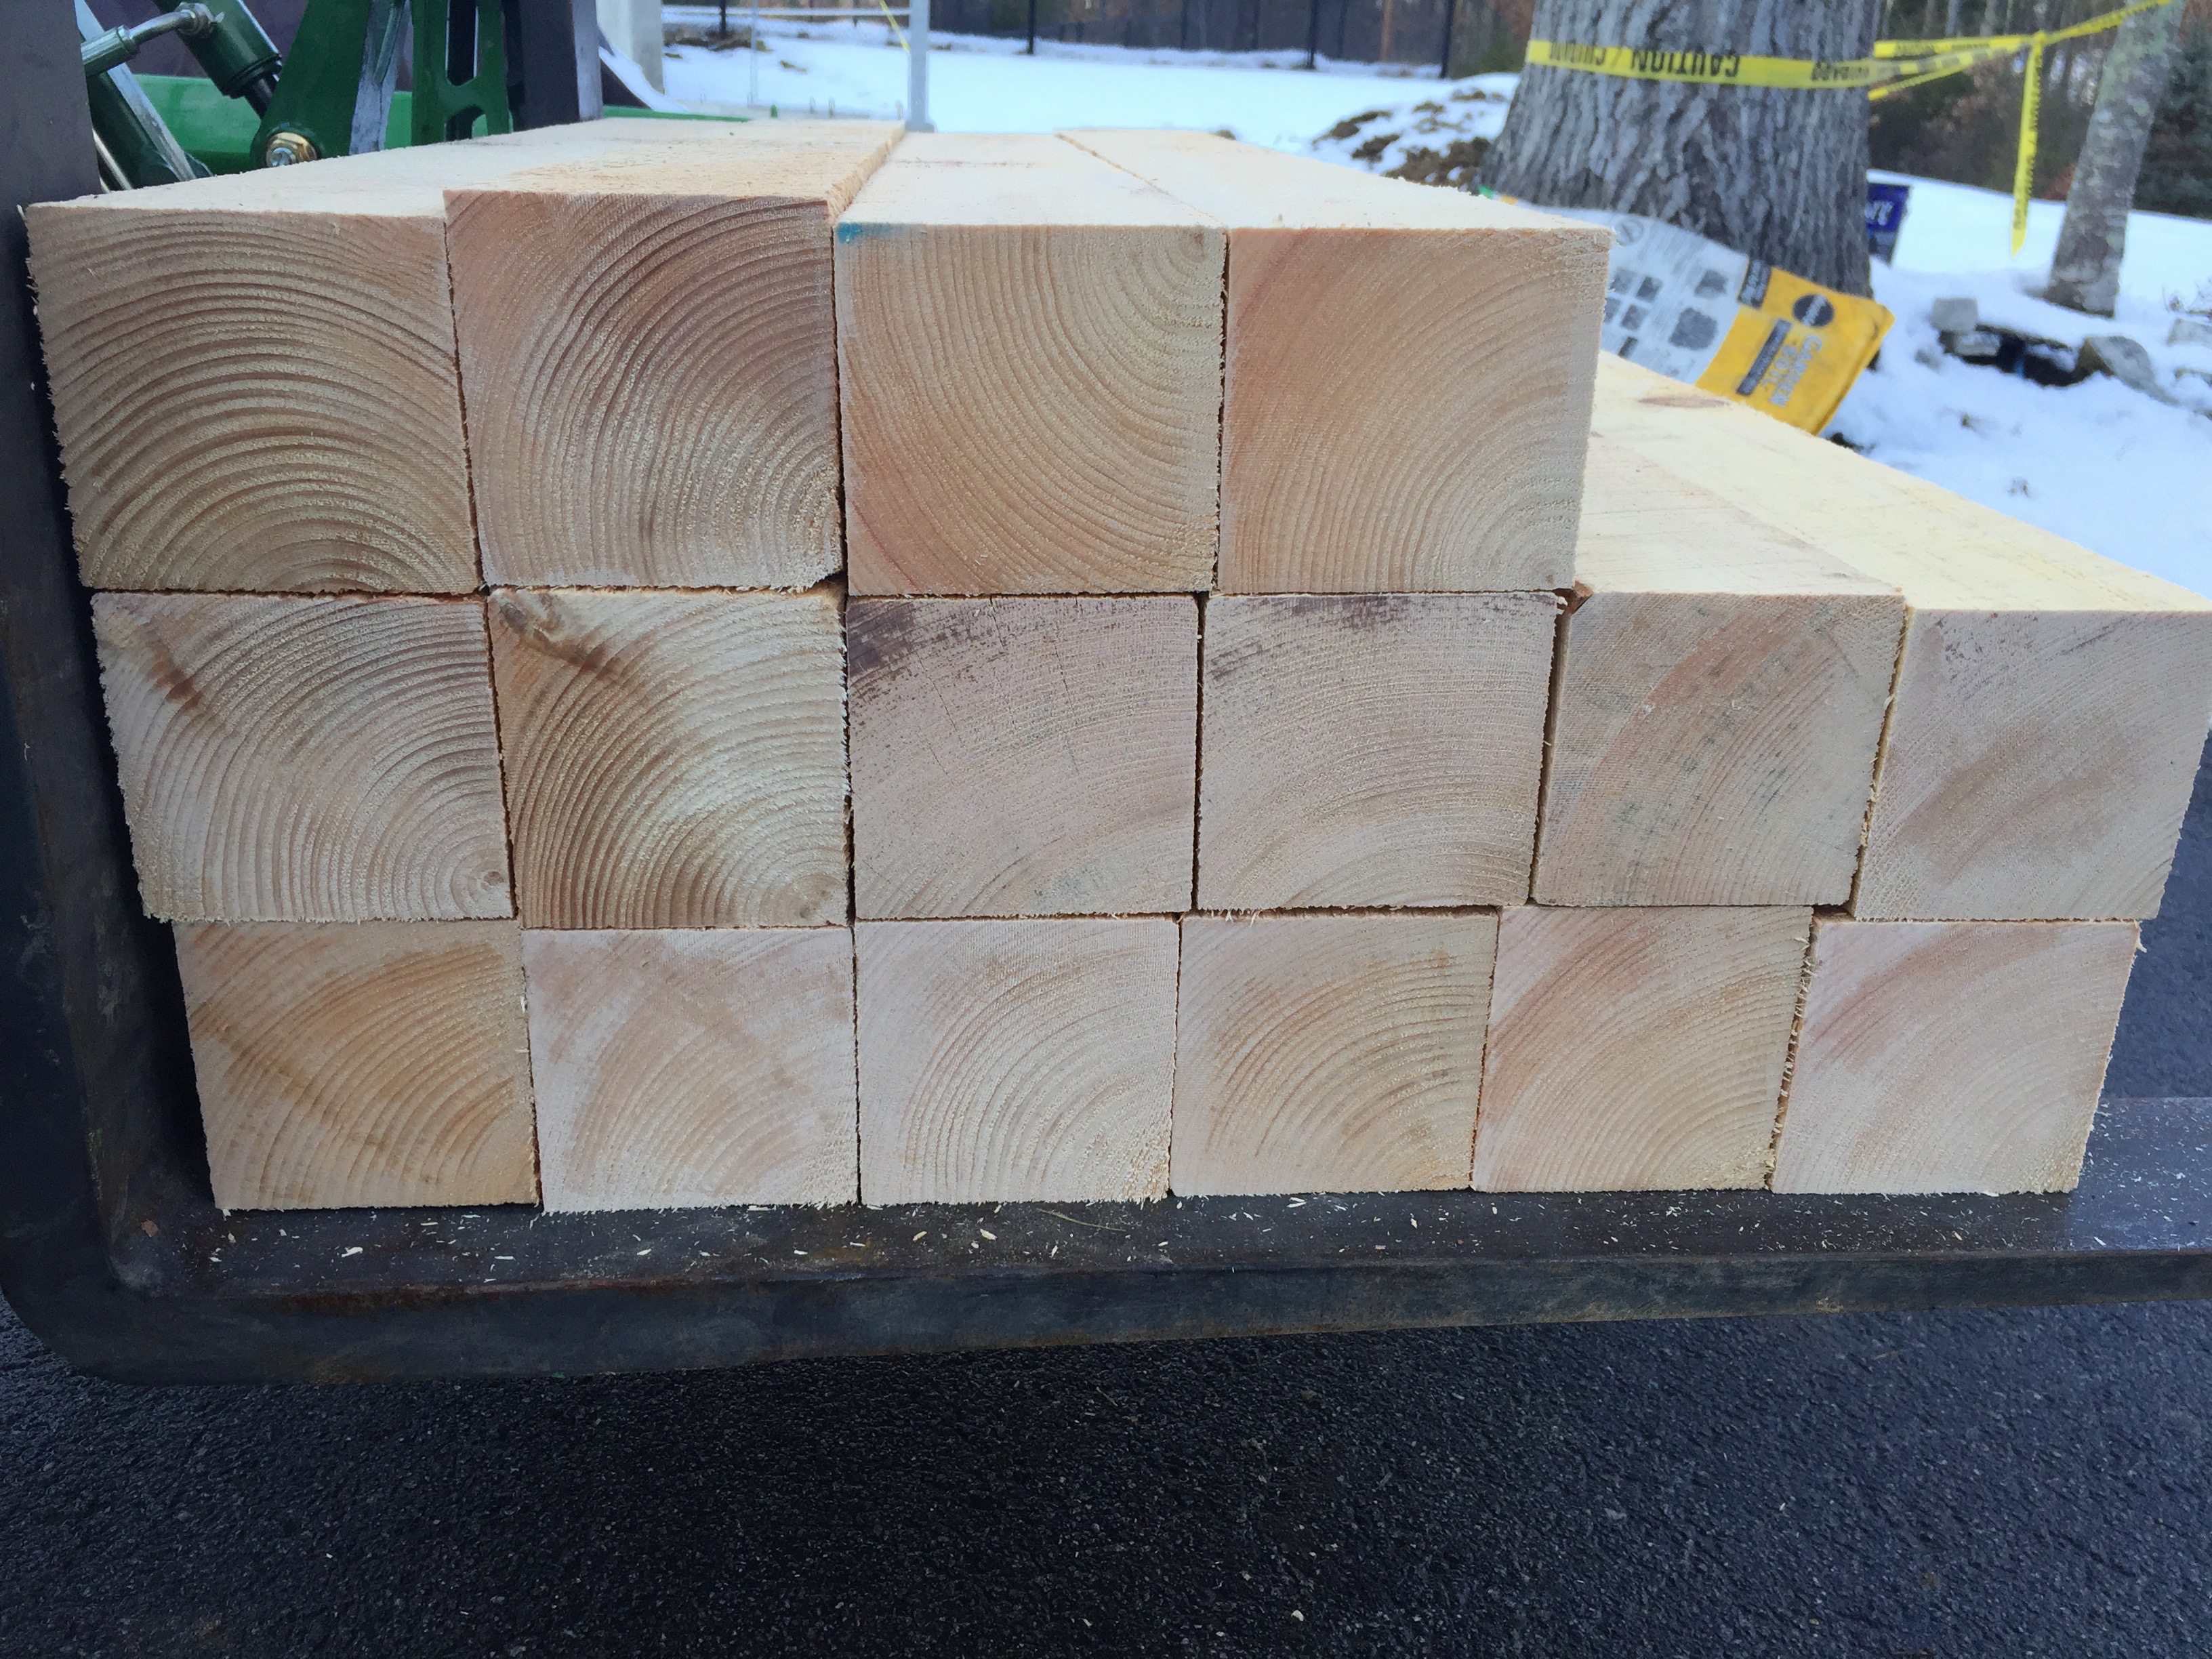
Large pile of green eastern white pine ready to go.
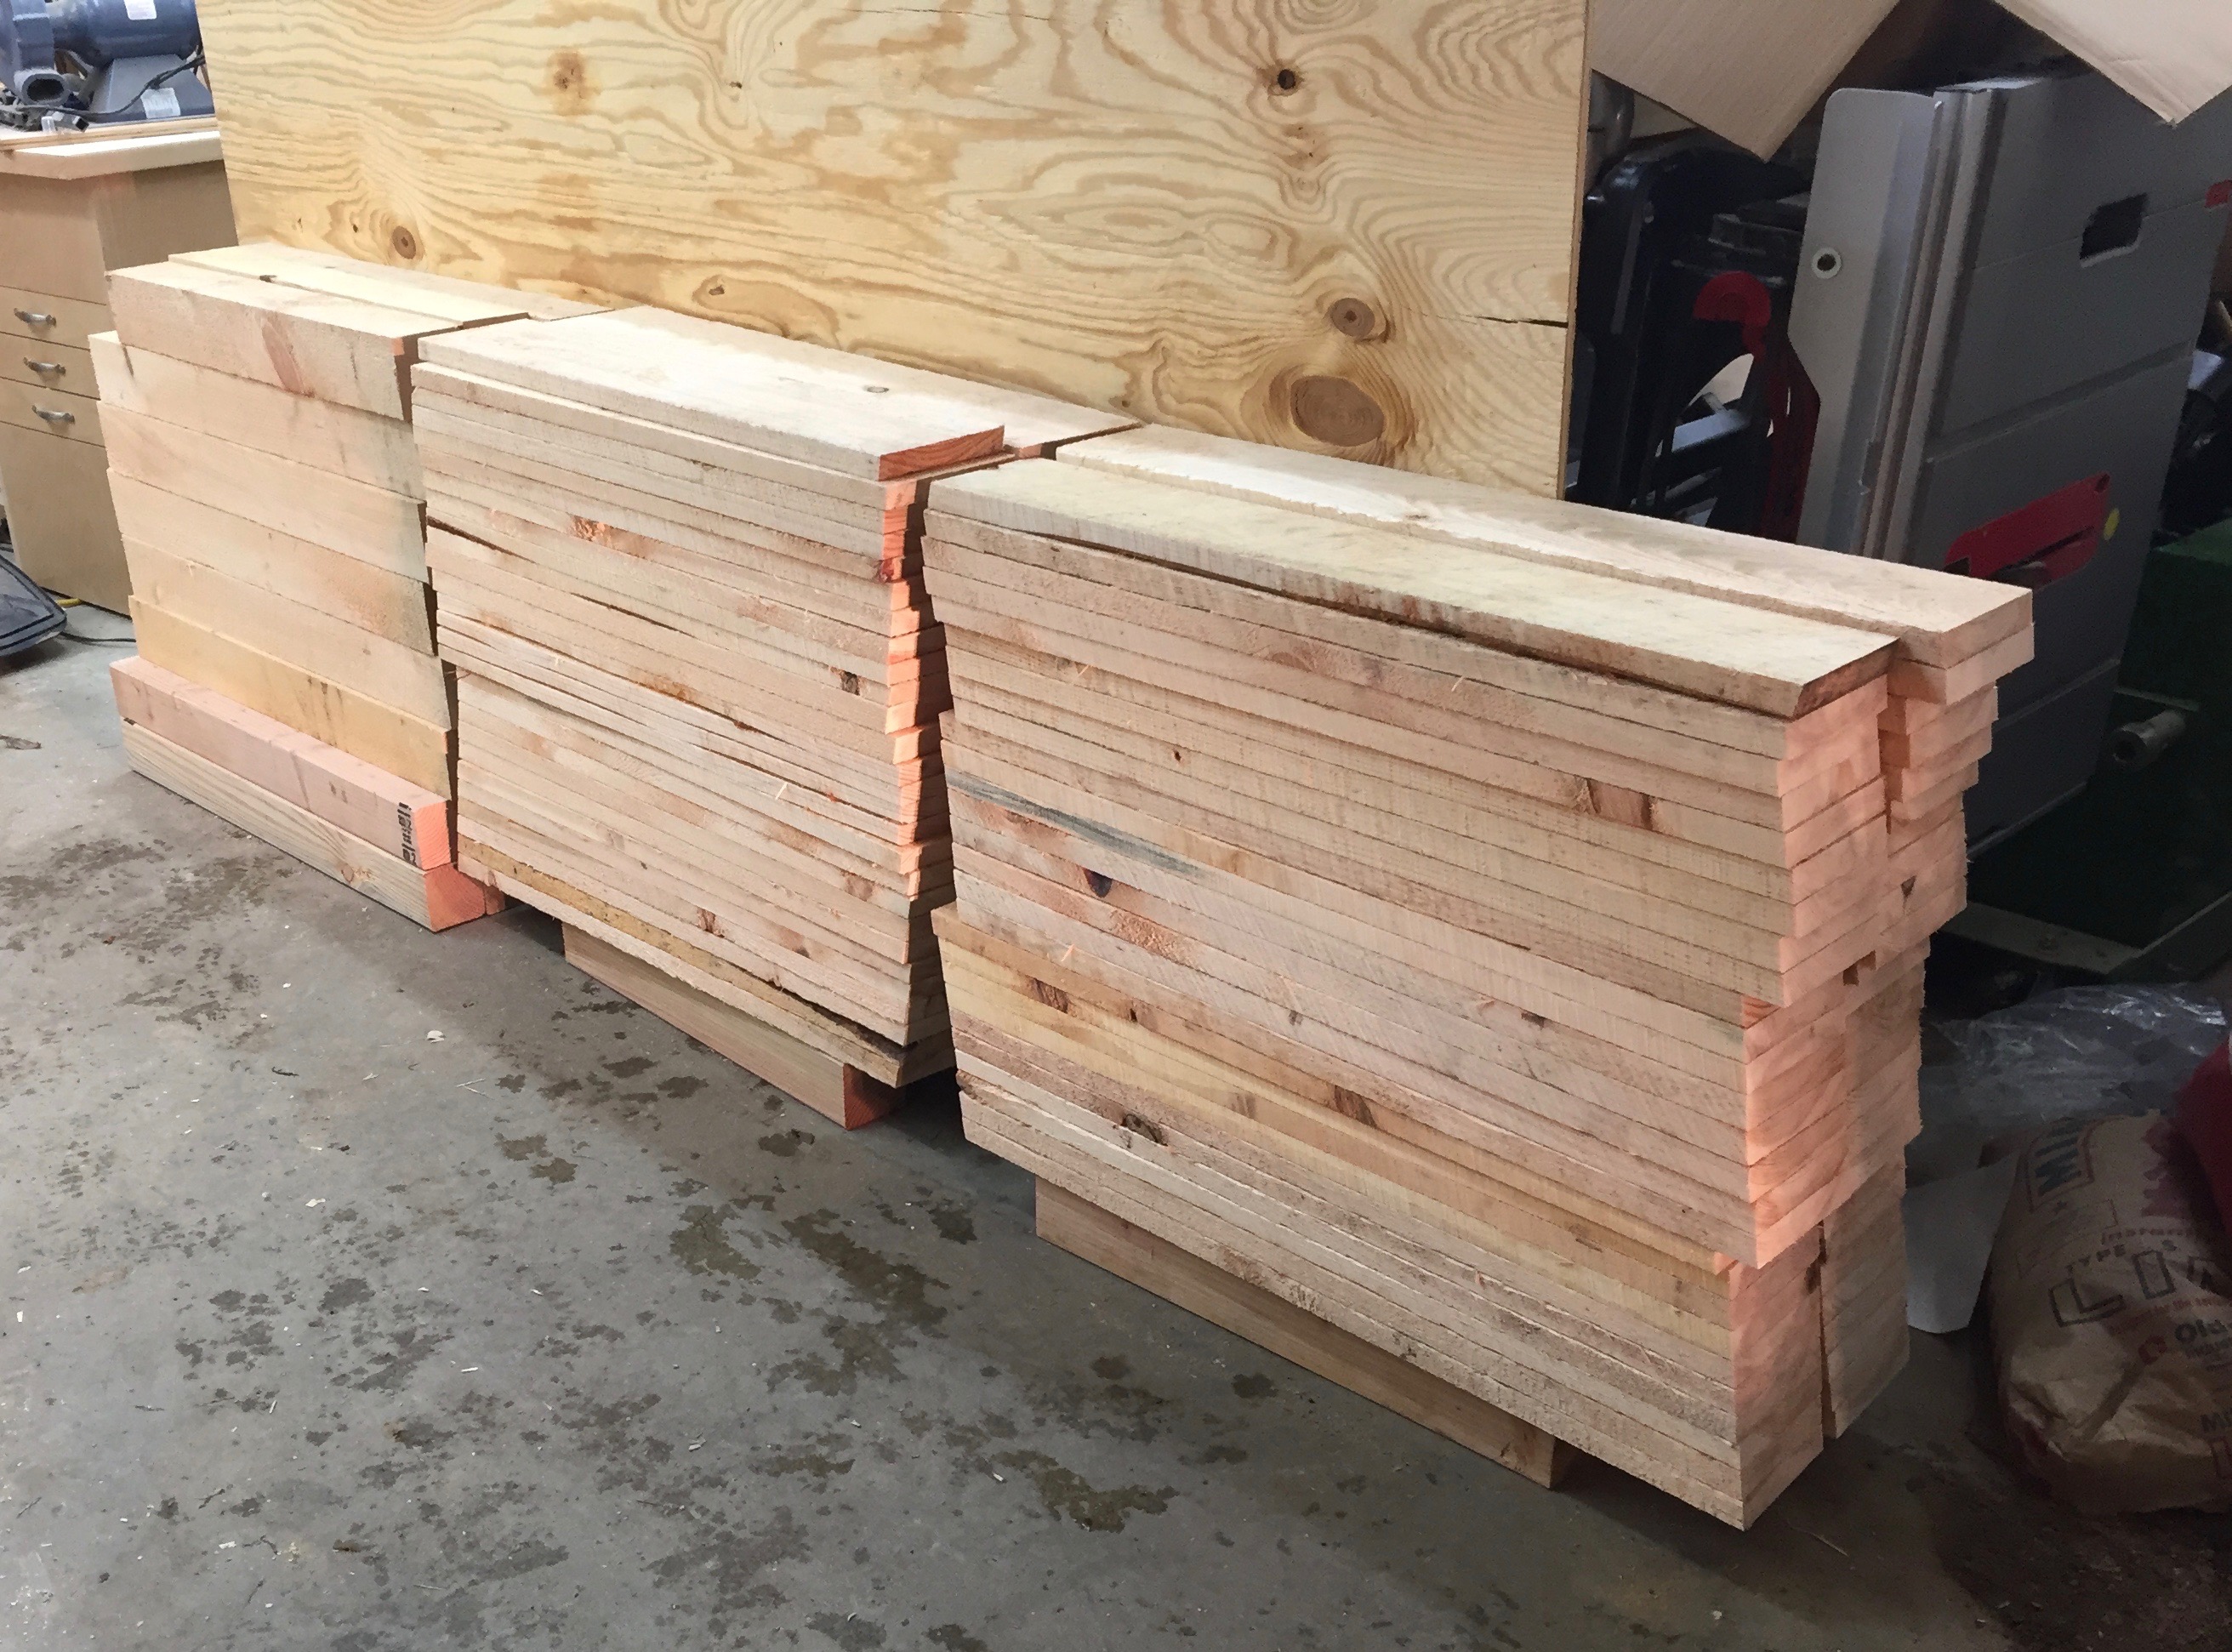
The wood of choice is green eastern white pine we buy from a local sawyer/lumber company. (Copeland And Sons Lumber). The beams (the work surface of a horse) is cut from a 4x4x12′, the legs are made from 1x6x12′ boards and the gussets are made from 1/2″ CDX plywood. Buying rough green stock like this from a sawyer helps keep the price per horse reasonable and the wood is full size, not nominal, so my 4×4 is 4″x4″ when I get it. I estimate that they cost me < $10 each in terms of materials.
You can see how much moisture is still in the 4x4s
A note on working with green lumber, for horses or timber frames or similar projects — this wood was a tree possibly only a day or two before I get it, so if you use a power tool you may get some water spray on you. Be warned. Also make sure you wipe down and oil your tools appropriately so they do not rust. In the photo above you can see the outer 1/4″ or so that has dried a bit vs the wet center on this fresh cut off piece.
Stack of cut beams
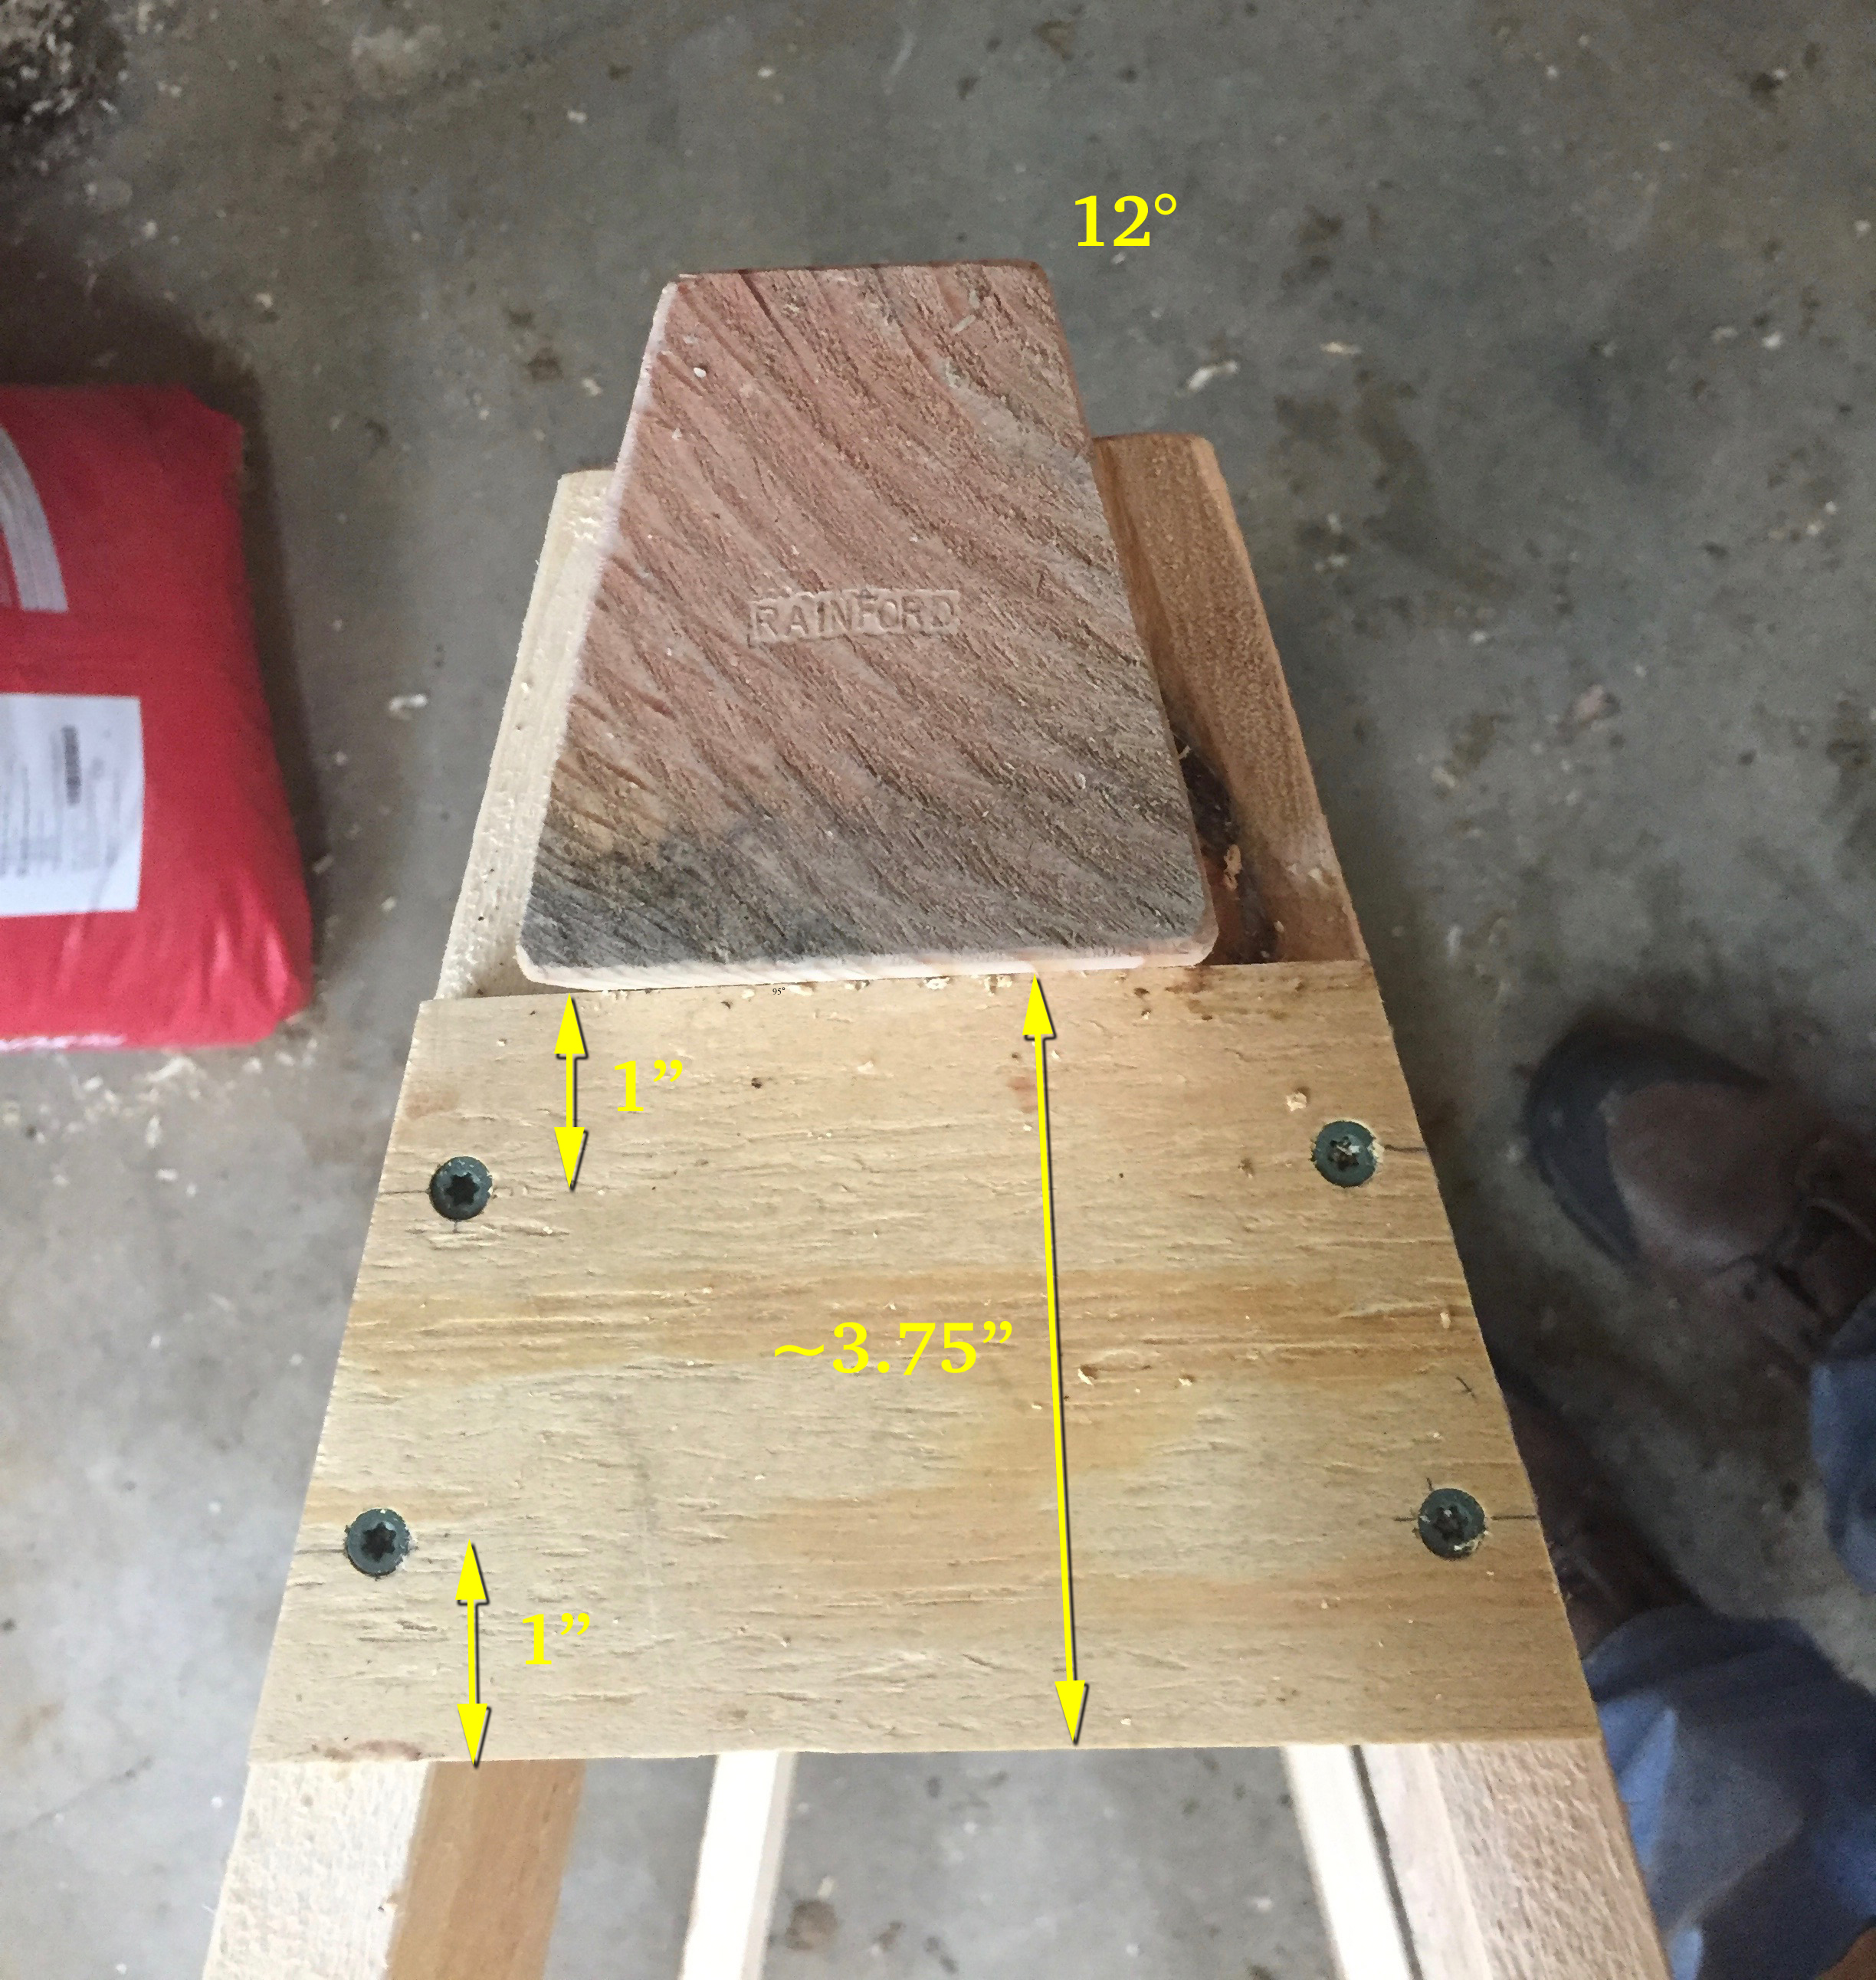
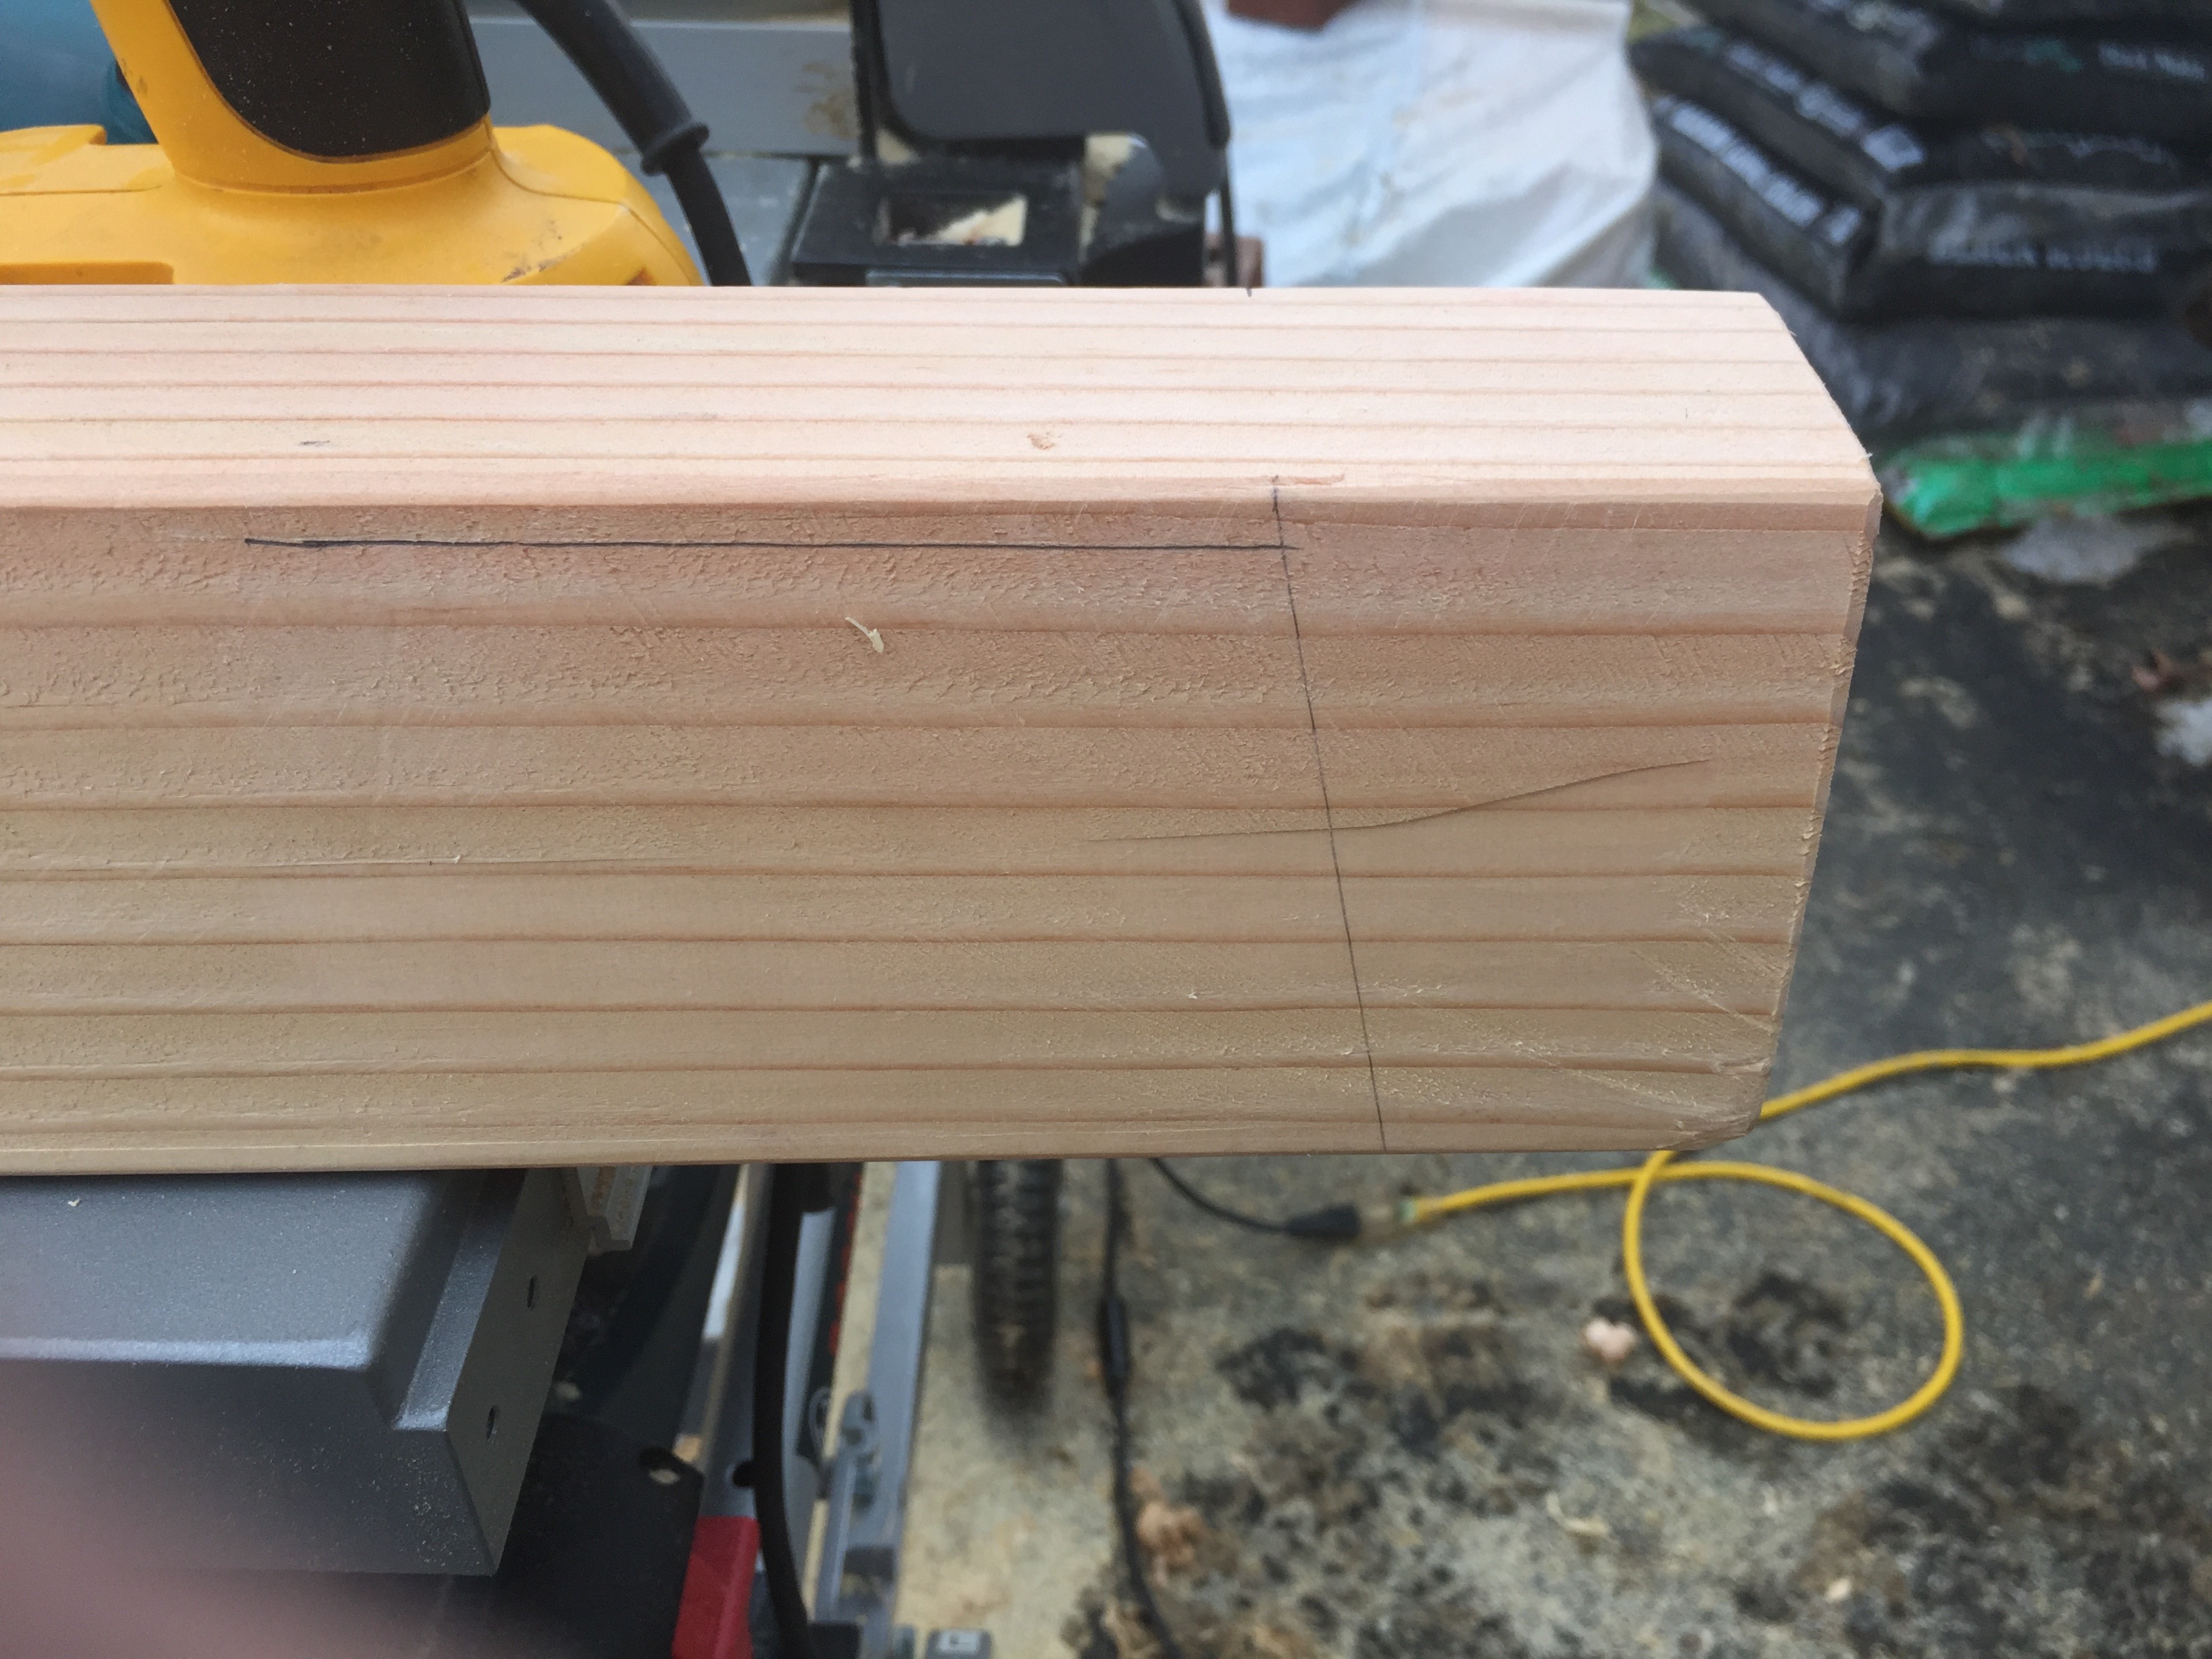
I start by cutting the beams to 36″ long. I then cut a 12 degree bevel on two sides. If your table saw cannot cut a full 4″ on an angle you can cut as much as you can, snap off most of the waste and then use a jointer or portable power planer (like 3-1/4″ Makita Door planer) to even out the side.
I also stamped my name into the end grain of each beam with my name stamp. It makes it easy to tell my horses apart from say another friend from the school.
Beam and gusset with dimensions. I also used my namespace on the beam end grain.
Next up I ripped my 4×8 sheet of 1/2″ CDX plywood into ~4″ wide strips. I then took a second pass on each strip with the blade set to a 5 degree angle. This allows the gussets to nestle up tightly against the beam during final assembly.
Cutting compound angles for the legs. 5 degrees and 12 degrees.
Next up I cut all the legs. I set the compound miter saw to cut at a left tilt of 5 degrees and a right rotation of 12 degrees. (See image above). The long side of each leg was cut to be 34.75″ long.
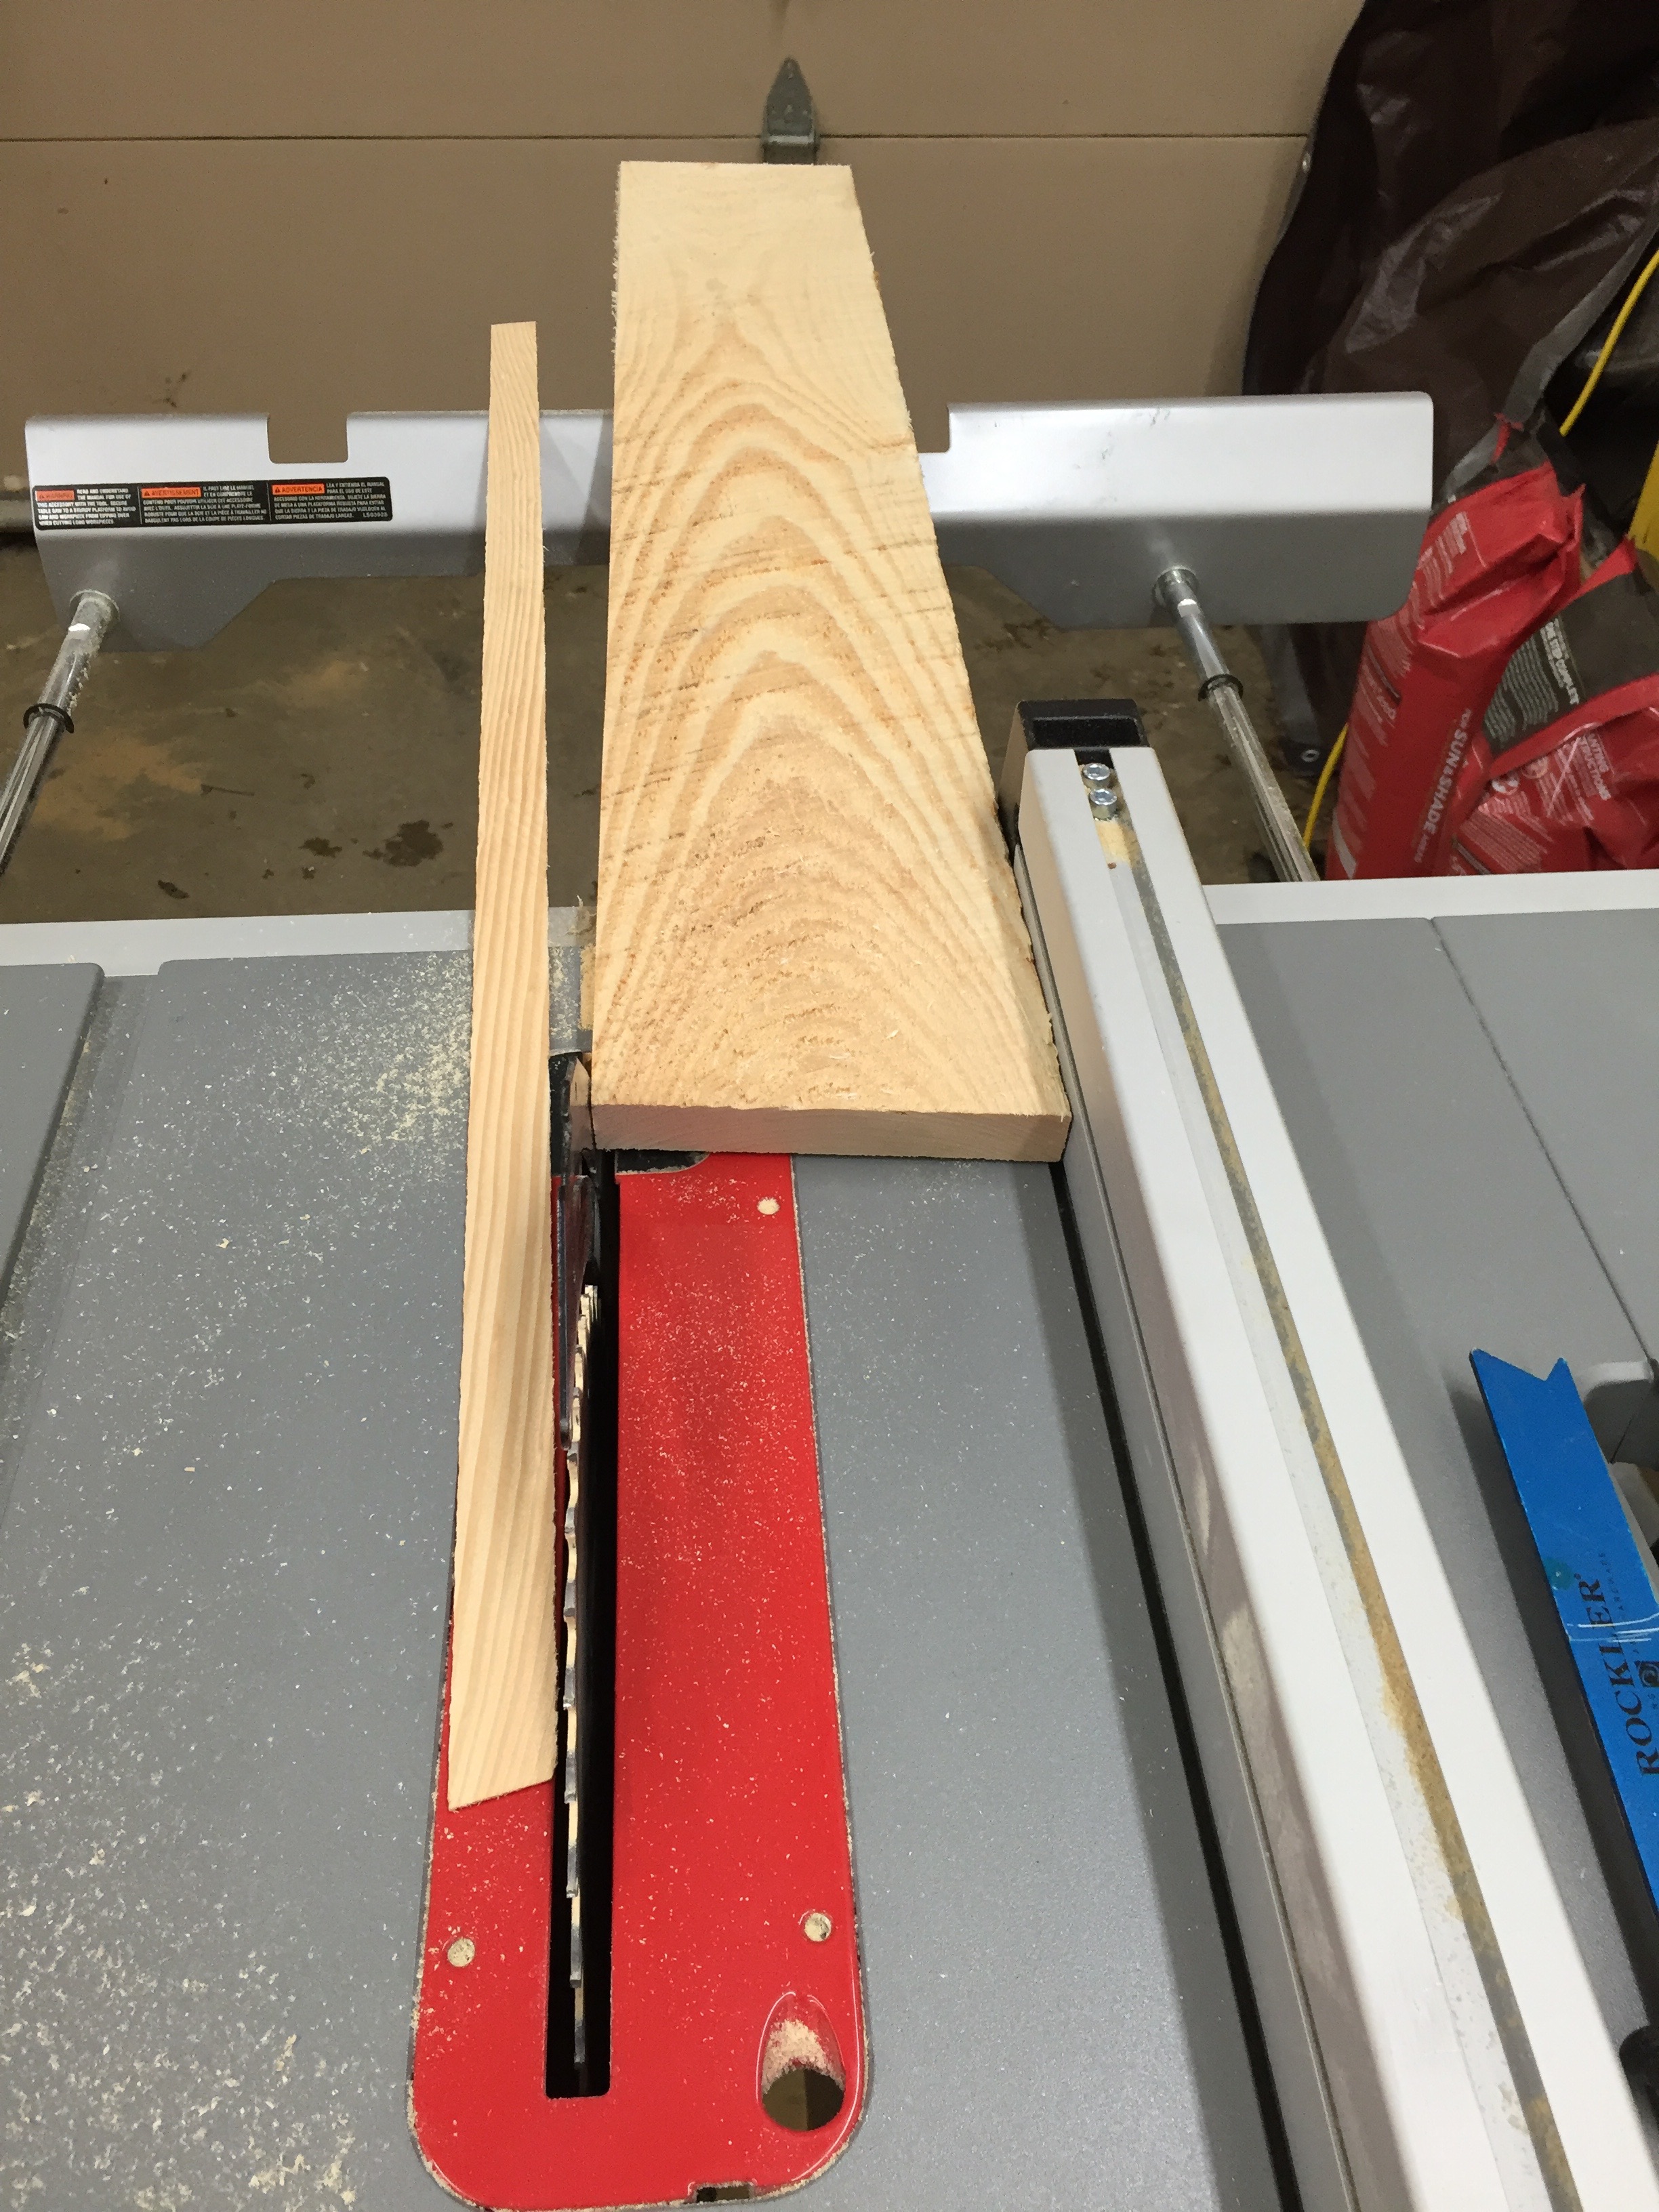
Ripping the legs to a consistent width
With all the legs cut I ripped the rough edge off of each board, then ripped the other side so all the boards landed at a consistent 5.5″ width.
Stacks of cut legs
You don’t have to plane the boards to thickness if you don’t want to. Leaving them as thick as possible added to the strength and I am not thrilled about passing green wood though my cast iron tools and into my dust collection system. My site chop saw and portable table saw both have aluminum tops which deal better with the wet wood.
112 legs ready to go
All the legs are the same, though above I stacked them to make sure I had a correct number for all the horses I planned to build. I also used a low angle block plane to break all the edges on the boards since they will be handled many times over the years and you don’t want any splinters.
Stacks of cut legs and beams back in the shop
I then brought my wood into the heated shop as we were getting some snow and stacked them as you see above. This was a big mistake as I’ll describe later. I planned to be out there the next day but with snow and a baby in the house they sat out there for a week. If you bring sopping wet/green wood into a heated shop, make sure you sticker them so air can flow around all the edges and the wood can dry evenly.
Layout for the 2″ ceramic star drive deck screws.
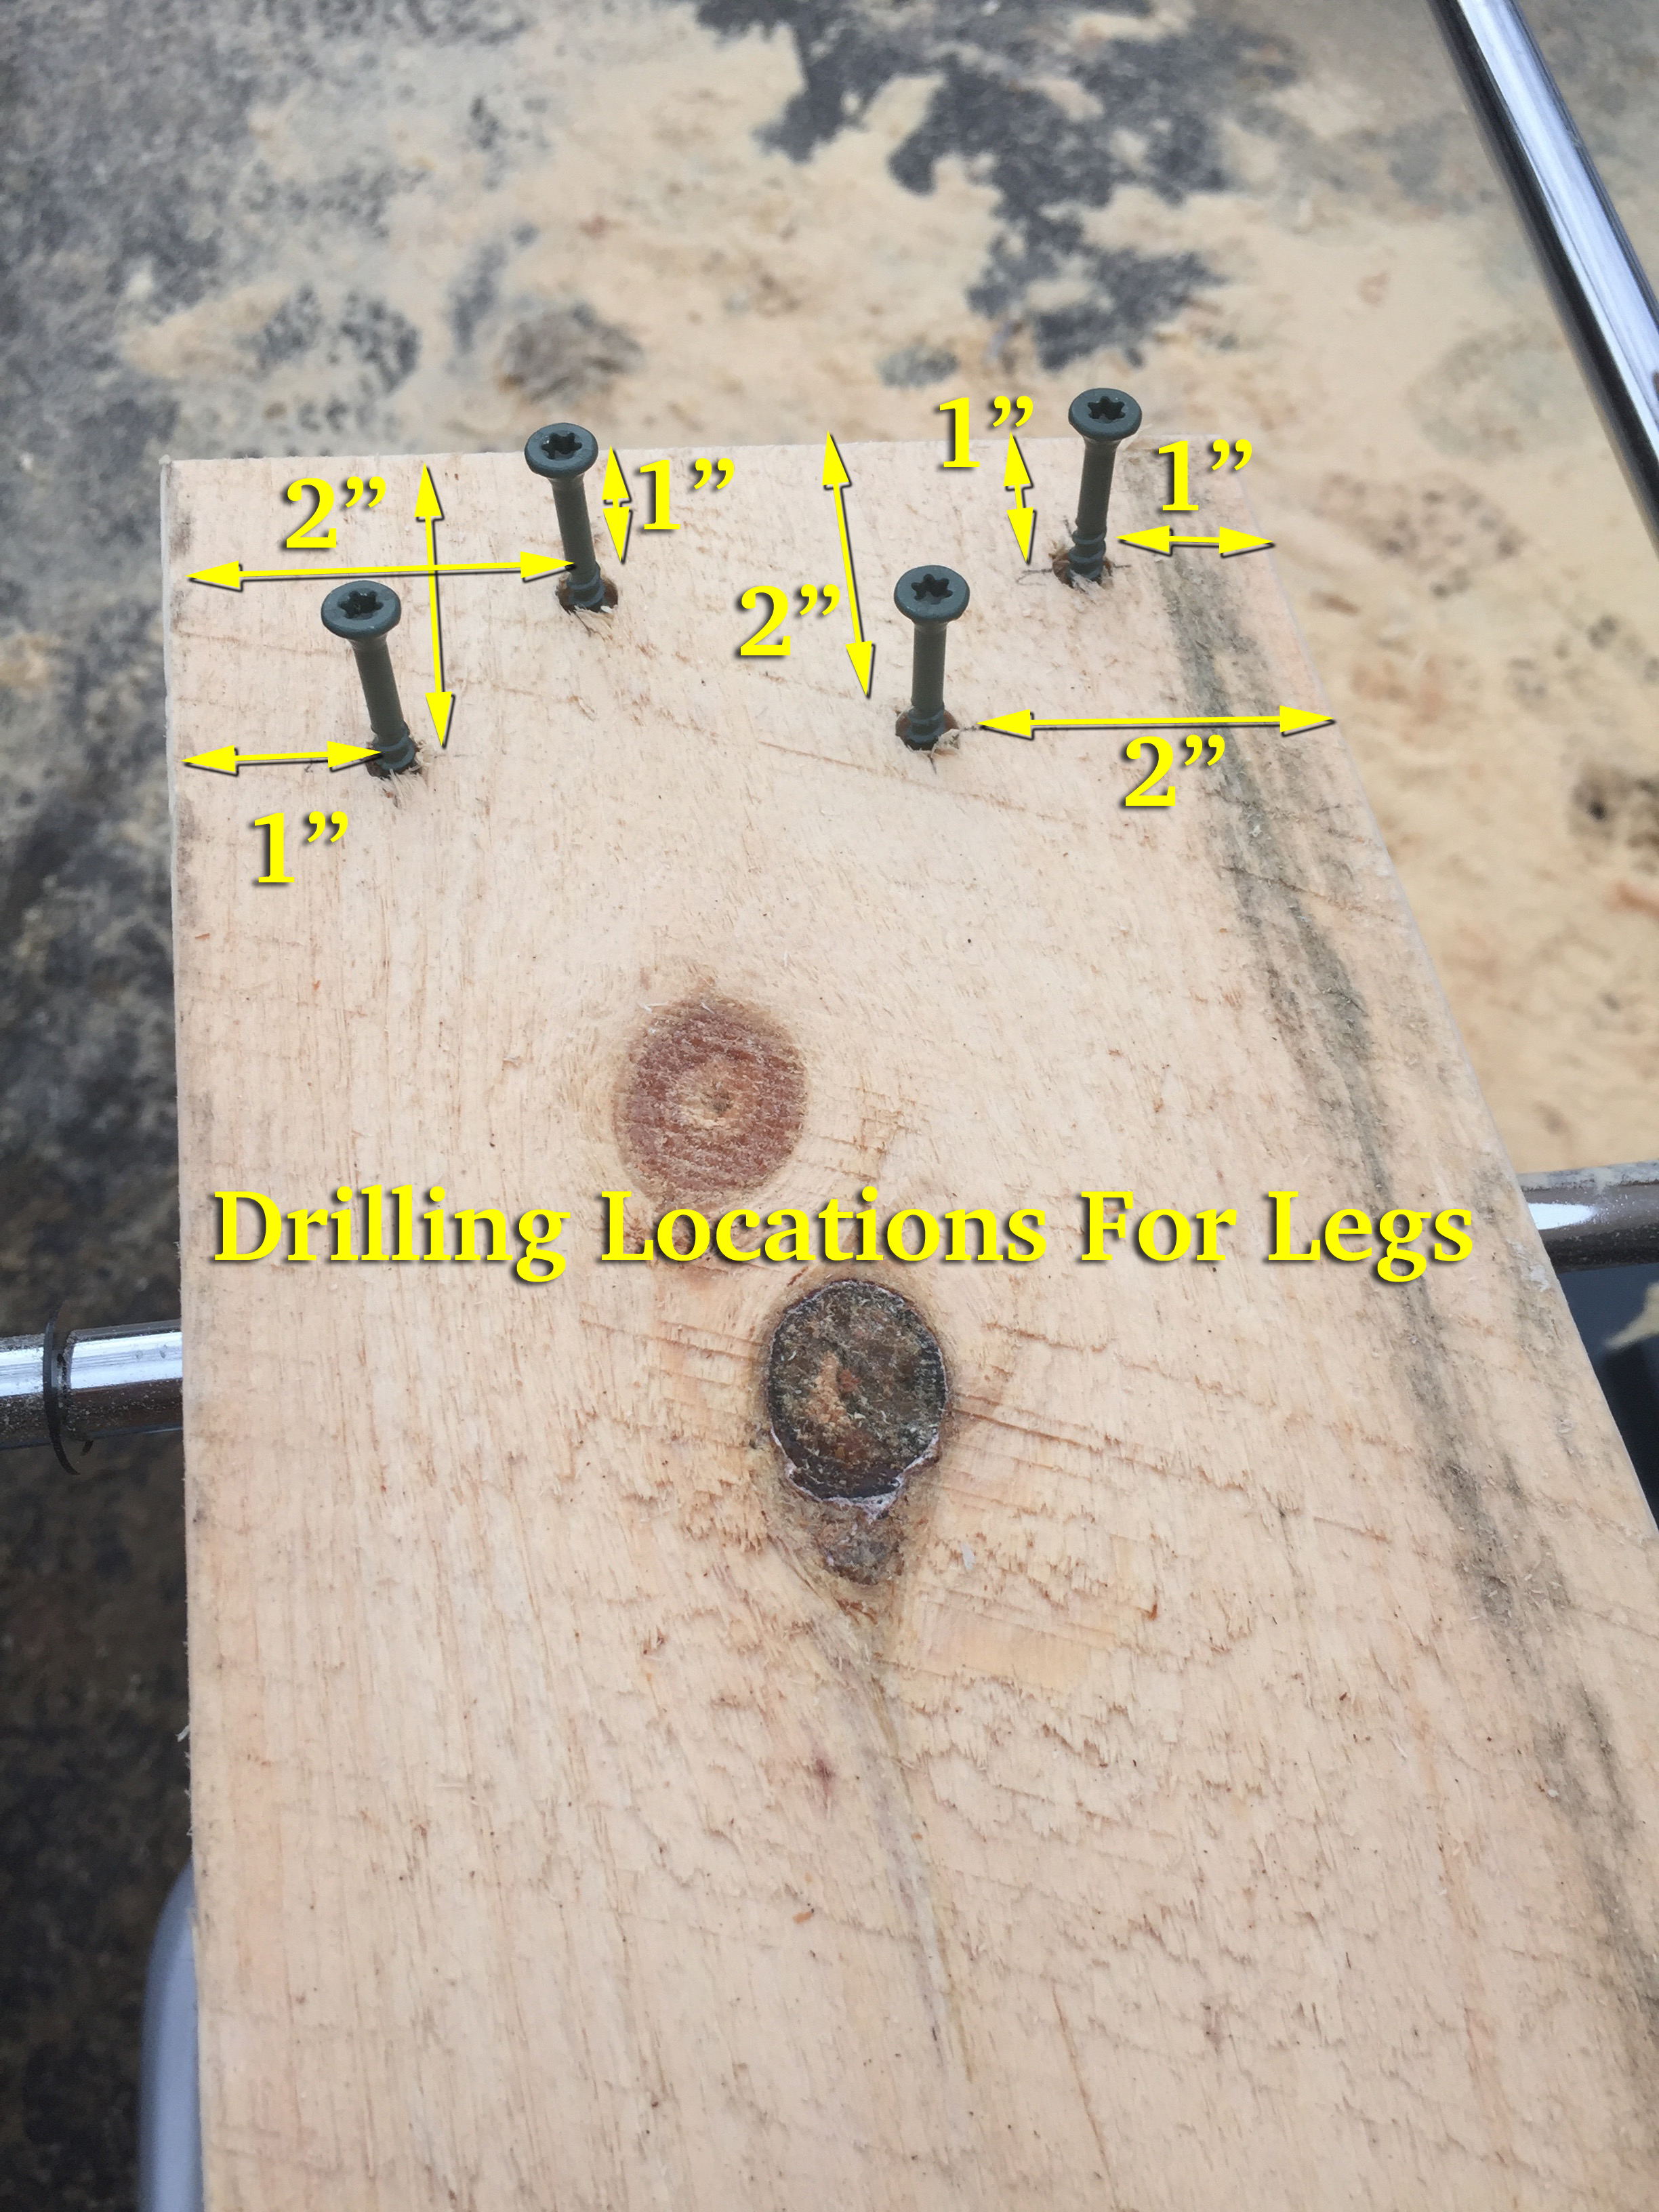
With all the legs cut I started to layout for the screws. I grab two combination squares and set one to be 1″ and set the other to 2″. This allows for fast/efficient layout. (see above image). Each of the screws is either 1″ or 2″ from the edge or top of the board. The screws are staggered to help avoid splitting the wood. I used DeckMate 2″ ceramic coated deck screws that have a nice thick shaft and are rated for outdoor structural use and do not rust. Do NOT use drywall screws on this sort of project, they are far too weak and not meant for the outdoors. One 5lb box of #8 2″ screws was enough to attach all the legs. After layout I pre-drill each of the holes and start the screws into the boards — this makes it a lot easier to assemble the horse later on.
Laying out the beam. 5 degree angle is set in 2.5″ from the end. The top of the legs should be 1/4″ below the top of the beam.
For the beams I make a tick mark 2.5″ in from each end on the top edge of the beam. Using a protractor I make a 5 degree line down the side of the beam — this splays the legs and gives use nice stable horse. Having two protractors on hand is nice as I have one set for the right and one set for the left. I then set a combination square to 1/4″ and make a line along the top edge of the beam — this allows me to line up the legs during assembly. I also broke all the edges with a block plane.
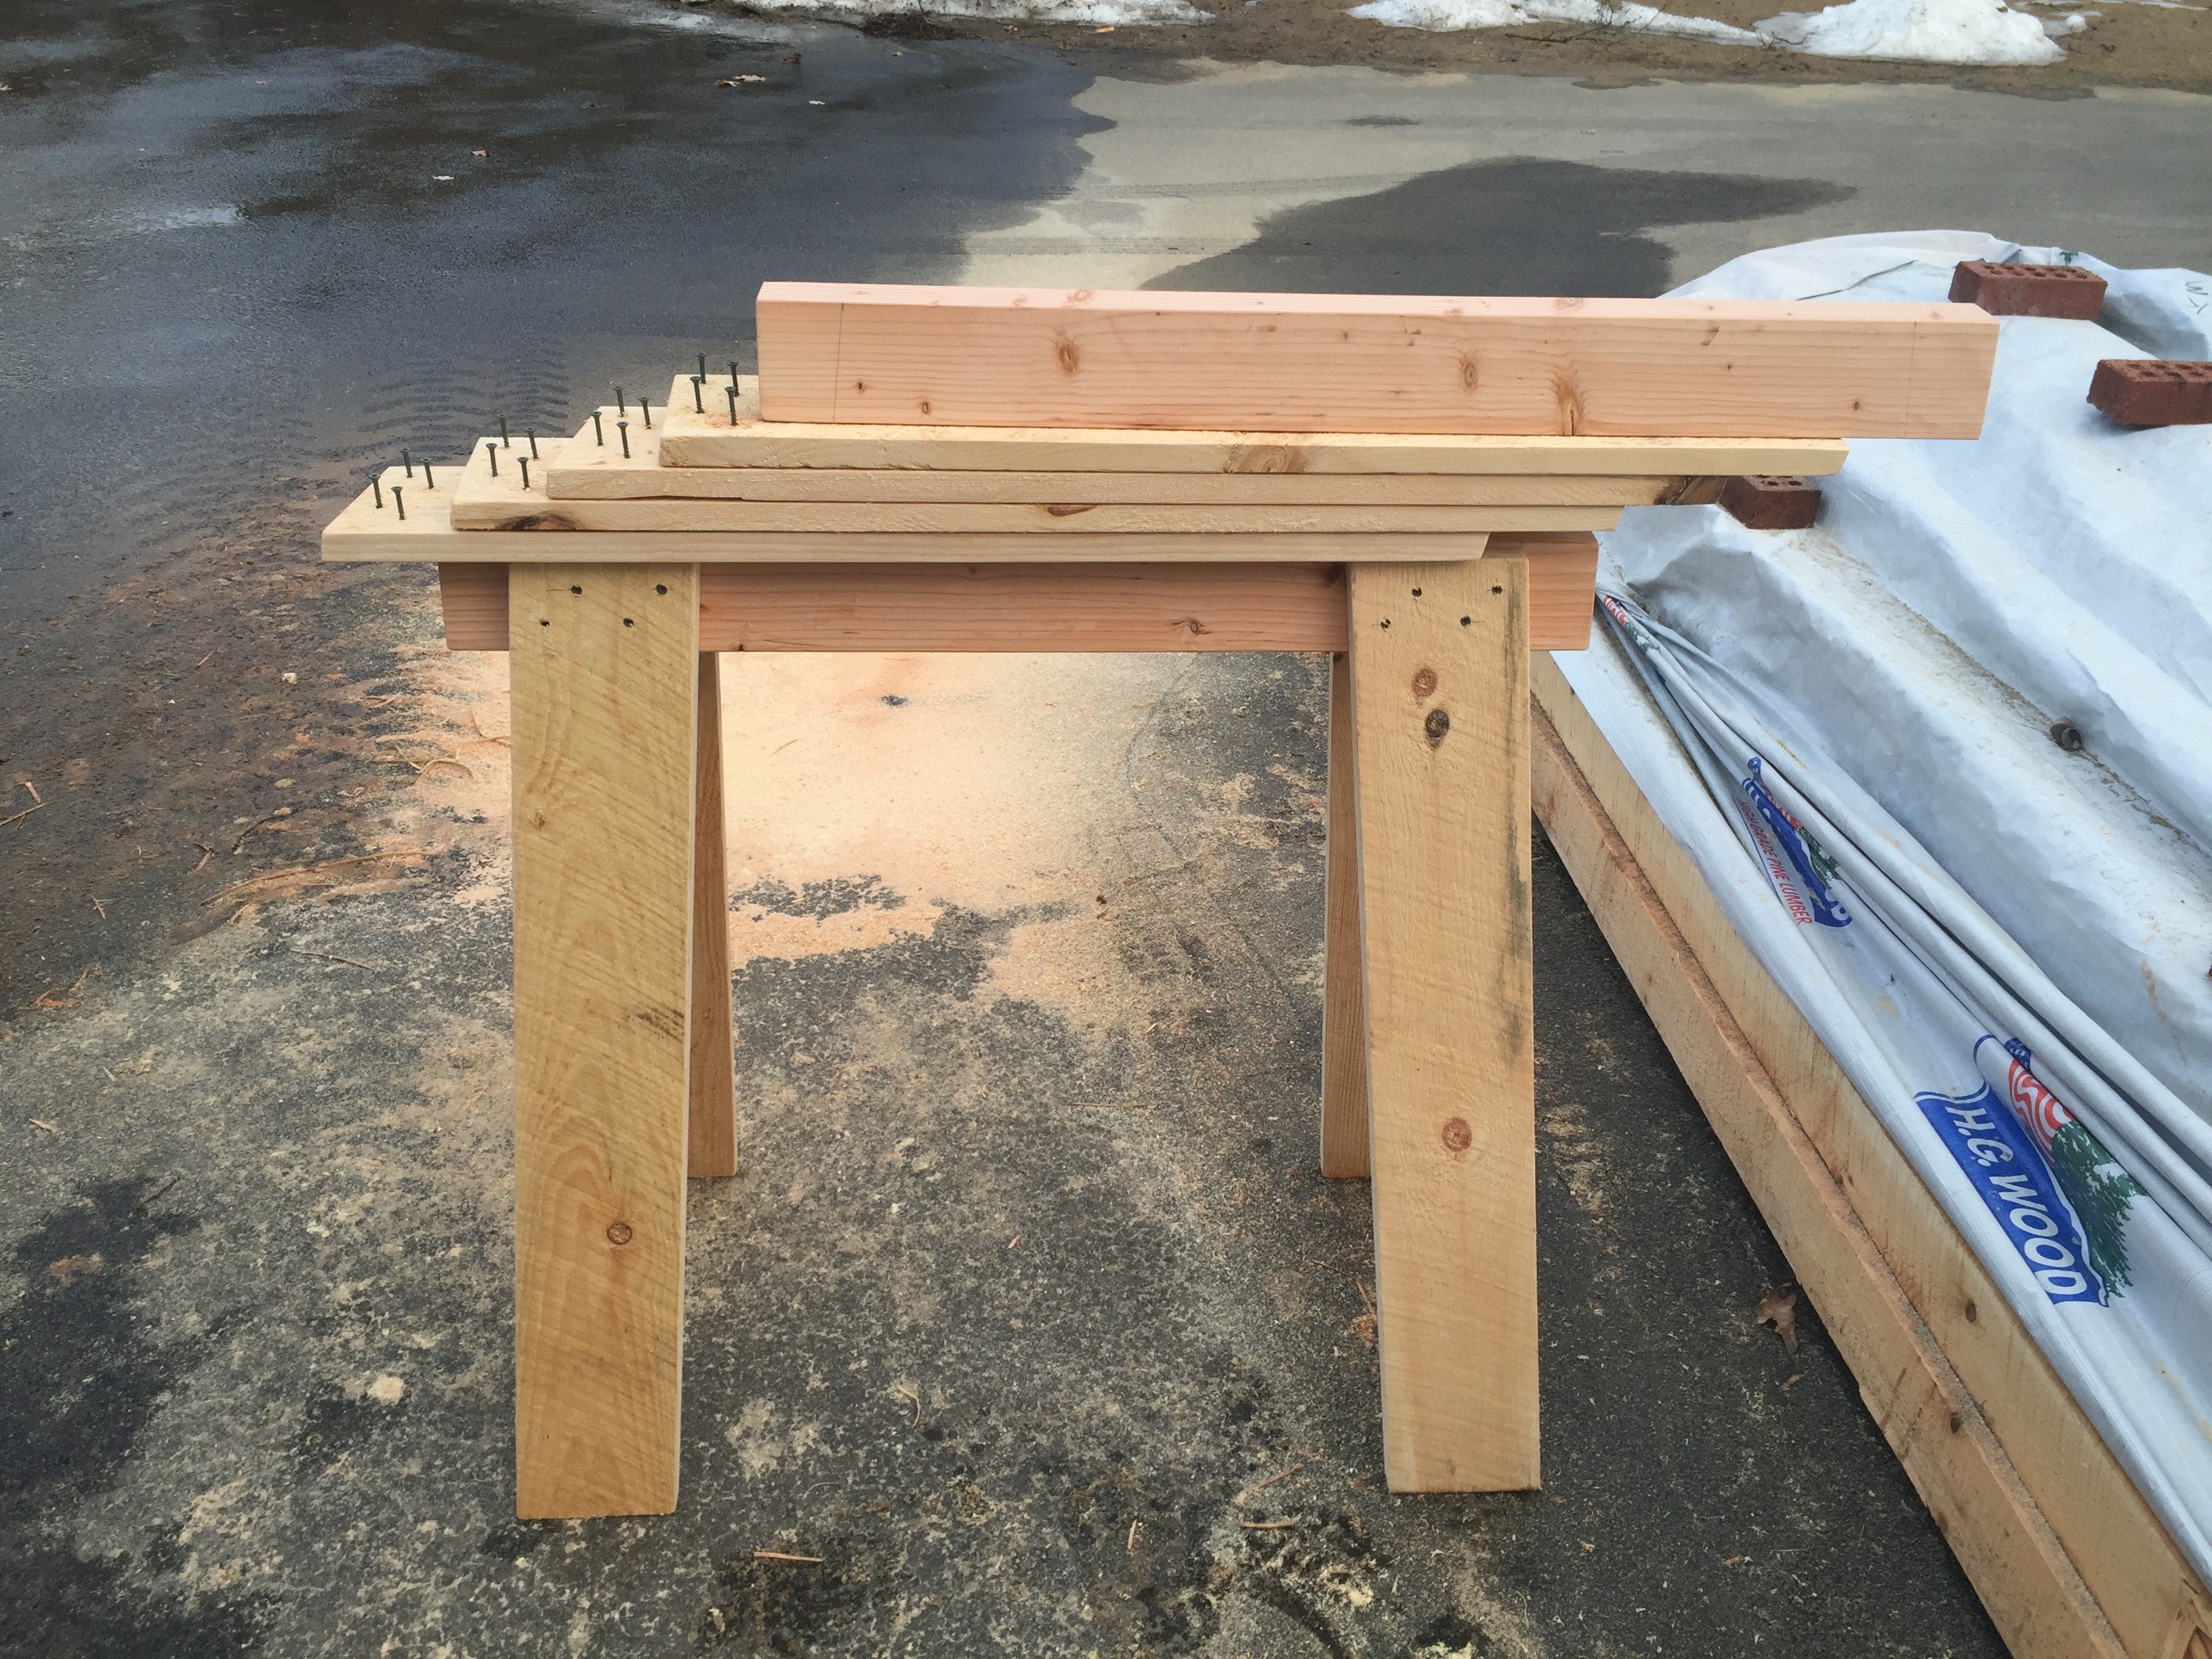
Another horse ready to be assembled
Early on I made a few pairs of saw horses to work from and did the majority of the horses as a large run.
Attaching the legs — I added one leg at a time, usually only sinking 2 or 3 of the pre-started screws into the beam. I add one leg, then add the second leg on the same side of the beam. This makes it easier to stand the horse on those two legs and add the third leg. When adding the 4th leg you’ll want to make sure all 4 legs are properly resting on the ground. If your horse wobbles this is your chance to adjust the legs. When the horse is standing the way you want you can sink the rest of the screws on the legs. When using an impact gun you don’t want to sink the screws any further into the wood than you absolutely have to. Ideally the screw heads should come to rest in the same plane as the surface of the wood, but green pine can be a bit soft so some of them may go deeper before they have enough grip to pull the leg tight to the beam.
Mass producing gusset plates.
With a beam and set of legs ready to go and standing nicely you can take a plywood gusset blank, bring it over to the partially assembled horse and trace where it meets the legs. Ideally the gussets should not stick out farther than the legs, otherwise they might catch on things. Making them say 1/32″ inside of the surface of the legs is what I shoot for. Using that traced piece I cut it and label it as a the template and use that for laying out each of the subsequent gussets
Important Notes About Gussets:
1.) When cutting the gusset the beveled end is always ‘up’ on the installed gusset — it mates nicely to the underside of the beam.
2.) When installing a gusset make sure the 5 degree bevel is facing the correct way so that it rest tightly up against the beam.
Impromptu work table
With a few horses pressed into early service I was able to make a makeshift table that allowed me to layout/mark all the of the gussets. Each one is secured with 4 screws. I made a mark for each screw to be 1″ down from the top or the bottom of the gusset and centered on the thickness of the leg, so for most that would be ~3/8″ in from the mitered edge. I turn a horse on its side and place the marked gusset where it is going to go. I then pre-drill the gusset in place and drive the screws. I used #8 1-5/8″ Deckmate Ceramic Star-drive screws and again a 5lb box was enough for this project.
Each horse required 16 2″ screws and 16 1-5/8″ screws.
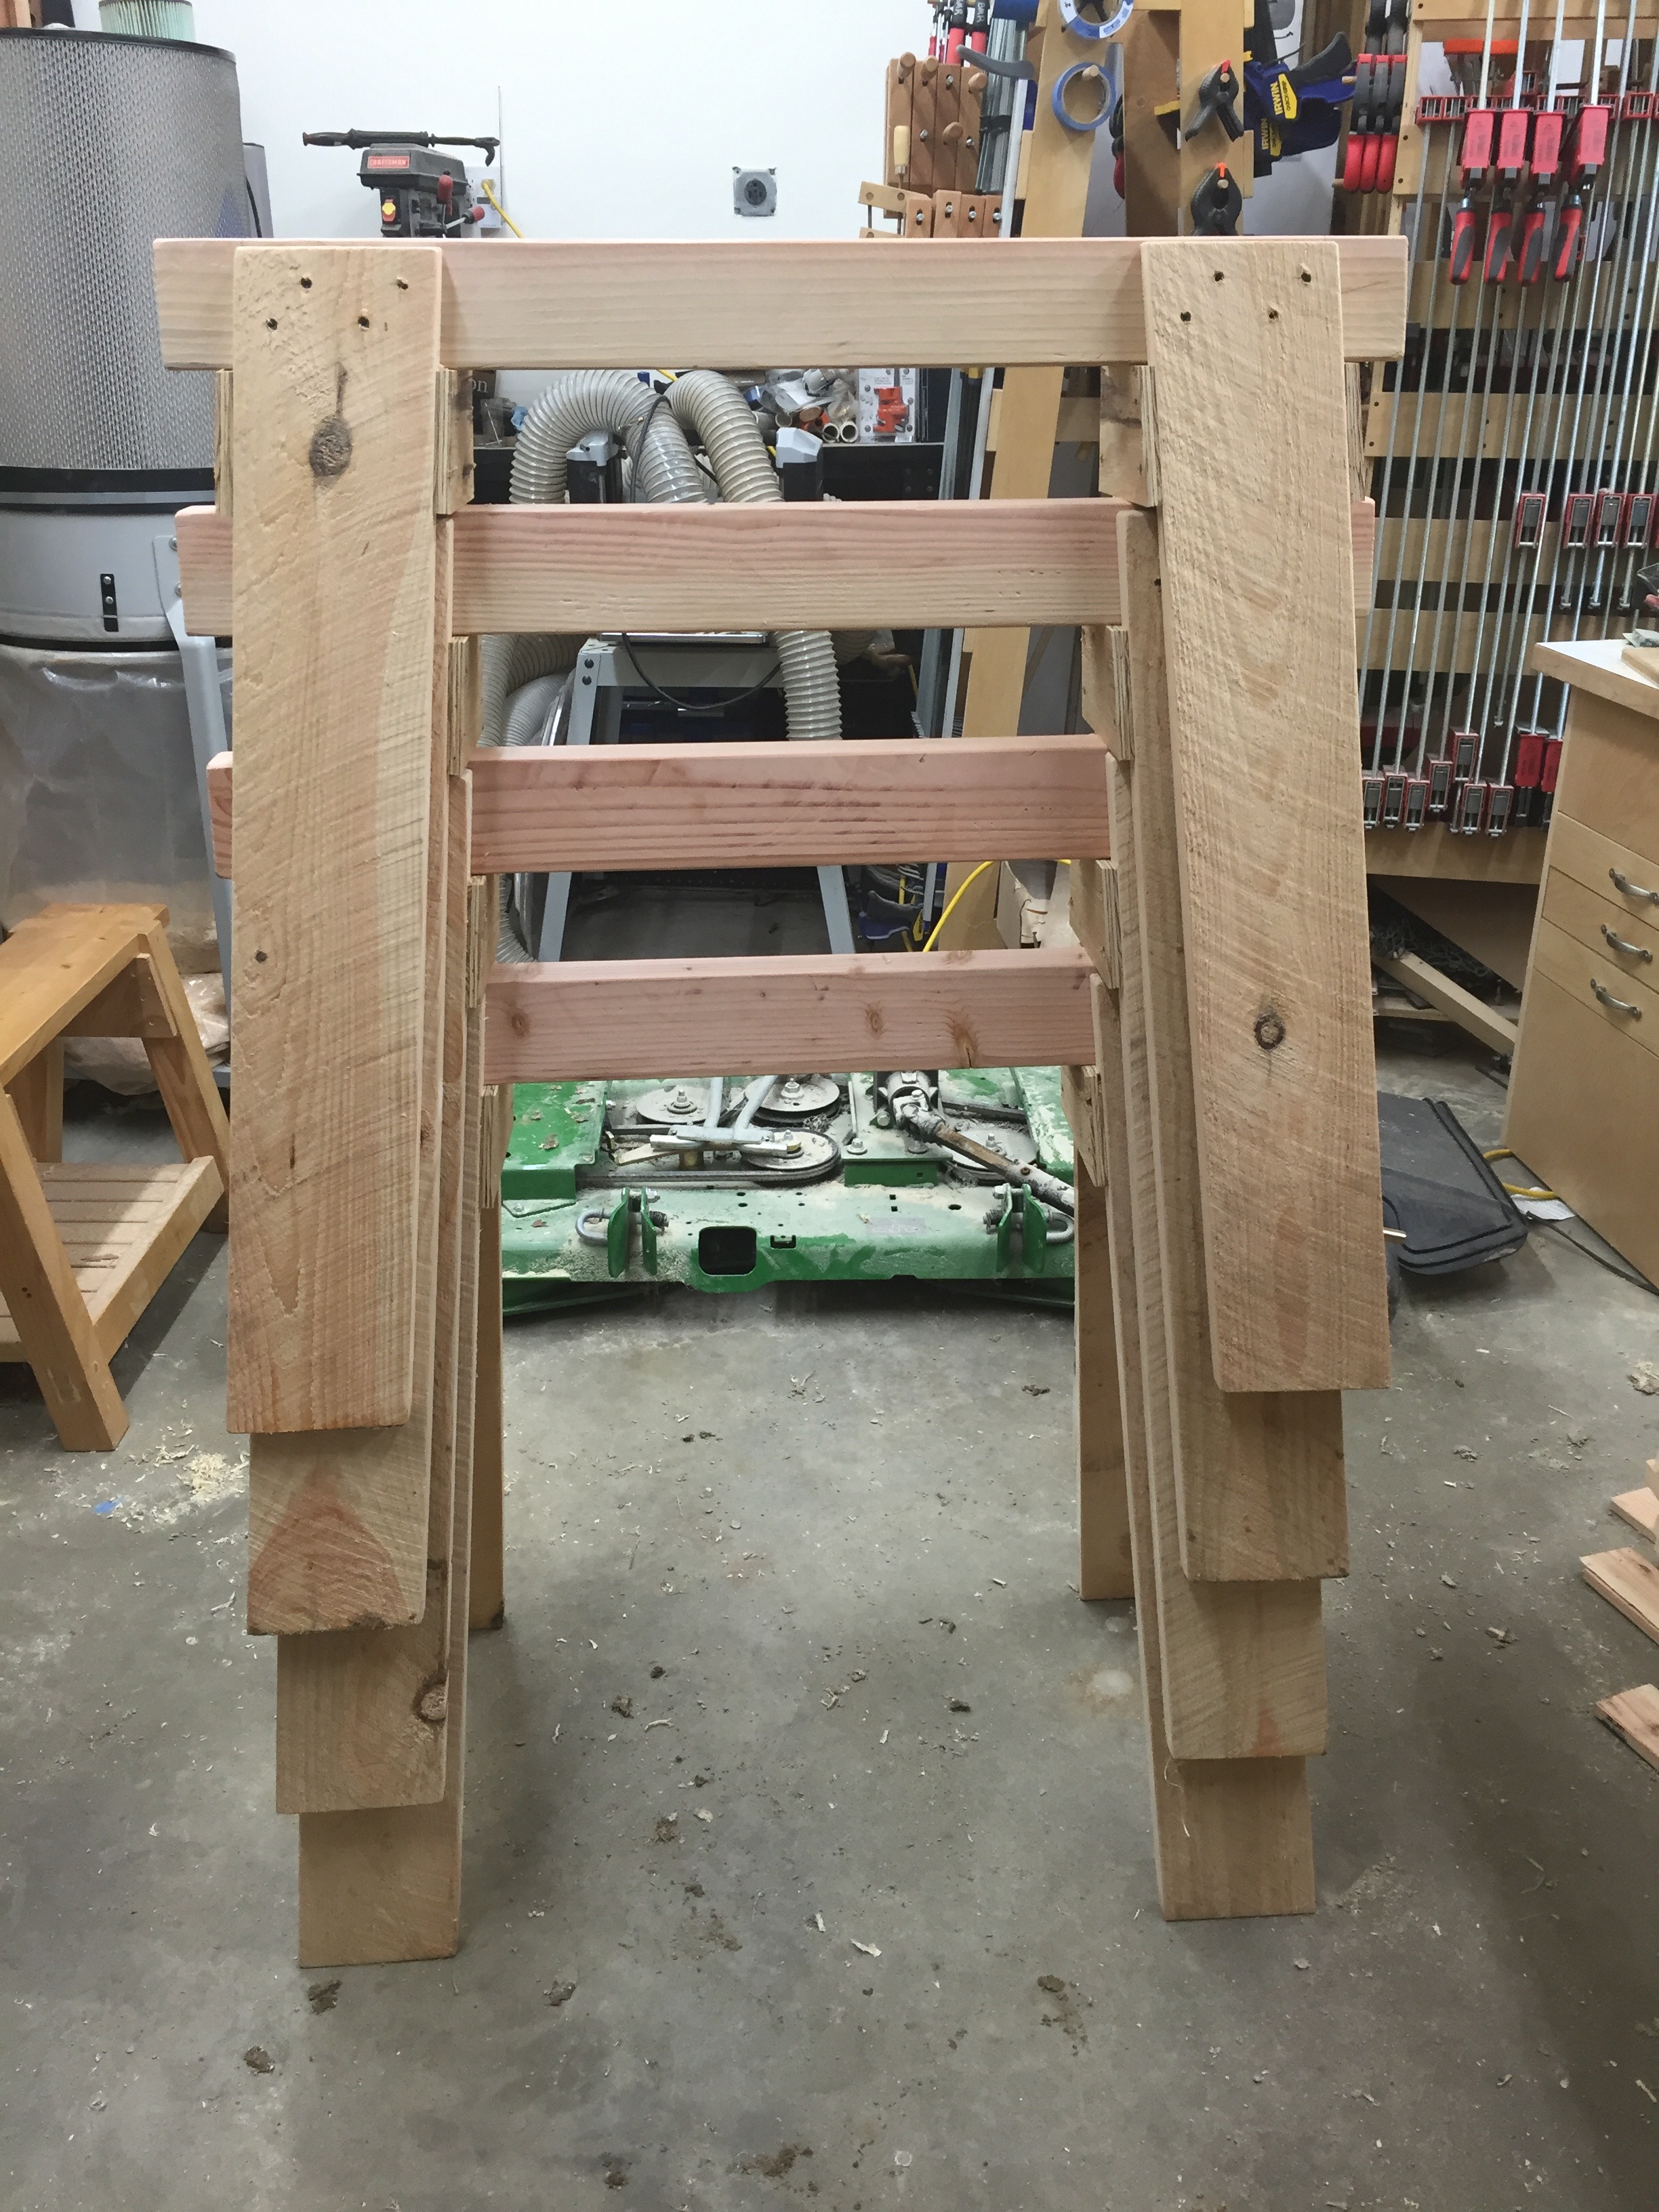
Saw horse with dimensions.
And now we have a completed horse! The image above has some more dimensional information for quick reference.
Lunchbox planer getting a workout
Now back to that mistake I mentioned earlier. By leaving the cut wet boards tightly stacked a mold/fungus quickly bloomed on half of the boards. I have a lot of allergies so I didn’t want to handle those boards any more than I’d have to, and it was unsightly, so I suited up and with my dust mask and fed them through my lunchbox planer. I also didn’t use my dust collector as I don’t want that wet fungus living in my filter. I planed the rough boards smooth and stickered them up to dry in the sun as I worked on other horses.
Letting the legs air dry a bit
That little mistake accidentally created ‘Denim Pine’ — pine boards with a blue tint that results from that fungus blooming and is desirable to some folks, presumably non-workers that like the look of it. (See above and below). With the mold/spores/fungus/grossness removed and stickered the legs will dry and be fine to use. As I completed each horse it will live out side where it can dry at a steady rate until the barn gets finished.
Some ‘Denim Pine’ Legs
How do you store all of these horses?
Stacked horses.
The horses stack nicely and even when stacked all the wood can dry nicely.
Wide angle view of the horses
This was the largest run of horses I’ve made to date so I set them all up out in the driveway just to see them all in one place.
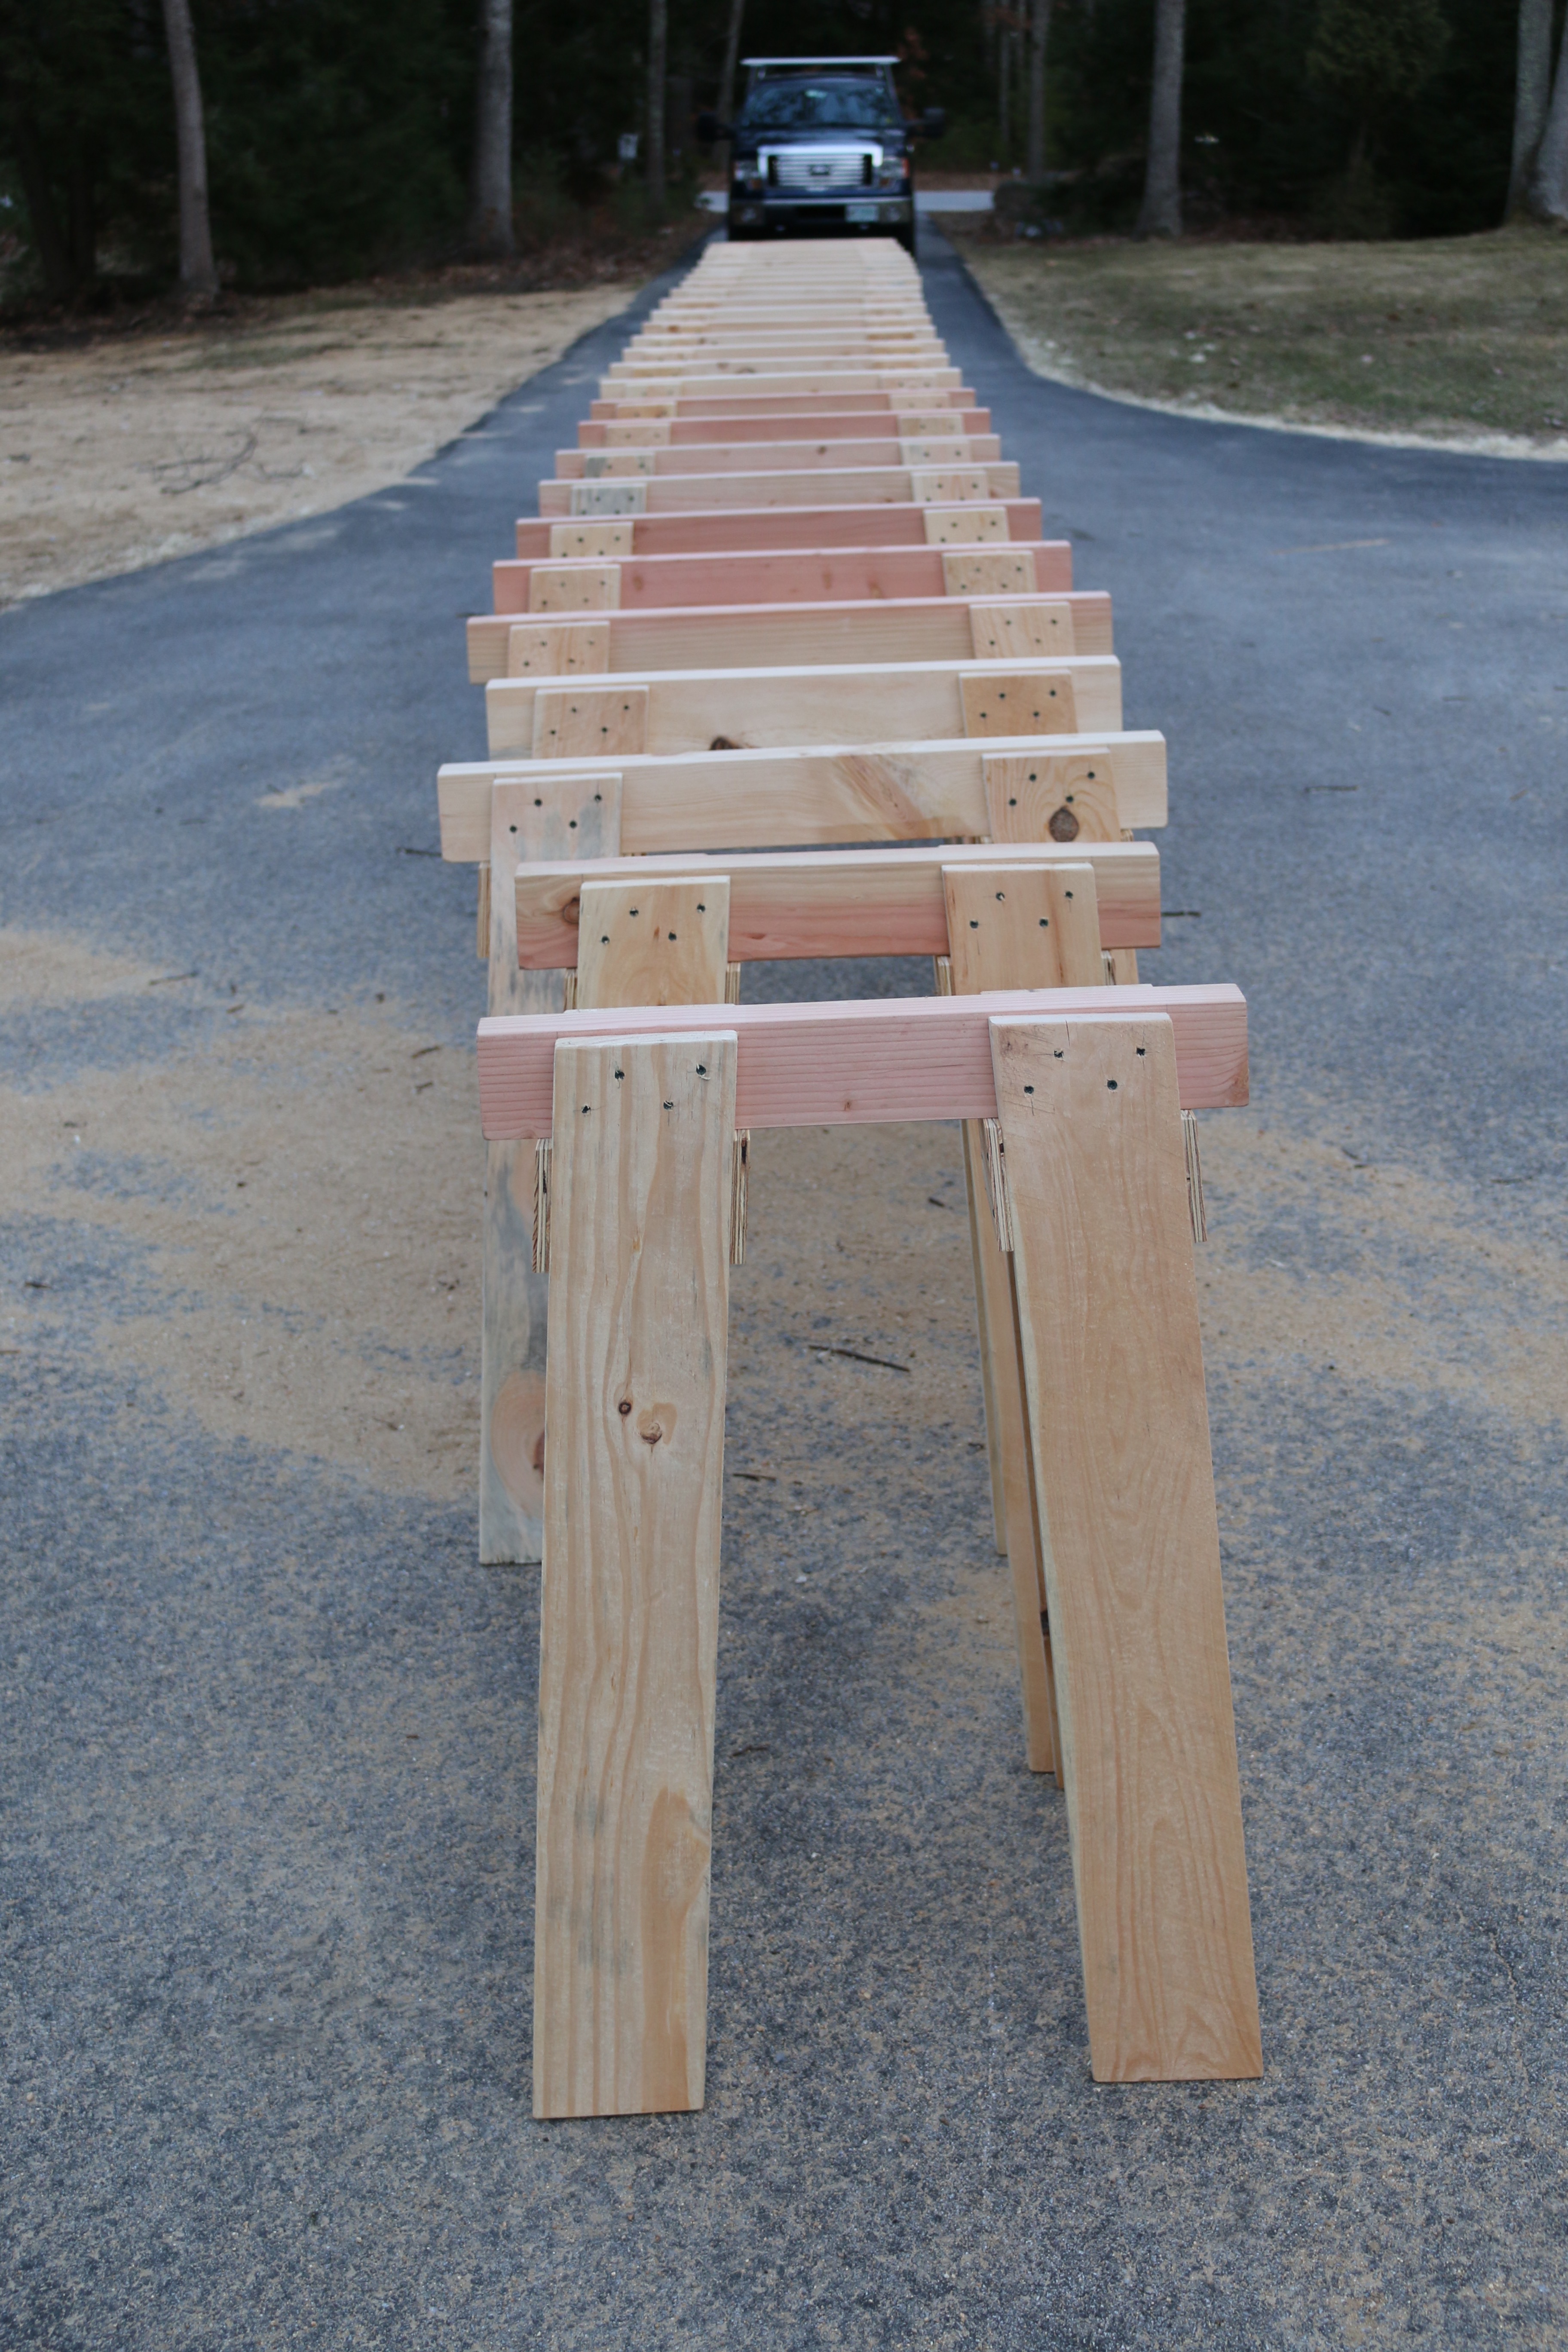
2 ponies in the foreground 26 horses in the background
Two of the horses, my ponies, had a 24″ beam as two of the 4x4s were a little short and I thought it would be nice to have a set that can fit into a tight place.
It looks like a TON of horses, but these 12, plus the 12 I already had will just barely be enough for the barn build.
What do you plan to do with all these horses?
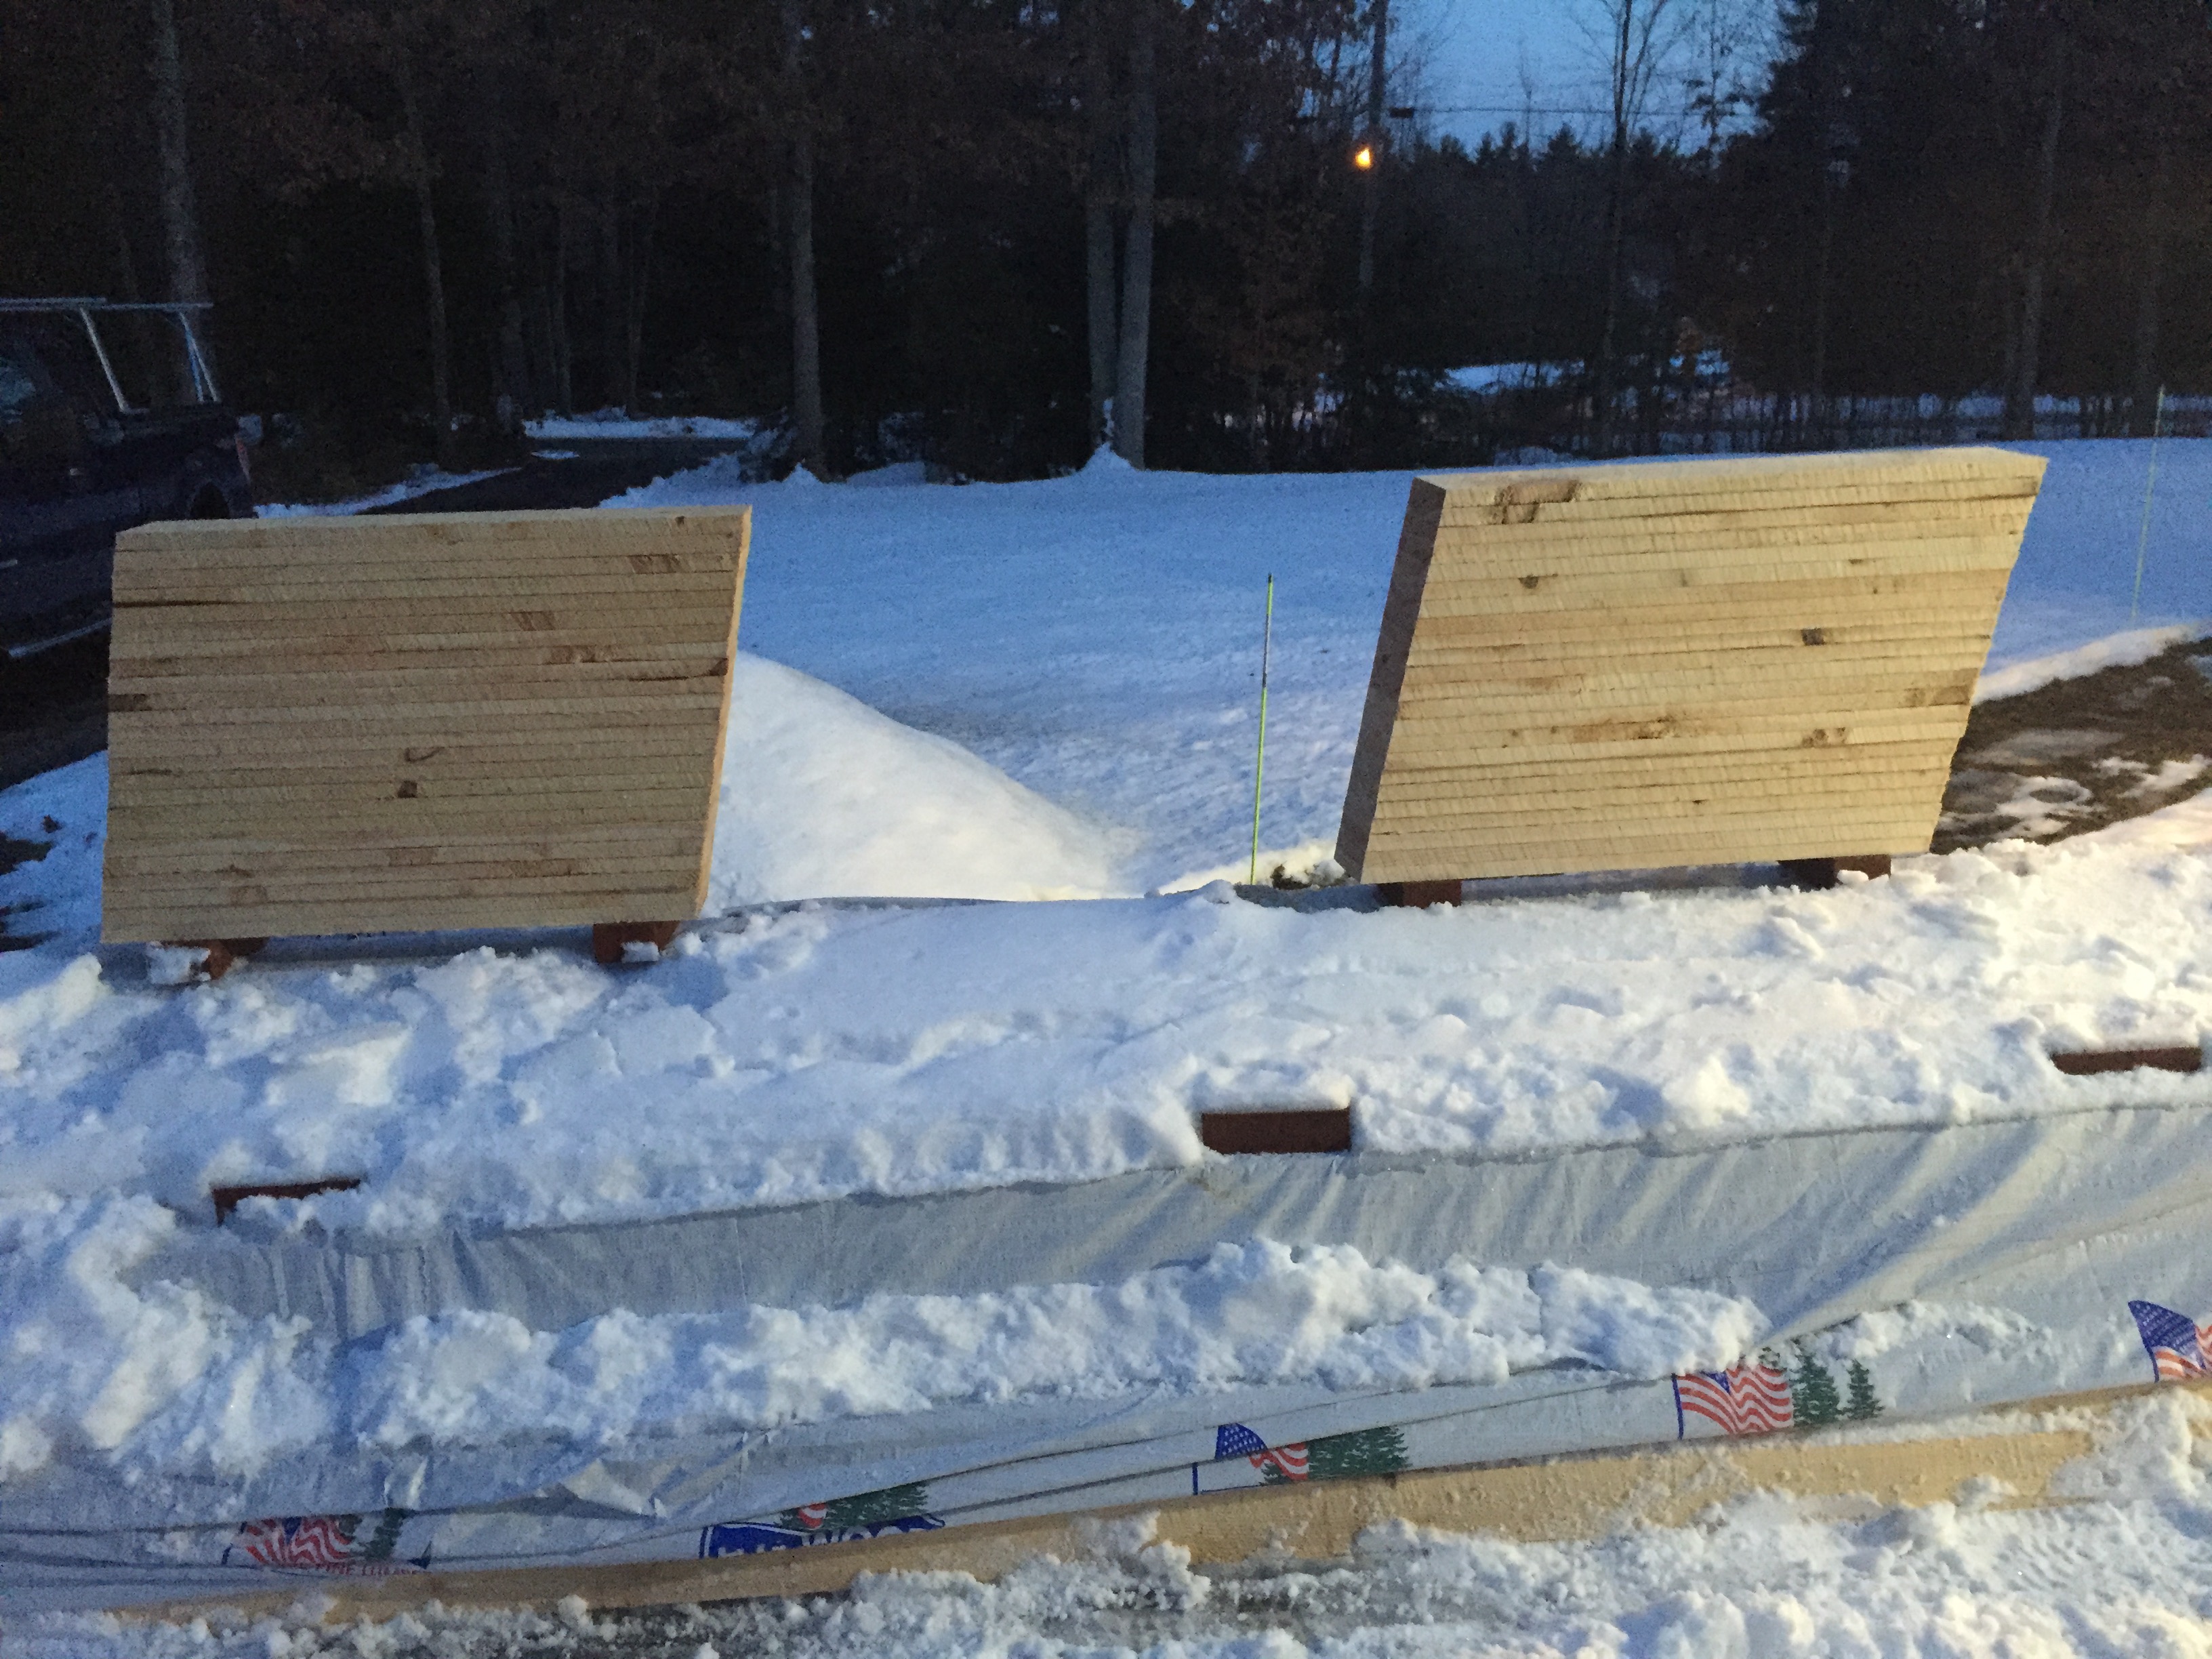
A LOT of shiplap siding on horses. 10-12″ wide 16′ long pieces
Above and below you can see a couple thousand linear feet of 16′ shiplapped pine sheathing held with ease by these horses.
A LOT of shiplap siding on horses
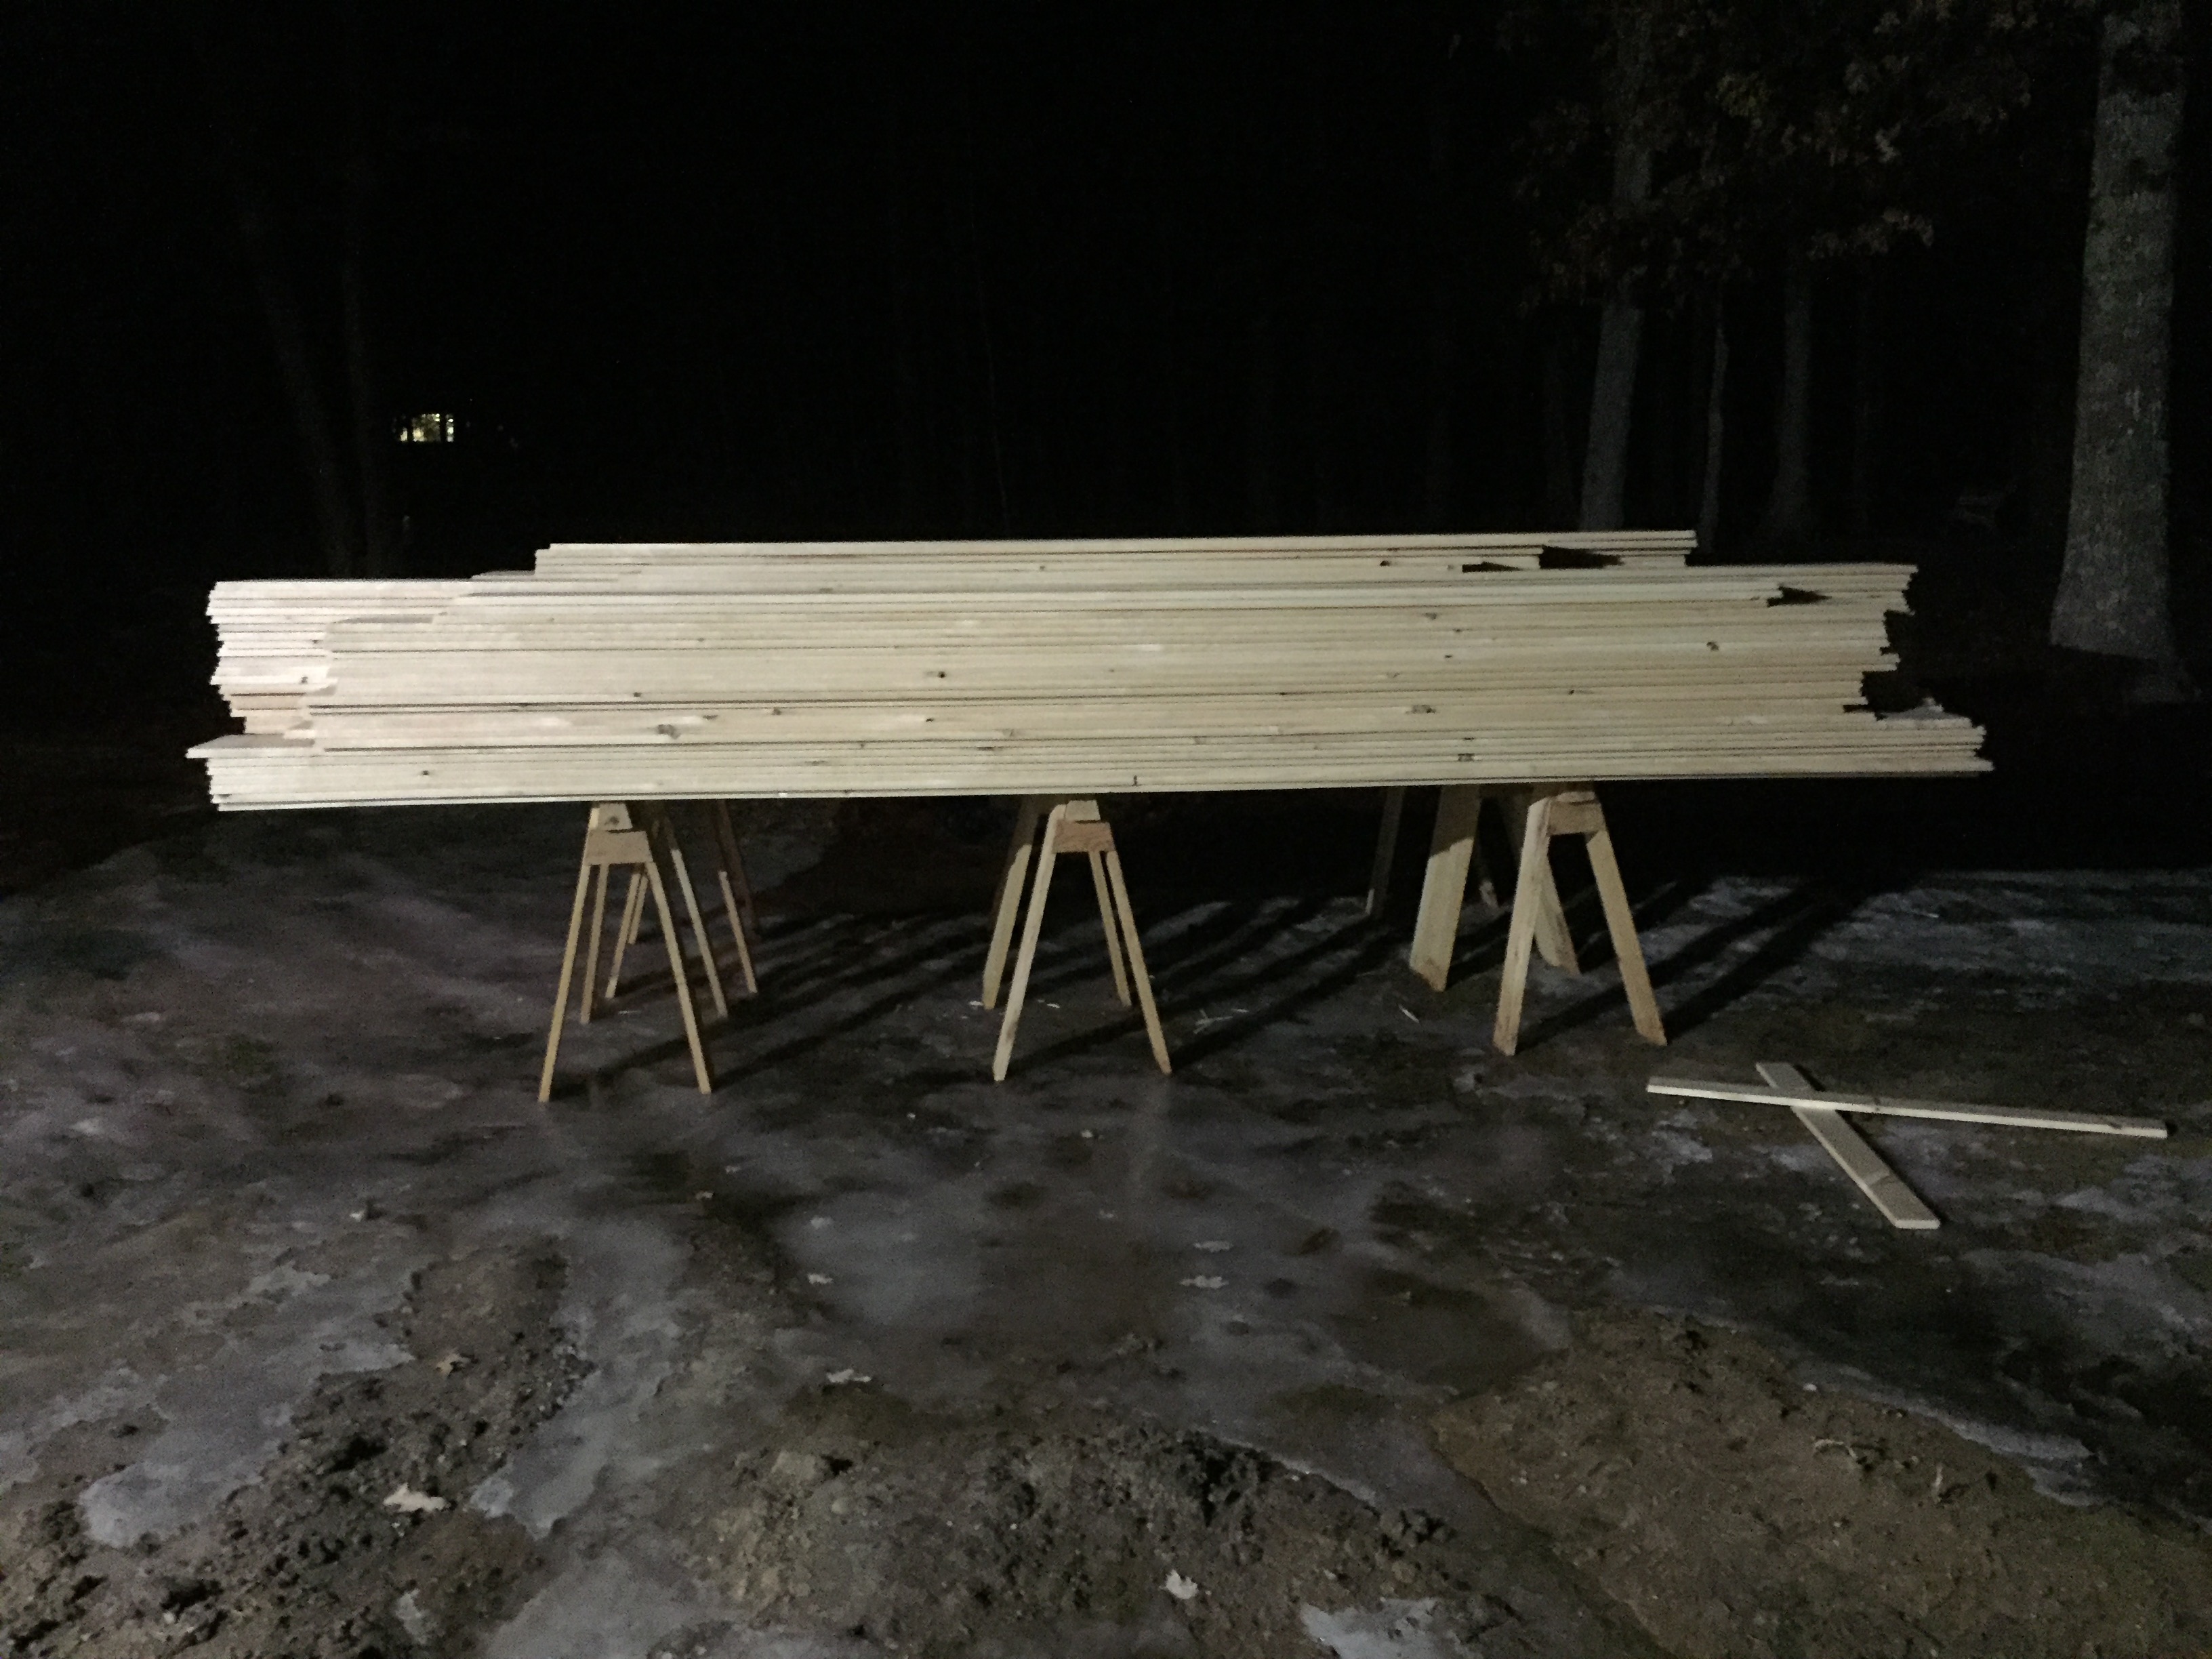
In the photo below are 24 2″ thick 12″ wide green pine planks that will be used in the barn loft. I estimated this wood to weigh 1800lbs and the 4 horses below seem to hold it with ease.
4 horses holding over 1850+lbs of green pine planking
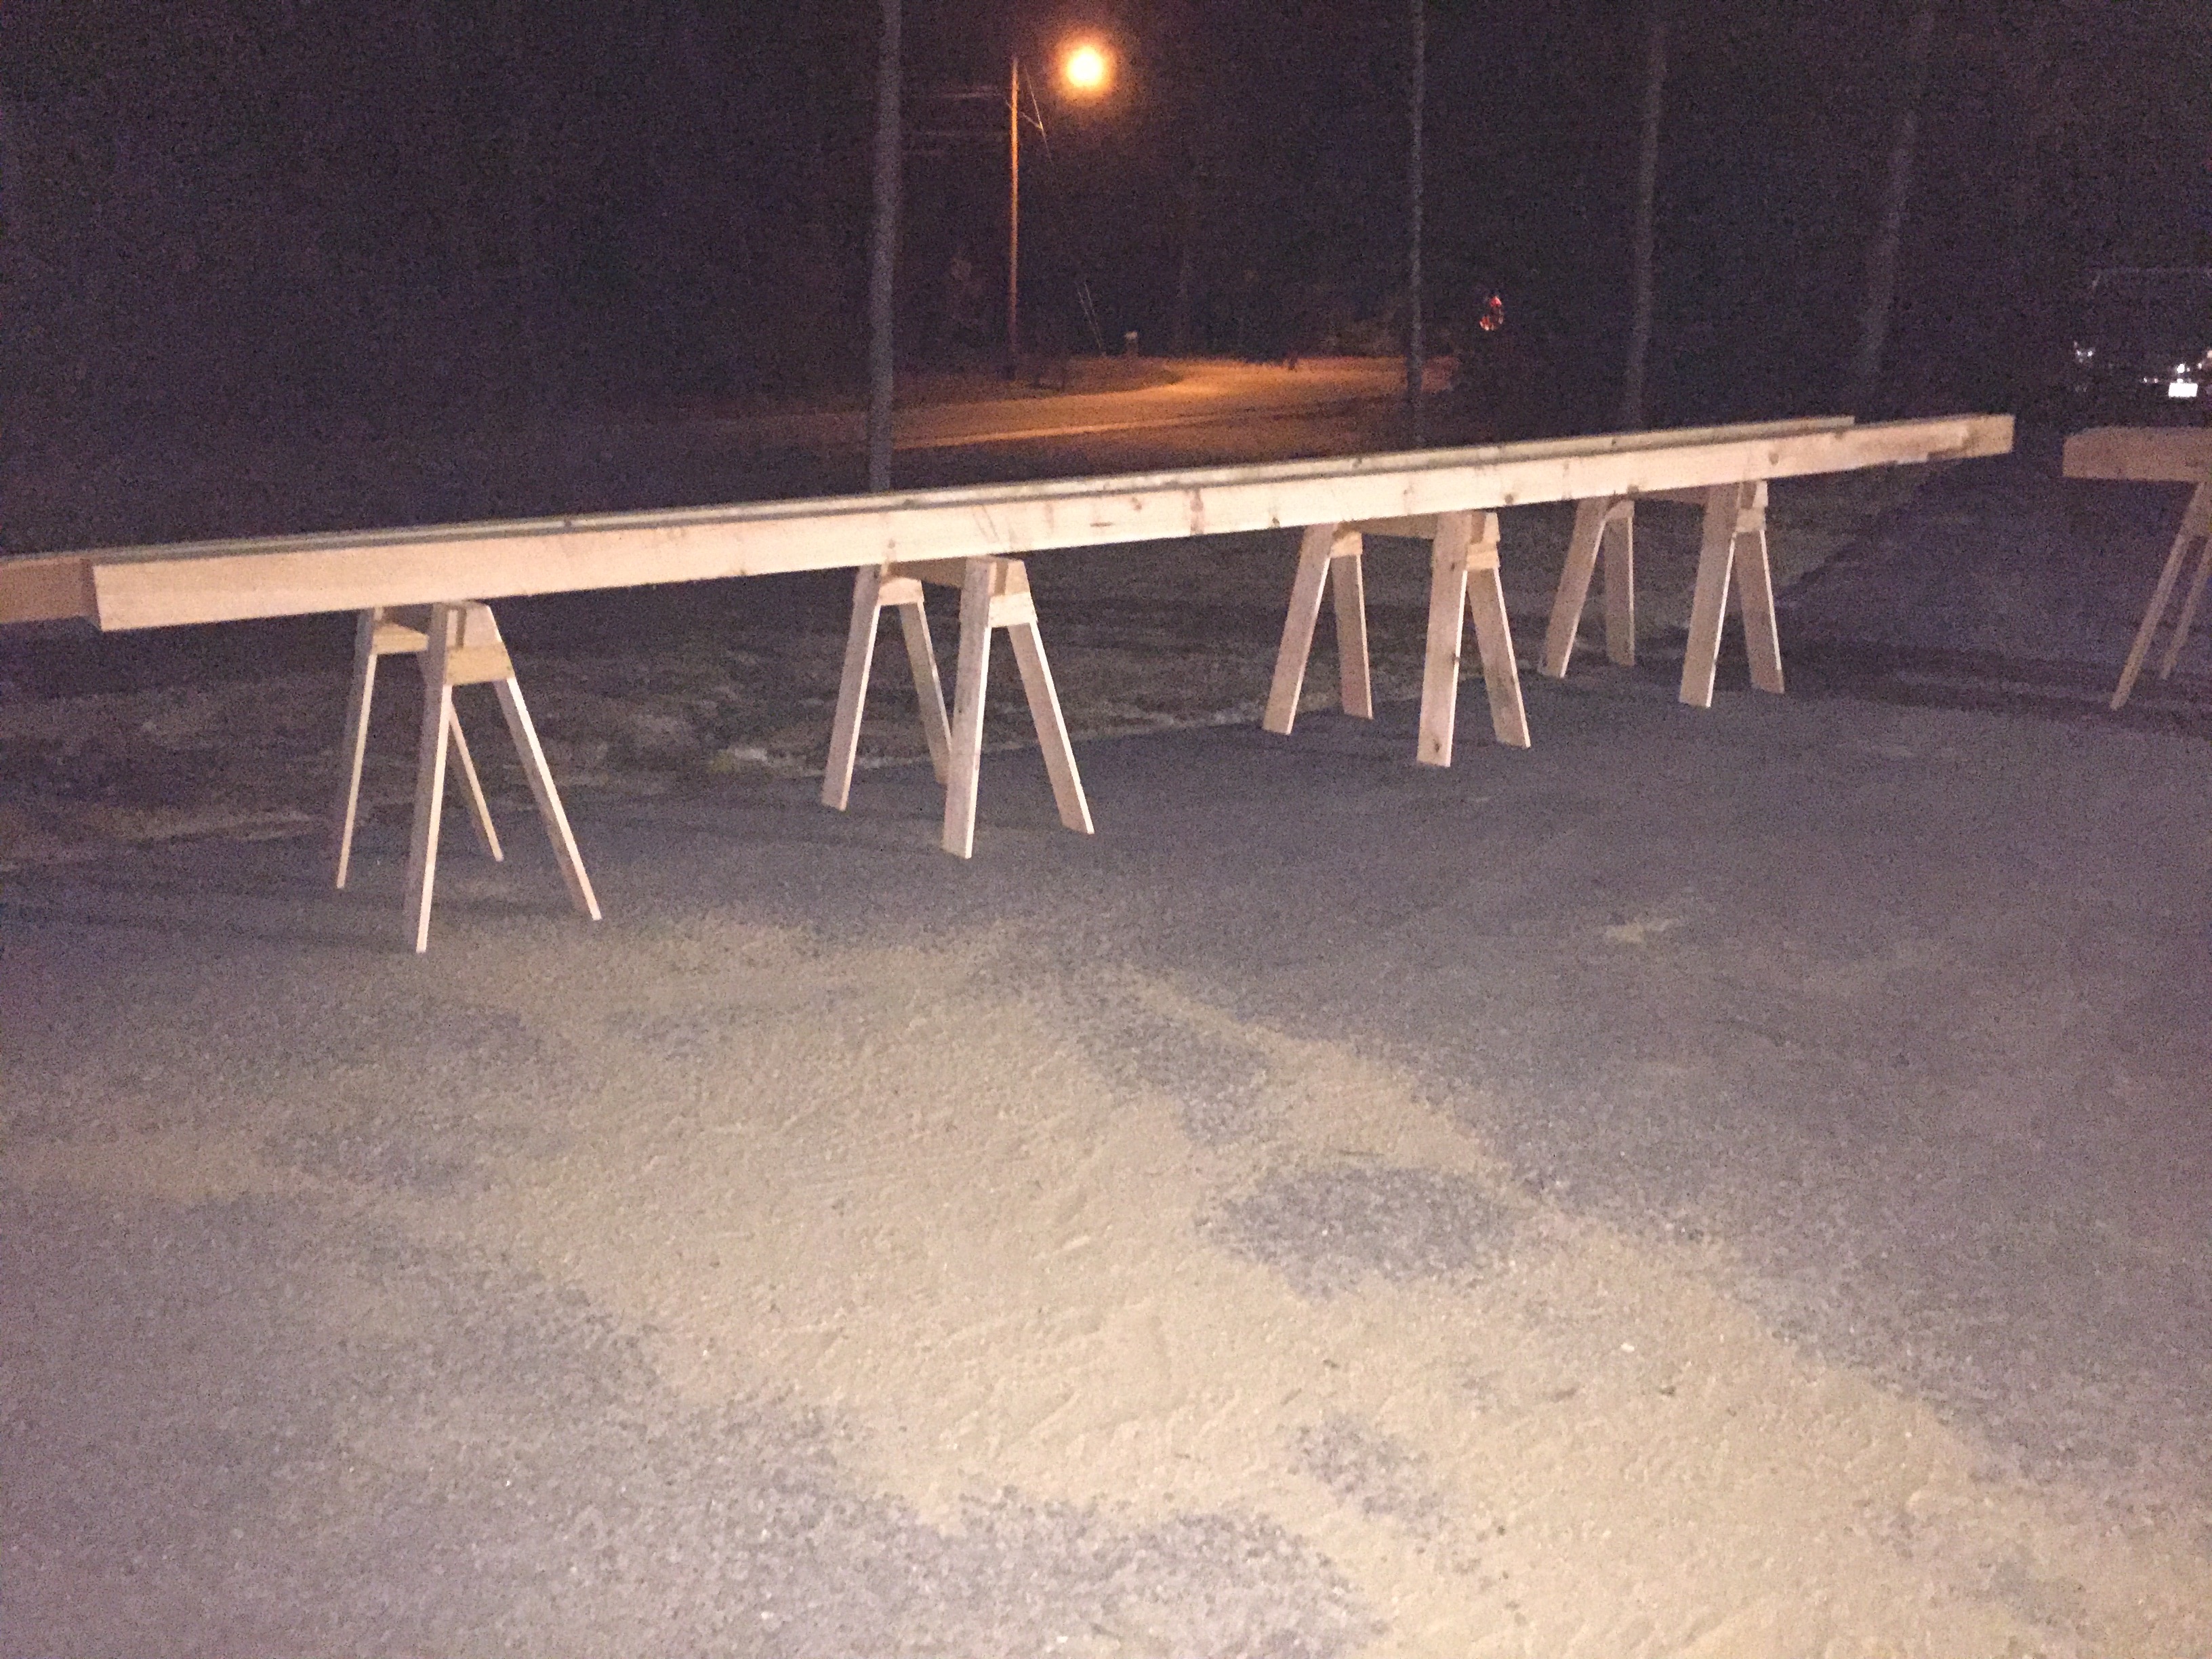
And below are some 6×9 25′ long timbers.
Horses holding 6″x9″x25′ timbers
As you can see these versatile horses are at home in the shop or out on a worksite and I hope that you’ll build a few pairs for yourself. If you do, please let me know in the comments.
Who doesn’t like a nice curve?
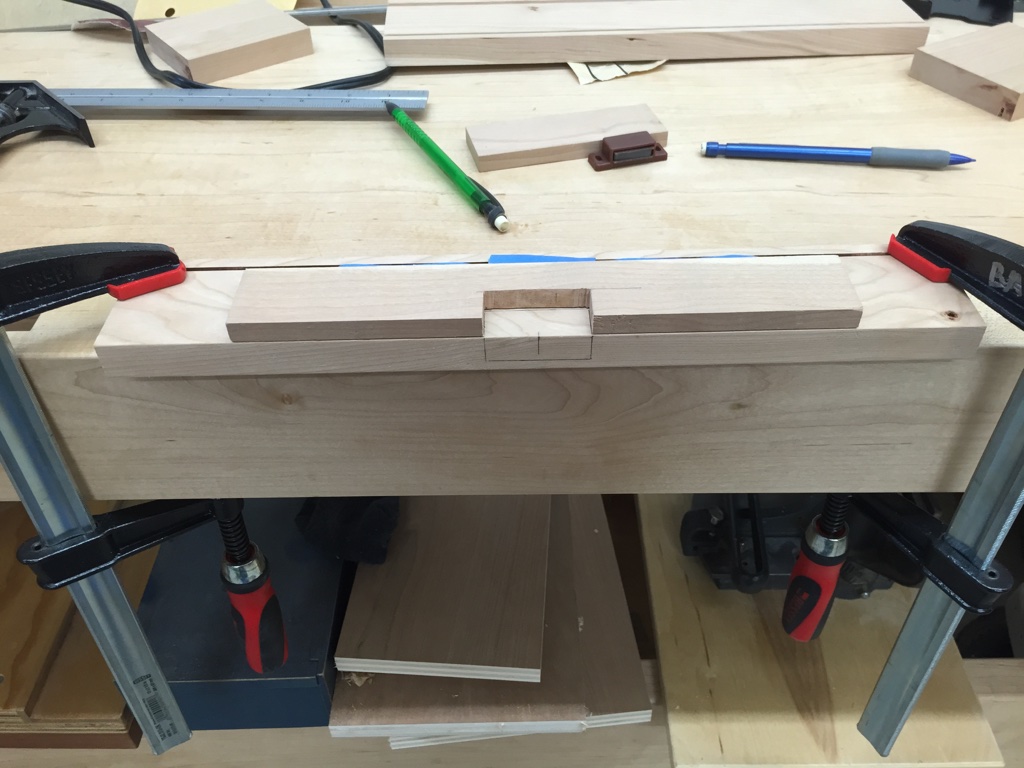
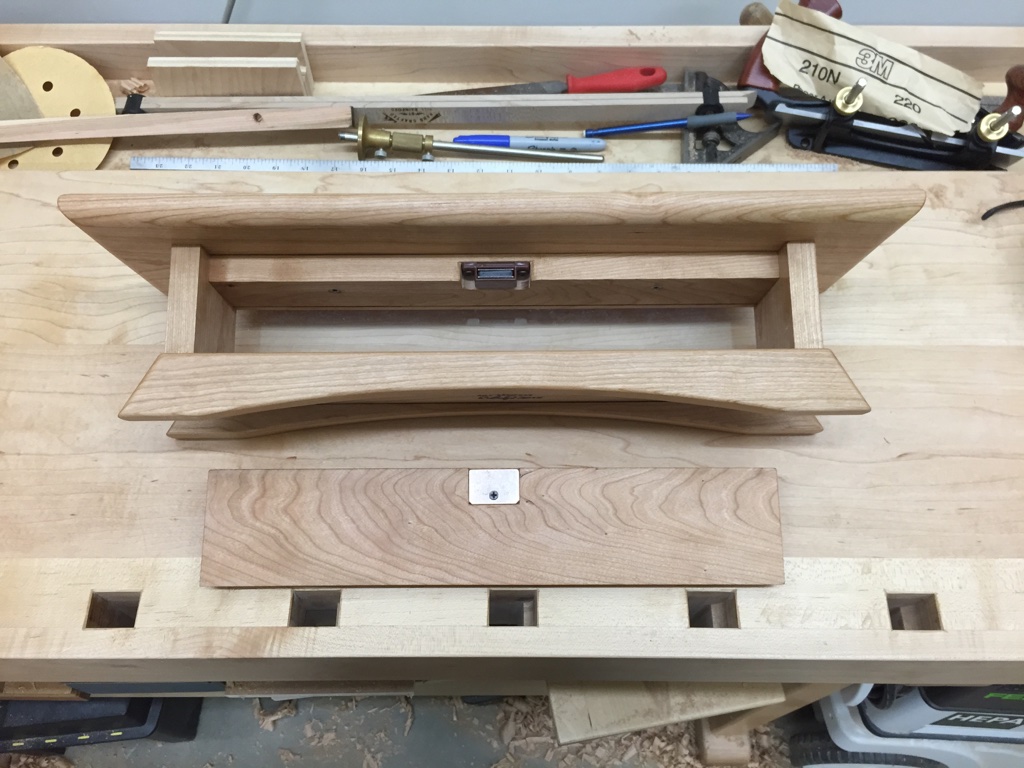
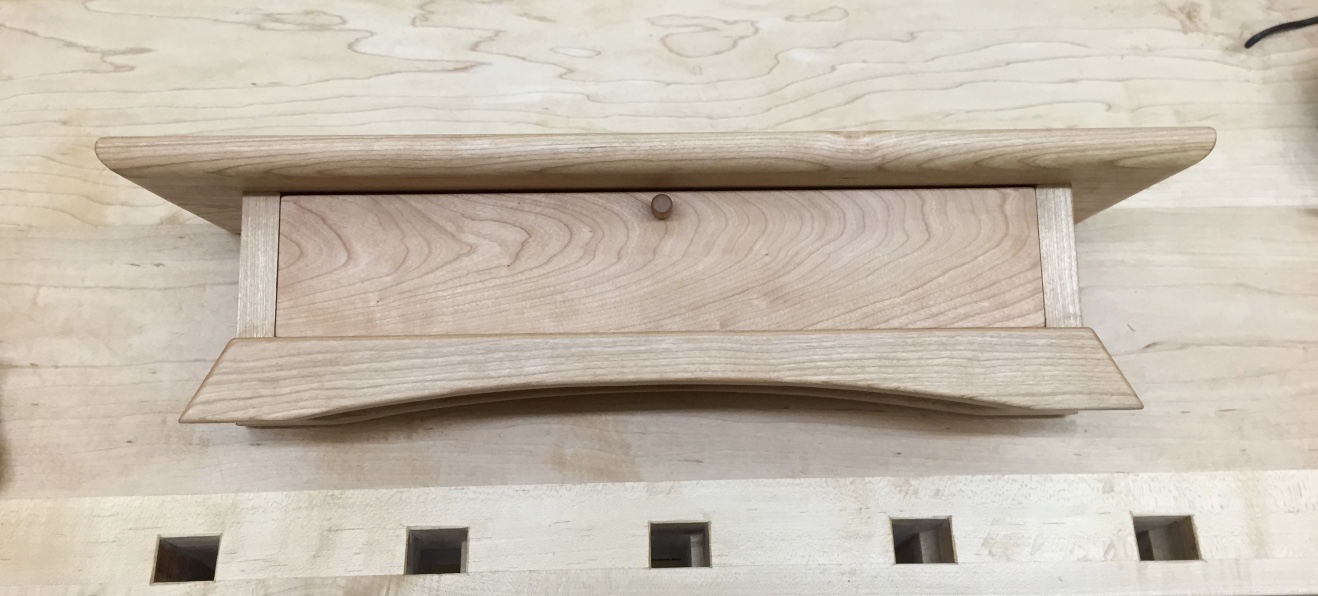
I recently had the honor of building an appropriate display case for my friend Lee Lemoine who is a Tae Kwon Do black belt. We talked a bit about what he was looking for, captured some dimensions for the coiled belt and looked at some sources for inspiration and then it was time to hit the drawing board.
Completed Black Belt Case
I spent about a day and a half drafting and revising my design until I could find something that would work. The cabinet is wide but not too deep nor terribly tall so it was going to be a challenge to make the joinery work. I thought about making the back access panel hinged or sliding or secured in some other manner, but I really didn’t want to see any hardware on this piece. I bought some small brass hinges and a clasp and just didn’t like how it would look. After sleeping on it an idea hit me….to hide a magnet catch since this case will rarely be opened. I also had Jim Tolpin and George Walker’s writing (By Hand and By Eye) echoing around in my head as I worked out pleasing proportions for the overhang of the top, size of the curve etc.
Planing the stock to final dimensions
After completing the plans, I planed all my stock and started working on the joinery.
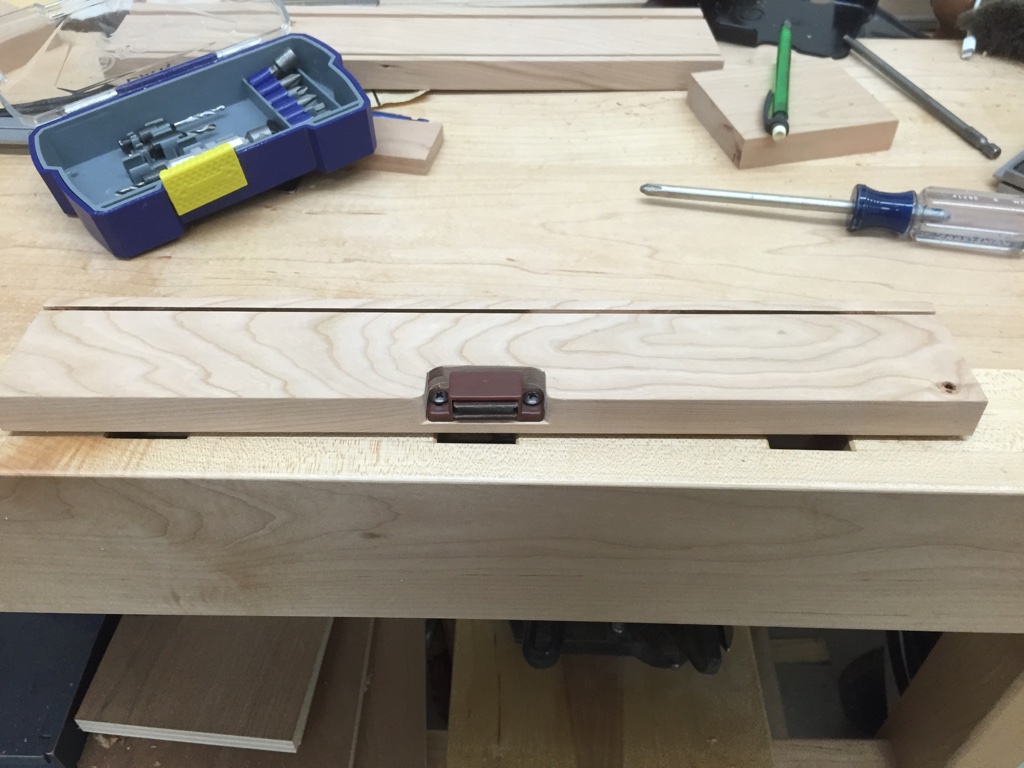
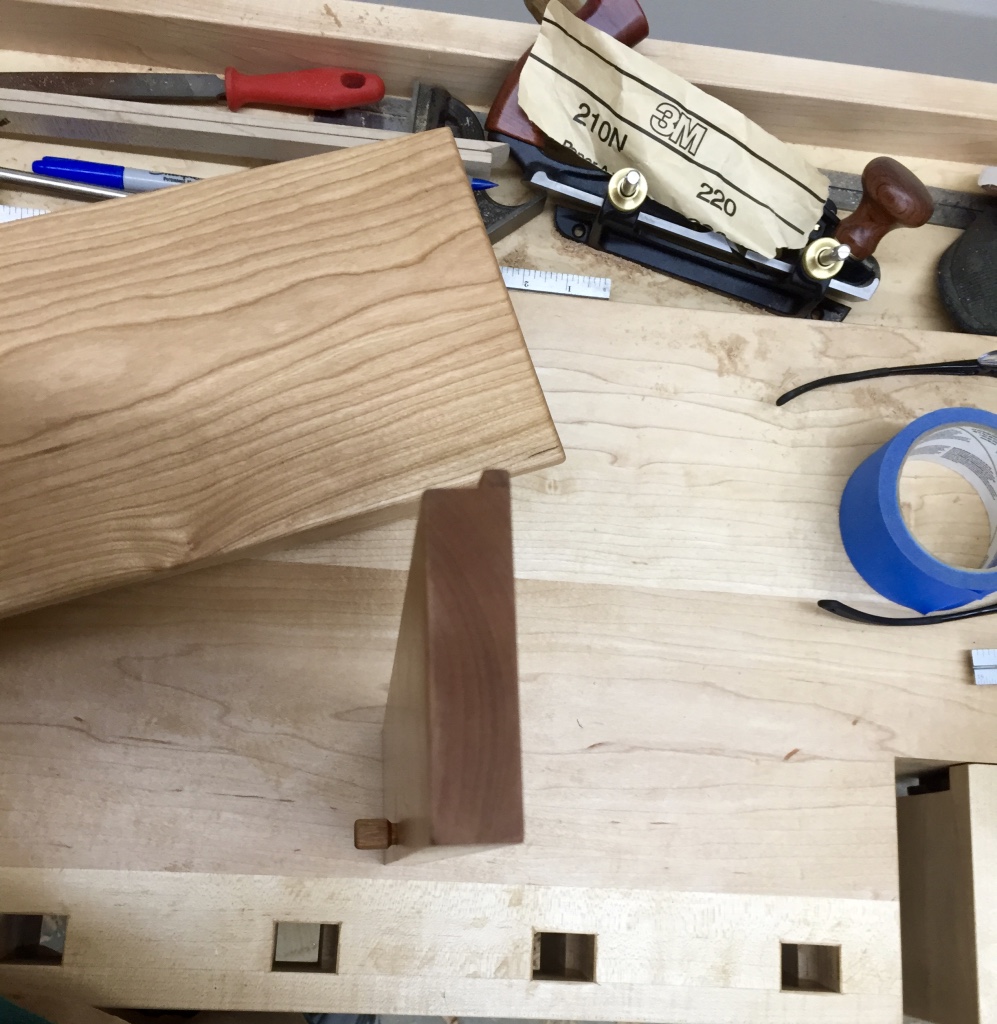
Quick template to remove material for the magnet catch
For the magnet catch I made a template on the band saw and used a router with a template bit to cut out the recess.
Test fitting the magnet catch
The catch was captured and would not be seen from the front (shown below)
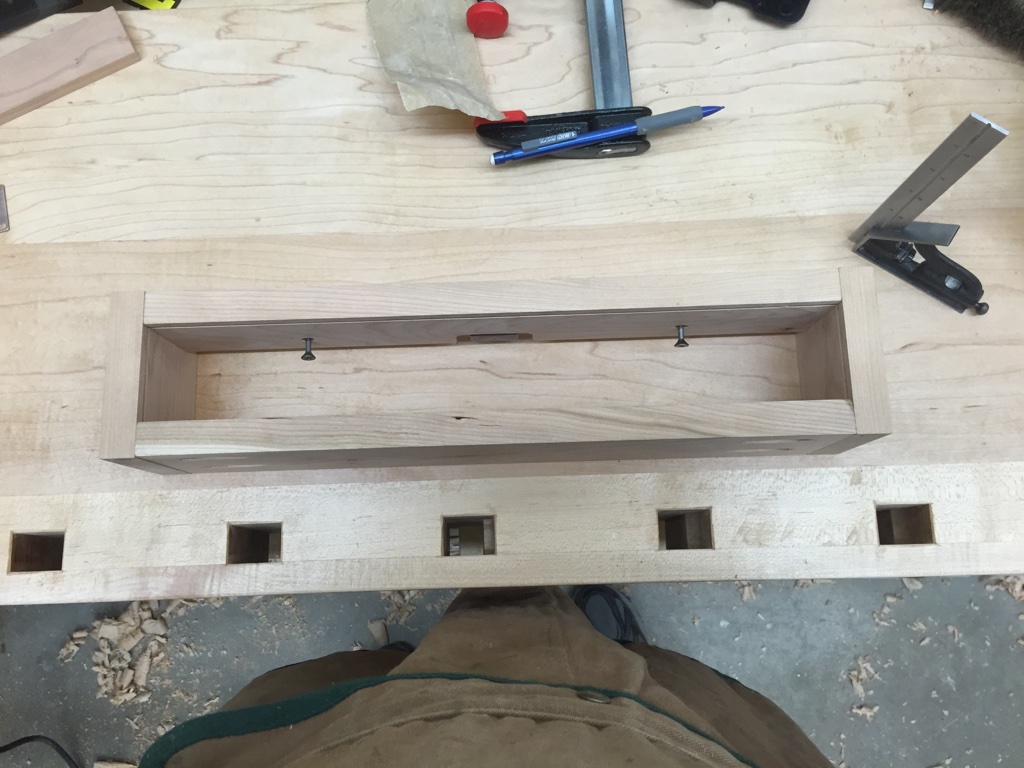
Preparing the core of the box to accept the top
Next up was constructing the core of the box. The core box needed to capture the glass front in a series of dadoes. I also wanted the box to be serviceable if the glass was ever broken. I needed to keep the joinery simple and decided to go with pocket hole screws since that would allow someone in the future to take the top off of the box and remove the top of the core of the box as well. The overhanging box top is affixed to the core box via screws. The challenge with the screws was the interior of the box was only 2-1/4″ tall so I had to use a square drive bit in a set of vise grips in order to secure the screws through the core box and into the top. (I pre-drilled both to make sure everything lined up where I wanted it)
Cutting a strip of glass
Next up was cutting the very long strip of glass for the front of the box. I used a stained glass ‘strip cutter’ which works much like a woodworking panel gauge with a fence. You score the glass in one even stroke and break it as you would any other piece of glass.
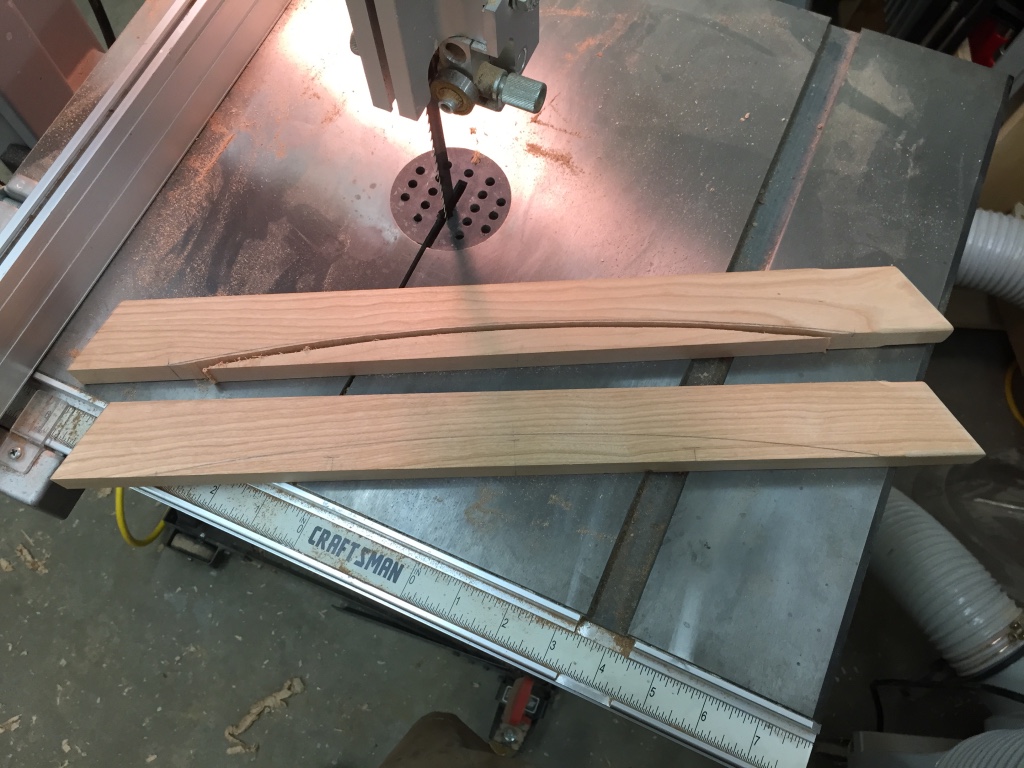
Laying out the curve with a faring stick
Next up was laying out the curve using a faring stick — which is a thin strip of even grained wood that you can bend to make the curve you want, then clamp it in place and draw your line with a pencil. If you thin out the strip you can adjust the rate of curvature.
Cutting the curves on the band saw
I cut out the curves using the band saw and cleaned them up with some spoke shaves.
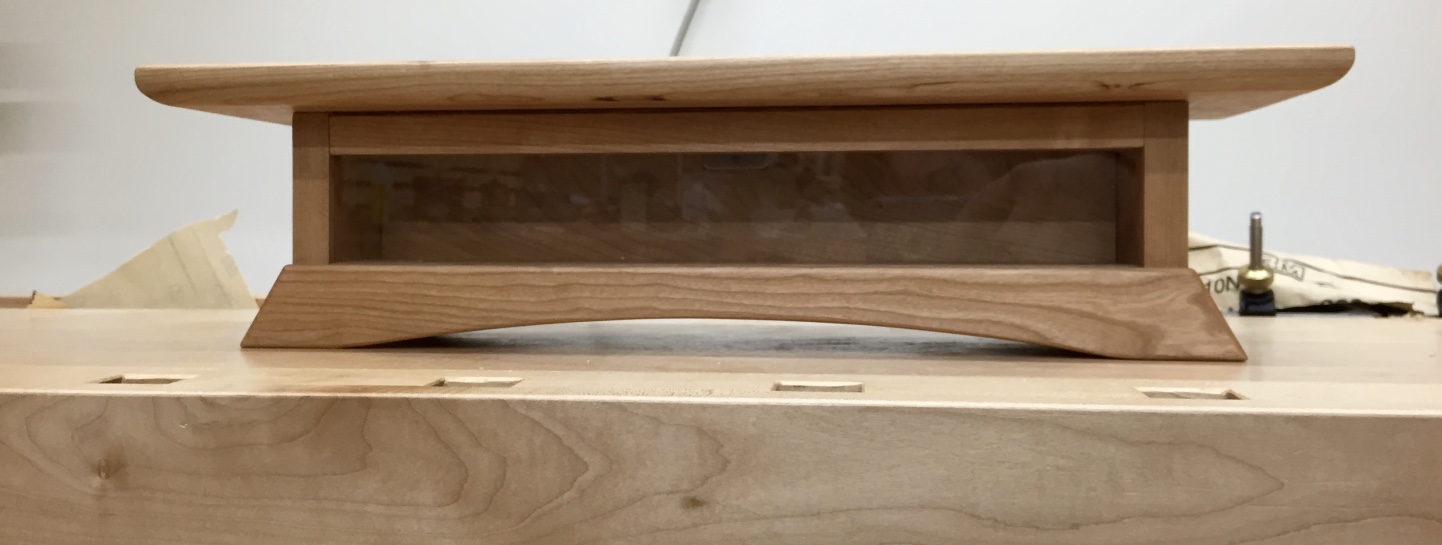
Rabbet will fit into a dado on the back of the case
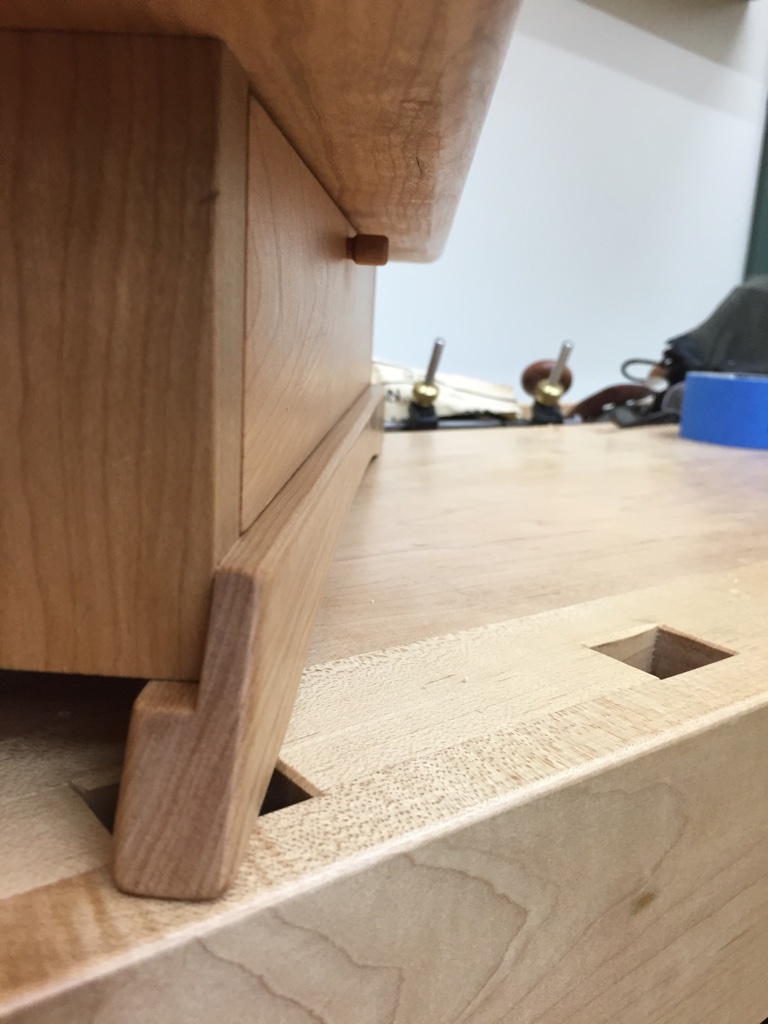
For the back of the case I needed it to fit tightly so it doesn’t let any light in and also created a rabbet to keep the bottom in the correct place. The magnet catch secures the top in place.
Back removed to show how the magnet catch works.
Shown above you can see the box opened and below you can see it closed.
Rear of the case when closed.
A small turned knob allows someone to remove the back and is often hidden in the shadow from the top — so when the case is on a table or similar you generally cannot even see it.
Small pull and clean lines on the back of the case
The piece is made from a single piece of cherry, finished with a Tung Oil Varnish and wax.
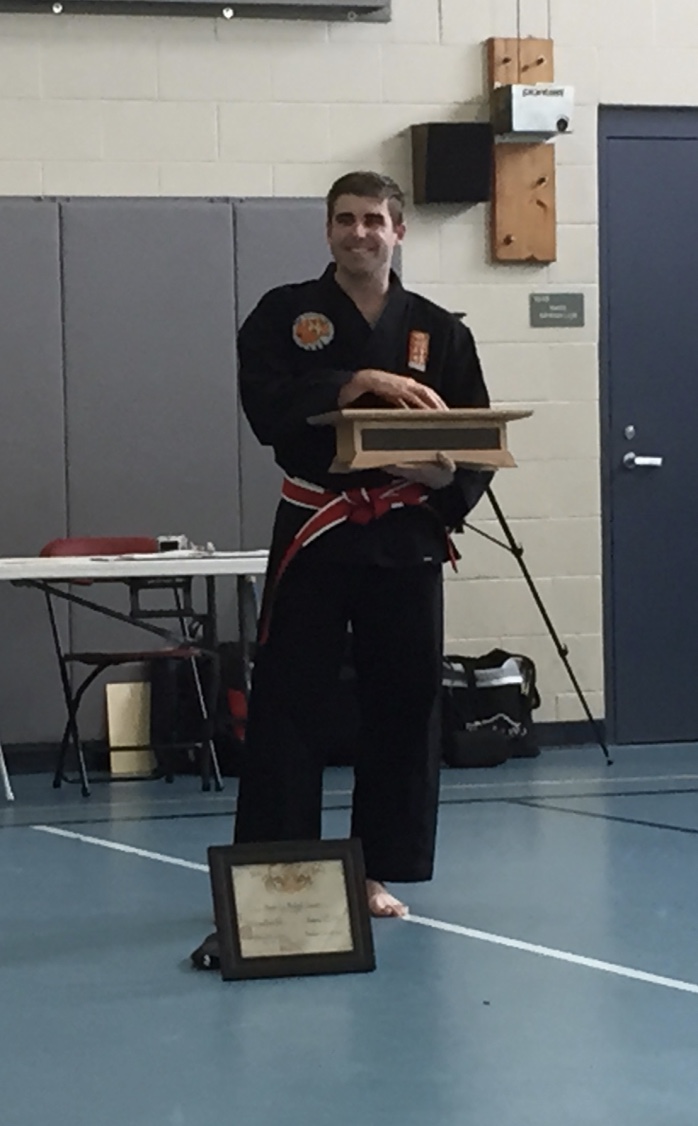
Master Lee describing what the belt means to him and the long road it took to get it
As I was building this case I was reading up on Asian design aesthetics and Tae Kwon Do (TKD) and all that Lee had to go through and master. As he rose through various levels of black belt he had to demonstrate skills and self control and continually work to learn and improve himself.
In my research, a concept that really jumped out at me was Wabi-Sabi — which represents a comprehensive Japanese world view or aesthetic centered on the acceptance of transience and imperfection. The aesthetic is sometimes described as one of beauty that is “imperfect, impermanent, and incomplete”. TKD comes from Korea, but from what I could find also has a similar concept in that country as well.
Lee presenting his black belt to his parents
With all the clean lines and symmetry on this piece I wanted to incorporate a tiny little something to try and capture a bit more of that Wabi-Sabi aesthetic or at least some of that spirit. So between the top of the core box and the overhanging box top I inlaid a tiny veneer strip of mahogany. It’s almost imperceptible as it hides in the shadows from the overhanging box top. As I worked on the piece I felt it was a reminder of imperfect beauty, self improvement and a reward for anyone really exploring the piece in detail in their hands.
Lee presented the case with his black belt to his parents during a touching speech and I hear it enjoys a sunny place in their living room.
Cherry Black Belt Case
It was great to see Master Lee Lemoine’s ceremony and I have a whole new respect for what Tae Kwon Do offers and what students can achieve through it. If you’d like to learn more about TKD and specifically the Tiger Claw NH school where Lee is now a Master you can visit their website here.
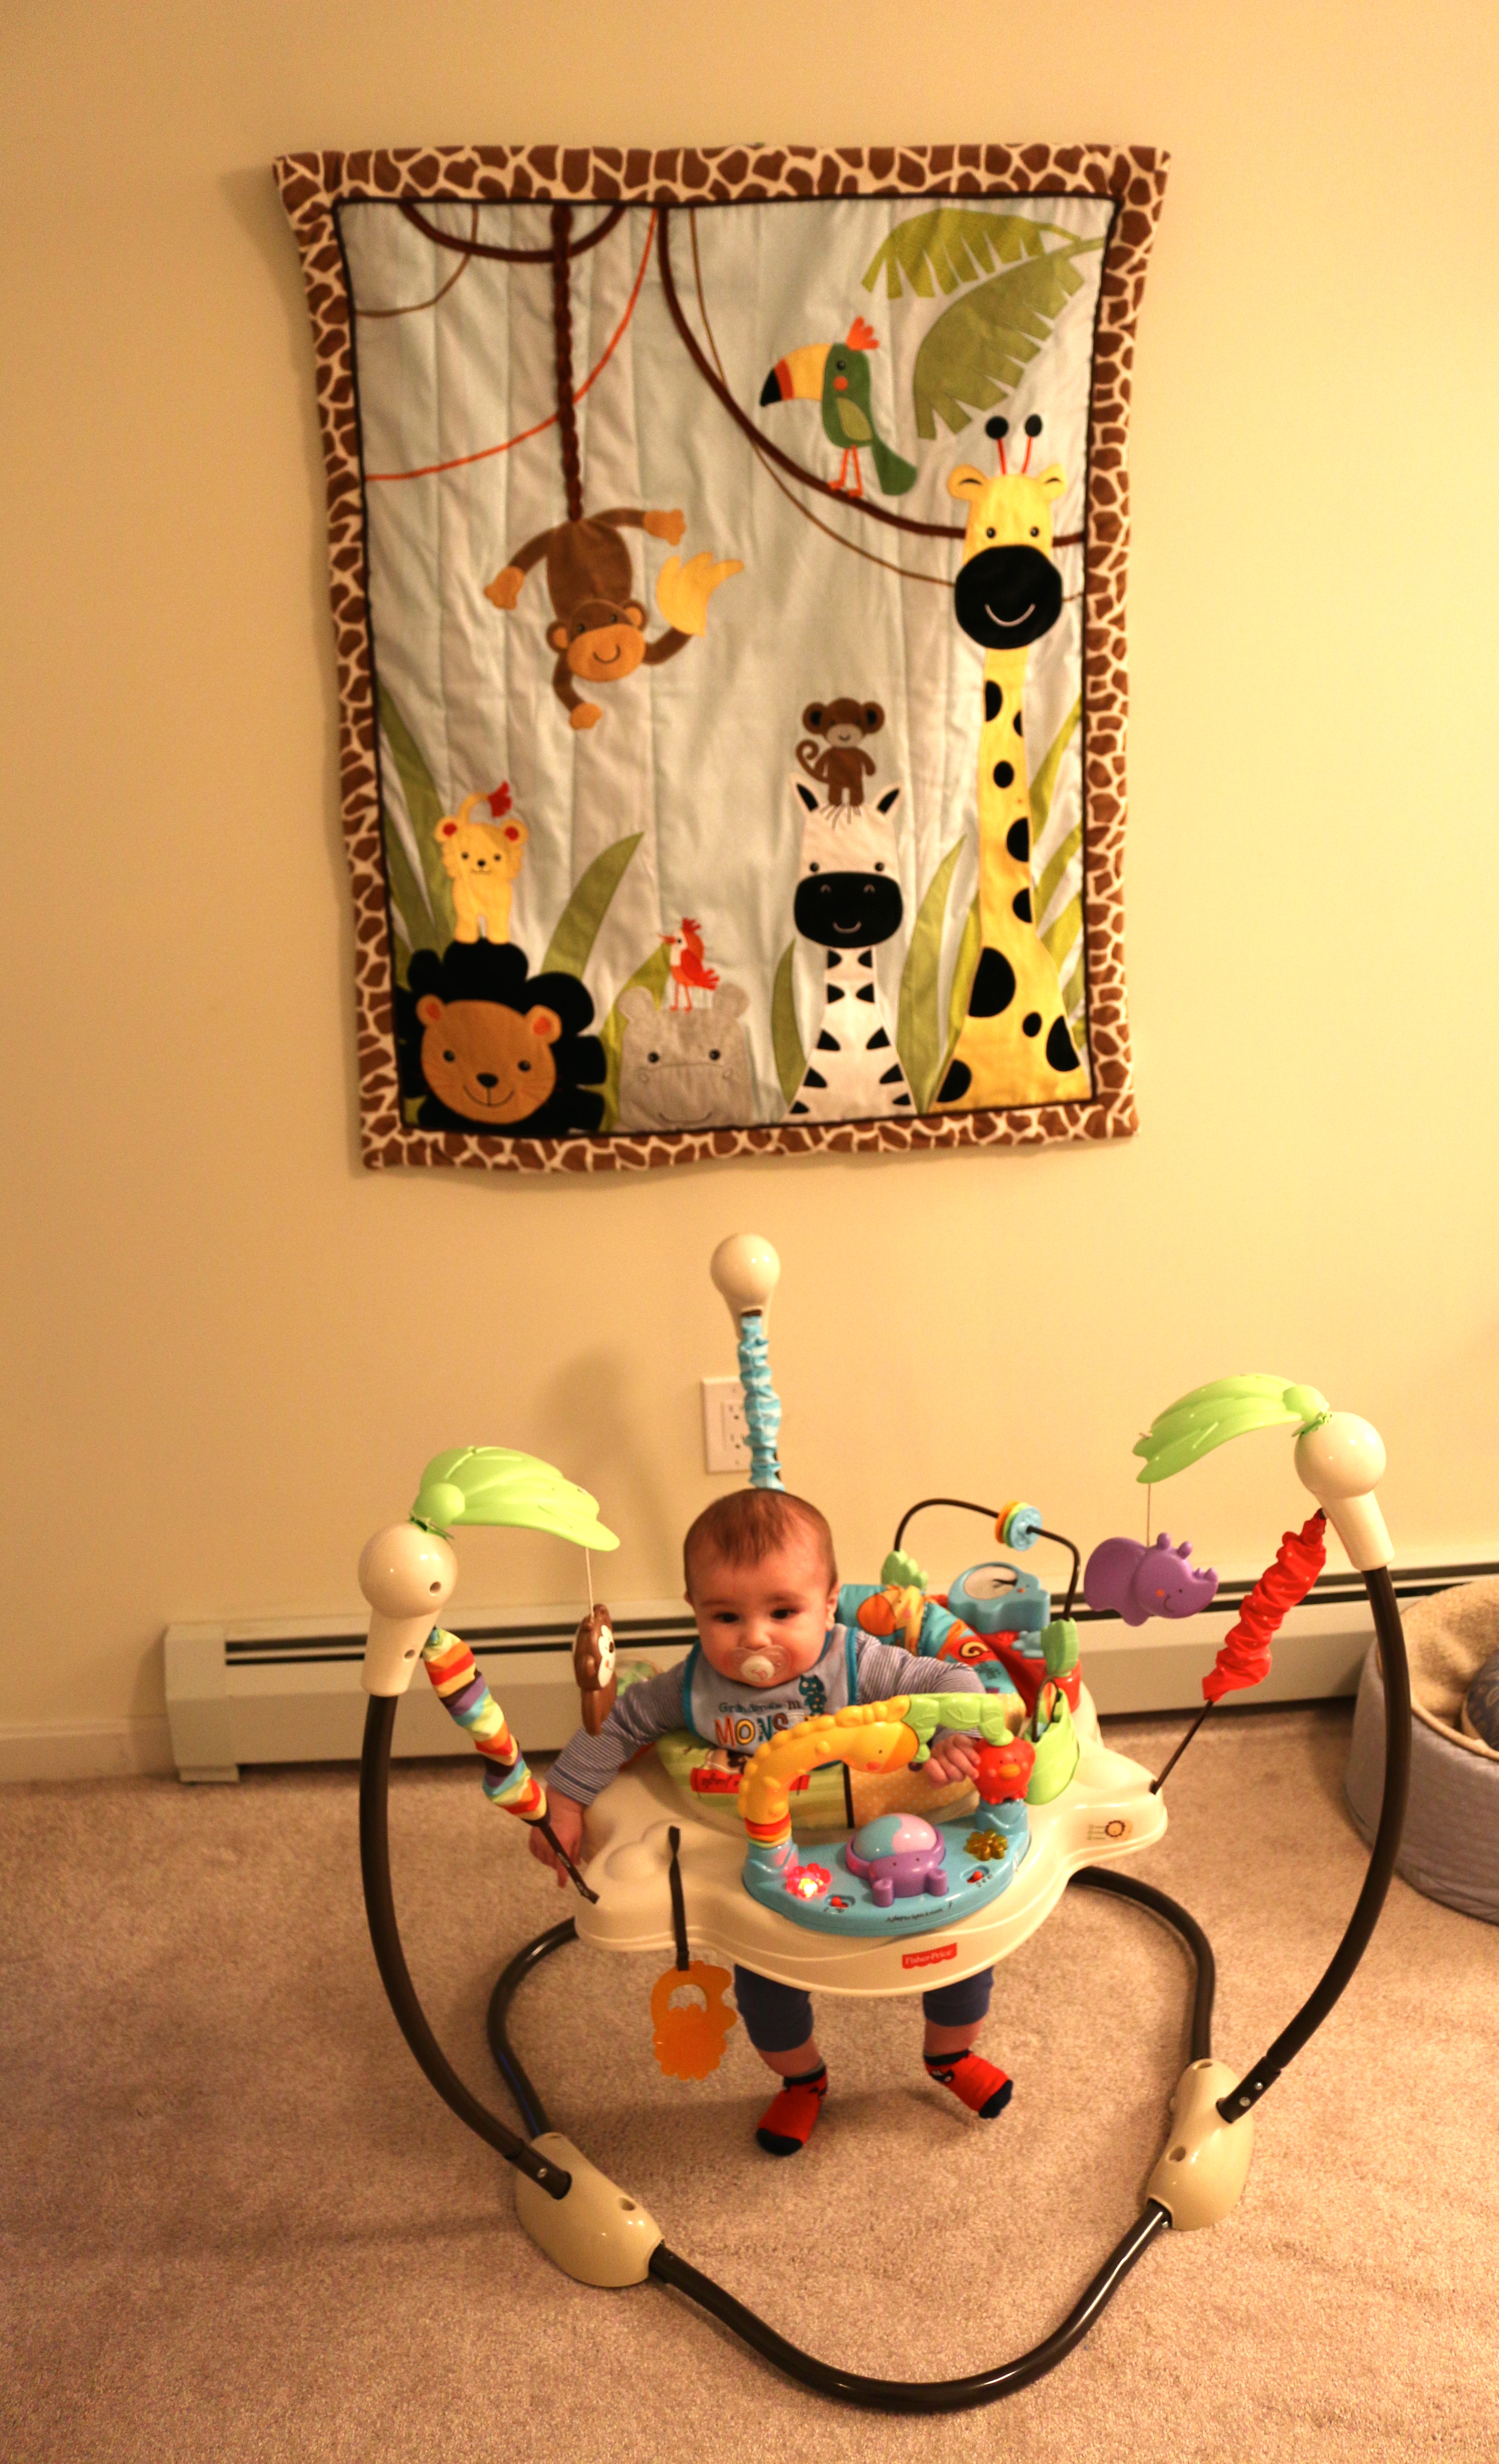
In August my wife and I had our first baby — Bradley. And with his arrival we went out and bought him all kinds of baby stuff to get his room ready. One of the key pieces of decorating his room was picking out his bedding. We picked a nice comforter set that coordinates his window curtains, changing table, pictures etc. The funny twist is that young babies should not have a comforter in their bed with them, so you spent all this money on a comforter you can’t use right now, what do you do with it?
Don’t worry the marketing folks were on top of this — sort of. They sew a nice loop in the back which is designed for a curtain rod or similar device to hang the comforter on the wall, but nobody makes one sized for a baby. The curtain rods look ridiculous as they keep the blanket too far off the wall, I refuse to use two binder clips handing from nails, and standard quilt racks/shelves are all way too wide. I guess the baby marketing team was too busy selling us wipe warmers, bottle sanitizers of all sort, teething chew toys and novelty onesies.
Then one afternoon as I was gathering up my scraps from building the crib a workable solution came to me…
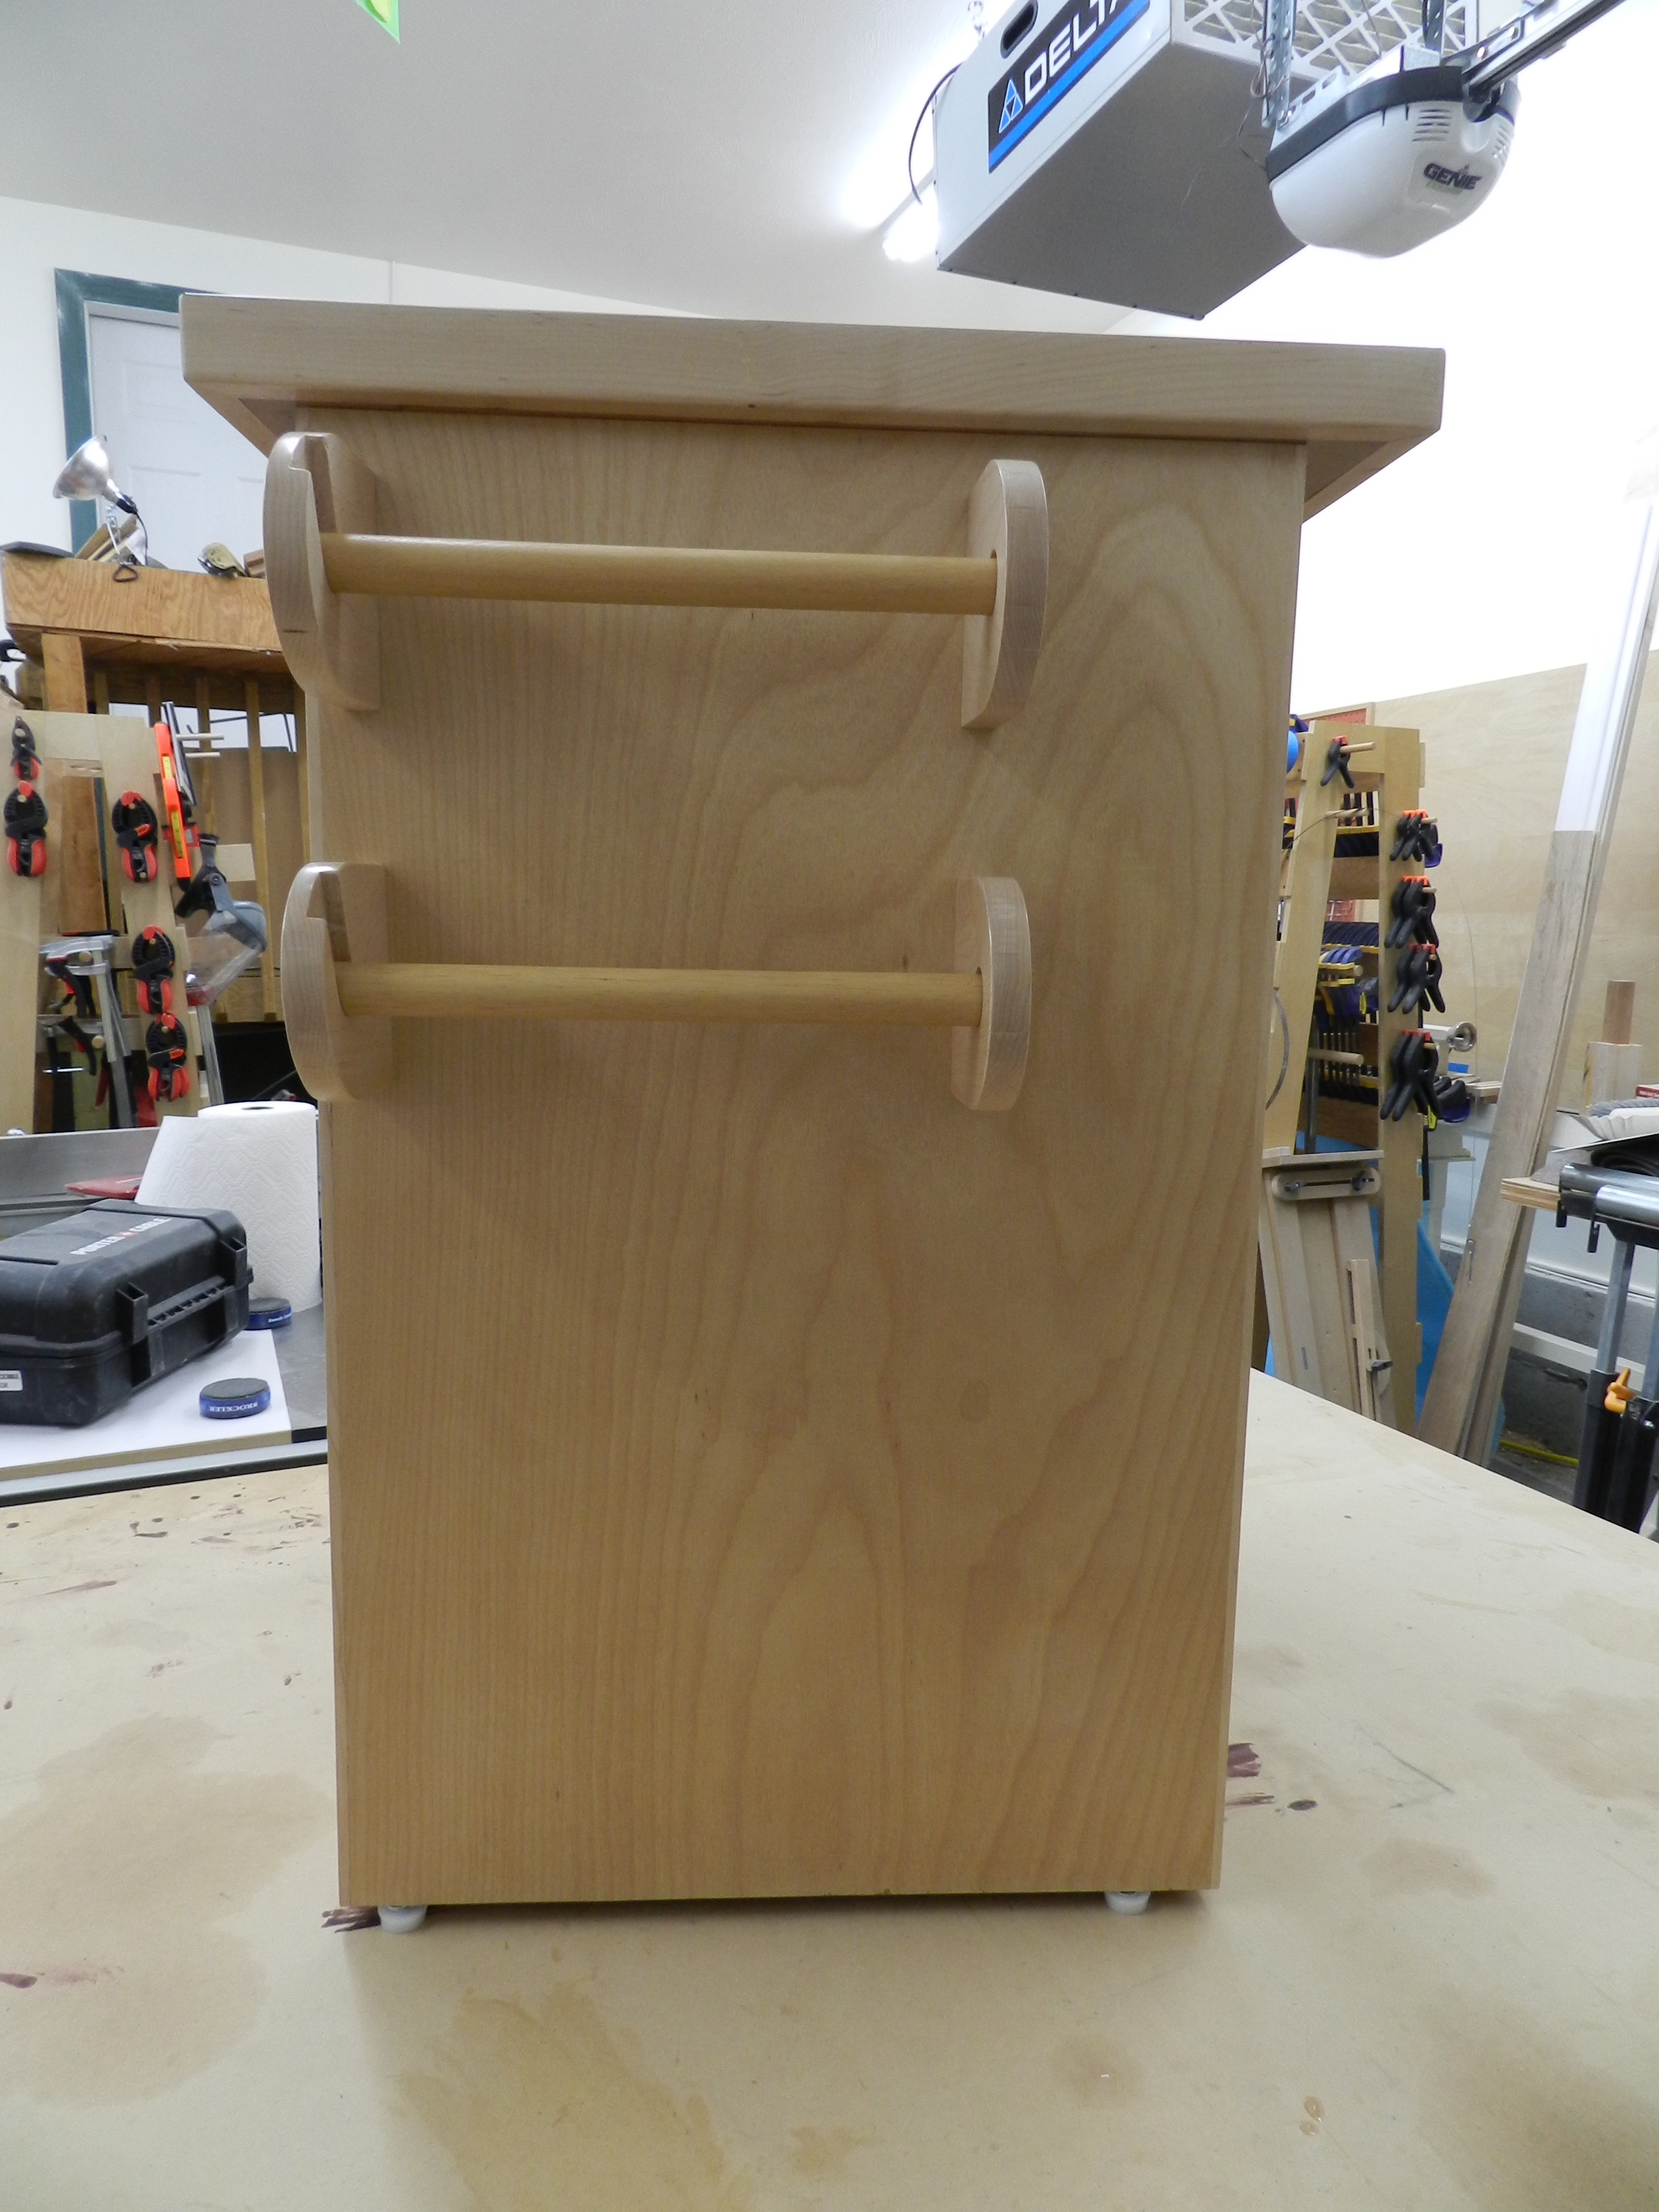
Paper Towel Holders on my NYW Sharpening Station
I’d use the same simple mechanism I used to hold my paper towels on my New Yankee Workshop Sharpening Station. It’s a simple solution that makes use of a dowel and two corner blocks to hold the dowel in place. One of the blocks has some wood removed so gravity will keep the dowel in place, but downward forces keep the dowel secure. To remove the dowel you lift that side straight up and it comes out via a path you have cleared for it.
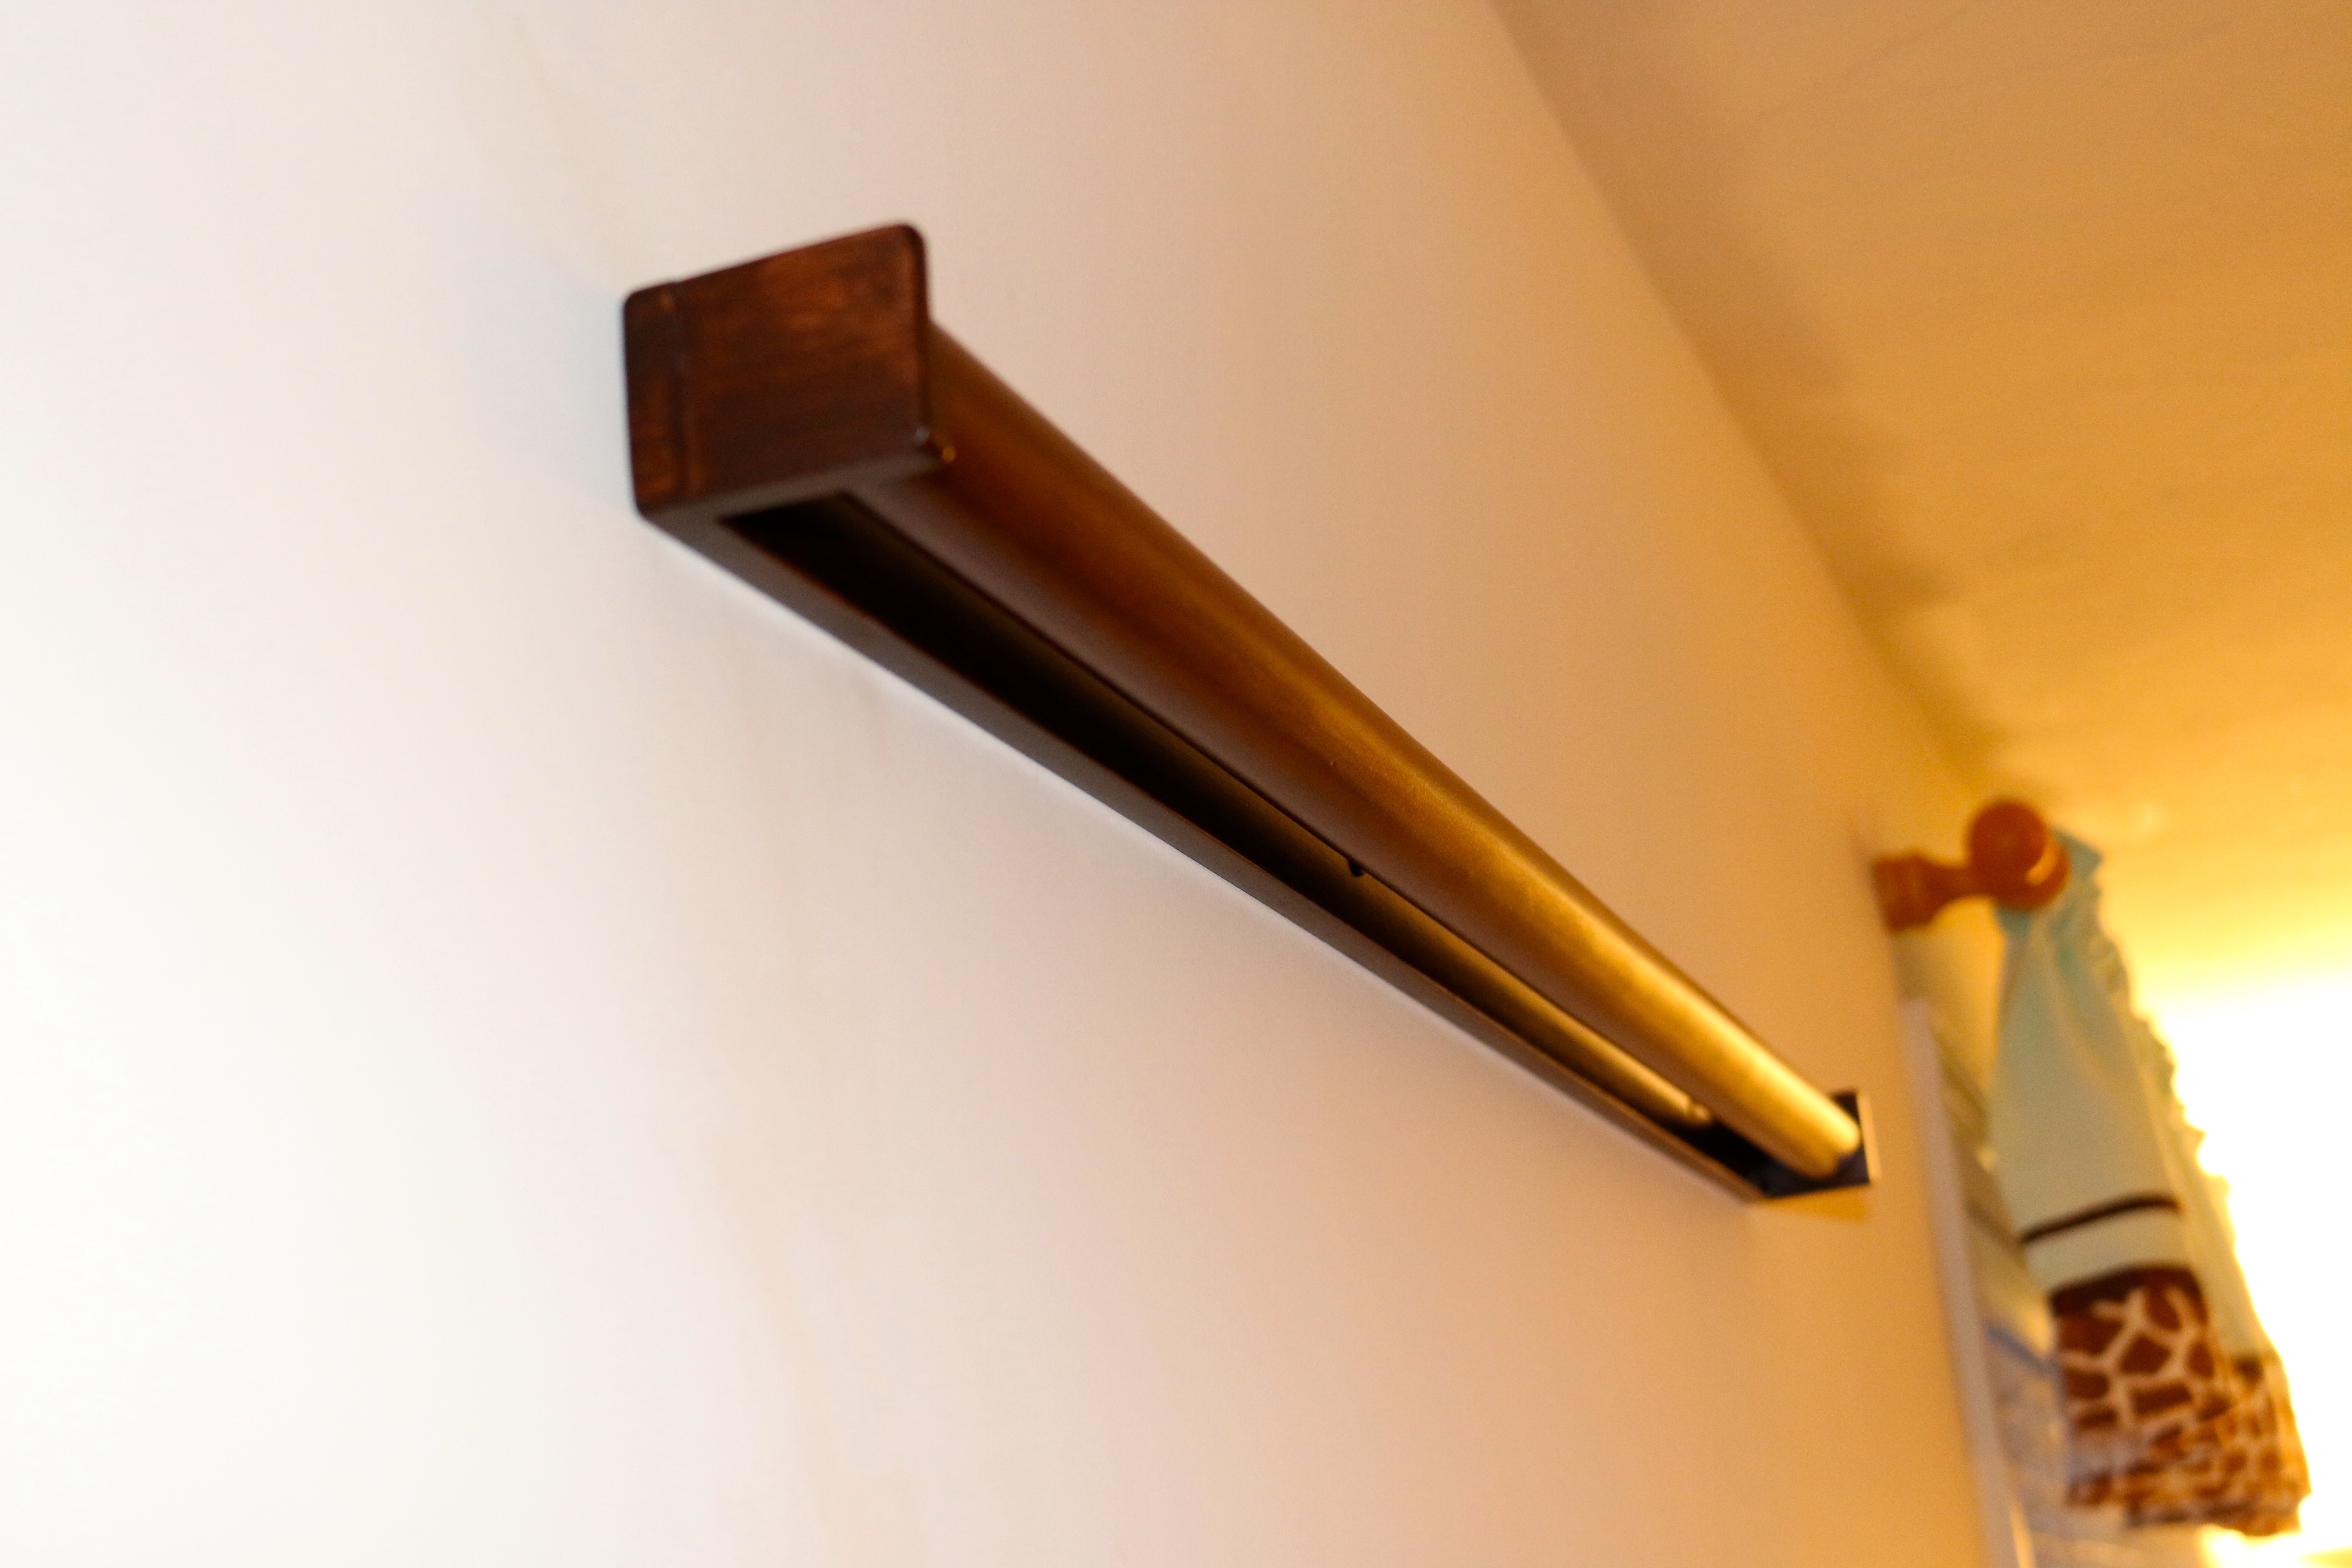
36″ Wide Baby Comforter Holder
I used a 1 1/4″ diameter 36″ long cherry dowel and some cherry scraps (extra crib slats) to make the holder. The dowel is only about 3/4″ off the wall, so when the comforter is in place it hangs very close to the wall the way I wanted it to look. The corner blocks are carefully glued and screwed through the back. The holder is affixed to the wall via some countersunk screws that are hidden by the dowel when it is in place. Since I was using scrap wood, I used the thin 3/8″ cherry stock I had on hand, but if I were to build this project again I’d beef up those blocks some more. I used a Forstner bit in the drill press to drill out for the dowel and for the open ended side used a chisel to remove the extra wood.
Finish set to match other pieces of baby furniture in the room
The finish is garnet shellac, followed by several coats of medium brown gel dye stain and finished with a few coats of semi-gloss poly-acrylic. When the comforter is put in place it completely covers the holder. The comforter is 2 inches wider than the 36″ pocket in the back so once on the wall the holder disappears.
Bradley in front of his new wall hanging
All in all it was a quick and easy project that solves a problem the baby marketeers haven’t gotten around to yet. Bradley seems to enjoy jumping in his jumparoo and looking at all the animals on his comforter so I consider this project a success.
If you wind up making your own version or have solved this problem in another way, let us know.
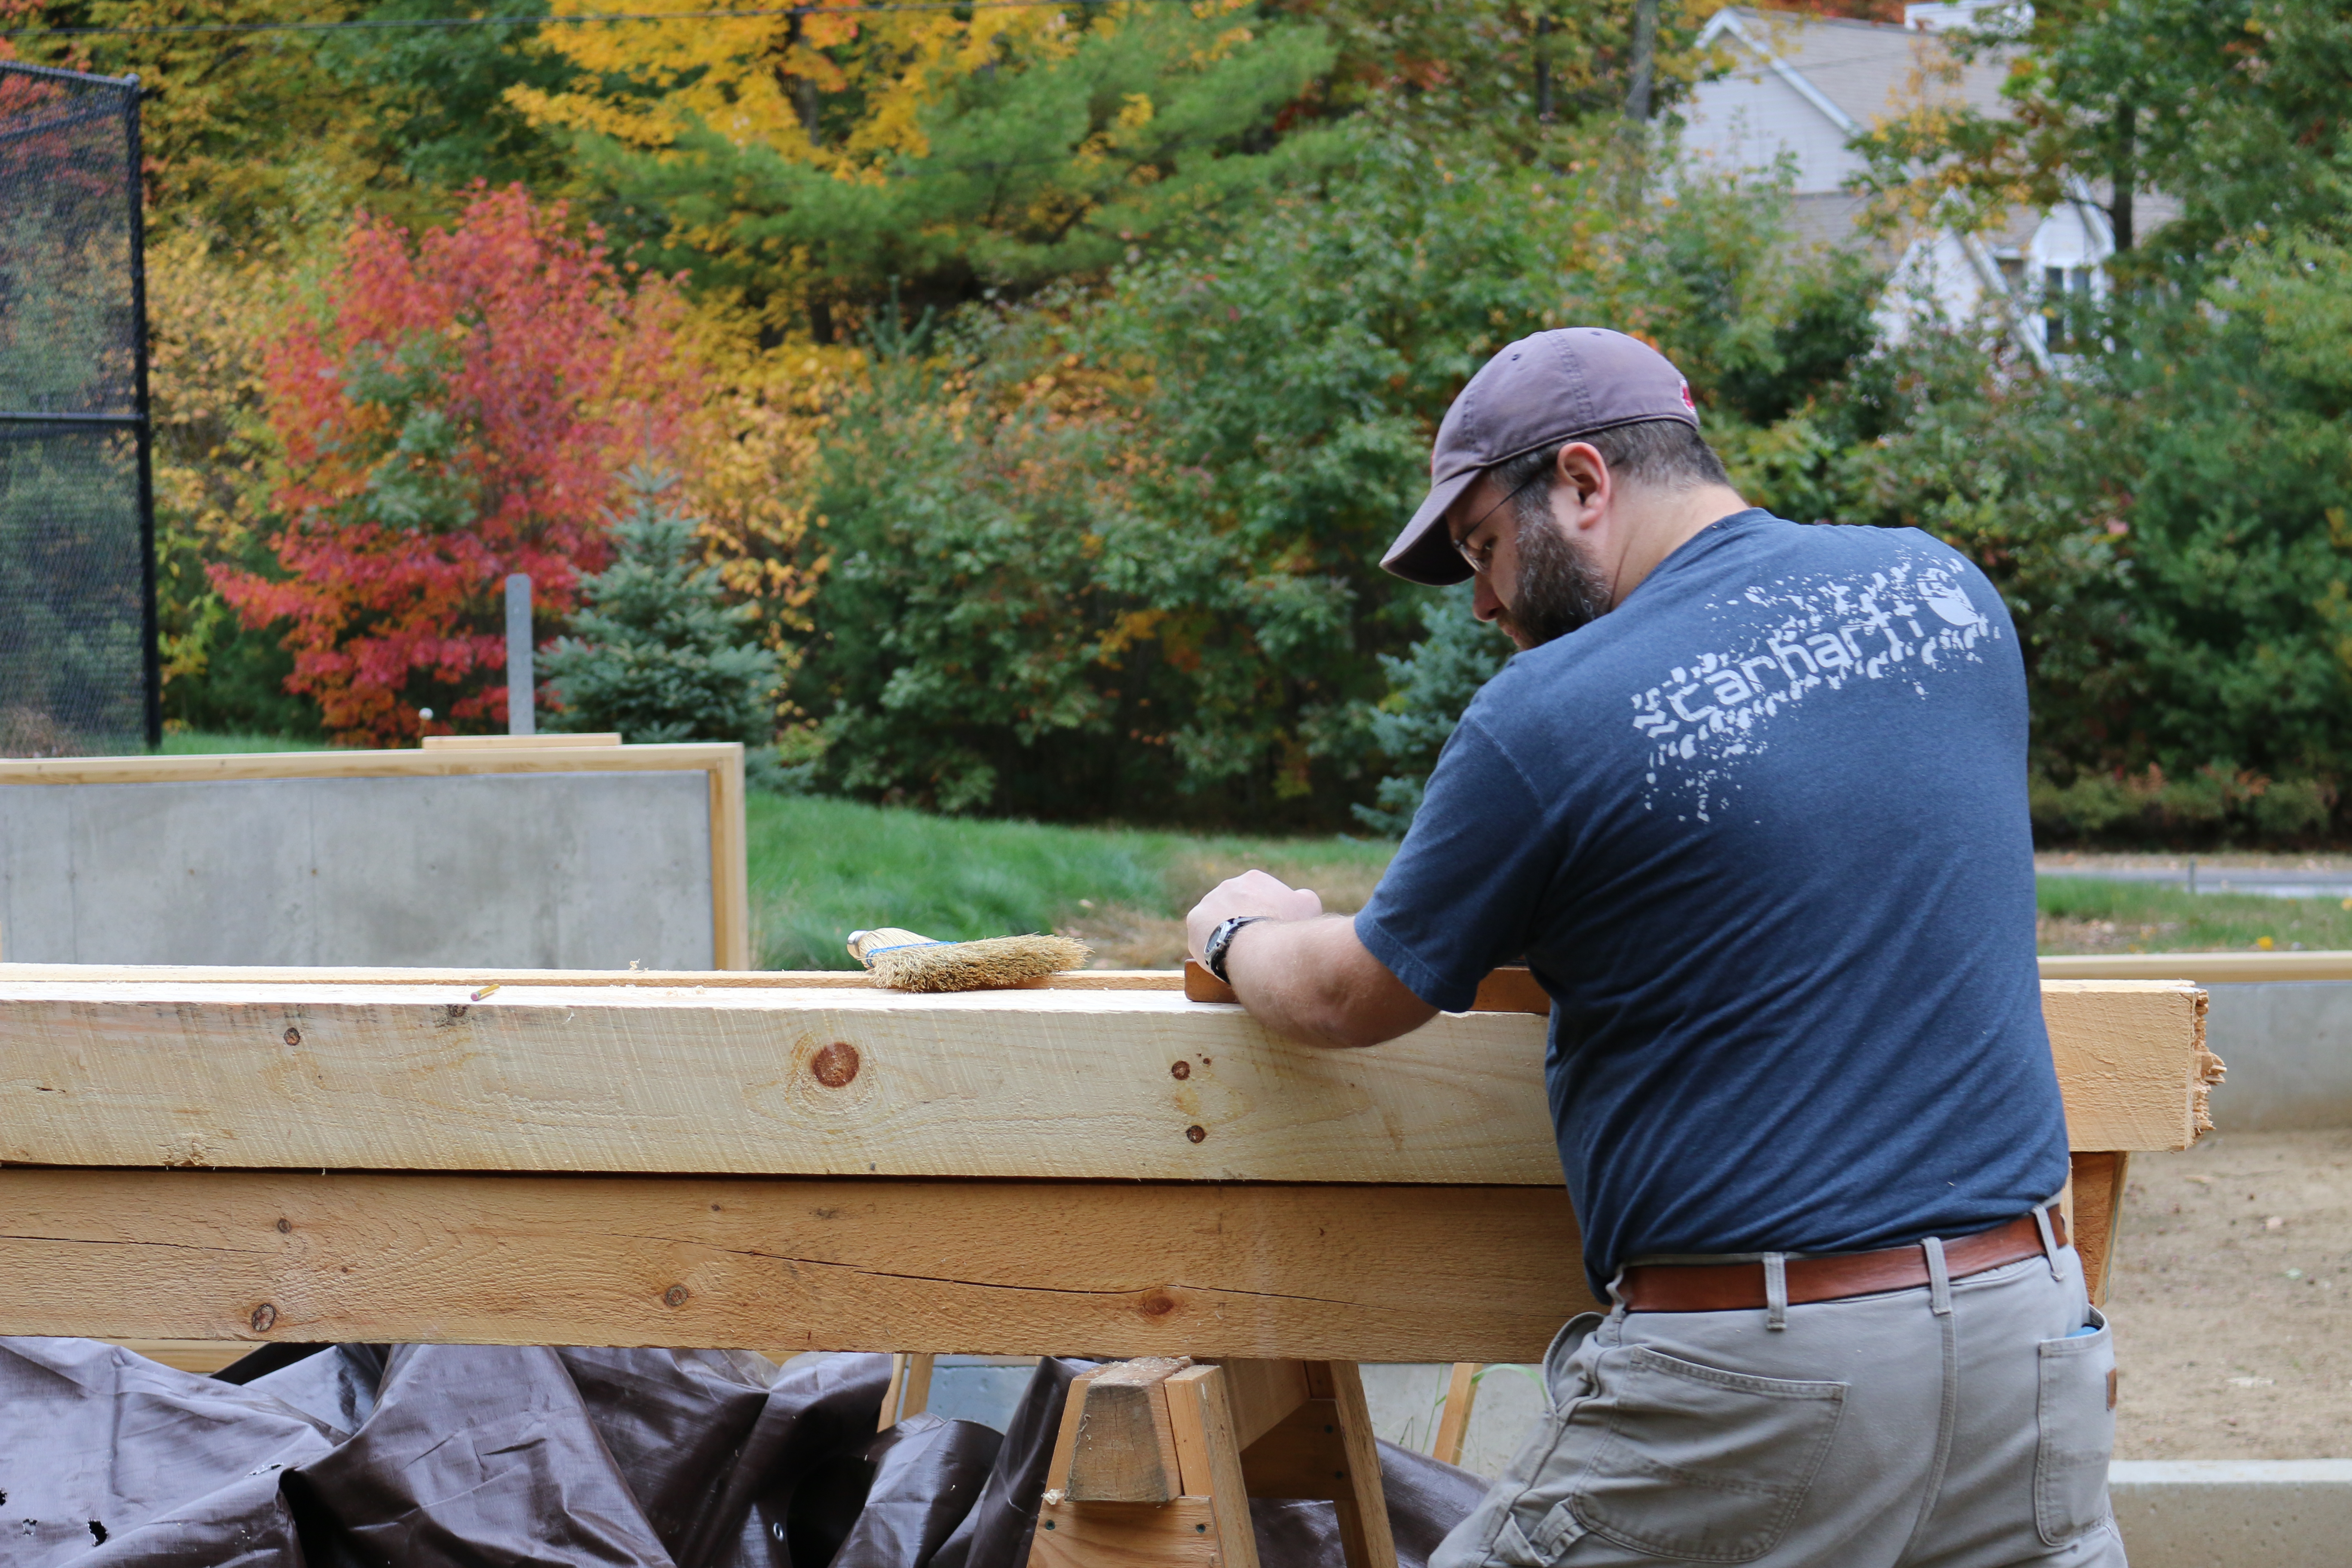
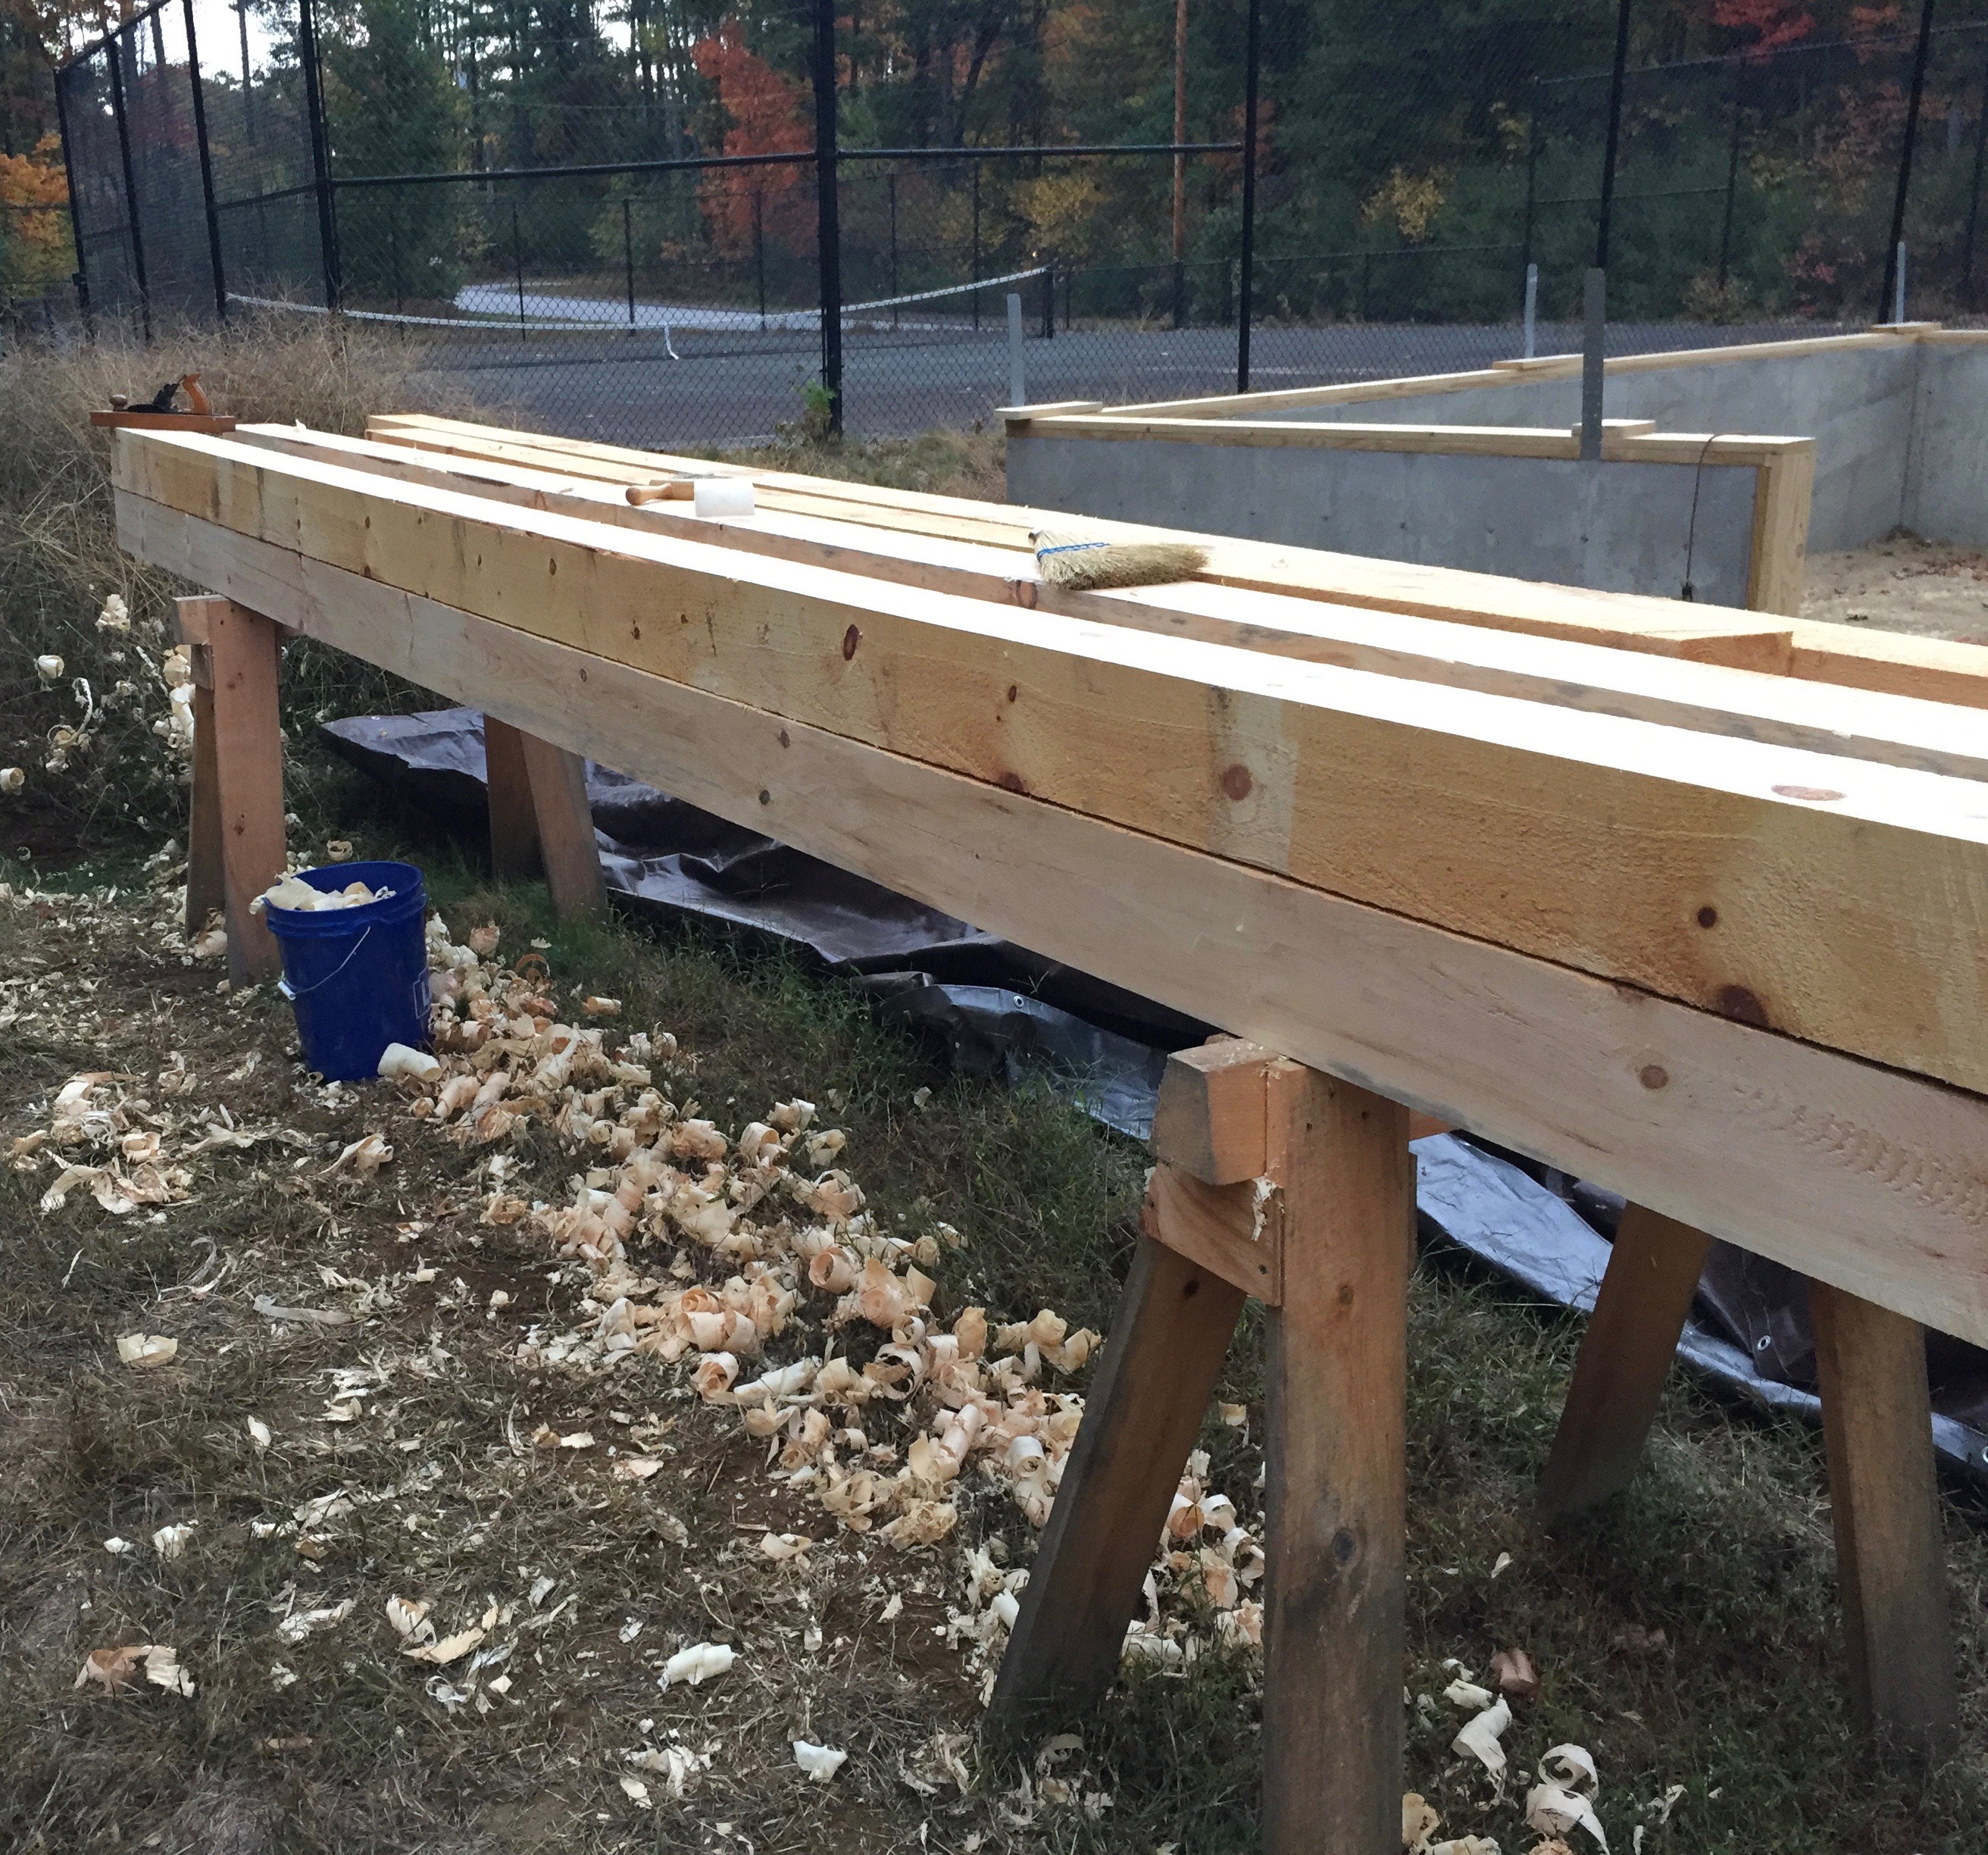
I recently finished off my never-ending project — building a proper workbench. I snapped some photos figuring it will never look this pristine again. Time to press the bench into service…
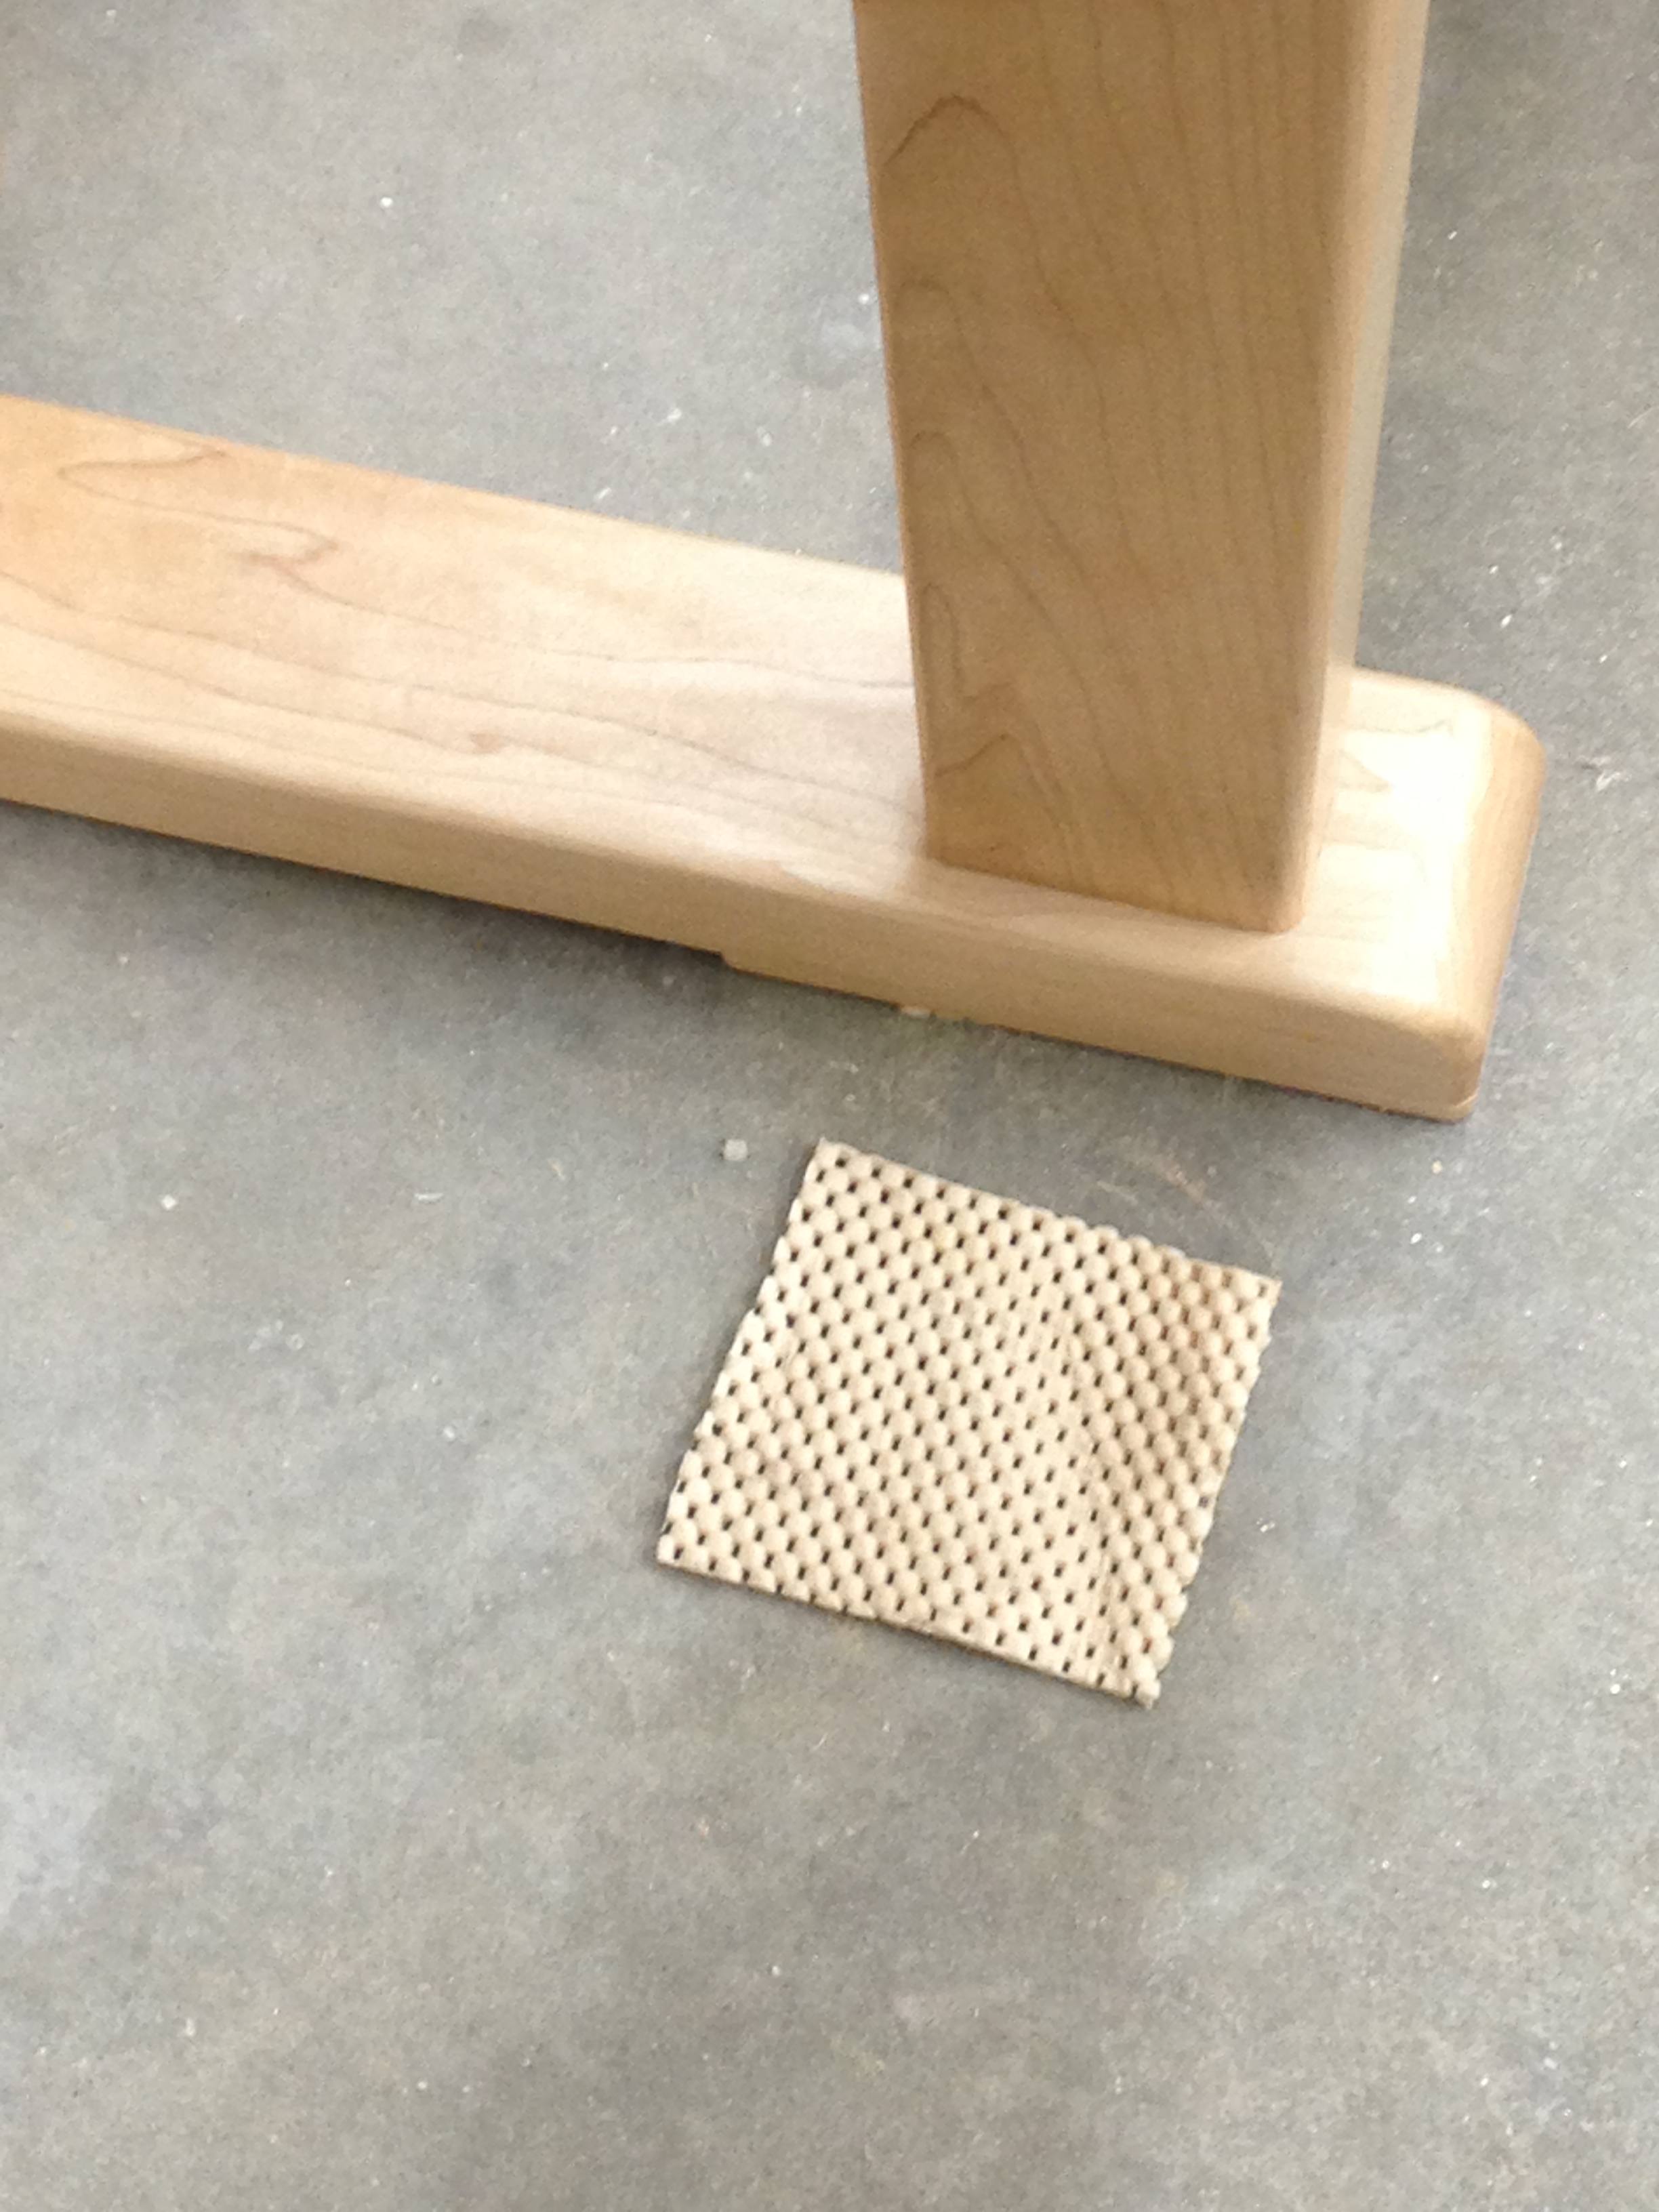
Things started off great, but I wanted to set my jack plane to take a heavy cut and see how just how aggressive I could get before the bench started to move. I’m 6′-1.5″ tall and 240lbs, so if I really get going I’ve moved many a sizable bench over the years. At 7′ long and made of solid maple the bench has a good amount of mass. The problem I have is a very smooth concrete floor which provides little traction for wood.
With a concrete slab I won’t be bolting the bench to the floor so I needed an alternative. I ran through several alternatives in my head but couldn’t come up with a good solution that didn’t jack up the bench. As I sat on my sawbench looking around the shop I recalled a blog post by Chris Schwarz from earlier in the year wherein he put some sandpaper on a shim and have very good results. (You can see Chris’ post here). Sandpaper didn’t get much traction on the concrete floor, but it triggered a different thought. Years ago Rockler marketed a ‘routing mat’ which was effectively an expensive roll of rubber drawer liner. The cheap Yankee in me promptly went out and bought a roll of drawer liner for a couple of dollars and he has served me well for a decade or so now. I went to my router station, grabbed the mat and cut out four squares roughly the size of the foot pads on my bench. I put them under the bench and repeated my experiment…
Rubber mat can help your bench stay put
To my surprise it worked great. The weight of the bench compressed the pad so much the bench height is negligibly higher off the ground. I was able to aggressively plane some hard maple scraps left over from the bench and it was solid and stationary. I’m sure someone who really wanted to move it enough could find a way, but the increase in traction was impressive. If you’re also living with a concrete floor in the shop you’ll want to give this a try — it’s about the best $1 bench upgrade you can make.
Take care,
-Bill
P.S. I’ll make some posts about building the bench, but right now I have a some competing priorities taking my much of my time. We have a baby on the way in August, I need to build a crib, and I’m teaching for much of the rest of the summer. I’ll be posting as I get some free time here and there but it may be in spurts.
P.P.S. In digging up the the blog post above from Chris I learned that I am not the first to do this sort of thing with various forms of rubber padding — nonetheless the simplicity and the results were still worth sharing.
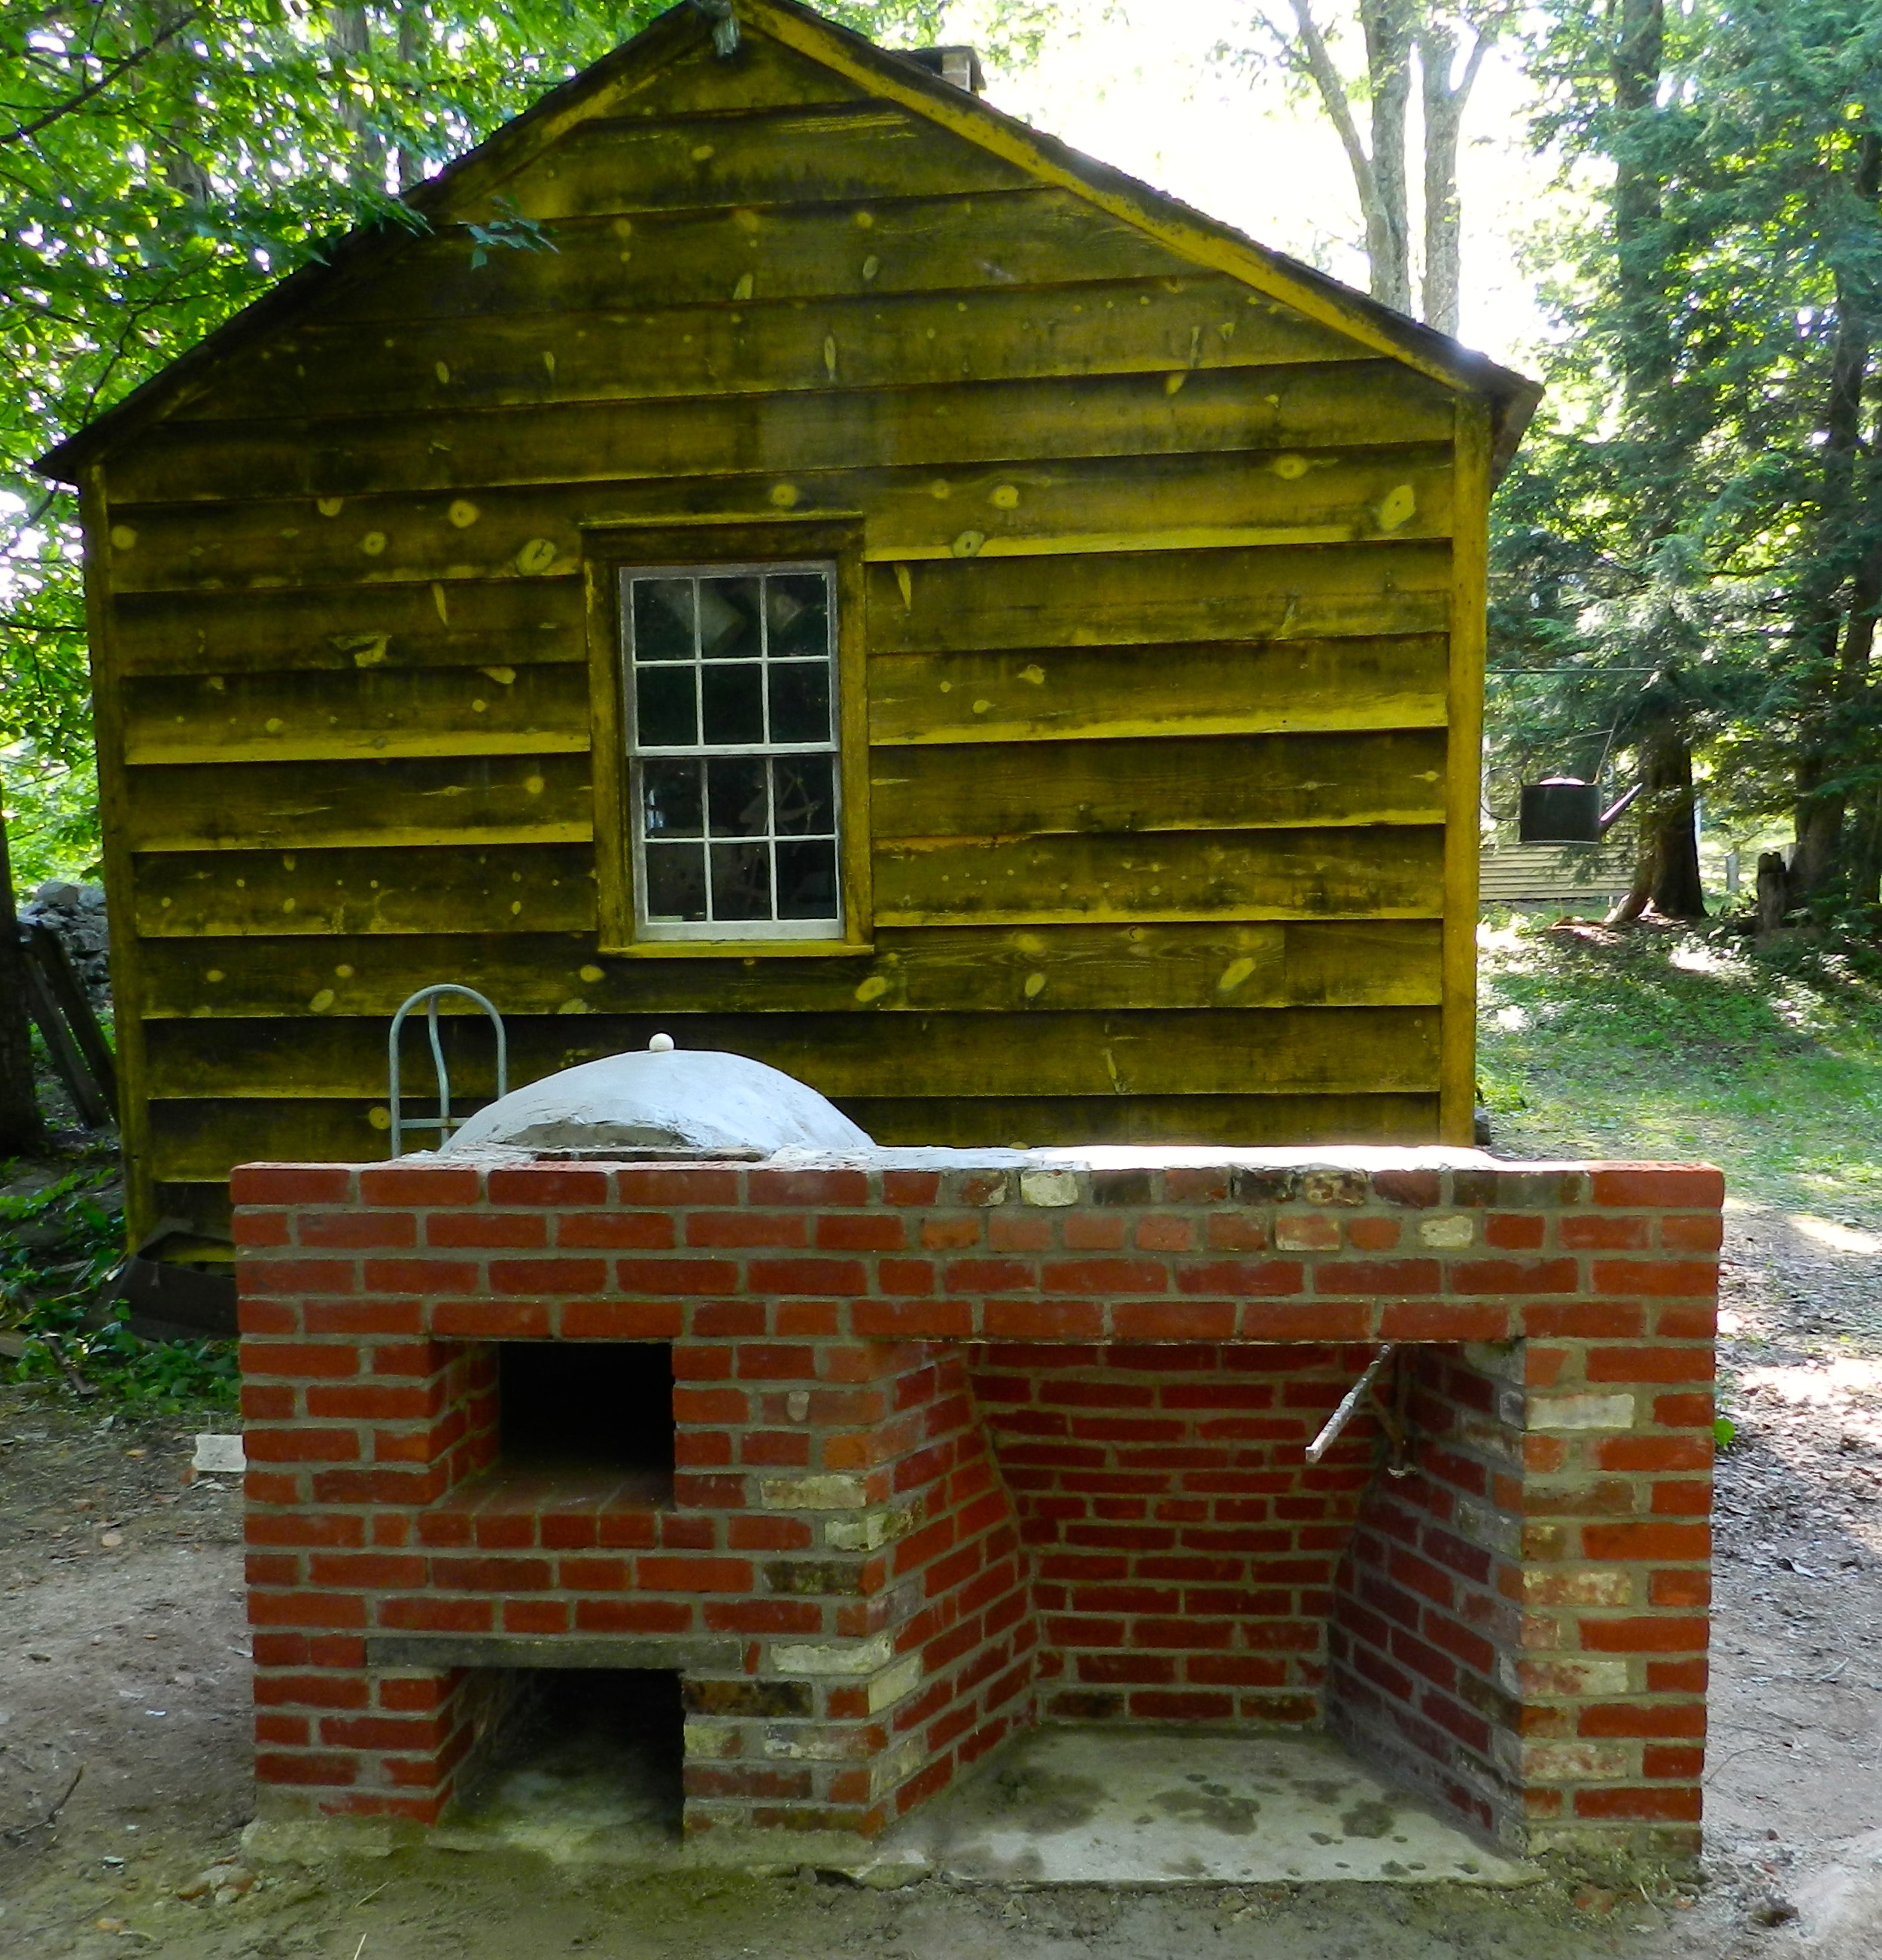
Have you ever wanted to build your own fireplace and beehive oven? It’s not for everyone, but it is something I’ve wanted to tackle for a long time. I’ve talked to a few masons, read all the new and old masonry books I could find, but still didn’t feel comfortable building my own. I could not find a good source that showed the end to end process. I also don’t want to end up burning my house down.
Completed Fireplace and Oven
To rectify this situation I figured I’d take a trip back in time. I just got back from spending a week at Historic Eastfield Village in Nassau NY (not far from Albany). If you’ve never been to Eastfield Village it’s a restored colonial village full of buildings and artifacts from the 18th and 19th century. What’s great about the village is that it is a hands on preservation laboratory where you can stay for free in the tavern and live with all the antiques and artifacts that are normally behind glass in a museum setting. What’s the catch? Well you are living as they did in earlier times. There is no electricity or bathroom. You live by candlelight — make sure to bring white taper candles — and you can cook your meals in one of the many fireplaces and ovens. After a long day of working out in the village it was a lot of fun to have a meal in the tavern, have a drink and play some tavern games by candlelight. Some folks were carving wood, some we playing dominoes with Billy’s ‘Eastfield Rules’ and others were enjoying a good conversation with folks from another part of the country. Staying at Eastfield is always a memorable experience.
Tools Of The Masonry Trade
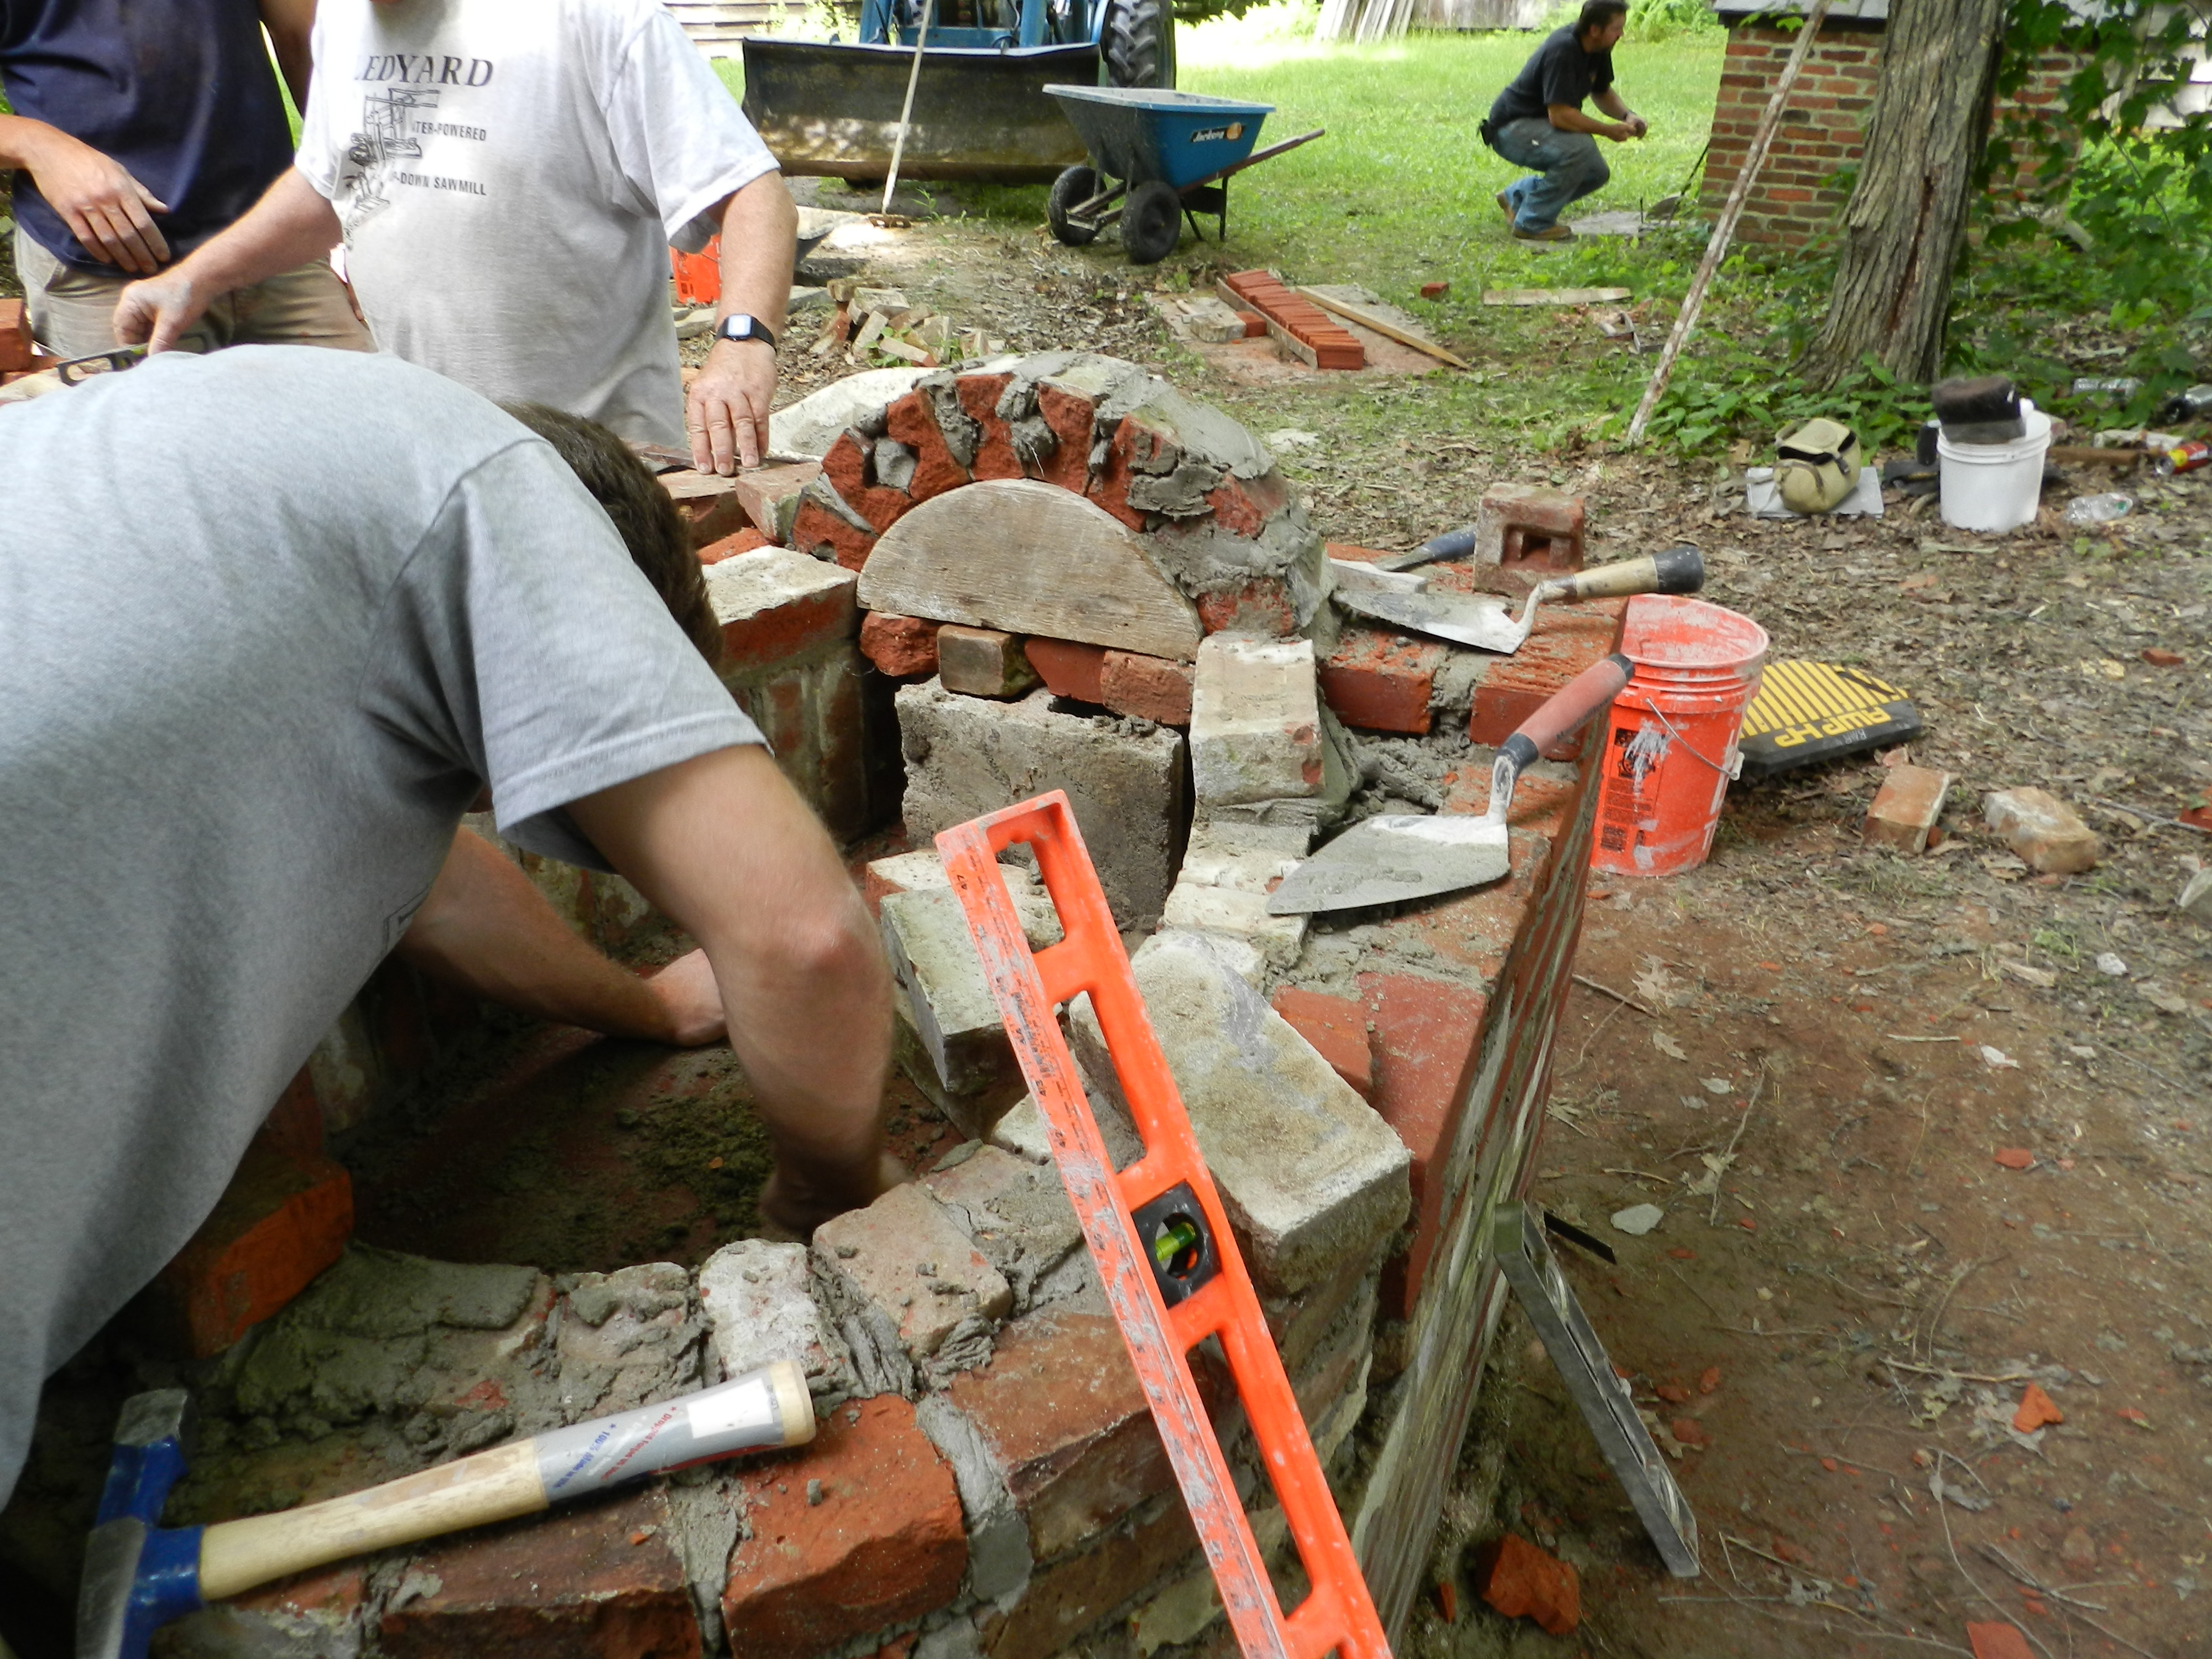
This 5 day class on building a traditional brick masonry fireplace and beehive oven was a special request from me and was filled with students and alumni from the North Bennet Street School’s Carpentry and Preservation Carpentry programs. We used all hand tools much as our forefathers would have used. Mortar mixed by hand with a hoe, bricks cut by hand with brick hammers — making some brickbats as we went, rubbing the face of a cut brick on a stone, setting and pointing with trowels and testing your work with levels. As I am predominantly a woodworker it was interesting to learn the skills required to tackle this project and as the week went on you could see the class pick up speed and some finesse. And I’m sure the next project we work on will be even better.
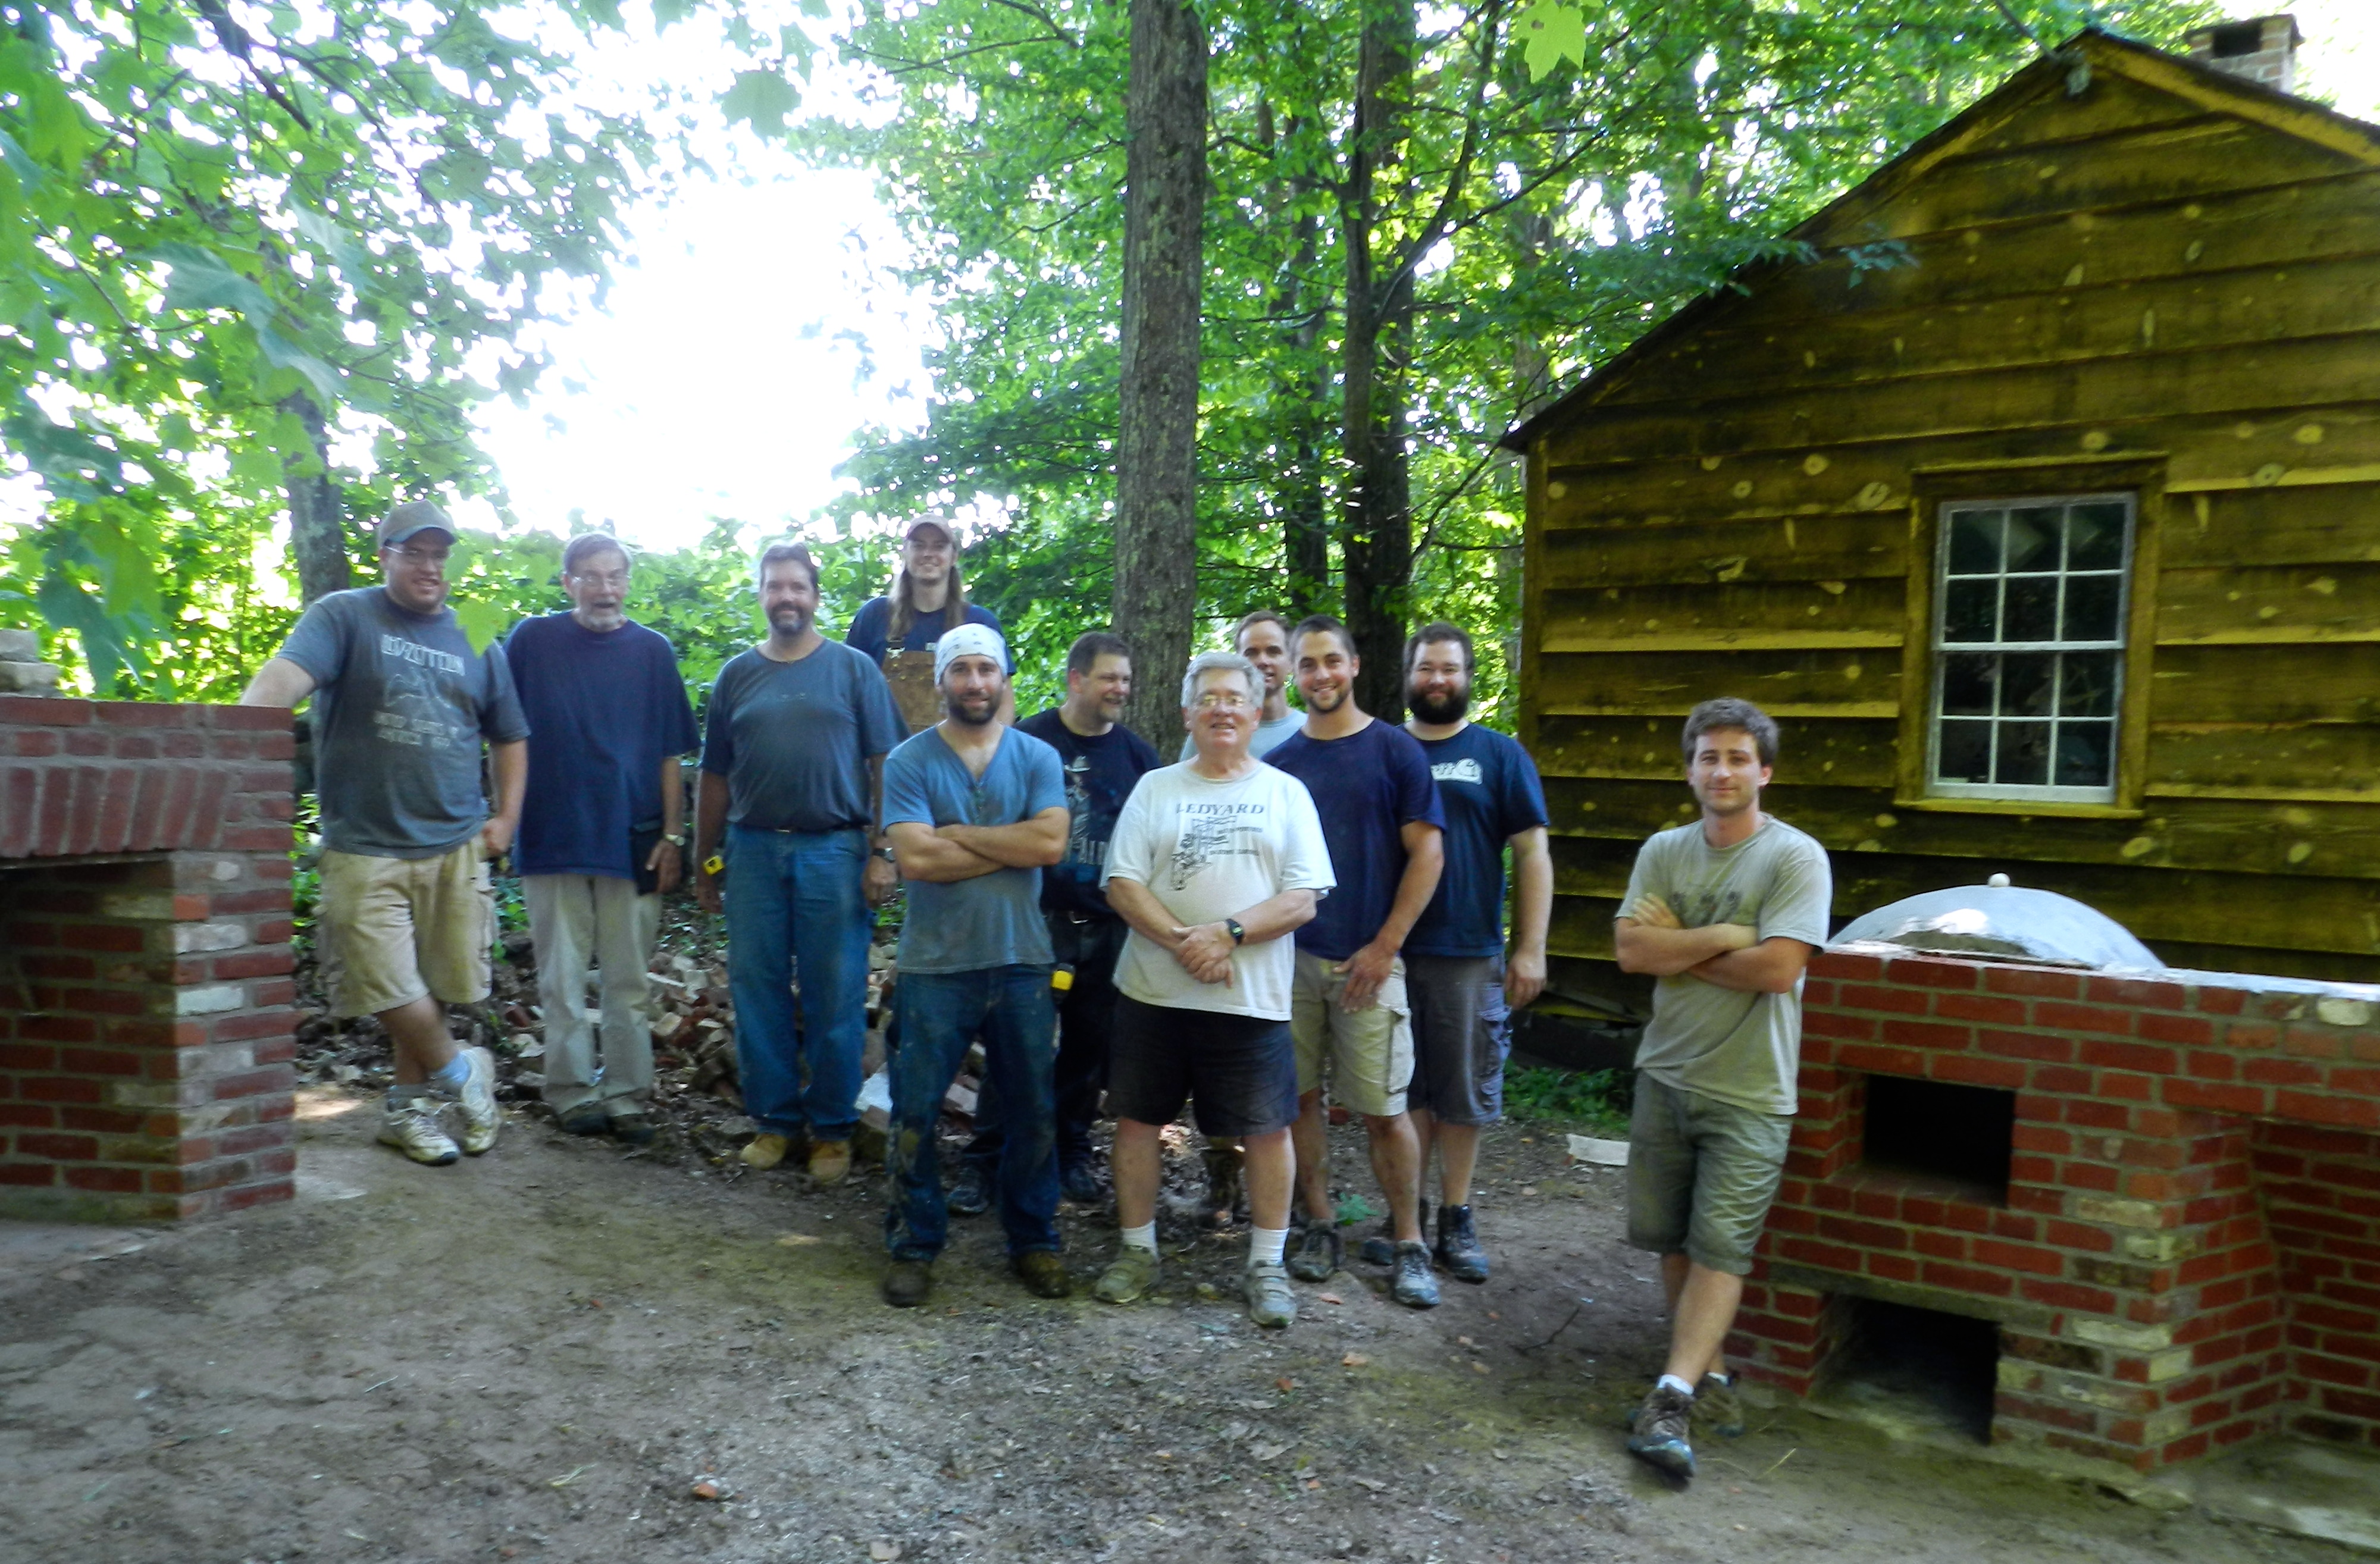
Group Shot of the Class
The class was taught by my friends Bill McMillen, his son John McMillen and Don Carpentier who is the founder of Eastfield Village — the village is set on his father’s ‘East Field’ and is Don’s long time home. Billy is also a master Tinsmith and preservationist having worked/taught/lead the preservation efforts at Old Richmond Town on Staten Island NY, taught at the Tinsmith Shop at Colonial Williamsburg and countless other venues. Don Carpentier moved and restored all the buildings in the village — an incredible undertaking and is also a well known historian and craftsmen having worked in wood, tinsmithing, blacksmithing and pottery. Don is also well known for his incredible Mochaware. John grew up around all this and is a skilled craftsman working in the NYC area.
If you’d like to see how we spent the week building these fireplaces, please check out the video below which walks you through the week at a high level (If you are reading my blog via email or some mobile phones you may have to click over to the actual post to watch the video):
You can also learn more about Eastfield Village’s current class schedule via their website here and the village in general via this nice video from Martha Stewart that you can watch here. If you can make the trip out to Eastfield Village for a class I highly encourage you to do so — it’s an experience you will never forget.
Take care,
-Bill
A Joiner's Guide To Traditional Woodworking and Preservation