Woodworking comes in many forms and has many specialties. One of the more interesting niche areas of woodworking is the dedicated group of craftsmen restoring and maintaining Woodie Wagons. (The iconic cars of the 1950s and popularized by many a movie and the surfer culture) One such craftsman is my friend Steve O’Shaughnessy who is also the head of the Preservation Carpentry Department at the North Bennet Street School.
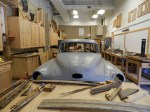
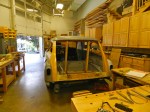
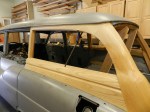
When visiting the the shop the other day I took some quick pics of his current project which is the restoration of a 1952 Buick Roadmaster Estate Wagon. Back in the 1950s some of this woodworking and maintenance was performed by the local Buick dealership — imagine that today?
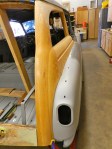
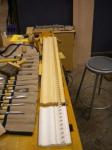
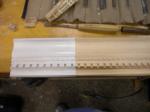
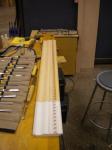
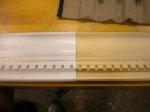
Steve has been meticulous in going through all the body and mechanical systems and cataloging all of the original wooden parts of the car. Since then he has systematically been replicating the wood pieces from Ash using a combination of his duplicarver system, skill and perseverance — as many of the pieces have delicate compound angles that have to fit just right in order for everything to line up. He was able to consolidate the original pieces and use them as templates when fabricating the new parts, but even with those templates on hand it still takes a lot of work to get it all fitting tight.
When he’s done he’ll have a classic show car and a piece of fine furniture he can drive down the highway at 55MPH — I can’t wait to see it completed.
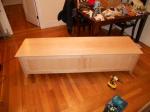
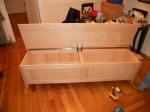
I fired up the way-back machine again to visit another project from the past — a solid hard maple kitchen bench. This was an interesting commission in that it had to fit a specific alcove in a new kitchen, stand up to life with a busy family and provide some additional storage. The other challenge was tying into the kitchen, keeping a shaker look and incorporating details from the room like beadboard.
To protect the fingers of small children from the large lid I chose to use toybox/safety hinges which do not allow the lid to slam down. The unit also lives right in front of a large baseboard heating element so the bottom (inner shelf) of the bench’s storage area had sufficient spacing between the members and clearance off the ground to allow the heat to rise around the unit and leave sufficient room for the wood to move without checking or breaking.
The piece is constructed of hard maple and finished with water based poly and hand rubbed wax. The beadboard was solid maple as well and all made by hand and ship lapped — that was a LOT of work, but much better than pre-made or pressed panels.
An important part of the Preservation Carpentry curriculum at the North Bennet Street School is working with traditional window sash. In earlier posts we’ve talked a lot about restoring old window sashes, but what about new work? Or a sash that is too far gone or not worth restoring? The best option is likely fabricating traditional window sash yourself. The task may seem formidable, but with some practice anyone with the time and determination can do it. I find the work to be quite enjoyable.
Completed sash with glazing in place
Having worked on many historic windows, and new factory made windows I definitely prefer earlier period windows (17th and 18th century). In our modern ‘throw away’ world most folks look at an old wooden window with disdain and are eager to toss them in the trash and get vinyl replacement windows. If I had my way that would be a crime against historic buildings. The media has everyone believing that modern windows are far more energy efficient and easier to live with compared to old windows and that is a view based on ignorance and marketing greed. I spent several years living in a rental house with brand new replacement vinyl windows and while they were only mid-range windows they were disgustingly drafty, hard to operate, could not be fixed if you broke a pane, and took away from the appearance of the home. A properly built and maintained traditional window can last for 100 years or more — a claim no modern window supplier would ever dare to claim. The key to the system is that ALL the pieces of traditional windows were of wood and designed so they could be regularly serviced and easily replaced — and since they are primarily wood the replacement parts are easily fabricated. Good luck finding a part of a manufactured window that far into the future.
Rich Friberg and Brom Synder fine tuning a muntin
Even though wooden sash may look delicate, you’d be surprised how strong they really are. The profiles are designed to look lighter than they really are, and when you start to add the glazing etc you’d be amazed how solid the sash will feel. A properly built window will have the necessary flashing in place and will not have any drafts or leakage. As the seasons change, open up and regularly inspect your windows. If you are concerned about stirring up lead dust on old windows, contact a window restoration or preservation specialist — and make sure they are EPA RRP licensed to do the work in accordance with the law. If your windows are sound but you’d like to try and bump up the efficiency of your home’s envelope, consider adding traditional style storm windows — which can be either interior or exterior style or both and should be divided light patterns that match your existing windows — try to avoid the aluminum clad plate glass style they have in the big box stores.
PRESERVATION TIP:
If you are living with an old window in your home that sticks — remove and inspect the sash. The sides of the window sash (aka the stiles) should NOT have any paint on the edges that run against the jamb. If you find your sticky window has paint on it, you should look to remove the paint from that edge and the jamb (in accordance with EPA RRP regulations) and then carefully wax those surfaces. The paint has thickness which makes it harder to move the window and with humidity can often get sticky/gummy. Make sure that you are careful when removing the paint from your sash that you do not also remove wood — you can’t replace it once its gone and you don’t want to wind up with a drafty window.
Setting the mirror with glazing points
The skills you learn when making a window sash can be applied to make other areas of woodworking. Above is a nice little wall hung mirror I made for my wife out of some extra materials I had. This same skills can be used to make glass cabinet doors, full size mirrors, cases, doors, etc.
If you’d like to see the process of building your own window sash, please check out the slideshow below which walks through the process (you can see many NBSS PC2 students in action):
What do you do when you need to tie into a non-stock molding? Or a very short run of custom or carved molding?
You make it yourself of course!
Making a short run of custom molding is often faster, and definitely cheaper than having a custom knife or bit fabricated. The next time you need a short run of molding I highly encourage giving this a try.
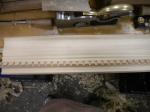
Below are some photos walking through the process of creating a short run of custom molding. This piece is an interesting bit of crown molding with a carved rope pattern and dentils. I think the ‘carved’ rope on the original was pressed in by machine, which is why I like my hand carved section even more than the original.
The process I followed:
Draw your profile on both ends of the piece
Rough in as much as you can via machine — like the table saw to save yourself time and effort
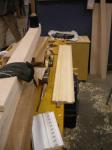
Use hollows and rounds (wooden molding planes) to get the curves
Square up your rabbet for the dentil
Cut the dental on the table saw, align it where you want and affix it to the piece
Walk off your carved pattern using dividers and pencils
Carve out your rope pattern
Enjoy your finished work 🙂
Working the curves and rabbet using wooden molding planes (hollows and rounds etc)
Installing the Dentil
Placing the dentil so it matches with the original sample
If you’re an avid wood turner and live in or near New England this is a road trip worth taking. The Old Schwamb Mill in Arlington MA (a short 1 block walk from the North Bennet Street School’s Arlington campus — and on the road to historic Lexington where I lived for a long time) is a great afternoon trip and the sort of place you could drive by every day and never notice — as I did for years. Once discovered, this site is a real gem, and also home to a Shaker furniture and supply store.
Turning and oval frame
You may be asking yourself, “how do I turn an oval frame?”
The magic is in the head stock — one of only a handful of this 100+ year old design known to still exist. And there are 3 or 4 of them at the mill. As the head turns there is a mechanical movement that moves the piece being turned up and down so that the wood is consistently presented to the tool at the tool rest. It also makes for a rhythmic noise as it runs. It’s not like most turning — think of it like scraping with style.
The mill has been at this location for 300+ years and making world famous oval frames for 137+ years. In addition to the lathe shown here there is also a massive version in the basement along with several other unique belt driven tools which expedited the process of making and joining these interesting frames. Work from this mill is in the White House and other similar places around the world.
A few years ago I inherited my grandfather’s old radial arm saw (RAS). Pop-pop (as I called him) passed away in 2004 and the tool sat in my mother’s garage until In finally got settled into place with enough room for more stationary equipment. My grandparents lived about 5 minutes away from my parents house and it was more or less like having a second set of parents. As a child I spent a ton of time helping my grandfather around the house with various projects. I’m an only child, and my mother was an only child, so I think I was the closest to Pop-pop, especially for guy stuff. I grew up watching old westerns and action movies with him, hanging out and working on models, trains etc.
So in 2007/2008 I moved the machine up from NY into my shop in MA and started the restoration process. It’s not the biggest model radial arm saw, but it was a solid model, very well intact and was a labor of love more than anything. It’s not a tool a use every day, but for the times I do use it (like repeated dadoes), its very good at what it does.
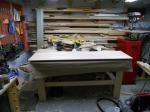
Restored unit with new Mr. SawDust table in pace
Here is a view of the completed machine complete with heavy duty ‘Mr. Sawdust’ table. If you ever do restore an old DeWalt Radial Arm saw I highly recommend the ‘Mr. Sawdust’ book as it was a great resource both on the history of the tool, how to tune it up, and how to build the Mr Sawdust table which really addresses the biggest shortcoming RAS’s had (giving you a much bigger and more stable work surface that will not deflect under load). It’s all shined up, cutting true, new blade, new base, new table and looking and running as good or better than new.
My grandfather was not always very neat and tidy in the garage/workshop and I thought it was interesting how I found the machine with all the accessories and original manuals stacked up on the table which was odd to me since I knew the machine had not been used in years and they had moved since it was last used. When I related this to my Dad he pointed out that it clearly must have been my grandfather putting it all together for me to have which was really emotional for me when I realized he was right. The happy ending is now that the machine is all restored and tuned up, it’s a bit like having Pop-pop in the shop with me.
Below is a slideshow covering the restoration process with more details in the photo captions.
It’s not every day I need to taper a table leg, but when I do, I want the operation to go off smoothly. For years I’ve used an extruded aluminum model which got the job done for modest size pieces but it had a lot of limitations especially if you value the quality of your work and your fingers.
This week I’m working on a shaker style console table for an upcoming show and I figured this was as good a time as any to build a better tapering jig. Thumbing through an old FWW compilation of shop improvement projects I found a jig I liked and I built my own.
Completed tapering jig ready to adjust to the needs of your work.
The result is a much larger unit that is far more secure in holding the piece while tapering with better results given the miter slot runner and zero clearance edge to align your piece with. In an upcoming post you’ll see the results of this jig in action.
UPDATE: Added some pics to the slideshow showing the jig in action and the results it produces — nice clean and consistent tapers.
This weekend I finally finished my new Kiln — a Kiln that would make Binford and Tim Allen happy. My wife is ready to kill me as its one more huge thing to move up to NH soon, but I want to get back into making some more Windsor chairs once we get settled in our new house this spring. I took a workshop last summer at NBSS and made a continuous arm Windsor chair and hope to make some more for our new place.
The design is based largely on one my friend Pete Galbert came up with and shared on his blog here with a few minor changes/tweaks based on the engineer in me and what materials I had on hand. I’m looking forward to it having a long service life.
Warmed up kiln is ready for business
Highlights:
2′ x 3′ x 4′
Thermostatically controlled
Reflective insulation
Cord storage
Chest handles
Leveling feet
Room for sizable pieces
Next up chair making project will be a shave horse.
This is a project I’ve been wanting for a while now.
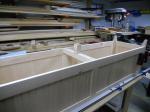
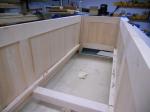
It’s an 8′ long steam box for steaming Windsor Chair and Architectural parts. It’s powered by 2 Wagner wallpaper steamers so it should have plenty of steam to get the job done even given it’s large size. Interior opening is 4″ x 6.5″x 8′ so plenty of room for most anything I would want to steam bend.
Completed 8′ long steam box. Note the reinforced legs that open to the correct angles for drainage.
Highlights of this unit:
Tight fitting steam entry ports which make use of threaded hose fittings
Folding legs so I can take the unit with me when I travel or to save shop space when not in use
Made from a single sheet of CDX Plywood
Some will say it is overbuilt for a Steam Box, but I hope to get a long service life out of it and most of the outside parts (legs etc) can all be remounted on another unit when the time comes to replace the core box.
Below is a slide show of the Steam Box being built along with some tips in the captions.
This slideshow requires JavaScript.
A Joiner's Guide To Traditional Woodworking and Preservation