Category Archives: Writing

Balloon Framing

Between Timber Framing and modern Platform Framing was an intermediate style of framing a building called ‘Balloon Framing’.

Balloon Frame 3D Model
Figure 1: Balloon Frame 3D Model

This method of framing was radical for its time. Started around the 1830s and steadily gaining in popularity through the end of the 19th century Balloon framing ushered in a new generation of building supplies and builders who benefited from and drove the advent of ever cheaper machine made nails, consistent milled lumber, and more efficient transportation methods (Rail box-cars etc). Beyond the technological advancements in the materials production and transportation this building method caught on quickly as buildings framed in this manner could be built cheaply with non-skilled labor and common nails and tools, thus farmers and do-it-yourselfers could build what they needed with a far shallower learning curve when compared to all the advanced joinery traditional timber framing required. This was invaluable to frontier areas where traditional carpenters and joiners were in short supply.

Bell's Carpentry Made Easy Plate 4
Figure 2: Bell’s Carpentry Made Easy Plate 4

In the mid-west and plains states in particular you see a lot of balloon framed houses during this period as they had good access to the mills producing these building materials, a desire to quickly build and expand existing buildings and in some areas a dearth of heavy timber needed to build in the older styles. Even in more populated areas back east you’ll see many of the Shingle Style and Victorian homes and Triple-Deckers were framed this way, though certainly some more austere farm houses of this period were also framed in this manner as it was an economical way to build. If you look carefully at some of the design details you can see how tastes and designs changed to make use of the dominant building supplies of the time. You’ll see higher ceiling heights, various bump outs, towers etc that were more easily executed with this style of framing and in keeping with the prevailing styles of the day. (See Figure 3)

Mansard Victorian in Manchester NH
Figure 3: Mansard Victorian in Manchester NH

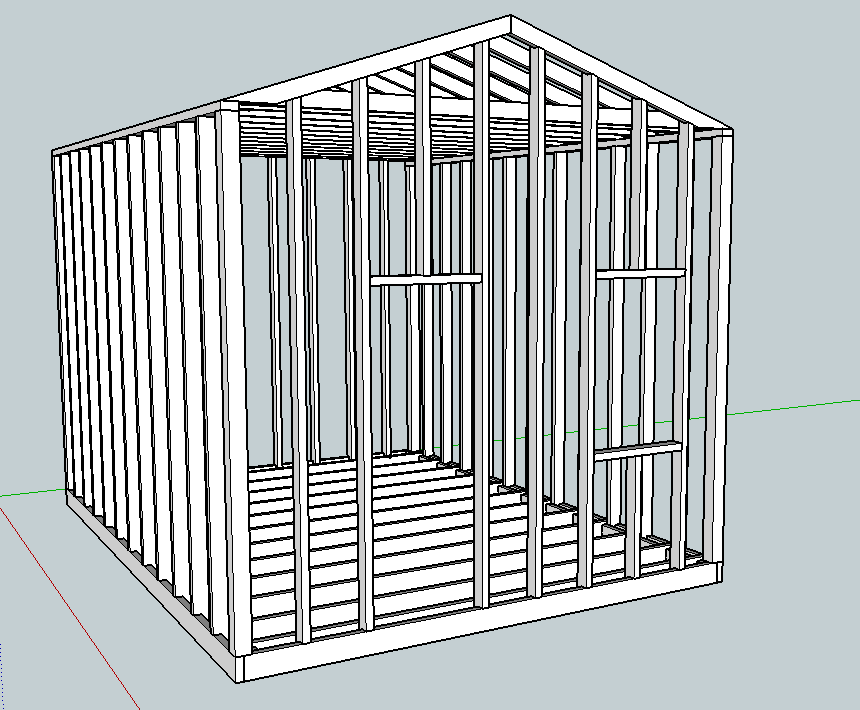
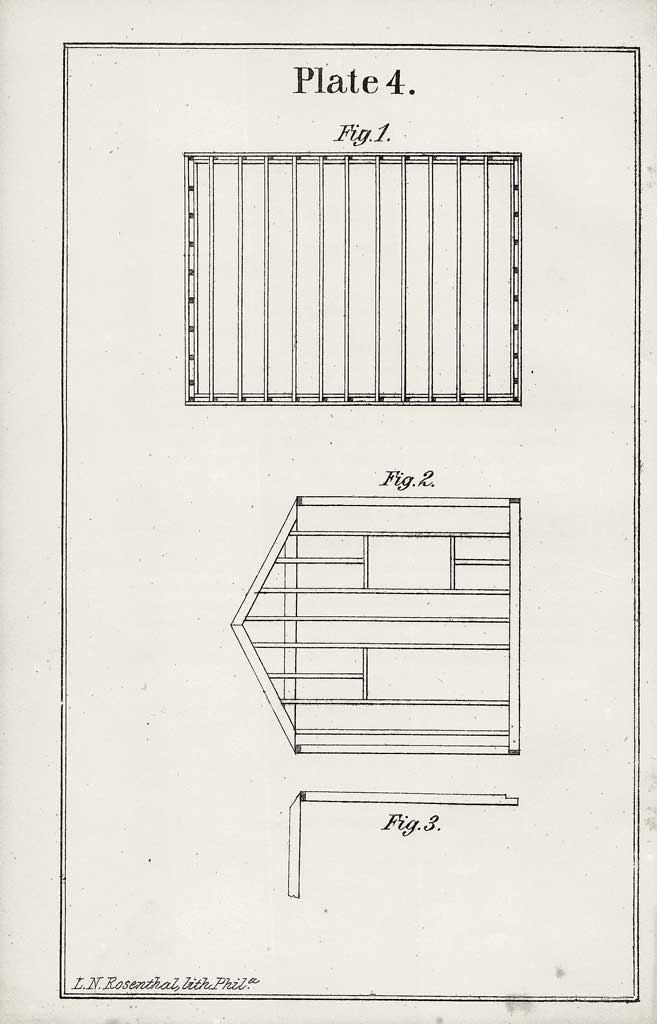
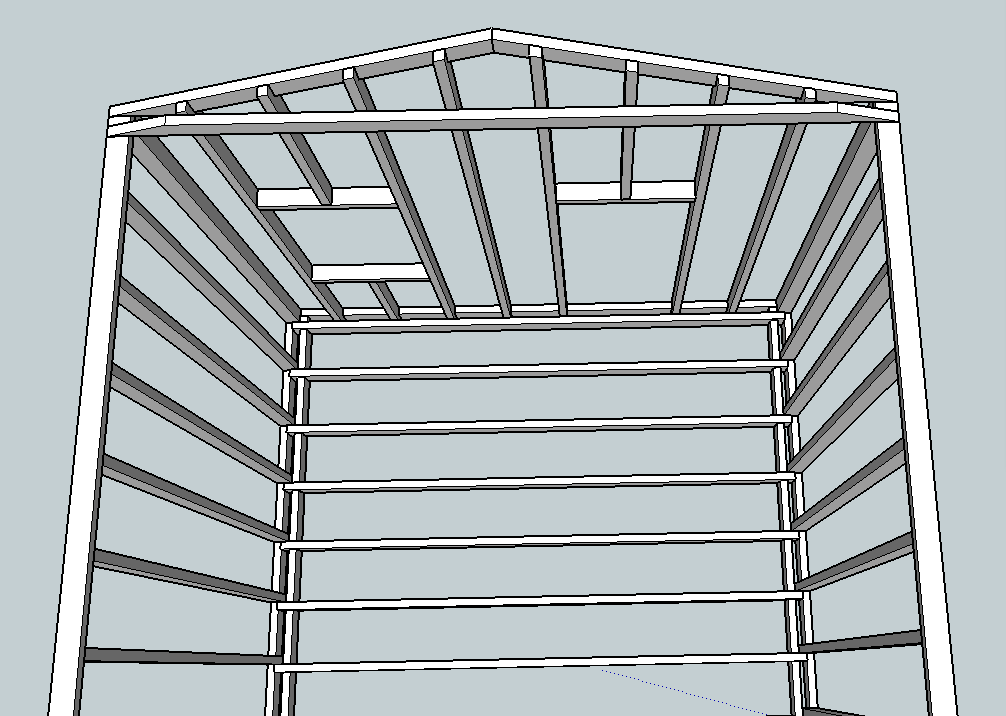
Balloon framing made use of common sized lumber coming from mills — the first real large scale use of 2x4s, 2x8s, 1x10s etc in framing a building and marked a transition from the heavy timbered buildings of the east coast of America and the ‘Old World’ that preceded it. In the earlier part of this period a 2×4 was actually 2″x4″ in some areas as opposed to the ‘nominal’ sizes we have today wherein a 2×4 is 1.5″x3.5″ by the time it makes it to a modern lumberyard, but that is a post for another day. The weight of the building was dispersed across a series of smaller consistent studs as opposed to a few heavy posts. Also notable was the fact that the studs ran from sill to plate, thus requiring the 2nd and 3rd floors to be ‘hung’ from the studs via ledger or ‘ribbon’ boards. (See Figures 2 and 4)

Bell's Carpentry Made Easy Plate 5
Figure 4: Bell’s Carpentry Made Easy Plate 5

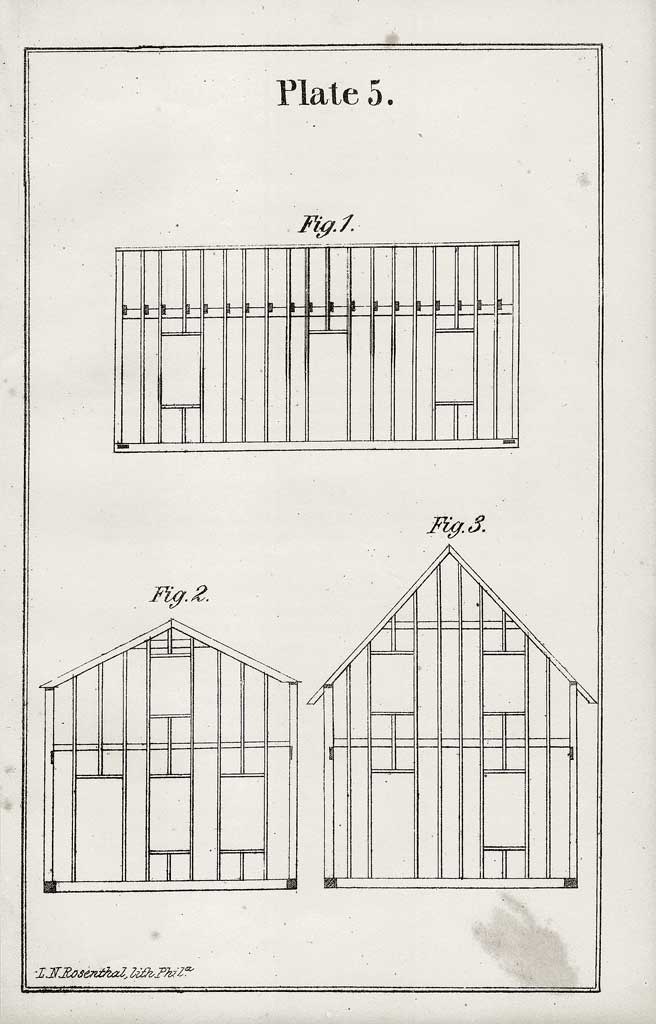
A great period resource for information about Balloon Framing is William Bell’s “Carpentry Made Easy: The Science and Art of Framing”. While Bell was not the first author to extol the virtues of Balloon Framing he may have been one of the most prolific. His ‘Carpentry Made Easy’ book was published continuously from 1858-1904. 46 years is quiet a testament to the information he provided. The book’s longevity is largely due to how the information is provided. Bell starts with a detailed section on basic math and geometry for carpenters and the moves into framing. He covers Balloon Framing for homes and modest sized buildings and moves on to heavy timber framing for industrial buildings, bridges, spires and the like. Bell was a trained carpenter and joiner and speaks the reader in a clear and concise way that was agreeable to most carpenters. Bell goes into technical detail but did so in such a way that any reasonably skilled carpenter could take this information and apply it to the project at hand. His words still resonate well today — in fact using his descriptions I was able to build a detailed 3D model in Sketch-Up based on his instructions for how to build a Balloon Framed structure. (See Figures 1 and 5). I’m sure that many a house carpenter had a dog-eared copy of this book in their toolbox and regularly referred to it over the years.

How fast did this transition happen?

Like most major shifts in an industry the transition from Heavy Timber Framing to Balloon Framing did not happen over night. The word had to get out, it had to be evaluated, the supplies had to be ready and a host of macro-economic pressures had to come together in order to facilitate this change — a strong need to build economical housing for an exploding population etc. Like most things, some isolated or rural areas clung to the old ways for longer periods and some areas were more willing to try out these new techniques. Even cutting over in terms of technique was an evolutionary change. If you look closely at Figure 4 above you’ll see that the house shown there has Balloon Framed walls with a heavy timbered sill, which the author notes as the preferred way to go if heavy timber is available, as opposed to Figure 2 which shows a more traditional balloon framed sill made from 2x framing elements.

In broad terms this building method started in the 1830s, crescendo-ed during the 1880s-1930s giving way to modern Platform Framing which was an evolutionary advancement that built upon the strengths and lessons of this movement. Balloon Framing and it’s relative efficiencies greatly improved the living conditions of many Americans and others of modest means and the burgeoning middle class.

Balloon Frame Cutaway 3D Model
Figure 5: Balloon Frame Cutaway 3D Model To Show Joinery

Why did Balloon Framing disappear? Disadvantages and Demise

With Balloon Framing, you framed an entire wall at once from sill to top plate, thus requiring longer framing members. Once the wall was standing you needed to have ladders and scaffolding in order to ‘hang’ the upper floors from the ledger plates and studs. This required more labor compared to modern platform framing where each level builds upon the lower level, thus requiring less labor, scaffolding and smaller framing members.

In some larger Balloon Framed buildings you’d see some sagging towards central walls due to differential shrinking of the framing members — joists resting on ledger boards will move a different amount when compared to joists nailed into the side of as stud. This kind of differential can add up in a larger building and took time to manifest itself. (See Wikipedia here for a more detailed explanation)

While the above items are negatives for this system of framing the final nail in it’s coffin was how it performs in a fire. The inter-stud wall cavities that run from sill to plate worked like a chimney flue and helped to rapidly spread fire throughout a Balloon Framed building. To counter this, fire blocking can be installed between each floor, but this was labor consuming to install and not quite as good as the fire resistance you’ll see in a Platform Framed building. Even today when filling out an application for homeowners insurance you’ll often see questions related to this kind of framing.

What replaced Balloon Framing?

Around the 1930s the death toll and property loss data was starting to add up and folks looked to rectify the situation. The solution was Platform Framing. In a nutshell you’d build a platform of sill, joists, rim joists and sub-flooring, use this as a platform to build the walls for one floor, you’d tilt up and nail off the walls, then build another platform on top of that until you top out your building. This method required less labor, shorter framing members and by breaking up the wall cavities at each floor provided better fire resistance.  After World War II the post war building boom accelerated the need for even more housing and faster build completion times. At this time we started to see the introduction of studs 16″ to accommodate sheet goods (Plywood and later OSB) in regular sizes as a replacement for more labor and material intensive traditional sheathing. And in a similar manner vinyl siting replaced genuine clapboards etc etc until you get to present day building materials and practices.

Conclusion

We don’t often see or hear much about Balloon Framing today as it has fallen out of favor in the building community, but it’s impact can be felt today in any Platform Framed structure that benefited from all the lessons learned by this earlier incarnation of efficient home building. I hope that the next time you are examining the framing of a Balloon Framed structure you’ll take a look and see what lessons it can teach you.

Take care,
-Bill

P.S. If you’d like to read William Bell’s “Carpentry Made Easy: The Science and Art of Framing” (1858) you can get a copy from the Toolemera Press here. It was a great read with interesting sections on timber framing, compound roof joinery, bridge-building, spire making and other interesting building topics above and beyond the Balloon Framing and carpenter’s geometry I mention in this article.

** Plates 4 and 5 of from Bell’s Book are provided via Gary Roberts of the Toolemera Press and used with his permission.

Winding Laths — Improve How You Flatten a Board

A good pair of winding lath or winding sticks is sometimes hard to find — I suspect not many survived the burn pile. The good news is that a new set is easily made in an few minutes at the bench.

Sighting down a board with winding sticks
Sighting down a board with winding sticks — (This set was made by my friend Bill Anderson of Edwards Mountain Woodworking)

Why would I want a pair of ‘Winding Sticks’? What do they do?

  • This pair of matching straight-edges are a fast and invaluable tool that allows you to quickly see if a board is flat.
  • By placing them at each end of a board, sighting down across the near stick and looking at the far one, you can more easily see any twisting or warping in the board. The sticks help accentuate any non-planer surfaces.
  • By moving one stick and sighting the board at a few locations along its length, you will quickly see how the board flows.
  • Using a single stick you can also check for any cupping or warping as you would with any other straightedge.
  • Once you identify parts of the board that need to be addressed, you can quickly plane them and re-evaluate the board using these sticks. (After a bit of practice, process goes quite fast)
Winding Lath by Otto Salomon in the Teacher's Handbook of Sloyd
Winding Lath by Otto Salomon in the ‘Teacher’s Handbook of Sloyd’ — a great prototype for your own winding sticks

From Otto Salomon’s ‘Teacher’s Handbook of Sloyd’ above you can read a nice description for how to use winding laths efficiently. The pair of wooden Sloyd winding laths shown above nest with each other via a set of fitted wooden pins and have a nice relief one the edge of the short sides so you can easily get a finger hold in there and separate the sticks when you want to use them. Otto also calls out an interesting alternative you can use in a pinch — by turning two try-planes on their side you can use them as an impromptu set of winding sticks and sight across them.

Sighting down two bench planes as impromptu winding sticks

Tips on making your own winding sticks:

  • Use quarter-sawn hardwood like hard maple or beech
  • Consider adding a contrasting inlay or strip to make it easier to sight across the sticks
  • I like to use sticks that are 1/2″ thick, about 2″ wide and about 18-24″ long
  • Sticks that can nest with each other or otherwise stay together are more likely to survive
  • Taper each stick  on one side so that it’s clear what edge is the top (it will not stand on its own on the edge you plane down to 1/8″)
  • If your sticks ever get out of true they are easily squared up again with a plane

The next time you are out in the shop, make a quick set of winding sticks and see how much it can improve your board flattening efficiency.

-Bill

P.S. If you don’t have the the time or scrap to make your own set from wood, and don’t have 2 jack or try planes handy, you need to have a stern talking to, but there are commercially available winding sticks available from Lee Valley and others. I admit that I do have a pair of the Lee Valley aluminum winding sticks which I bought when I first got started in hand tool woodworking. They are well machined and the design hits all the major tips called out above — with the exception of being made of wood of course.

Nesting metal winding sticks from Lee Valley

Much like the shop made winding sticks, these aluminum sticks work well and need virtually no maintenance.

Metal Winding Sticks in Use

P.P.S — This is an extended version of a post I put together for my friends at Popular Woodworking on the contributor’s blog which can be found here.

What does your tool chest say about you?

The spartan exterior of many traditional tool chests was as much a security system as it was a design element. When closed the clean lines and rugged exterior looked did not draw your attention and looked much the same as many other stoutly built traveling chests and trunks you’d see on a given day. While unassuming in travel or quietly sitting in the back of the shop, many of these chests contained a far more interesting interior.

Beautiful Tool Chest from 1849 with extensive inlay work, divided tills, half lock etc
Beautiful Tool Chest from 1849 with extensive inlay work, divided tills, half lock etc. (The maker of this chest clearly must have loved card games)

How often do you see carpenter with a bucket of rusty tools and a paint splattered truck and wondered about ‘If this is how they take care of their tools and truck, what kind of slapdash work would they do for me?’

Beyond just a safe and secure place to store your tools, the way you build and customize your chest says a lot about you and how you work. A clean and orderly chest, worksite, and truck can be a great advertisement for the quality of work you do. I’ve found folks are drawn to a nice chest like moths to a light bulb.

Large chest with inlaid lid
Large joiner’s chest with inlaid lid

What do you look for in a solid chest?

  • It should be easy to find the tools you want to use and quickly pack and unpack them
  • Invest in strong but light materials like Eastern White Pine and use denser woods only for wear parts
  • Do not get caught up with fancy inlays, hidden compartments and nest after nest of drawers
  • Don’t skimp on the hardware, screws and finish — they will see a lot of hard use over the life of the chest
  • A strong lid, well secured with a tight fitting dust seal
Front view with drawer's opened
Front view with drawer’s opened

When I built a traveling toolchest for my own work I went with a utilitarian design that functioned much like rolling luggage of today. Inside there is a tray on top,  a series of removable drawers to hold planes and small items and some open cubbies that were easily accessible and could be secured behind locking doors. The heavy chest lifts, telescoping handle and wheels make it manageable to move. The drawers can be swapped out depending on the needs of the current project and I could vary the height as needed — having a double deep drawer etc.

Rear view with luggage style handle extended

Tips for laying out the interior of your own chest:

  • Design your chest from the inside out to fit your current tools and leave room to grow or modify as your tools and interests change over the years
  • Start with your largest tool — for most it is a No. 7 or No.8 Jointer Plane or panel saws — and segment from there
  • Tools you use most often should be the easiest to find  — marking tools, squares, bench chisels, saws etc
  • Make something you are proud of — you’ll be using this chest for years to come and it will be regularly inspected by all your woodworking friends
  • Don’t be afraid to experiment — the great chests all evolved from earlier models, but temper that by remembering that simplicity and expressed construction will often serve you better than lots of glitz without substance

The above principles guide me as I build my own tool chests I and I hope they will help you as get out into the shop and build a chest that is a reflection of your woodworking skills and personality.

You can learn more about my thoughts on Tool Chests on my blog here.

-Bill Rainford

P.S. The above post is an extended version of what I wrote up for my friends over at Popular Woodworking as part of their Daily Woodworking Blog which you can find here.

Lights, Camera, Action….

I’m happy to report that the companion video series for my recent Fine Homebuilding article ‘Master Carpenter: Reproducing Traditional Moldings’ went online today.

Behind the scenes. (Photo courtesy of the Taunton Press)

I had a great time making the videos and I hope you will enjoy watching them. Several of them are free, though a few of them are reserved for FineHomebuilding.com (FHB) members only.

Bill Rainford using molding planes to reproduce traditional molding profiles. (Photo courtesy of the Taunton Press)

Details below as they were presented this morning in Fine Homebuilding’s e-newsletter and where to find the videos:

Fine Homebuilding Logo

In this Master Carpenter series, Bill Rainford shows how to get period details right with both power and hand tools.

Watch the intro video

Plus watch more free episodes from this series:
Interview with the craftsman
Bill chats about how traditional carpentry is better for his body and soul
An inside look at old-fashioned home building
Bill and senior editor Chuck Bickford visit the Alvah Kittredge House and dig into its traditional construction details

Sign in as a member or sign up for a FREE 14-day trial to see this complete series and much more.

Take care,
-Bill

Reproducing Traditional Molding for the Alvah Kittredge House

The Alvah Kittredge House in Roxbury Massachusetts is a great example of high style Greek Revival architecture in Boston and a tangible link to the city and the nation’s early history.

Alvah Kittredge House in the 1880s (Photo Courtesy of Historic Boston Inc)

The Greek Revival Style was most popular in the United States during the second quarter of the 19th century. (Approximately 1820-1850) During this time period the population and economy was also growing by leaps and bounds. The United States was still a young nation and many folks wanted to show off their new found affluence.  During this period of great optimism there was a strong belief in the American Democracy and many associated the ideals of the new nation with those of early Greek Democracy. Around this time, access to Greece and the designs of antiquity were also coming into the mainstream as influential citizens like Thomas Jefferson read books like ‘The Antiquities of Athens‘, Benjamin Latrobe and others built out Hellenistic monuments and public buildings in Washington D.C. and other large east coast cities, and builder’s guides like Asher Benjamin’s ‘The Practical House Carpenter’ proliferated the tool chests of local joiners and carpenters. Given this atmosphere many folks wanted to have their own building look like a Greek temple. For most of the ‘middling’ Americans, especially those in more rural and western locales the scale and details would be simplified down to keeping classical proportions and greatly simplifying details to meet their budgets — pilasters instead of columns, simplified moldings or even flat boards attempting to echo the pediment and other design elements of a Greek temple.

Looking up at the portico of the Alvah Kittredge House (Photo by Bill Rainford)

In places with money — like public buildings and mansions — the builders could afford to go big with design elements like a colonnaded portico and carved relief details in the pediment etc. The Alvah Kittredge house is a great example of a high style Greek revival home which reflected the wealth of its original owner, and of Boston and the US in general at that time.  Not only is the house unusual given how the city has grown up around this once grand country estate, but the scale of the front facade needs to be seen in person to be properly appreciated. The two story portico with its double hung windows and high ceilings required wide and detailed moldings in order to be the appropriate scale for such a magnificent home.

The original crisp detail of this hand run molding is obscured by the many layers of paint over the generations. (Photo courtesy of the Taunton Press)

This 8 inch wide molding was made by hand using traditional wooden molding planes likely on site and from eastern white pine. This is not the sort of thing you can buy at a local big box store, or millworks supply company. The best way to replicate this sort of casing is to make it from the same materials and in the same manner as the original joiner….

Using a molding comb to capture the profile. (Photo courtesy of the Taunton Press)

I started by capturing the molding profile via molding comb or profile gauge which aids in transferring the profile to the newly prepared stock.

Setting in the details with a Snipe's Bill plane. (Photo courtesy of the Taunton Press)
Setting in the details with a Snipe’s Bill plane. (Photo courtesy of the Taunton Press)

Next by using traditional wooden molding planes I carefully set in all the major transitions in the profile

Using traditional molding planes to replicate the profile. (Photo courtesy of the Taunton Press)

Many of these planes I use date back to the time period when the Kittredge house was actually built and yields results that simply cannot be duplicated by machine. The original handwork had variations and facets which catch the light differently when compared to stock that is milled by a machine.

Section of new molding alongside an original sample -- a nice match. (Photo by Bill Rainford)
Section of new molding alongside an original sample — a nice match. (Photo by Bill Rainford)

The end result is a near identical match that will help insure that future generations living in the Kittredge house will be able to enjoy it’s many details in much the same way as Alvah did when the house was first built.

If you’d like to learn more about how to make traditional moldings, please check out the related article ‘Master Carpenter Series:Traditional Molding’ I wrote for FineHomebuilding which can be found here  (There is also a related video series which you can find on www.finehomebuilding.com/extras for the Sept 2013 issue)

-Bill Rainford
Preservation Carpenter, Joiner, and Instructor
https://rainfordrestorations.wordpress.com

P.S. The above post was written for my friends at Historic Boston Inc here. You can learn more about Historic Boston and specifically about the Alvah Kittredge House here.

How many tools do I really need? — Sloyd Tool List

Hello Fellow Sloyders,

The post below is an expanded version of a recent post I made for my friends at Popular Woodworking which can be found here. For the sake of continuity on the series related to Sloyd on this blog I am providing an extended look at this topic.

In honor of American Independence day this past week, why not do something that makes you a little more independent?

When I started out woodworking I’d watch television shows and read magazines pushing all kinds of fancy new tools and think ‘If only I had a shop full of those tools I could build anything’. I spent a long time saving my pennies, reading the reviews and trying out the latest tools. The models seemed to change with the seasons. New project? Time for a new bit or jig or gizmo. Realizing that earlier craftsmen didn’t have access to all of these modern wonders yet they produced far more intricate work, I went in search of the hand cut dovetail and the arts and mysteries of our ancient craft.

Sloyd Tool Cabinet
Sloyd Tool Cabinet & Tool Set — Makes a great gift for the Sloyder in your life

I quickly found that power equipment was not broadening my capabilities as much as it was like an anchor tethering me to a limited band of work and taking up valuable shop space. I also didn’t like wearing the requisite dust mask, hearing protection and safety glasses all the time — it was like a mini sensory deprivation chamber. When I asked master cabinetmaker Dan Faia (NBSS) what he does for dust protection in his own shop, his succinct reply was “I never coughed up a curl“. That pithy remark reflected the very different view traditional woodworkers have — without all the big machines, the dust and noise,  you can focus on the work, invest in a smaller set of high quality tools that should last a lifetime and enjoy the process as much as the result.

Sloyd Tool Cabinet Ad -- From Chandler and Barber
Sloyd Tool Cabinet Ad — From Chandler and Barber (Photo Courtesy of John Pirie)

If you are looking to downsize your powered shop, get into more traditional woodworking or just starting out the questions that often come up are —

What is a good minimum set of tools I need to get started? How much is this all going to cost me?

In researching the Sloyd tool cabinet shown above I found some old tool catalogs from Chandler and Barber of Boston (a primary supplier of Sloyd paraphernalia including the Larsson benches etc ) including one from 1900 complete with a listing of and pricing for all the tools in the cabinet.  According to the Federal Reserve’s website $1 in 1900 that should be worth about $27 today. A straight monetary conversion doesn’t paint a complete picture since some tools that were common back then are a specialty today and vice versa so I also included a column showing what an equivalent quality tool would cost new today.

In 1900,  just as it was when I was a student over 100 years later, the view is that it is better to buy a quality tool once that will last a lifetime than buy something of poor quality which will not serve you well in your work. Keep that in mind as you review the list — since the tools were not the cheapest back then and surely are not the cheapest today. But with this modest set of tools you can build an amazing array of projects just as many ‘Sloyders’ (Sloyd school students) have done before us.

Tool Original Price Original Price in Today’s $ Today’s Price Notes
2′ Folding Wood Rule $0.15 $4.05 $24.00 Bi-fold Rule from Garret Wade
6″ Metal Blade Try Square $0.25 $6.75 $13.65 Swanson Try Square On Amazon
Marking Gauge $0.25 $6.75 $30.00 Robert Larson Marking Gauge on Amazon
Bevel Gauge $0.25 $6.75 $22.50 Shinwa (Japanese) Lee Valley or Amazon
Pair Dividers, 5 inch $0.30 $8.10 $49.50 Starrett 4″ or 6″ on Amazon
Screw Driver, 4 inch $0.15 $4.05 $13.95 Marples, from Tools For Working Wood
13 oz. Claw Hammer $0.42 $11.34 $9.97 Stanley 13 oz Hammer, Walmart
Block and Rabbet Plane $1.00 $27.00 $175.00 Lie Nielsen Block Rabbet Plane
Bailey Jack Plane $1.13 $30.51 $93.00 Stanley Bailey Jack, from Rockler
Cross-cut Saw, 20 inch $1.37 $36.99 $96.00 Pax Handsaw, from Lee Valley
Splitting Saw (Rip), 20 inch $1.37 $36.99 $96.00 Pax Handsaw, from Lee Valley
Keyhole Saw $0.20 $5.40 $18.00 Japanese Keyhole Saw, from Lee Valley
Firmer Chisel, 1/4 inch $0.25 $6.75 $28.95 Henry Taylor, from Traditional Woodworker
Firmer Chisel, 3/4 inch $0.32 $8.64 $30.95 Henry Taylor, from Traditional Woodworker
Firmer Gouge, 3/8 inch $0.29 $7.83 $40.95 Henry Taylor, from Traditional Woodworker
Firmer Gouge, 3/4 inch $0.34 $9.18 $44.95 Henry Taylor, from Traditional Woodworker
Bit Brace $0.50 $13.50 $69.50 French Bit Brace, from Lee Valley
Jennings Pattern Bits, 1/4,1/2,3/4in. $0.78 $21.06 $54.00 Auger Bits, from Traditional Woodworker
2 Gimlet Bits $0.20 $5.40 $16.00 7 Piece Set, from Garret Wade
Screwdriver Bit $0.15 $4.05 $11.50 Driver Adapter Bit, from Lee Valley
Countersink $0.20 $5.40 $19.50 Hand Countersink, from Lee Valley
Spoke Shave $0.15 $4.05 $34.99 Stanley Spoke Shave, from Rockler
Brad Awl $0.05 $1.35 $19.95 Brad Awl, from Lee Valley
Nail Set $0.10 $2.70 $3.15 Stanley Nail Set, from Amazon
Half Round File $0.34 $9.18 $9.97 Nicholson Half Round File, from Home Depot
Oil Stone $0.50 $13.50 $18.99 Norton Combo Oil Stone, from Amazon
Oil Can $0.10 $2.70 $7.11 Goldenrod Oil Can, from Amazon
Pair Combination Pliers $0.50 $13.50 $8.60 Crescent H26N, from Amazon
Can Glue $0.15 $4.05 $5.88 Titebond, from Amazon
Assorted Brads $0.05 $1.35 $7.23 Crown Bolt brad and nail assortment, from Amazon
Assorted Screws $0.10 $2.70 $8.10 Maxcraft woodscrew assortment, from Amazon
Total: $11.91 $321.57 $1081.84

If your wallet still cringes at the totals above, fear not, for the totals above are for all brand new tools. The one luxury we have in our modern day of hand tools falling out of favor is the large secondhand market where you might be able to scoop up some great tools — possibly even some of the actual tools that once inhabited these cabinets for the original price in today’s dollars or less.

Fully Stocked Sloyd Tool Cabinet

So before you break out the barbeque, give some thought to how you can free yourself from a mountain of modern tools and invest in a modest set of traditional hand tools that will get you started on the path to more enjoyable woodworking.

-Bill

P.S. Extended Content For Readers of My Blog:

Note, the table above is expanded to show what sources I pulled my current pricing data from — which may be controversial to some — but was a best effort to identify similar makes, brands, qualities and countries of origin to be the same as what was in the original cabinet. For items no longer made in the U.S.A. I tried to find the next closest replacement.

P.P.S Why did the relative price of new tools go up so much?

This is a topic we’ll explore more in a future post, but for all the armchair economists looking to convert see what a dollar was worth in the past, this site from the FED was interesting.

Traditional Sloyd Tool Cabinet

I recently had the opportunity to make a post to the Popular Woodworking online community which is edited by Dan Farnbach the PWM online editor.

Below is an extended version of that first post:

Bill Rainford -- Preservation Carpenter, Joiner, Instructor
Bill Rainford — Preservation Carpenter, Joiner, Instructor

Bill Rainford is a young and driven craftsman in whom I think you’ll find a lot in common. Voraciously self-taught at first, Bill went on to graduate from the Preservation Carpentry Program at one of New England’s premier craft schools. He now teaches workshops at that school (North Bennet Street) and serves as adjunct faculty at the Boston Architectural College, in addition to developing his own body of commissioned work, building his blog and holding down a day job in software. I want to welcome Bill to the community as an occasional guest writer. He’s going to bring us a little history and several techniques from his area of expertise, which he describes as traditional joinery –though Bill’s skills do not fit neatly in just one category.

We may also do a project plan over the course of the next few months. Please welcome Bill by reading this newsletter and then visiting his blog! Of particular interest is Bill’s recent collaboration with Roy Underhill – more on that at the bottom of this e-mail.

–Dan

What Sloyd Did For Me and My Woodworking Apprenticeship

Part of what made my training in preservation carpentry so rewarding was the way in which it was taught.  We followed a system of educational handwork derived from what was originally developed at Nääs in Sweden and known as the ‘Educational Sloyd System.’ Sloyd is the Swedish word for ‘craft’ and most commonly associated with skilled manual craft work. In the early years of the school in the late 19th century, there was a strong need in Boston and America as a whole to help new immigrants learn the skills needed to acclimate to this new country and develop skills to support oneself. This Sloyd System trained students by building a series of useful models/items each of which introduced basic tools and skills, built confidence to tackle more advanced work, and fostered the ability to evaluate your own work and push yourself to reach new levels of accomplishment.

Elementary Sloyd Training in traditional woodworking techniques
Elementary Sloyd Training based on traditional woodworking techniques

When Otto Aaron Salomon wrote ‘The Theory of Educational Sloyd‘ (page 7) he described the goals one should strove for in teaching and learning within this system.

The focus was not simply the ‘utilitarian aim’ :

  1. To directly give dexterity to the use of tools
  2. To execute exact work

There was also a larger, more ‘formative aim’ to the education:

  1. To instill a taste for, and love of, labour in general
  2. Inspire a respect for rough, honest, bodily labour
  3. Develop independence and self-reliance
  4. Train habits of order, exactness, cleanliness and neatness
  5. Train the eye and sense of form. To give a general dexterity of hand and to develop touch
  6. To accustom attention, industry, perseverance and patience
  7. To promote the development of physical powers

The goal of all this training was not just to help find a job, but to help round out the person. Students may never pick up a tool again, but they will forever have the knowledge of how to make and evaluate things with your hand and your eye and appreciate the labor of others – something I often feel is lacking in members of my generation.

Sloyd Knife grain direction exercise

Students in this sort of program would often start with a simple block of wood and a Sloyd knife and learn to make controlled cuts. From this modest exercise they will absorb 3 of the most important lessons a woodworker will ever learn:

  1. Cutting with the grain
  2. Cutting against the grain
  3. Splitting wood

From this most basic of exercises students are able to make usable objects like a pencil sharpener, letter opener, penholder etc. which they are able to keep, evaluate and use. As the training progresses the students will have more freedom to implement their own designs and apply the skills they have learned.

Fast Forward to Today

This sort of learning by doing, ability to be self critical, self-sufficient, and continually push oneself is still present at the school. In the current programs at NBSS students work under the supervision of a master craftsman who will start with the basics and guide students through their training. By the end of the 1, 2, or 3-year program, depending on major, students will demonstrate proficiency in many tasks, and while there is always more to learn they will be well situated to seek out and tackle the next big project.

After graduating from my training, I remained interested in Sloyd and did further research on the topic. I learned that many of the benches and hanging tool cabinets designed and produced for early Sloyd programs were based on the designs of Gustaf Larsson of The Boston Sloyd School and produced locally in Boston. Some of the benches are still in use by the school and you can find some second hand every now and then on eBay, but the hanging tool cabinet was news to me.

Sloyd Tool Cabinet Advertisement from the late 19th/early 20th century
Sloyd Tool Cabinet advertisement from the late 19th/early 20th century

Shortly after learning about the Larsson tool cabinet I made a serendipitous discovery at a local pawn shop in New Hampshire – I actually found one of these cabinets and in very good shape given its age. All the hardware was intact, and only the front door was rebuilt. It was clear that this cabinet was used for a very long time by someone who cared about it, as the replacement door inherited the hardware and layout of the original.

My antique Sloyd tool cabinet

I am working on a reproduction of this piece, and will be presenting parts of that project here and on the Popular Woodworking blog. Future posts will include a bit on how the cabinet was made, interesting details on the tools that once inhabited this cabinet, as well as notes and prices on modern equivalents. If there is interest I will also make some explorations into some of the Sloyd exercises which can help improve your own hand skills.

Roy Underhill is a fellow Sloyd enthusiast and has been inspirational to me in my research. I caught up with him this week and he offered even more wisdom on the topic, saying:

“Everyone human likes to move, so we came up with yoga, dance and sport to make movement more engaging and expanding. So too with woodworking and Sloyd. The exercises of Sloyd can bring every modern woodworker along a thoughtful path of liberating discipline, of progress and accomplishment — and reconnection with the good feelings of our ancient craft.”

Using your Sloyd Training

If you’d like to join me in re-connecting with the joy of our ancient craft of woodworking I will be taking some classes at Roy’s Underhill’s ‘The Woodwright’s School’ in Pittsboro NC this July 9-12. The first class is Making a Traditional Jointer plane with Bill Anderson and the second class is Making a Traditional Metal Namestamp with Peter Ross. Both of these classes are a great way to learn some basic Sloyd skills and experience the satisfaction of using a high quality tool you made yourself for years to come. If you’d like more information on one or both of these classes, please check out my post on this topic here. If you are interested in attending, please do not wait to sign up — there is a minimum number of students needed to sign up by mid-June in order for the classes to run.

-Bill

Self-Anchoring Sharpening-Stone Station

Late last night I got home late from the EAIA Annual conference down on Cape Cod — we had a great time at the event and I will post on that more this week.

In my mailbox I was happy to see the new issue of Fine Homebuilding — the July 2013 Issue — since it contains the first small article I wrote for them. It can be found in the ‘Tips and Techniques’ section of the magazine on page 24 in a piece titled ‘A self-anchoring sharpening-stone station’

Below is a picture from this small article, but if you want to see all the details, please check out the magazine on your local newsstand or view this tip online here.

Self Anchoring Sharpening Stone Holder

Stay tuned for next month’s issue (August/September 2013) — I have a much longer piece with online video components coming out in with that issue.

-Bill