After spending way too much digging around in buckets and tool boxes I decided I needed some real wall storage for the shop. I also figured since I spend so much of my free time down in the shop I might as well make it a nice looking place to be. So back in the spring of 2008 I embarked on a long series of shop improvement projects.
Phase 1 — Wall Storage
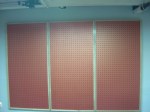
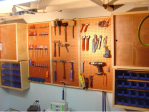
Based roughly on some plans from an older WOOD magazine article I build a series of 2’x4′ pegbaord panels. Each of these wood frames has a french cleat on the back and spacer on the bottom so they could be hung from a french cleat mounted to the wall. I really like this system as it lets me easily move things around as my shop space needs change. (Every time a new major tool is added things often get juggled around). I really didn’t like the drab look of dark brown that pegboard normally is, so I decide to paint it a metallic copper color using a 2 part latex paint that worked out great. I also spray painted all the pegs/hooks copper as well. I found this paint reflected light well and gave a warmer feeling to the shop. I wound up making 6 of these panels which are currently in 2 banks of 3. From there I also made a pair of cabinets with similar copper doors and adjustable shelves and a pair of screw storage cabinets with lexan doors and lots of little McFeely’s bins. I’m currently in the process of moving to a new shop with some more wall space so I hope to add to this system of wall storage again soon.
Since then I also made hose storage, small parts bins, turning tool holders and a range of other similar shop helpers that hang from this cleat system. I’ll post more on these additions in the future. It has been a great way to organize tools and keep them handy and visible.
Completed bank of copper colored modular pegboard storage
Second bank of pegboard ready to go
Filling up the pegboards with copper painted hardware
In the summer of 2010 my father and my cousin Sue came to me with an interesting commission. My Aunt and Uncle’s 50th wedding anniversary was coming up and he wanted to something special to celebrate it. Uncle Bob and Aunty Betty had an interesting old revolving coffee table with book storage underneath it that all the kids in the family used over the years to play board games etc with their Grandpa (Uncle Bob to me). They all had fond memories of the table, but with advancing age it was hard to lean over the old table which was fairly low and a little on the small side. The challenge to me was to build the same table, but make it a little bigger and a little taller and keep it a surprise — so all I had to work from was the SINGLE picture below, a couple of dimensions and a rough guess on what it was made from. Working on a mid 20th century modern piece was a nice departure from my usual work which is more traditional pieces from the 18th and 19th century.
Original Table in an Old Photo
From the above information I decided to use solid cherry for the table, worked out the design in Autocad (first time and only time since I bothered to use Autocad instead of drafting by hand) It was neat to get used to that program, but I felt that it often slowed me down compared to my drafting board. My Dad also donated to the cause a nice and thick circular piece of glass that would protect the new table from the ravages of constant use by children.
Completed Reproduction
Above is the result of this effort. Each platter is larger than the original, the spindles are turned with shoulders and also wedged and glued into place. Under the top platter is a stretcher system that will allow for seasonal wood movement. The spindles form a series of book storage spaces and is a pretty neat design. I put a gentle radius on the edges of the discs which blended very well into the glass protective top. The legs/undercarriage is attached to the unit via a heavy duty lazy Susan mechanism that allows the whole table to rotate making it a great table for games and similar activities.
Upon delivery of the new table I was eager to get a look at the original. As it turns out the original was a made from pine and stained and from what I heard built from a kit in the late 1950s or early 1960s. The new table was a hit with everyone at the party and should last for many generations to come.
Below you can see the table being constructed and delivered:
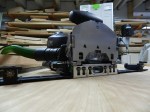
Beyond basic mortise and tenon joinery/carcass construction the Festool Domino XL also has potential to replace my biscuit joiner.
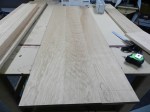
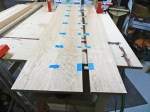
I’ve been working on a curly cherry shaker console table for our dining room and wanted to see how well the indexing fence would work in gluing up a table top. The first step was milling the wood and laying it out to get the best grain patterns.From there I marked out where I wanted the dominoes — being careful to make sure when the top is cut to final size no domino would be exposed. I also marked the center lines on blue tape to save with later cleanup.
TIP: set the tape back from the edge — otherwise you run the risk of having blue tape forever captured in your joint and ruining the appearance of the top.
I started off working the same way I would with a biscuit joiner — using the center line as my guide. Things moved along well and with the dust collector attached the machine left nice clean holes. On the second joint I used the indexing fence to speed up production. The key to using this fence well is making sure that you have BOTH fences set exactly the same and doing a test cut on scrap wood — this way you can be sure your joints line up the way you want. The first time using this method I did the same measuring and tape technique to gauge if I was drifting at all. If you are diligent in applying pressure so that your indexing pin is firmly in place you’ll be amazed with the result.If you are worried about the drift, you can set the machine to cut wider mortises and give some wiggle room like you have with biscuits. (I would recommend this technique for very long table tops — the more dominos you use in a row the more chance you have of making an error — but when going this route you have to be mindful of how your wider mortises can affect where the next mortise is set and lead you to drift off from where you expect as the extra room adds up — so use it with caution and/or mark things out as I have done above)
In an upcoming post I will cover using the domino to construct the carcase to support this table top — wherein the skirt boards were all made from a single piece of wood and provides a continuous grain pattern across the piece including the drawer fronts. Stay tuned.
Festool Domino XL with indexing fence ready to join a table top
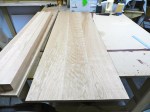
Curly Cherry boards milled and ready to be joined.
Setting up the Domino is easy with clearly marked gauges.
Taped and marked holes on board edges with dominoes dry fitted in place
Can’t get enough of 17th and 18th century hand tools? C’Mon I know I’m not the only one…..
Reconstructed Shaker Barn is home to the tool collection
In a rather unassuming barn deep inside of the Shelburne Museum in Shelburne VT you’ll find a treasure trove of antique tools on display. The collection has a large display of classic woodworking tools and many specialty trades like coopering, timber framing, bookbinding, locksmithing, shoemaking, blacksmithing and many other common trades of yore. Sounds almost like a listing of the majors we have at NBSS. 🙂
Molding planes
Every time we go, it’s always the first thing I want to go look at, and while it may seem a lost world to many, I’m always giddy to see how many tools from the same time period I’m regularly using in my own shop. It’s one of the best collections of traditional woodworking tool’s I’ve seen and it’s all on display.
In addition, the Shelburne also has great period houses, a paddlewheel steamship, lighthouse, classical and modern art, a huge collection of old toys, wagons/buggies/sleighs, rotating exhibits and events. If you are ever in the Burlington VT area I highly recommend you spend a day at the museum.
You can find out more about the Shelburne Museum here.
Sometimes art imitates life and vice versa. Sometimes we make new products that look old, and during the late 20th and early 21st centuries often those new products don’t quite hit the mark — think pressed hollow core interior doors made to look like a 6 panel door.
My senior project at NBSS gave me an opportunity to take on my own revisionist history challenge when working on a circa 1700 SaltBox colonial home in Sherborn MA. The rear ell door (most used door by the family) looked like this:
The ‘Before’ picture. Original 20th century door to be replaced.
Homes from that period would not have lights (aka window panes) in a traditional door, but most folks would not be consciously aware of that, and the family was used to having this more modern style door. Unfortunately for the green door pictured above it was at the end of its service life and a modern (20th century) factory made door not worth restoring. So the challenge to me was to build a more traditional door that fit the opening, had lights in it, but better matched the style and molding profiles of the house.
I designed and built a more traditional door which you can see in progress below. It’s a 9 light (smaller panes), 4 panel door built in the traditional style from eastern white pine. The design was similar to a house found on the Wellington House in Waltham MA and some similar 6 panel doors of the period. All the major joints are draw bored and tenoned (so it can be repaired if need be 100 years from now), all the muntins were run by hand and coped, the lights were hand glazed, the panels were pre-finished so you won’t see raw wood as the seasons change etc. I also used a full size story stick when laying out the joinery and traditional hardware. (Period hinges and Suffolk latch). Other work included new door jamb and casing, oak threshold, leadwork flashing, touching up some insulation etc.
Door in progress. I pre-finished the panels so when they move with the seasons you will not see exposed unfinished wood.
The result of all this work is a very nice door that looks like it was part of the house for a very long time.
You’re raising a barn inside?! Yep, it’s not every day you get to raise a barn indoors, but back in the fall of 2009 the NBSS PC2 class of 2010 raised Matt’s timber frame barn inside of the class room. The frame is a 1.5 story barn/workshop cut using square rule joinery. The frame is eastern white pine.
Completed frame
If I recall correctly the weather at that time was not playing well and we had the space and height in the building so they move all the workbenches and went for it. Below is a time lapse slideshow showing the frame being raised. I had a great vantage point from up in the loft to capture the action. This barn will eventually be a workshop for Matt who was a PC2 student at the time.
If you’re an avid wood turner and live in or near New England this is a road trip worth taking. The Old Schwamb Mill in Arlington MA (a short 1 block walk from the North Bennet Street School’s Arlington campus — and on the road to historic Lexington where I lived for a long time) is a great afternoon trip and the sort of place you could drive by every day and never notice — as I did for years. Once discovered, this site is a real gem, and also home to a Shaker furniture and supply store.
Turning and oval frame
You may be asking yourself, “how do I turn an oval frame?”
The magic is in the head stock — one of only a handful of this 100+ year old design known to still exist. And there are 3 or 4 of them at the mill. As the head turns there is a mechanical movement that moves the piece being turned up and down so that the wood is consistently presented to the tool at the tool rest. It also makes for a rhythmic noise as it runs. It’s not like most turning — think of it like scraping with style.
The mill has been at this location for 300+ years and making world famous oval frames for 137+ years. In addition to the lathe shown here there is also a massive version in the basement along with several other unique belt driven tools which expedited the process of making and joining these interesting frames. Work from this mill is in the White House and other similar places around the world.
Back in 2011 the NBSS Preservation Carpentry class worked on the Harvard Shaker Meeting House. It was a beautiful location. The class of 2010 worked on the front side of the house and the class of 2011 completed the back side. In this bucolic setting the class learned a lot about slate roofing and traditional staging.
Rear view of the Harvard Shaker Meeting House
Project goals:
Remove existing slate roof — preserving as many sound slates as we can
Stabilize existing sheathing
Install new plywood sheathing, ice and water shield and new flashing and vent fixtures
Replace missing cornice and stabilize raster tails
Re-hang the slates
Learn about traditional site built staging techniques
Below is a slide show outlining the work covered here.
We recently posted on some square rule Timber Framing work. As a contrast, today we’ll take a look at an earlier form of timber framing known as ‘Scribe Rule’. In contrast to ‘Square Rule’ timber framing with interchangeable parts, pieces of a scribe rule timber frame are each scribed to one another — so each piece can only be used in a single location.
NBSS Sign in front of reconstructed floor system
Back in 2009 as part of a North Bennet Street School Project at Brookwood Farm we worked on restoring the timber frame for a 2 bay English Style barn that was thought to be the oldest such barn in New England. Against the odds, the dendrochronology results were inconclusive which was disappointing, but based on what we can tell from what was left of the barn, even if it’s not the oldest it was/is still a notable barn both for some of the old world design and techniques used in its original construction.
The barn was found when a parks employee ran into the side of this barn (which was attached via ells to several other barns at Brookwood farm) with a tractor and uncovered posts that looked hand hewn. From there the school was eventually called in, and after careful evaluation and research by Steve O’Shaughnessy, Rich Friberg and others that this barn was indeed a rare bird and worth preserving. The class of 2009 and 2010 carefully dismantled the barn, cataloged the pieces and loaded it into a tractor trailer that now resides at the school (at the time of this writing). In or around May 2012 the restored/repaired frame should be raised again — I hope to post more on that if I am present for the barn raising.
The sills and floor structure of the barn were severely rotted, missing or replaced by the time we got to the barn, so in order to repair the barn we needed to start at the bottom and work our way up. This started with hand hewing new sills from oak.
Bill notching in on the side of a timber.
After juggling off the sides with the felling ax, we moved on to the hewing axe, the use of which could best be described as halfway between an ax and a chisel. It also makes for a great workout routine — but remember to let the ax head do the work — trying to swing as hard as you can reduces your accuracy and just wears you out faster — believe me the oak knows how tough it is.
Bill hewing the log into a square timber
After doing a lot of square rule work with timbers from a saw mill, we all had new appreciation for how much work went into many of our historical structures in terms of manual labor. Once we had the sills ready to go the next step was to join them together using scribe rule techniques. Scribing is an intricate process which will get you handy with your plumb bob, level and scribes real fast. You’ll also learn the term ‘bump and die’ meaning if you bump into my carefully placed timber as I am trying to scribe it, I will kill you. 🙂 Death threats aside it can be a very interesting and rewarding process. This technique is especially well suited for folks working with hand hewn timbers which can often be warped, bowed, tapering, etc. and one can see how it worked well during the times when hand hewn timber was the only option available.
Completed floor system
Once the flooring system was complete the next step was repairing/replacing the large oak gun-stock posts.
Lee working on hewing a gunstock post from oak
With our work done, the next year’s class took over and continue to work on the various pieces of this barn back in the trailer at the school.
Below is a slide show outlining in more detail the process:
A few years ago I inherited my grandfather’s old radial arm saw (RAS). Pop-pop (as I called him) passed away in 2004 and the tool sat in my mother’s garage until In finally got settled into place with enough room for more stationary equipment. My grandparents lived about 5 minutes away from my parents house and it was more or less like having a second set of parents. As a child I spent a ton of time helping my grandfather around the house with various projects. I’m an only child, and my mother was an only child, so I think I was the closest to Pop-pop, especially for guy stuff. I grew up watching old westerns and action movies with him, hanging out and working on models, trains etc.
So in 2007/2008 I moved the machine up from NY into my shop in MA and started the restoration process. It’s not the biggest model radial arm saw, but it was a solid model, very well intact and was a labor of love more than anything. It’s not a tool a use every day, but for the times I do use it (like repeated dadoes), its very good at what it does.
Restored unit with new Mr. SawDust table in pace
Here is a view of the completed machine complete with heavy duty ‘Mr. Sawdust’ table. If you ever do restore an old DeWalt Radial Arm saw I highly recommend the ‘Mr. Sawdust’ book as it was a great resource both on the history of the tool, how to tune it up, and how to build the Mr Sawdust table which really addresses the biggest shortcoming RAS’s had (giving you a much bigger and more stable work surface that will not deflect under load). It’s all shined up, cutting true, new blade, new base, new table and looking and running as good or better than new.
My grandfather was not always very neat and tidy in the garage/workshop and I thought it was interesting how I found the machine with all the accessories and original manuals stacked up on the table which was odd to me since I knew the machine had not been used in years and they had moved since it was last used. When I related this to my Dad he pointed out that it clearly must have been my grandfather putting it all together for me to have which was really emotional for me when I realized he was right. The happy ending is now that the machine is all restored and tuned up, it’s a bit like having Pop-pop in the shop with me.
Below is a slideshow covering the restoration process with more details in the photo captions.
This slideshow requires JavaScript.
A Joiner's Guide To Traditional Woodworking and Preservation