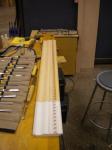
As a student at the North Bennet Street School, one of the many projects Preservation Carpentry students have to complete is the staircase model. The project is a great exercise for students as they each get to walk through the process of building a staircase from end to end. The only caveat is that the stair treads are only about 18″ wide since going full size in width does not add much to the learning experience and makes it feasible to have 10+ staircases in a single classroom.
Rough stringers in place
Above we start off laying out and cutting the rough stringers and then move through each stage until we have a completed staircase. This is one of the projects wherein the students have some design freedom in how they want to trim out the staircase. Some were very modern and minimalist, some very plain vanilla with all square stock, some very traditional.
Turned walnut balusters
I am an avid turner and had done a lot of finish carpentry before coming to the school so as a challenge to myself I decided I wanted to turn my own newel posts and balusters and finish off the piece as if it was installed in a house. It was a lot of extra effort, but a great experience. Once completed my staircase model was on display as part of the NBSS annual student works show and exhibit.
You can see the completed project here:
Completed staircase model
If you are interested in seeing a time lapse of how this staircase was built, please check out the slide show below:
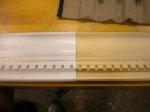
An important part of the Preservation Carpentry curriculum at the North Bennet Street School is working with traditional window sash. In earlier posts we’ve talked a lot about restoring old window sashes, but what about new work? Or a sash that is too far gone or not worth restoring? The best option is likely fabricating traditional window sash yourself. The task may seem formidable, but with some practice anyone with the time and determination can do it. I find the work to be quite enjoyable.
Completed sash with glazing in place
Having worked on many historic windows, and new factory made windows I definitely prefer earlier period windows (17th and 18th century). In our modern ‘throw away’ world most folks look at an old wooden window with disdain and are eager to toss them in the trash and get vinyl replacement windows. If I had my way that would be a crime against historic buildings. The media has everyone believing that modern windows are far more energy efficient and easier to live with compared to old windows and that is a view based on ignorance and marketing greed. I spent several years living in a rental house with brand new replacement vinyl windows and while they were only mid-range windows they were disgustingly drafty, hard to operate, could not be fixed if you broke a pane, and took away from the appearance of the home. A properly built and maintained traditional window can last for 100 years or more — a claim no modern window supplier would ever dare to claim. The key to the system is that ALL the pieces of traditional windows were of wood and designed so they could be regularly serviced and easily replaced — and since they are primarily wood the replacement parts are easily fabricated. Good luck finding a part of a manufactured window that far into the future.
Rich Friberg and Brom Synder fine tuning a muntin
Even though wooden sash may look delicate, you’d be surprised how strong they really are. The profiles are designed to look lighter than they really are, and when you start to add the glazing etc you’d be amazed how solid the sash will feel. A properly built window will have the necessary flashing in place and will not have any drafts or leakage. As the seasons change, open up and regularly inspect your windows. If you are concerned about stirring up lead dust on old windows, contact a window restoration or preservation specialist — and make sure they are EPA RRP licensed to do the work in accordance with the law. If your windows are sound but you’d like to try and bump up the efficiency of your home’s envelope, consider adding traditional style storm windows — which can be either interior or exterior style or both and should be divided light patterns that match your existing windows — try to avoid the aluminum clad plate glass style they have in the big box stores.
PRESERVATION TIP:
If you are living with an old window in your home that sticks — remove and inspect the sash. The sides of the window sash (aka the stiles) should NOT have any paint on the edges that run against the jamb. If you find your sticky window has paint on it, you should look to remove the paint from that edge and the jamb (in accordance with EPA RRP regulations) and then carefully wax those surfaces. The paint has thickness which makes it harder to move the window and with humidity can often get sticky/gummy. Make sure that you are careful when removing the paint from your sash that you do not also remove wood — you can’t replace it once its gone and you don’t want to wind up with a drafty window.
Setting the mirror with glazing points
The skills you learn when making a window sash can be applied to make other areas of woodworking. Above is a nice little wall hung mirror I made for my wife out of some extra materials I had. This same skills can be used to make glass cabinet doors, full size mirrors, cases, doors, etc.
If you’d like to see the process of building your own window sash, please check out the slideshow below which walks through the process (you can see many NBSS PC2 students in action):
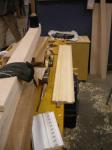
What do you do when you need to tie into a non-stock molding? Or a very short run of custom or carved molding?
You make it yourself of course!
Making a short run of custom molding is often faster, and definitely cheaper than having a custom knife or bit fabricated. The next time you need a short run of molding I highly encourage giving this a try.
Below are some photos walking through the process of creating a short run of custom molding. This piece is an interesting bit of crown molding with a carved rope pattern and dentils. I think the ‘carved’ rope on the original was pressed in by machine, which is why I like my hand carved section even more than the original.
The process I followed:
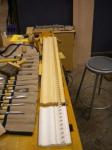
Draw your profile on both ends of the piece
Rough in as much as you can via machine — like the table saw to save yourself time and effort
Use hollows and rounds (wooden molding planes) to get the curves
Square up your rabbet for the dentil
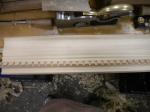
Cut the dental on the table saw, align it where you want and affix it to the piece
Walk off your carved pattern using dividers and pencils
Carve out your rope pattern
Enjoy your finished work 🙂
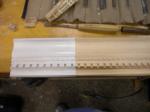
Working the curves and rabbet using wooden molding planes (hollows and rounds etc)
Installing the Dentil
Placing the dentil so it matches with the original sample
On Friday 5/18/12 I was able to participate in an unusual barn raising at the Brookwood Farm in Canton MA. It was the culmination of several years of work by North Bennet Street School students and instructors. The barn is unusual in that it is one of, if not the oldest known surviving 2 bay English style timber framed barns in New England. (I documented some of the history in earlier posts on this topic if you are interested) The barn is also interesting in how it was framed — with 2 bays being asymmetric and an interesting use of rafters and purlins.
Rich overseeing construction
As a student I worked on the floor system (joists and sills) along with hewing some of the replacement gunstock posts from solid oak along with milling LOTs of material that will be used to side and otherwise finish this barn. The class year before my class they worked on documenting the barn, labeling and dissembling the barn and working on the floor system. The class years to follow worked on restoring other members of the frame, laying up the foundation and now the raising.
School van in front of the barn frame
The completed frame contains a mixture of original materials and new oak which was hand hewn and carefully cut to replace rotted materials. The result is a piece of local history that is now preserved for future generations (as it will likely be the focal point for many events at Bookwood Farm — known for its Maple Sugar Days)
Below you can see a series of photos capturing the raising and some other interesting sights from the big day:
After spending way too much digging around in buckets and tool boxes I decided I needed some real wall storage for the shop. I also figured since I spend so much of my free time down in the shop I might as well make it a nice looking place to be. So back in the spring of 2008 I embarked on a long series of shop improvement projects.
Phase 1 — Wall Storage
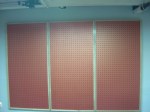
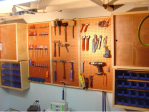
Based roughly on some plans from an older WOOD magazine article I build a series of 2’x4′ pegbaord panels. Each of these wood frames has a french cleat on the back and spacer on the bottom so they could be hung from a french cleat mounted to the wall. I really like this system as it lets me easily move things around as my shop space needs change. (Every time a new major tool is added things often get juggled around). I really didn’t like the drab look of dark brown that pegboard normally is, so I decide to paint it a metallic copper color using a 2 part latex paint that worked out great. I also spray painted all the pegs/hooks copper as well. I found this paint reflected light well and gave a warmer feeling to the shop. I wound up making 6 of these panels which are currently in 2 banks of 3. From there I also made a pair of cabinets with similar copper doors and adjustable shelves and a pair of screw storage cabinets with lexan doors and lots of little McFeely’s bins. I’m currently in the process of moving to a new shop with some more wall space so I hope to add to this system of wall storage again soon.
Since then I also made hose storage, small parts bins, turning tool holders and a range of other similar shop helpers that hang from this cleat system. I’ll post more on these additions in the future. It has been a great way to organize tools and keep them handy and visible.
Completed bank of copper colored modular pegboard storage
Second bank of pegboard ready to go
Filling up the pegboards with copper painted hardware
In the summer of 2010 my father and my cousin Sue came to me with an interesting commission. My Aunt and Uncle’s 50th wedding anniversary was coming up and he wanted to something special to celebrate it. Uncle Bob and Aunty Betty had an interesting old revolving coffee table with book storage underneath it that all the kids in the family used over the years to play board games etc with their Grandpa (Uncle Bob to me). They all had fond memories of the table, but with advancing age it was hard to lean over the old table which was fairly low and a little on the small side. The challenge to me was to build the same table, but make it a little bigger and a little taller and keep it a surprise — so all I had to work from was the SINGLE picture below, a couple of dimensions and a rough guess on what it was made from. Working on a mid 20th century modern piece was a nice departure from my usual work which is more traditional pieces from the 18th and 19th century.
Original Table in an Old Photo
From the above information I decided to use solid cherry for the table, worked out the design in Autocad (first time and only time since I bothered to use Autocad instead of drafting by hand) It was neat to get used to that program, but I felt that it often slowed me down compared to my drafting board. My Dad also donated to the cause a nice and thick circular piece of glass that would protect the new table from the ravages of constant use by children.
Completed Reproduction
Above is the result of this effort. Each platter is larger than the original, the spindles are turned with shoulders and also wedged and glued into place. Under the top platter is a stretcher system that will allow for seasonal wood movement. The spindles form a series of book storage spaces and is a pretty neat design. I put a gentle radius on the edges of the discs which blended very well into the glass protective top. The legs/undercarriage is attached to the unit via a heavy duty lazy Susan mechanism that allows the whole table to rotate making it a great table for games and similar activities.
Upon delivery of the new table I was eager to get a look at the original. As it turns out the original was a made from pine and stained and from what I heard built from a kit in the late 1950s or early 1960s. The new table was a hit with everyone at the party and should last for many generations to come.
Below you can see the table being constructed and delivered:
Beyond basic mortise and tenon joinery/carcass construction the Festool Domino XL also has potential to replace my biscuit joiner.
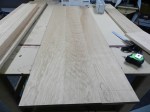
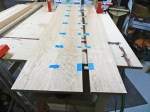
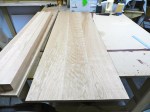
I’ve been working on a curly cherry shaker console table for our dining room and wanted to see how well the indexing fence would work in gluing up a table top. The first step was milling the wood and laying it out to get the best grain patterns.From there I marked out where I wanted the dominoes — being careful to make sure when the top is cut to final size no domino would be exposed. I also marked the center lines on blue tape to save with later cleanup.
TIP: set the tape back from the edge — otherwise you run the risk of having blue tape forever captured in your joint and ruining the appearance of the top.
I started off working the same way I would with a biscuit joiner — using the center line as my guide. Things moved along well and with the dust collector attached the machine left nice clean holes. On the second joint I used the indexing fence to speed up production. The key to using this fence well is making sure that you have BOTH fences set exactly the same and doing a test cut on scrap wood — this way you can be sure your joints line up the way you want. The first time using this method I did the same measuring and tape technique to gauge if I was drifting at all. If you are diligent in applying pressure so that your indexing pin is firmly in place you’ll be amazed with the result.If you are worried about the drift, you can set the machine to cut wider mortises and give some wiggle room like you have with biscuits. (I would recommend this technique for very long table tops — the more dominos you use in a row the more chance you have of making an error — but when going this route you have to be mindful of how your wider mortises can affect where the next mortise is set and lead you to drift off from where you expect as the extra room adds up — so use it with caution and/or mark things out as I have done above)
In an upcoming post I will cover using the domino to construct the carcase to support this table top — wherein the skirt boards were all made from a single piece of wood and provides a continuous grain pattern across the piece including the drawer fronts. Stay tuned.
Festool Domino XL with indexing fence ready to join a table top
Curly Cherry boards milled and ready to be joined.
Setting up the Domino is easy with clearly marked gauges.
Taped and marked holes on board edges with dominoes dry fitted in place
Can’t get enough of 17th and 18th century hand tools? C’Mon I know I’m not the only one…..
Reconstructed Shaker Barn is home to the tool collection
In a rather unassuming barn deep inside of the Shelburne Museum in Shelburne VT you’ll find a treasure trove of antique tools on display. The collection has a large display of classic woodworking tools and many specialty trades like coopering, timber framing, bookbinding, locksmithing, shoemaking, blacksmithing and many other common trades of yore. Sounds almost like a listing of the majors we have at NBSS. 🙂
Molding planes
Every time we go, it’s always the first thing I want to go look at, and while it may seem a lost world to many, I’m always giddy to see how many tools from the same time period I’m regularly using in my own shop. It’s one of the best collections of traditional woodworking tool’s I’ve seen and it’s all on display.
In addition, the Shelburne also has great period houses, a paddlewheel steamship, lighthouse, classical and modern art, a huge collection of old toys, wagons/buggies/sleighs, rotating exhibits and events. If you are ever in the Burlington VT area I highly recommend you spend a day at the museum.
You can find out more about the Shelburne Museum here.
Sometimes art imitates life and vice versa. Sometimes we make new products that look old, and during the late 20th and early 21st centuries often those new products don’t quite hit the mark — think pressed hollow core interior doors made to look like a 6 panel door.
My senior project at NBSS gave me an opportunity to take on my own revisionist history challenge when working on a circa 1700 SaltBox colonial home in Sherborn MA. The rear ell door (most used door by the family) looked like this:
The ‘Before’ picture. Original 20th century door to be replaced.
Homes from that period would not have lights (aka window panes) in a traditional door, but most folks would not be consciously aware of that, and the family was used to having this more modern style door. Unfortunately for the green door pictured above it was at the end of its service life and a modern (20th century) factory made door not worth restoring. So the challenge to me was to build a more traditional door that fit the opening, had lights in it, but better matched the style and molding profiles of the house.
I designed and built a more traditional door which you can see in progress below. It’s a 9 light (smaller panes), 4 panel door built in the traditional style from eastern white pine. The design was similar to a house found on the Wellington House in Waltham MA and some similar 6 panel doors of the period. All the major joints are draw bored and tenoned (so it can be repaired if need be 100 years from now), all the muntins were run by hand and coped, the lights were hand glazed, the panels were pre-finished so you won’t see raw wood as the seasons change etc. I also used a full size story stick when laying out the joinery and traditional hardware. (Period hinges and Suffolk latch). Other work included new door jamb and casing, oak threshold, leadwork flashing, touching up some insulation etc.
Door in progress. I pre-finished the panels so when they move with the seasons you will not see exposed unfinished wood.
The result of all this work is a very nice door that looks like it was part of the house for a very long time.
You’re raising a barn inside?! Yep, it’s not every day you get to raise a barn indoors, but back in the fall of 2009 the NBSS PC2 class of 2010 raised Matt’s timber frame barn inside of the class room. The frame is a 1.5 story barn/workshop cut using square rule joinery. The frame is eastern white pine.
Completed frame
If I recall correctly the weather at that time was not playing well and we had the space and height in the building so they move all the workbenches and went for it. Below is a time lapse slideshow showing the frame being raised. I had a great vantage point from up in the loft to capture the action. This barn will eventually be a workshop for Matt who was a PC2 student at the time.
This slideshow requires JavaScript.
A Joiner's Guide To Traditional Woodworking and Preservation