Are you a busy woodworker on the go? Looking for some more hand tool luggage to go with your saw till? Then look no further than this stylish Hand Tool Cart! Its clean lines and stylish fenders will turn heads as you roll from the workshop to the trade show. But wait, there’s more…..
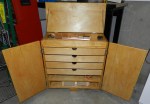
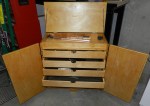
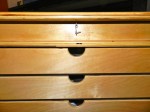
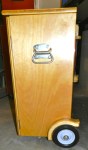
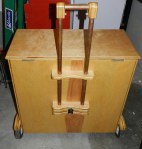
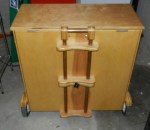
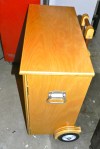
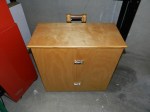
OK, now that we’ve chased that car salesman out of the shop we can talk about the details. I based the design on a ‘Tool Caddy’ I saw in issue 158 of Wood Magazine from 2004; though I made some modifications/additions. I scaled up the width of the chest to fit a #8 plane and panel saws. I built out a full set of drawers to hold planes and marking gauges etc. I added locking clasps on the front so it can be locked. I installed safety chains on both sides of the flip top lid — which is where I store items I use most frequently — combo square, brush, card file, scraper, scale, marking gauge etc. The lid also locks inside the protected zone covered by the main chest doors. The luggage style handle mechanism is made from copper pipe and folds out of the way when not in use. I also added heavy duty chest pulls to aid in maneuvering the chest as it can get heavy fast. I particularly like the fenders as a finishing touch. I also took care to match wood grain across the pieces. The cart is made from birch plywood, finished with 4 coats of polyurethane and 2 coats of wax. I’ve used it for several years now and it has been a great addition to the shop.
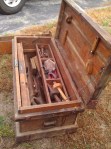
I need to get something off my chest– literally. Ever since reading the Anarchist’s Tool Chest I’ve had Tool Chest envy. My wife and I recently moved up to NH from Boston and it seems like it has been taking a lifetime to get my shop setup and fully functional again. Teaching, work, life, smaller projects and commissions keep getting in the way. Once winter sets in and I get more ‘me’ time in the shop I plan to build my own proper tool chest — though right now hand my tools ride around in style via a mobile tool chest/cart I built as a student at NBSS — complete with curved fenders, a retractable handle, 4 drawers and a tray top (I’ll post more on that in an upcoming post).
This past week I was at the Live Free or Die tool show and auction in Nashua NH — and is part of my twice annual pilgrimage to the ultimate old hand tool show. Beyond great deals on hard to find tools, it’s also a great place to see lots of faces from NBSS, vendors I’ve been buying from for years and the one random guy who only seems to sell very ornate turned plumb bobs every year.
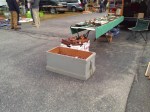
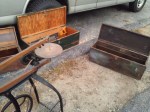
Below are some of the more interesting tool chests I was able to find and photograph with my camera phone (please excuse the quality of them). The wide variety of what survived was a great source of inspiration.
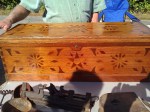
Tool Chest with Extensive Inlay Work and single Till inside
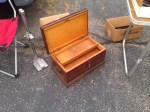
Small portable chest
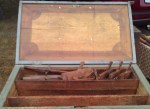
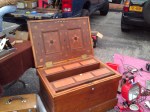
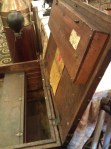
Large chest with inlaid lid
Close Up
Remains of a large tool chest with wood and rope handle
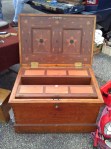
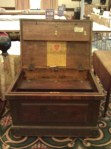
Beautiful Tool Chest from 1849 with extensive inlay work, divided tills, half lock etc
More of that ornate tool chest. This gentleman must have loved playing cards
Chest with heavy metal reinforced corners
Chest with Heavy Metal reinforced corners
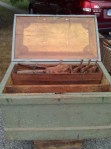
Large chest from the auction. Interesting box till on the lid
Detail view of that box till on the lid
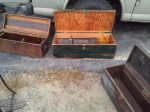
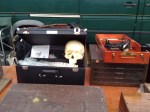
Some of the more pedestrian and modern tool chests — I see some plywood
More of the modern chests, and a treadle powerd scroll saw
You never know what you will find in a chest here — including a human skeleton (anatomy model)
You can learn more about the Anarchist’s Tool Chest here on my friend Chris Schwarz’s blog. (Along with other great books by the Lost Art Press)
Sorry Chris — I was unable to find any slant topped chests, but I gave it a good try.
A stone building or home often conveyed a sense of lasting presence, wealth, and a connection to the many famous stone structures of antiquity that we so often try to emulate and incorporate into our architectural designs. So why not just build with stone in the first place?
The answer is usually economics — wood is a lot cheaper, easier to move and shape compared to stone — so if you could make your wooden home look like stone you’ll be keeping up with the Jones’ and not break the bank.
I just returned from a trip down to Washington D.C. where we also visited Mount Vernon — the home of George and Martha Washington with amazing views of the Potomac — and the most famous example of Feigned Rustication I am aware of.
George and Martha Washington’s Home — Mount Vernon
What is Rustication?
Rustication is a term from the world of Masonry wherein the individual stones are squared off or beveled so as to accentuate the textured edges of each block. You can learn more about it on Wikipedia here. You can often see this feature on the lower and/or first levels of large masonry structures like banks and older stone office buildings. It provided a sense of grounding and provided a stark contrast to the smoother ashlar work on upper stories.
Close up of the Mansion
What is Feigned Rustication?
Feigned Rustication is the process of taking wood siding — carving/shaping it so that it looks like a series of rusticated stones, priming and painting it, and then when the paint is still wet covering it with fine sand so that the board takes on the color/shape/texture of stone.
Rustication Process as shown in stages on a sign out on the grounds of Mount Vernon. (Click to enlarge)
Here is a close up view of this technique applied to the exterior siding and trim:
Close up detail of Rustication
While not alchemy, this technique got the job done and from a distance it’s hard to tell the building is not made from stone until you get up close — and even then you have to know what you are looking at.
The Rustication lets the home look like as if it is made of stone
So while George and Martha Washington were generally quite wealthy during their time, they did make decisions that weighed materials vs. appearance vs. cost much the same way we do in our own homes today and stretched the dollar as much as they could. As you can see in the picture below, for secondary buildings they only applied this technique to the fronts of the buildings — around the corner you can see the siding reverts back to a nice beaded clapboard detail. You can also see some other more common faux finishes like artificial grain applied to some doors in the home — to make them look like expensive mahogany. This was a fairly common practice and not looked down upon the way some readers may be interpreting this.
Note the transition from Rustication back to beaded claps on the side of this secondary building
Now that you’ve seen how we can transform wood into stone — were you fooled by the illusion? Are you going to work some similar alchemy on your own home’s exterior?
I highly recommend visiting Mount Vernon if you are in the Northern VA/Washington D.C. Area. You can find out more about this historic home, museum and grounds here.
In your travels if you find some other examples of Feigned Rustication, let me know here on the blog. (Another famous place with this treatment is Monticello also in Virgina)
Back in grade school, I enjoyed when students would get up in front of the class and talk about what they did for their summer vacation. This summer rather than taking a rest from a very recent move to New Hampshire and new job earlier in the year I decided to spend it pursuing my passion for teaching traditional craft skills.
I’ve been teaching the ‘Traditional Building’ master’s class at the Boston Architectural College (BAC) in partnership with the North Bennet Street School (NBSS). It’s a low residency master’s program in Historic Preservation wherein students come in from around the country for a very intensive hands on week in Boston and spend the rest of the semester working online. For 8 straight days the students are with me from the early morning until dinner time, they grab a quick bite to eat and spend their evenings completing the intensive portion of their other class this semester ‘Preservation Philosophy and Practice’ with Virginia ‘Ginny’ Adams.
Some highlights of the week included:
A walking tour of many historic homes and buildings in Boston including the Paul Revere House, Otis House, Gibson House and Trinity Church hosted by Steve O’Shaughnessy who is the Head of the NBSS Preservation Carpentry Department
Walking tour of historic buildings and homes in Boston
Learning about how to mix and analyze paint with historic paint expert Sara Chase who is a PC program adviser to NBSS
Mixing paints and related analysis
Learning about historic hardware and fasteners with preservation expert Robert Adam (former head of PC program at NBSS) and touring the Saugus Ironworks NHP
At the Saugus Ironworks NHP
A private tour of the Museum of Fine Arts (MFA) Boston
Group shot at the MFA
Historic plaster work with master plasterer Andy Ladygo — another adviser to the NBSS PC Program
Historic Plastering
Traditional woodworking (hand planes, moldings etc) and Historic Window Sash Restoration with Bill Rainford (NBSS PC Graduate and Workshop Instructor)
Sash restoration work
Historic Timber Framing with Rich Friberg — NBSS Preservation Carpentry instructor and master wood turner
Timber Framing. Photo by Zachary Ingalls
To commemorate the experience Robert Ogle, MDS Director at the BAC had the shirts below made up for the class which will be a new tradition for this program. I’m happy to report that everyone survived the week.
“I survived the HP Intensive Week @ The BAC Fall 2012”
Once the intensive was over, everyone took a quick breath, headed home and have been busy with their cameras and notebooks applying some of the skills they learned to their own work and later assignments in the class ever since.
All in all it was a great way to spend a summer vacation.
How often have you seen saws just tossed in with other tools in a box or bucket? For how much money you spend on a good quality saw and for the results you expect out of it there is no excuse for abusing the saw in transit. A saw banging around in a tool box can get bent, dull, have the set of the teeth get out of alignment etc. Described below is how I solved this problem for my saws in the shop and out on the job site.
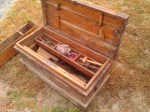
Saw Till with Handle and Safety Strap
The traditional way a saw was transported around was in a saw till. They often took on many forms — sometimes as part of a larger tool chest, attached to the inside of the lid of a larger tool box, as a stationary wall cubby or cabinet or as its own portable unit. For me the portable unit was a great place to start. I made a pair of tills that are shown in the photos below.
Saw Till Construction Detail
The carcass of my saw till is similar to one we used at NBSS. It’s made of 1/2″ plywood sides, 3/4″ plywood top, 1/4″ plywood dividers. I took it further by sanding, rounding the corners and finishing it with Shellac and Wax. The real improvements I made were the addition of a carry handle and safety strap. The strap is nylon like you would use on a backpack — I used my sewing machine to sew returns on the straps, attached them to the side of the till with button studs and used a nice plastic clasp to connect the two sides. This strap is pulled through the open D handles on the saws and keeps them from falling out. The plastic clasp allows you to change the size of the strap as your arsenal of saws changes over time and allows for quick access. When mounting the handle do your best to locate it in such a way that it balances nicely when loaded up with saws — it will be easier on your wrists and will keep the saws where they belong.
Saw Till In Its Natural Setting
This is a great weekend shop project and I hope you will consider building one. The size and shape of the sides should be dictated by the largest saw you plan to put in your till. If you do build your own, please do share your pics or posts with me and we can link them to this post.
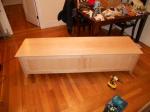
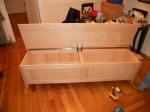
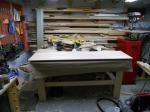
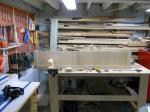
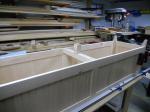
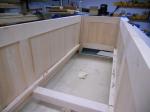
I fired up the way-back machine again to visit another project from the past — a solid hard maple kitchen bench. This was an interesting commission in that it had to fit a specific alcove in a new kitchen, stand up to life with a busy family and provide some additional storage. The other challenge was tying into the kitchen, keeping a shaker look and incorporating details from the room like beadboard.
To protect the fingers of small children from the large lid I chose to use toybox/safety hinges which do not allow the lid to slam down. The unit also lives right in front of a large baseboard heating element so the bottom (inner shelf) of the bench’s storage area had sufficient spacing between the members and clearance off the ground to allow the heat to rise around the unit and leave sufficient room for the wood to move without checking or breaking.
The piece is constructed of hard maple and finished with water based poly and hand rubbed wax. The beadboard was solid maple as well and all made by hand and ship lapped — that was a LOT of work, but much better than pre-made or pressed panels.
In many posts we’ve talked about why old windows are worth saving and how to build or restore sash for them, but not much on what it would take to build a new window complete with jamb and trim and install it.
Completed window installed in the side of the barn
A while back I had just such an opportunity when working on the timber framed barn workshop of my friend Rich. Much of the work for these windows took place in the shop — building traditional single hung (one moving sash) true divided light windows. A hand built window can offer a VERY long service life, be easily repaired and often look much better than anything you can buy commercially. The ability to build a new jamb to go along with your sashes will allow you to really fine tune the movement of the windows, the exact choice of hardware — if any and allow you to create a distinctive look for your home.
Bill cutting through the wall to install my window.
Once the shop work was completed, the jamb is complete, the sash are fitted, glazed and the paint has dried it was time to install the completed window unit into the barn. When working on a timber framed barn you’ll want to make sure you’ve carefully laid out where you want the windows to go — you generally do not want your window obstructed by braces or other framing members. You’ll also want to make sure that you have added in sufficient nailers and/or studs so that your window can be firmly attached to the building.
These hand built windows, complete with jamb, sills, casing and leaded flashing install much the same way you would install an Anderson or Pella new construction drop in window. You’ll want to take the same time and effort to level the window, add insulation if needed, and flash out the window. Once installed you can trim out the interior of the window to blend with the interior surfaces.
Me posing with the newly installed window
If you’ve invested the time to learn how to build a traditional window sash, building an entire window as described here can be a very enjoyable and rewarding experience — plus with these new found skills you can go off and build a window of any size and shape.
Below is a quick slideshow of the above windows being installed into a timber framed barn.
As a student at the North Bennet Street School, one of the many projects Preservation Carpentry students have to complete is the staircase model. The project is a great exercise for students as they each get to walk through the process of building a staircase from end to end. The only caveat is that the stair treads are only about 18″ wide since going full size in width does not add much to the learning experience and makes it feasible to have 10+ staircases in a single classroom.
Rough stringers in place
Above we start off laying out and cutting the rough stringers and then move through each stage until we have a completed staircase. This is one of the projects wherein the students have some design freedom in how they want to trim out the staircase. Some were very modern and minimalist, some very plain vanilla with all square stock, some very traditional.
Turned walnut balusters
I am an avid turner and had done a lot of finish carpentry before coming to the school so as a challenge to myself I decided I wanted to turn my own newel posts and balusters and finish off the piece as if it was installed in a house. It was a lot of extra effort, but a great experience. Once completed my staircase model was on display as part of the NBSS annual student works show and exhibit.
You can see the completed project here:
Completed staircase model
If you are interested in seeing a time lapse of how this staircase was built, please check out the slide show below:
An important part of the Preservation Carpentry curriculum at the North Bennet Street School is working with traditional window sash. In earlier posts we’ve talked a lot about restoring old window sashes, but what about new work? Or a sash that is too far gone or not worth restoring? The best option is likely fabricating traditional window sash yourself. The task may seem formidable, but with some practice anyone with the time and determination can do it. I find the work to be quite enjoyable.
Completed sash with glazing in place
Having worked on many historic windows, and new factory made windows I definitely prefer earlier period windows (17th and 18th century). In our modern ‘throw away’ world most folks look at an old wooden window with disdain and are eager to toss them in the trash and get vinyl replacement windows. If I had my way that would be a crime against historic buildings. The media has everyone believing that modern windows are far more energy efficient and easier to live with compared to old windows and that is a view based on ignorance and marketing greed. I spent several years living in a rental house with brand new replacement vinyl windows and while they were only mid-range windows they were disgustingly drafty, hard to operate, could not be fixed if you broke a pane, and took away from the appearance of the home. A properly built and maintained traditional window can last for 100 years or more — a claim no modern window supplier would ever dare to claim. The key to the system is that ALL the pieces of traditional windows were of wood and designed so they could be regularly serviced and easily replaced — and since they are primarily wood the replacement parts are easily fabricated. Good luck finding a part of a manufactured window that far into the future.
Rich Friberg and Brom Synder fine tuning a muntin
Even though wooden sash may look delicate, you’d be surprised how strong they really are. The profiles are designed to look lighter than they really are, and when you start to add the glazing etc you’d be amazed how solid the sash will feel. A properly built window will have the necessary flashing in place and will not have any drafts or leakage. As the seasons change, open up and regularly inspect your windows. If you are concerned about stirring up lead dust on old windows, contact a window restoration or preservation specialist — and make sure they are EPA RRP licensed to do the work in accordance with the law. If your windows are sound but you’d like to try and bump up the efficiency of your home’s envelope, consider adding traditional style storm windows — which can be either interior or exterior style or both and should be divided light patterns that match your existing windows — try to avoid the aluminum clad plate glass style they have in the big box stores.
PRESERVATION TIP:
If you are living with an old window in your home that sticks — remove and inspect the sash. The sides of the window sash (aka the stiles) should NOT have any paint on the edges that run against the jamb. If you find your sticky window has paint on it, you should look to remove the paint from that edge and the jamb (in accordance with EPA RRP regulations) and then carefully wax those surfaces. The paint has thickness which makes it harder to move the window and with humidity can often get sticky/gummy. Make sure that you are careful when removing the paint from your sash that you do not also remove wood — you can’t replace it once its gone and you don’t want to wind up with a drafty window.
Setting the mirror with glazing points
The skills you learn when making a window sash can be applied to make other areas of woodworking. Above is a nice little wall hung mirror I made for my wife out of some extra materials I had. This same skills can be used to make glass cabinet doors, full size mirrors, cases, doors, etc.
If you’d like to see the process of building your own window sash, please check out the slideshow below which walks through the process (you can see many NBSS PC2 students in action):
What do you do when you need to tie into a non-stock molding? Or a very short run of custom or carved molding?
You make it yourself of course!
Making a short run of custom molding is often faster, and definitely cheaper than having a custom knife or bit fabricated. The next time you need a short run of molding I highly encourage giving this a try.
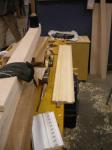
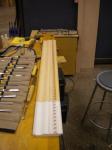
Below are some photos walking through the process of creating a short run of custom molding. This piece is an interesting bit of crown molding with a carved rope pattern and dentils. I think the ‘carved’ rope on the original was pressed in by machine, which is why I like my hand carved section even more than the original.
The process I followed:
Draw your profile on both ends of the piece
Rough in as much as you can via machine — like the table saw to save yourself time and effort
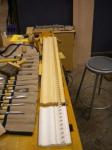
Use hollows and rounds (wooden molding planes) to get the curves
Square up your rabbet for the dentil
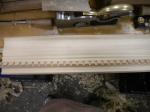
Cut the dental on the table saw, align it where you want and affix it to the piece
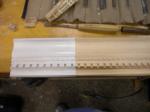
Walk off your carved pattern using dividers and pencils
Carve out your rope pattern
Enjoy your finished work 🙂
Working the curves and rabbet using wooden molding planes (hollows and rounds etc)
Installing the Dentil
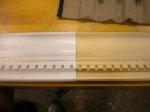
Placing the dentil so it matches with the original sample
Trim the dentil
Carve the rope pattern
Enjoy the finished work
Close up of finished work
A Joiner's Guide To Traditional Woodworking and Preservation